How to Fix Timing on Car: A Comprehensive Guide
Fixing the timing on your car can dramatically improve engine performance. At CARDIAGTECH.NET, we provide the tools and expertise to ensure your vehicle runs smoothly and efficiently. Learn how to properly adjust your car’s timing and unlock its full potential, while considering factors such as timing lights, harmonic balancers, and distributor adjustments for optimal performance.
1. Ignition Timing: An In-Depth Overview
Ignition timing is the precise moment your spark plugs ignite the fuel-air mixture in the engine cylinders. Achieving optimal ignition timing is critical for peak engine performance, fuel efficiency, and overall reliability.
1.1 Understanding the Four-Stroke Cycle and Timing
The four-stroke engine cycle consists of intake, compression, combustion, and exhaust. Ignition occurs near the end of the compression stroke, as the piston reaches Top Dead Center (TDC). However, the fuel-air mixture doesn’t burn instantaneously. To ensure complete combustion, the spark plug must fire slightly before the piston reaches TDC. This is known as “timing advance.”
Think of it like this: You want the peak pressure from the combustion to occur just as the piston starts its downward power stroke. Firing the spark plug early allows the fuel-air mixture to fully ignite and generate maximum force.
1.2 Initial Timing vs. Total Timing
- Initial Timing: The base timing setting when the engine is at idle. It’s measured in degrees Before Top Dead Center (BTDC).
- Total Timing: The maximum timing advance achieved at higher engine speeds. It includes the initial timing plus any additional advance from the mechanical and/or vacuum advance systems.
For example, an engine might have an initial timing of 10 degrees BTDC and a total timing of 34 degrees BTDC.
1.3 Why Timing Needs to Change
As engine speed increases, the time available for combustion decreases. The fuel-air mixture still requires the same amount of time to burn, so the spark plug needs to fire even earlier to achieve optimal combustion. This is why the total timing is greater than the initial timing.
1.4 Potential Problems with Incorrect Timing
Incorrect timing can lead to several issues:
- Too much advance: Engine knocking or pinging, overheating, reduced power, and potential engine damage.
- Too little advance: Poor performance, reduced fuel efficiency, and rough idle.
- No start condition: If the timing is drastically off, the engine may not even start.
1.5 CARDIAGTECH.NET Insight
At CARDIAGTECH.NET, we understand the intricacies of ignition timing. Proper adjustment requires precision tools and a deep understanding of engine mechanics. Our selection of timing lights, harmonic balancer tools, and diagnostic equipment ensures you have everything you need to achieve optimal performance. Contact us at +1 (641) 206-8880 for expert advice and product recommendations.
2. Mechanical vs. Vacuum Advance: Understanding the Systems
Older engines often use mechanical and/or vacuum advance systems to adjust timing based on engine speed and load.
2.1 Mechanical Advance
The mechanical advance system uses weights and springs inside the distributor to advance the timing as engine speed increases. As the engine RPM rises, centrifugal force causes the weights to move outward, advancing the timing.
- Weights: The weights are connected to the distributor shaft and move outward as engine speed increases.
- Springs: The springs control the rate at which the weights move, determining how quickly the timing advances.
2.2 Vacuum Advance
The vacuum advance system uses engine vacuum to further advance the timing during light-load cruising conditions. A vacuum canister connected to the distributor diaphragm responds to changes in engine vacuum.
- High Vacuum (Cruising): When the engine is cruising at a steady speed, engine vacuum is high. This pulls on the diaphragm in the vacuum canister, advancing the timing and improving fuel economy.
- Low Vacuum (Acceleration): When you accelerate, engine vacuum drops. The vacuum advance system retracts, allowing the mechanical advance to control the timing.
2.3 Combination Systems
Many older engines use both mechanical and vacuum advance systems to optimize timing for various driving conditions. The vacuum advance primarily enhances fuel economy during cruising, while the mechanical advance ensures proper timing during acceleration and high-speed operation.
distributorweights.jpg
2.4 CARDIAGTECH.NET Tip
Whether you are dealing with mechanical or vacuum advance, CARDIAGTECH.NET offers top-of-the-line tools to fine-tune your engine’s performance. We carry high-quality timing lights, distributor wrenches, and vacuum gauges to help you achieve the perfect timing curve. Call us at +1 (641) 206-8880 for personalized assistance.
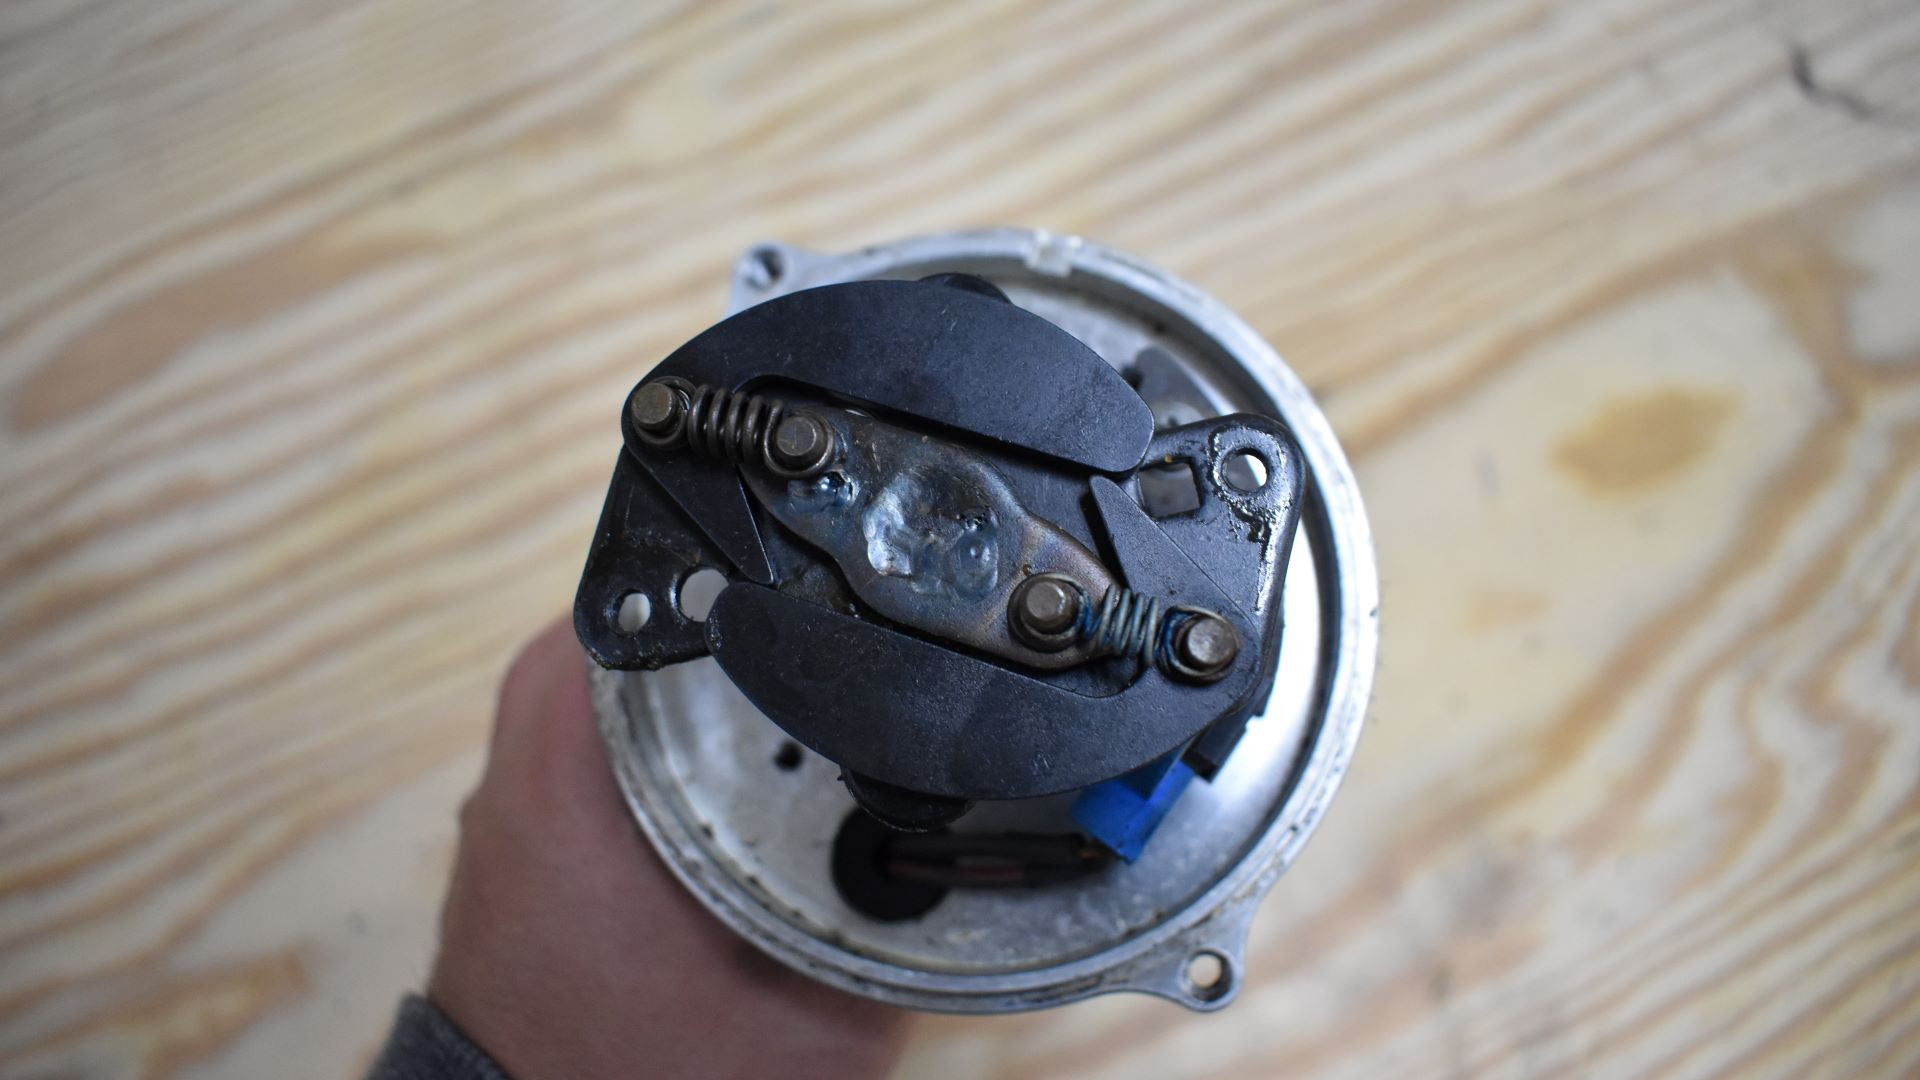
3. A Look Inside the Distributor
The distributor is the heart of the ignition system in older engines. It’s responsible for distributing high-voltage electricity to the spark plugs in the correct firing order and controlling the timing advance.
3.1 Distributor Shaft
The distributor shaft is driven by the engine’s camshaft, ensuring that the distributor rotates in sync with the engine. The shaft is often divided to allow for movement related to total timing adjustments.
3.2 Mechanical Advance Components
- Advance Weights: As engine speed increases, these weights move outward, changing the position of the rotor and advancing the timing.
- Advance Springs: These springs control the rate at which the weights move, influencing the timing advance curve.
3.3 Vacuum Advance Canister
The vacuum advance canister is mounted on the outside of the distributor and connected to the distributor shaft. It uses engine vacuum to provide additional timing advance during cruising.
3.4 Adjusting Mechanical and Vacuum Advance
Adjusting the mechanical and vacuum advance systems involves changing the springs, weights, and vacuum canister settings to achieve the desired timing curve. This can require specialized tools and knowledge.
3.5 CARDIAGTECH.NET Advantage
CARDIAGTECH.NET offers a wide range of high-performance distributors and components designed to optimize your engine’s ignition timing. Our expert technicians can help you select the right distributor and components for your specific engine and performance goals. Contact us at +1 (641) 206-8880 for expert advice.
4. Preliminary Steps: Gathering Information
Before diving into timing adjustments, gather as much information as possible about your engine and its timing requirements.
4.1 Vehicle-Specific Information
Different automakers handle timing advances in different ways. Research your vehicle’s specific timing specifications and any unique features of its ignition system.
4.2 Distributor Type
Identify the type of distributor you have (e.g., HEI, MSD, or stock). Different distributors use different components and adjustment methods.
4.3 Performance Modifications
If you’ve made any performance modifications to your engine (e.g., new heads, camshaft, or headers), they may affect the optimal timing settings. Consult with experienced mechanics or performance specialists to determine the best timing curve for your modified engine.
4.4 Forum Research
Online forums can be a valuable resource for finding information about timing settings for similar engine setups. However, remember that every engine is unique, so you may need to fine-tune the settings based on your own observations and testing.
4.5 Total Timing Expectations
Determine the amount of initial and total advance you need. While total timing generally doesn’t change, initial timing and the RPM at which total timing is reached may need adjustment.
4.6 CARDIAGTECH.NET Support
At CARDIAGTECH.NET, our team of experienced technicians can provide expert guidance on determining the optimal timing settings for your engine. We can help you research your vehicle’s specifications, identify your distributor type, and account for any performance modifications you’ve made. Call us at +1 (641) 206-8880 for personalized support.
5. Safety First: Important Precautions
Working on your car’s timing involves working under the hood with a running engine. Always follow these safety precautions to prevent injuries:
5.1 Eye Protection
Wear safety glasses to protect your eyes from debris.
5.2 Hand Protection
Wear gloves to protect your hands from hot engine components and sharp edges.
5.3 Fan Awareness
Be aware of the spinning engine fan and keep your hands and timing light wires away from it.
5.4 Hot Components
Be careful not to touch hot engine components such as the exhaust manifold or headers.
5.5 Secure Wiring
Ensure the timing light wiring is securely connected to prevent accidental disconnections or sparks.
5.6 CARDIAGTECH.NET Safety Gear
CARDIAGTECH.NET offers a wide range of safety glasses, gloves, and other safety gear to protect you while working on your car. Prioritize your safety and invest in high-quality protective equipment. Visit our website at CARDIAGTECH.NET or call us at +1 (641) 206-8880 to learn more.
6. Essential Tools and Parts
Having the right tools and parts is crucial for accurate and efficient timing adjustments.
6.1 Timing Light
A timing light is essential for measuring the ignition timing.
6.2 Timing Tape or Timing Tab
Timing tape or a timing tab is used to accurately measure the timing advance.
6.3 Socket Wrench
A socket wrench is needed to loosen and tighten the distributor clamp.
6.4 Allen Keys
Allen keys are used to adjust the vacuum advance.
6.5 Screwdriver
A screwdriver may be needed for various adjustments.
6.6 Dwell Meter (If Applicable)
A dwell meter is used to measure the dwell angle on older ignition systems.
6.7 New Distributor Cap and Rotor (Optional)
Replacing the distributor cap and rotor can improve ignition performance.
6.8 Replacement Vacuum Lines (Optional)
Replacing old or cracked vacuum lines can ensure proper vacuum advance operation.
6.9 CARDIAGTECH.NET Inventory
CARDIAGTECH.NET carries a comprehensive selection of timing tools, distributor components, and other essential parts for your car’s ignition system. We source our products from trusted manufacturers to ensure the highest quality and reliability. Visit our website at CARDIAGTECH.NET to browse our inventory or call us at +1 (641) 206-8880 for expert assistance.
7. Step-by-Step Guide to Shooting and Adjusting Timing
Follow these steps to accurately shoot and adjust your car’s timing.
7.1 Mechanical Advance Adjustment
- Install Timing Tape/Mark Balancer: Install timing tape on the harmonic balancer or mark it with paint.
- Warm Up Engine: Get the engine up to operating temperature.
- Hook Up Timing Gun: Connect the timing light to the battery and the number one cylinder spark plug wire.
- Loosen Distributor Clamp: Loosen the distributor clamp so you can rotate the distributor.
- Disconnect Vacuum Advance: Disconnect and plug the vacuum advance line.
- Point and Shoot: Aim the timing light at the harmonic balancer and timing tab.
- Set Initial Timing: Rotate the distributor until the desired initial timing is displayed on the timing tab.
- Bring Up RPMs and Record Total Timing: With the initial timing set, have a friend bring the engine RPM up while you monitor the timing. Record the total timing and the RPM at which it is reached.
- Kill Engine and Make Adjustments: Adjust the springs and weights in the distributor to bring in total timing at the desired RPM.
- Start Engine and Verify Results: Restart the engine and verify the initial and total timing.
- Test Drive: Take the car for a test drive to ensure it’s running as desired.
7.2 Vacuum Advance Adjustment
- Break Out Allen Key: Use an Allen key with a T-handle for better control.
- Disconnect Vacuum Line From Canister: Disconnect the vacuum line from the canister.
- Insert Key Until You Feel Keyway: Insert the Allen key into the vacuum advance canister until you feel the keyway.
- Rotate Counter-Clockwise to Reduce Timing: Rotate the key counter-clockwise to reduce timing.
- Test and Repeat: Test drive the car and repeat the process until pinging disappears.
7.3 CARDIAGTECH.NET Expertise
Adjusting timing can be challenging, but CARDIAGTECH.NET is here to help. We offer expert guidance and a wide selection of timing tools to ensure you get the job done right. Our technical team can walk you through the process step-by-step and answer any questions you may have. Call us at +1 (641) 206-8880 for expert assistance.
8. Monitoring Your Adjustments
After making timing adjustments, it’s crucial to monitor the results and ensure the engine is running optimally.
8.1 Timing Light Verification
Use a timing light to verify the initial and total timing after each adjustment.
8.2 Listening for Detonation
Listen carefully for any signs of engine knocking or pinging, which can indicate excessive timing advance.
8.3 Monitoring Engine Temperature
Keep an eye on the engine temperature gauge to ensure the engine is not overheating, which can also be a sign of excessive timing advance.
8.4 Evaluating Performance
Assess the engine’s overall performance, including idle quality, throttle response, and power output.
8.5 Adjusting as Needed
If you notice any issues or the engine is not running as expected, make further timing adjustments as needed.
8.6 CARDIAGTECH.NET Diagnostic Tools
CARDIAGTECH.NET offers a range of diagnostic tools that can help you monitor your engine’s performance and identify any potential issues. Our selection includes engine analyzers, timing lights, and other essential tools for optimizing your car’s timing. Visit our website at CARDIAGTECH.NET or call us at +1 (641) 206-8880 to learn more.
9. Pro Tips for Success
Follow these pro tips to achieve optimal timing and engine performance.
9.1 Cam Timing is Different
Remember that cam timing is a separate adjustment from ignition timing, and they affect engine performance in different ways.
9.2 Mark Your Balancer
Mark the location of the total timing number you desire with a notch and some white paint on the balancer.
9.3 Listen to Your Engine
Don’t rely solely on recommendations from others. Listen to your engine and make adjustments based on its specific needs.
9.4 Check Balancer Condition
Make sure your harmonic balancer isn’t worn or damaged, as this can throw off your timing readings.
9.5 Faster Isn’t Always Better
Bringing total timing in too quickly can make the engine harder to control on the street.
9.6 CARDIAGTECH.NET Expertise
At CARDIAGTECH.NET, our team of experienced technicians has a wealth of knowledge and expertise in ignition timing. We can provide personalized advice and guidance to help you achieve optimal engine performance. Call us at +1 (641) 206-8880 for expert assistance.
10. FAQs About Ignition Timing
Here are some frequently asked questions about ignition timing:
10.1 Q: What happens if engine timing is off?
A: Off timing can cause a range of problems, from poor performance to engine damage. Symptoms include rough idling, reduced power, engine knocking, overheating, and difficulty starting.
10.2 Q: How long does it take to fix timing on a car?
A: The time it takes to fix timing depends on the complexity of the issue and your level of experience. A simple adjustment may only take a few minutes, while a more complex repair could take several hours.
10.3 Q: Does advancing timing make more power?
A: Advancing timing can increase power, but only if the engine needs it. Too much advance can actually reduce power and damage the engine.
10.4 Q: How do you check timing without a timing light?
A: You cannot accurately check timing without a timing light.
10.5 Q: How does retarding the timing affect the engine?
A: Retarding the timing can reduce engine knocking and overheating, but it can also reduce power and fuel efficiency.
10.6 Q: What is the ideal timing for my engine?
A: The ideal timing varies depending on the engine, vehicle, and driving conditions. Consult your vehicle’s service manual or an experienced mechanic for specific recommendations.
10.7 Q: Can I adjust timing myself, or should I take it to a professional?
A: If you have experience working on engines and a good understanding of timing principles, you may be able to adjust timing yourself. However, if you’re not comfortable with the process or don’t have the necessary tools, it’s best to take it to a professional.
10.8 Q: What are the signs of a bad distributor?
A: Signs of a bad distributor include misfires, rough idling, difficulty starting, and a flashing check engine light.
10.9 Q: How often should I check my car’s timing?
A: Check your car’s timing as part of your regular maintenance schedule, or whenever you notice any symptoms of timing issues.
10.10 Q: Where can I find more information about ignition timing?
A: You can find more information about ignition timing in your vehicle’s service manual, online forums, and automotive repair websites.
10.11 CARDIAGTECH.NET Knowledge Base
CARDIAGTECH.NET is your go-to resource for all things automotive. Visit our website at CARDIAGTECH.NET to access our extensive knowledge base, including articles, videos, and troubleshooting guides. Our team of experts is dedicated to providing you with the information and support you need to keep your car running smoothly.
Conclusion: Unlock Your Engine’s Potential with CARDIAGTECH.NET
Correctly fixing the timing on your car can unlock its full potential, improving performance, fuel efficiency, and overall reliability. CARDIAGTECH.NET provides the tools, expertise, and support you need to achieve optimal timing and keep your engine running at its best.
Don’t let timing issues hold you back. Contact CARDIAGTECH.NET today at +1 (641) 206-8880 and let our team of experts help you get your car running smoothly and efficiently.
Contact Information:
- Address: 276 Reock St, City of Orange, NJ 07050, United States
- Whatsapp: +1 (641) 206-8880
- Website: CARDIAGTECH.NET
Let CARDIAGTECH.NET be your trusted partner in automotive repair and performance. We’re here to help you get the job done right.

