How To Fix Flat Tire On Car: A Complete Guide
Experiencing a flat tire can be a frustrating and inconvenient ordeal. But with the right knowledge and tools, knowing how to fix flat tire on car can empower you to handle the situation safely and efficiently. CARDIAGTECH.NET is here to help you turn this daunting task into a manageable one, providing a comprehensive guide and offering top-notch tools to ensure a smooth repair. Don’t let a punctured tire ruin your day – learn about tire maintenance, roadside safety, and essential auto repair equipment.
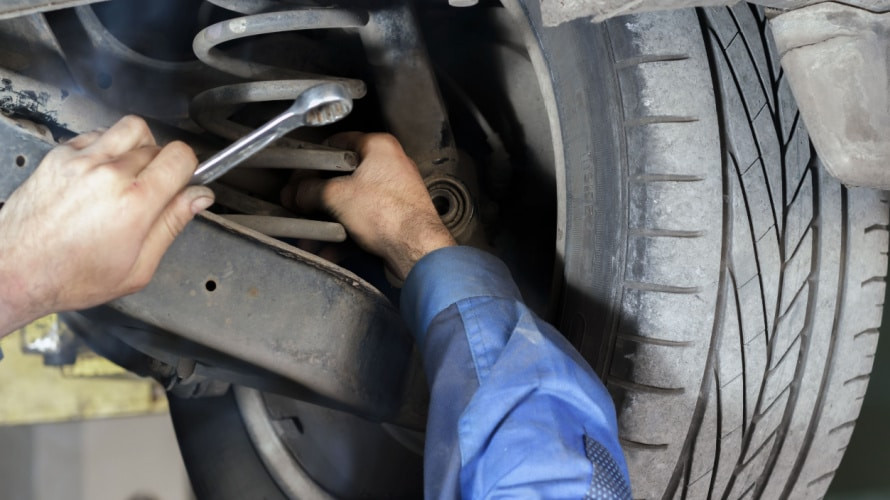
1. Essential Tools for Fixing a Flat Tire
Before you even begin the process of changing a flat tire, it’s crucial to have the necessary tools on hand. Ensuring you have these items readily available can save you time and frustration.
| Tool | Description |
|---|---|
| Inflated Spare Tire | A fully inflated spare tire in good condition is your primary replacement for the flat tire. |
| Car Jack | Used to lift the vehicle so you can safely remove the flat tire. |
| Lug Wrench | Essential for loosening and tightening the lug nuts that secure the wheel to the vehicle. |
| Wheel Wedges/Bracing | These are placed behind the wheels to prevent the car from rolling, adding an extra layer of safety. |
| Work Gloves | Protect your hands from dirt, grease, and sharp edges during the tire-changing process. |
| Owner’s Manual | Contains valuable information about your vehicle, including the location of the spare tire and tools, as well as specific instructions for changing the tire. |
| Tire Pressure Gauge | Checks the spare tire’s inflation level, ensuring it’s ready for use. |
| Flashlight or Headlamp | Provides necessary light if you’re changing the tire in low-light conditions or at night. |
| Reflective Warning Triangles | Increase visibility to other drivers, especially if you’re on the side of the road. |
| Rain Poncho | Useful in case of inclement weather to keep you dry while changing the tire. |
| Kneeling Pad or Cardboard | Protects your knees while you work on the tire. |
Many modern vehicles come equipped with these tools, typically located in the trunk, under the floor panel, or in storage compartments. Consult your vehicle’s owner’s manual to locate these tools. If any items are missing, CARDIAGTECH.NET offers a wide range of high-quality auto repair tools to complete your kit.
2. Step-by-Step Guide: How to Change a Flat Tire
Changing a flat tire might seem intimidating, but with a clear step-by-step guide, you can handle it confidently. Here’s how to get back on the road safely, and remember, CARDIAGTECH.NET is here to provide the tools you need.
2.1 Ensuring Safety First
Before commencing any work, prioritize safety.
- Find a Safe Location: As soon as you realize you have a flat, gradually slow down and find a level surface away from traffic. A parking lot or the side of a quiet street is preferable.
- Turn on Hazard Lights: Activate your hazard lights to alert other drivers.
- Engage the Parking Brake: This ensures the vehicle remains stationary.
- Use Wheel Wedges: Place wheel wedges behind the wheels that are diagonally opposite the flat tire. For example, if the front right tire is flat, place the wedges behind the rear left wheel.
2.2 Preparing for the Tire Change
- Gather Your Tools: Retrieve your spare tire, car jack, lug wrench, owner’s manual, and gloves. A flashlight might be necessary if it’s dark.
- Remove the Wheel Cover/Hubcap: If your wheel has a cover, use the flat end of the lug wrench or a screwdriver to carefully remove it.
2.3 Loosening the Lug Nuts
- Position the Lug Wrench: Place the lug wrench on one of the lug nuts.
- Loosen the Nuts: Turn the wrench counterclockwise to loosen the nuts. They may be very tight, so use your foot or body weight for extra leverage. Only loosen them slightly; don’t remove them completely yet.
2.4 Using the Car Jack
- Consult the Owner’s Manual: Check your vehicle’s owner’s manual to locate the correct jacking points on the frame. These are typically reinforced areas designed to support the vehicle’s weight.
- Position the Jack: Place the jack under the designated jacking point.
- Raise the Vehicle: Slowly and steadily raise the vehicle until the flat tire is about 6 inches off the ground. Ensure the car is stable before proceeding.
2.5 Removing the Flat Tire
- Remove the Lug Nuts: Now, fully unscrew the lug nuts and keep them together in a safe place.
- Pull Off the Tire: Grip the tire with both hands and gently pull it towards you until it comes off the hub.
2.6 Installing the Spare Tire
- Align the Spare Tire: Mount the spare tire onto the wheel studs, aligning the bolt holes with the studs.
- Hand-Tighten the Lug Nuts: Push the spare tire onto the hub and hand-tighten the lug nuts in a star pattern (opposite nuts) to ensure even pressure.
2.7 Lowering the Vehicle
- Lower the Jack: Slowly lower the vehicle until the spare tire touches the ground, but the full weight of the car is not yet on the tire.
- Tighten the Lug Nuts: Use the lug wrench to fully tighten the nuts in a star pattern.
- Lower Completely: Lower the vehicle completely and remove the jack.
2.8 Final Tightening
- Final Tightening: Give the lug nuts one last tightening. Use your full weight on the wrench to ensure they are as tight as possible.
2.9 After the Change
- Stow the Flat Tire and Tools: Place the flat tire and all tools back in their designated storage locations.
- Check the Spare Tire Pressure: Use a tire pressure gauge to ensure the spare tire is properly inflated. Inflate if necessary.
- Drive to a Service Station: Spare tires are often temporary and not meant for extended use. Visit a service station to have your flat tire repaired or replaced.
By following these steps, you can confidently change a flat tire. For high-quality tools and equipment, visit CARDIAGTECH.NET, where you can find everything from jacks to wrenches to ensure you’re always prepared.
3. Preventing Flat Tires: Proactive Measures
Preventing flat tires is always better than dealing with them on the roadside. Here are some proactive measures you can take to minimize your chances of experiencing a flat, with the support of equipment from CARDIAGTECH.NET.
3.1 Regular Tire Pressure Checks
Maintaining proper tire pressure is crucial for preventing flats and ensuring optimal tire performance.
- Frequency: Check your tire pressure at least once a month and before any long trips.
- Tools: Use a reliable tire pressure gauge from CARDIAGTECH.NET.
- Optimal Pressure: Refer to the sticker on your driver’s side doorjamb or your vehicle’s owner’s manual for the recommended tire pressure.
- Benefits: Proper inflation reduces the risk of punctures, improves fuel efficiency, and extends tire life.
3.2 Avoid Road Hazards
Being vigilant about road conditions can significantly reduce your risk of a flat tire.
- Sharp Objects: Avoid driving over nails, glass, metal shards, and other sharp objects.
- Potholes: Steer clear of potholes, which can cause immediate damage to your tires and wheels.
- Construction Zones: Exercise caution in construction zones, where debris is more likely to be present.
3.3 Regular Tire Inspections
Regularly inspecting your tires can help you identify potential problems before they lead to a flat.
- Tread Depth: Check the tread depth using a tread depth gauge. If the tread is worn down to 2/32 of an inch, it’s time to replace the tires.
- Sidewall Damage: Look for cuts, bulges, or abrasions on the sidewalls. These can weaken the tire and increase the risk of a blowout.
- Uneven Wear: Uneven wear patterns can indicate alignment issues or suspension problems, which should be addressed promptly.
- Professional Inspections: Have your tires professionally inspected during routine maintenance appointments.
3.4 Tire Rotation
Rotating your tires helps ensure even wear, which can prolong their lifespan and reduce the likelihood of flats.
- Frequency: Rotate your tires every 6,000 to 8,000 miles, or as recommended by your vehicle’s manufacturer.
- Benefits: Even wear ensures that no single tire becomes overly worn, reducing the risk of punctures and blowouts.
3.5 Avoid Overloading Your Vehicle
Overloading your vehicle puts excessive stress on your tires, increasing the risk of damage and flats.
- Weight Limits: Consult your vehicle’s owner’s manual for the maximum load capacity.
- Distribution: Distribute weight evenly throughout the vehicle to avoid placing excessive stress on any one tire.
3.6 Use Quality Tires
Investing in high-quality tires can provide better durability and resistance to punctures.
- Tire Ratings: Research tire ratings and reviews to choose tires that are known for their reliability and resistance to damage.
- Professional Advice: Consult with a tire specialist to select the best tires for your vehicle and driving conditions.
By taking these proactive steps, you can significantly reduce your risk of experiencing a flat tire. CARDIAGTECH.NET offers a variety of tools and equipment to help you maintain your tires and stay safe on the road.
4. Repairing a Flat Tire: When and How
While replacing a flat tire with a spare is a common solution, sometimes repairing the flat tire is a viable option. Here’s when and how you can repair a flat tire, with the right equipment from CARDIAGTECH.NET.
4.1 Assessing the Damage
Before attempting to repair a flat tire, it’s essential to assess the damage.
- Location: The puncture must be located on the tread area of the tire, not on the sidewall. Sidewall punctures are generally not repairable.
- Size: The puncture should be no larger than ¼ inch in diameter. Larger punctures may compromise the tire’s structural integrity.
- Angle: The puncture should be relatively straight. Angled punctures may be difficult to seal properly.
4.2 Tire Repair Kits
Tire repair kits are a convenient solution for minor punctures. These kits typically include:
- Plugs: Rubber or rope-like plugs that are inserted into the puncture to seal it.
- Reamer Tool: Used to clean and prepare the puncture hole.
- Insertion Tool: Used to insert the plug into the puncture.
- Rubber Cement: Applied to the plug to help it adhere to the tire.
- Inflation Device: A small air compressor or CO2 cartridges to reinflate the tire.
CARDIAGTECH.NET offers a range of high-quality tire repair kits to suit your needs.
4.3 Step-by-Step Repair Process
- Locate the Puncture: Identify the puncture in the tire tread.
- Prepare the Hole: Use the reamer tool to clean and enlarge the puncture hole. This helps the plug adhere properly.
- Insert the Plug: Thread the plug through the eye of the insertion tool.
- Apply Rubber Cement: Coat the plug with rubber cement.
- Insert the Plug into the Tire: Push the insertion tool into the puncture hole until about ½ inch of the plug remains exposed.
- Remove the Insertion Tool: Carefully remove the insertion tool, leaving the plug in place.
- Trim Excess Plug: Use a sharp knife to trim the excess plug flush with the tire tread.
- Inflate the Tire: Use the included air compressor or CO2 cartridges to inflate the tire to the recommended pressure.
- Check for Leaks: Apply soapy water to the repaired area to check for leaks. If you see bubbles, the repair may not be effective, and you should consult a professional.
4.4 When to Seek Professional Repair
While tire repair kits can be useful for minor punctures, certain situations require professional attention.
- Sidewall Punctures: As mentioned earlier, sidewall punctures are generally not repairable due to the tire’s flexing in this area.
- Large Punctures: Punctures larger than ¼ inch in diameter should be repaired by a professional.
- Multiple Punctures: If the tire has multiple punctures in close proximity, it may need to be replaced.
- Uncertainty: If you are unsure about the severity of the damage or the effectiveness of your repair, it’s always best to consult a professional.
4.5 Benefits of Professional Tire Repair
- Expertise: Professional tire technicians have the knowledge and experience to properly assess and repair tire damage.
- Equipment: They have access to specialized equipment, such as tire patching machines and balance machines, to ensure a thorough and safe repair.
- Safety: Professional repairs are performed to meet industry standards, ensuring your safety on the road.
CARDIAGTECH.NET can help you prepare for minor tire repairs with our range of tire repair kits, but always prioritize safety and consult a professional when necessary.
5. Understanding Tire Types and Their Impact on Flat Tire Frequency
The type of tires you have on your vehicle can influence how often you experience flat tires. Different tire types are designed for specific driving conditions and have varying levels of durability. CARDIAGTECH.NET can help you select the right tires and maintain them properly.
5.1 All-Season Tires
- Description: All-season tires are designed to provide a balance of performance in various weather conditions, including dry, wet, and light snow.
- Durability: They offer moderate durability and are suitable for everyday driving.
- Flat Tire Frequency: With average resistance to punctures, all-season tires are less prone to flats than some specialized tires but more vulnerable than others.
- Maintenance Tips: Regularly check tire pressure and tread depth to maximize their lifespan and minimize the risk of flats.
5.2 Performance Tires
- Description: Performance tires are designed for enhanced handling and grip, often used on sports cars and high-performance vehicles.
- Durability: They typically have softer rubber compounds for better grip, which can make them more susceptible to punctures and wear.
- Flat Tire Frequency: Performance tires may experience higher flat tire frequency due to their softer construction.
- Maintenance Tips: Regularly inspect for cuts and abrasions, and maintain proper inflation to prevent premature wear and flats.
5.3 Winter Tires
- Description: Winter tires are designed for optimal performance in cold weather and snowy conditions.
- Durability: They feature specialized tread patterns and rubber compounds that provide excellent grip on ice and snow but may wear quickly on dry pavement.
- Flat Tire Frequency: Winter tires are generally durable in winter conditions but can be more prone to damage if used on dry roads.
- Maintenance Tips: Use winter tires only during the winter months and store them properly when not in use to prolong their lifespan.
5.4 Run-Flat Tires
- Description: Run-flat tires are designed to allow you to continue driving for a limited distance and speed after a puncture.
- Durability: They have reinforced sidewalls that can support the vehicle’s weight even when the tire is deflated.
- Flat Tire Frequency: While they don’t prevent punctures, run-flat tires allow you to drive to a safe location for repair or replacement.
- Maintenance Tips: Monitor tire pressure closely and replace run-flat tires after they have been driven on while flat, even if they appear to be in good condition.
5.5 Truck and SUV Tires
- Description: These tires are designed for the higher load capacities and rugged conditions often encountered by trucks and SUVs.
- Durability: They typically have reinforced construction and deeper tread patterns for increased durability and resistance to punctures.
- Flat Tire Frequency: Truck and SUV tires are generally more resistant to flats than passenger car tires due to their robust construction.
- Maintenance Tips: Regularly check tire pressure and rotate tires to ensure even wear and prolong their lifespan.
5.6 Factors Affecting Tire Durability
- Tire Age: As tires age, the rubber can become brittle and more susceptible to cracking and punctures. Check the manufacturing date on your tires and replace them every six to ten years, regardless of tread depth.
- Driving Habits: Aggressive driving habits, such as hard braking and cornering, can accelerate tire wear and increase the risk of flats.
- Road Conditions: Driving on rough or poorly maintained roads can increase the likelihood of tire damage and flats.
- Storage: Proper tire storage can prolong their lifespan. Store tires in a cool, dry place away from direct sunlight and ozone sources.
By understanding the different types of tires and their characteristics, you can make informed decisions about which tires are best suited for your vehicle and driving conditions. CARDIAGTECH.NET offers a wide selection of tires and maintenance tools to help you keep your tires in top condition and minimize the risk of flat tires.
6. The Role of Tire Pressure Monitoring Systems (TPMS) in Preventing Flat Tires
Tire Pressure Monitoring Systems (TPMS) play a crucial role in preventing flat tires by alerting drivers to changes in tire pressure. Here’s how TPMS works and how it can help you maintain optimal tire conditions, with the support of tools from CARDIAGTECH.NET.
6.1 Understanding TPMS
- Definition: TPMS is an electronic system that monitors the air pressure inside your tires and alerts you when the pressure drops below a certain level.
- Types: There are two main types of TPMS:
- Direct TPMS: Uses pressure sensors inside each tire to measure pressure and temperature.
- Indirect TPMS: Uses the vehicle’s anti-lock braking system (ABS) sensors to monitor tire rotation speed. If one tire is losing pressure, it will rotate at a different speed than the others.
6.2 How TPMS Prevents Flat Tires
- Early Detection: TPMS provides real-time monitoring of tire pressure, allowing you to detect and address pressure issues before they lead to a flat tire.
- Optimal Inflation: Maintaining proper tire pressure improves fuel efficiency, extends tire life, and reduces the risk of punctures and blowouts.
- Warning System: When tire pressure drops below the recommended level, the TPMS will alert you with a warning light on your dashboard.
6.3 Benefits of TPMS
- Enhanced Safety: Proper tire inflation improves handling and braking performance, enhancing your safety on the road.
- Cost Savings: Maintaining optimal tire pressure can save you money on fuel and tire replacements.
- Environmental Benefits: Improved fuel efficiency reduces emissions and helps protect the environment.
6.4 Maintaining Your TPMS
- Regular Checks: Even with TPMS, it’s important to manually check your tire pressure regularly using a reliable tire pressure gauge from CARDIAGTECH.NET.
- Sensor Maintenance: TPMS sensors have batteries that may need to be replaced periodically. Consult your vehicle’s owner’s manual for recommended maintenance intervals.
- Professional Service: Have your TPMS serviced by a qualified technician during routine maintenance appointments.
6.5 Troubleshooting TPMS Issues
- Warning Light: If the TPMS warning light comes on, check your tire pressure immediately. Inflate any tires that are below the recommended level.
- Sensor Malfunction: If the TPMS warning light remains on after inflating your tires, there may be a sensor malfunction. Consult a professional for diagnosis and repair.
- False Alarms: In some cases, TPMS may trigger false alarms due to temperature fluctuations or sensor issues. If you suspect a false alarm, have your system checked by a technician.
6.6 TPMS and Tire Rotation
When rotating your tires, it’s important to ensure that the TPMS sensors are properly reset and recalibrated. This may require the use of a TPMS scan tool, which is available at CARDIAGTECH.NET.
6.7 TPMS and Aftermarket Wheels
If you install aftermarket wheels on your vehicle, you may need to transfer the TPMS sensors from your original wheels or purchase new sensors. Ensure that the sensors are compatible with your vehicle’s TPMS system.
By understanding the benefits of TPMS and properly maintaining your system, you can significantly reduce your risk of flat tires and enjoy a safer, more efficient driving experience. CARDIAGTECH.NET offers a range of TPMS tools and equipment to help you keep your tires in top condition.
7. Emergency Roadside Assistance: A Reliable Backup Plan
Even with the best preparation and maintenance, flat tires can still occur. Having a reliable emergency roadside assistance plan can provide peace of mind and ensure you’re never stranded. Here’s why emergency roadside assistance is a valuable backup plan, and how CARDIAGTECH.NET supports your preparedness.
7.1 Understanding Emergency Roadside Assistance
- Definition: Emergency roadside assistance is a service that provides assistance to motorists who experience breakdowns or other emergencies while on the road.
- Services: Common services include:
- Towing: Transporting your vehicle to a repair shop or other location.
- Flat Tire Service: Changing a flat tire or providing temporary repair.
- Jump Starts: Jump-starting a dead battery.
- Lockout Service: Unlocking your vehicle if you’re locked out.
- Fuel Delivery: Bringing fuel to your location if you run out.
7.2 Benefits of Emergency Roadside Assistance
- Peace of Mind: Knowing that help is just a phone call away can provide peace of mind, especially on long trips or in unfamiliar areas.
- Safety: Roadside assistance can help you avoid dangerous situations, such as changing a tire on a busy highway.
- Convenience: Services are available 24/7, so you can get help whenever and wherever you need it.
- Cost Savings: Roadside assistance can save you money on towing and repair costs.
7.3 How to Choose a Roadside Assistance Plan
- Coverage: Consider the types of services offered and the coverage limits.
- Service Area: Ensure the plan covers the areas where you typically drive.
- Response Time: Look for a plan with a quick response time.
- Cost: Compare the cost of different plans and choose one that fits your budget.
- Reputation: Read reviews and check the reputation of the provider.
7.4 Popular Roadside Assistance Providers
- AAA: Offers a range of membership options with varying levels of coverage.
- Allstate Roadside Assistance: Provides services to Allstate customers and non-customers.
- Better World Club: An environmentally friendly alternative to AAA.
- Your Auto Insurance Company: Many auto insurance companies offer roadside assistance as an add-on to your policy.
7.5 How to Request Roadside Assistance
- Contact Your Provider: Call the roadside assistance provider’s toll-free number or use their mobile app to request assistance.
- Provide Information: Be prepared to provide your location, vehicle information, and a description of the problem.
- Stay Safe: While waiting for assistance, stay in a safe location away from traffic.
7.6 CARDIAGTECH.NET: Supporting Your Preparedness
While emergency roadside assistance is a great backup, being prepared with the right tools and knowledge can help you handle many situations yourself. CARDIAGTECH.NET offers a range of products to help you stay prepared:
- Tire Repair Kits: For minor punctures, a tire repair kit can get you back on the road quickly.
- Jacks and Wrenches: Ensure you have the right tools to change a tire safely and efficiently.
- Tire Pressure Gauges: Regularly check your tire pressure to prevent flats.
- Emergency Kits: A well-stocked emergency kit can provide essential supplies in case of a breakdown.
By combining emergency roadside assistance with the right tools and knowledge from CARDIAGTECH.NET, you can be confident that you’re prepared for any roadside emergency.
8. Maintaining a Well-Stocked Car Emergency Kit
A well-stocked car emergency kit is an essential component of roadside safety. It ensures that you have the necessary supplies to handle unexpected situations, from flat tires to medical emergencies. CARDIAGTECH.NET can help you assemble the perfect kit to keep you safe and prepared.
8.1 Essential Items for Your Car Emergency Kit
- First Aid Kit: Include bandages, antiseptic wipes, pain relievers, gauze, tape, and any personal medications.
- Jumper Cables: For jump-starting a dead battery.
- Tire Repair Kit: Including plugs, reamer tool, insertion tool, and rubber cement.
- Tire Pressure Gauge: To check tire pressure and ensure proper inflation.
- Multi-Tool or Utility Knife: A versatile tool for various tasks.
- Duct Tape: For temporary repairs.
- Gloves: Work gloves to protect your hands.
- Flashlight or Headlamp: With extra batteries.
- Reflective Warning Triangles or Flares: To alert other drivers to your presence.
- Rain Poncho: To keep you dry in inclement weather.
- Blanket: For warmth in cold weather.
- Snacks and Water: Non-perishable food and bottled water.
- Cell Phone Charger: To keep your phone charged.
- Whistle: To signal for help.
- Pen and Paper: For writing notes or instructions.
- Owner’s Manual: For vehicle-specific information.
- Spare Tire, Jack, and Lug Wrench: Essential for changing a flat tire.
8.2 Customizing Your Emergency Kit
- Climate: Adjust your kit based on the climate in your area. If you live in a cold climate, include extra blankets and warm clothing. If you live in a hot climate, include extra water and sunscreen.
- Personal Needs: Add any personal items that you may need, such as medications, eyeglasses, or baby supplies.
- Vehicle Type: Consider the type of vehicle you drive. If you have a truck or SUV, you may need additional tools or equipment.
8.3 Storing Your Emergency Kit
- Location: Store your emergency kit in an easily accessible location, such as the trunk or cargo area of your vehicle.
- Container: Use a durable, waterproof container to protect the contents of your kit.
- Organization: Organize the items in your kit so that they are easy to find in an emergency.
8.4 Maintaining Your Emergency Kit
- Regular Inspections: Check your emergency kit regularly to ensure that all items are in good condition and that nothing is expired.
- Replace Used Items: Replace any items that you use from your emergency kit.
- Update Seasonal Items: Update your kit seasonally to ensure that you have the necessary items for the current weather conditions.
8.5 CARDIAGTECH.NET: Your Partner in Roadside Preparedness
CARDIAGTECH.NET offers a wide range of products to help you build and maintain a well-stocked car emergency kit:
- First Aid Kits: Comprehensive kits with all the essential medical supplies.
- Jumper Cables: Heavy-duty cables for reliable jump-starts.
- Tire Repair Kits: Complete kits for repairing minor punctures.
- Tire Pressure Gauges: Accurate and easy-to-use gauges.
- Flashlights and Headlamps: Durable and reliable lighting solutions.
- Multi-Tools and Utility Knives: Versatile tools for various tasks.
By partnering with CARDIAGTECH.NET, you can ensure that you have the right supplies to handle any roadside emergency.
9. The Impact of Wheel Alignment on Tire Wear and Flat Tire Prevention
Proper wheel alignment is essential for maintaining optimal tire wear and preventing flat tires. Misalignment can lead to uneven wear patterns, increased stress on tires, and a higher risk of punctures and blowouts. CARDIAGTECH.NET offers tools and equipment to help you maintain proper wheel alignment.
9.1 Understanding Wheel Alignment
- Definition: Wheel alignment refers to the angles of your vehicle’s wheels relative to each other and to the vehicle’s body.
- Key Angles: The main alignment angles are:
- Camber: The inward or outward tilt of the wheel when viewed from the front.
- Caster: The angle of the steering axis when viewed from the side.
- Toe: The direction in which the wheels point relative to each other when viewed from above.
9.2 How Wheel Misalignment Affects Tire Wear
- Uneven Wear: Misalignment can cause tires to wear unevenly, leading to premature tire replacement.
- Feathering: Occurs when the tire tread is worn at an angle, creating a feather-like edge on the tread blocks.
- Camber Wear: Results in excessive wear on the inside or outside edge of the tire.
- Toe Wear: Causes the tire to wear in a saw-tooth pattern.
9.3 How Wheel Alignment Prevents Flat Tires
- Reduced Stress: Proper alignment reduces stress on tires, minimizing the risk of punctures and blowouts.
- Even Wear: Even wear ensures that no single area of the tire becomes overly worn, reducing the risk of flats.
- Optimal Handling: Correct alignment improves handling and stability, enhancing your safety on the road.
9.4 Signs of Wheel Misalignment
- Pulling: The vehicle pulls to one side while driving.
- Vibration: The steering wheel vibrates.
- Uneven Tire Wear: Noticeable uneven wear patterns on your tires.
- Off-Center Steering Wheel: The steering wheel is not centered when driving straight.
9.5 Maintaining Proper Wheel Alignment
- Regular Alignments: Have your wheel alignment checked and adjusted regularly, typically every 12,000 miles or as recommended by your vehicle’s manufacturer.
- After Impacts: Get an alignment after hitting a curb, pothole, or other object that could damage your suspension.
- When Replacing Tires: Have an alignment performed when you replace your tires to ensure even wear on the new tires.
9.6 CARDIAGTECH.NET: Tools for Wheel Alignment
CARDIAGTECH.NET offers a range of tools and equipment to help you maintain proper wheel alignment:
- Alignment Machines: For accurate and precise alignment adjustments.
- Alignment Tools: Including camber gauges, caster gauges, and toe gauges.
- Wheel Balancers: To ensure that your wheels are properly balanced, which can also affect tire wear.
By maintaining proper wheel alignment, you can prolong the life of your tires, improve your vehicle’s handling, and reduce the risk of flat tires. CARDIAGTECH.NET is your partner in ensuring optimal wheel alignment.
10. Understanding Tire Sidewall Markings
Understanding tire sidewall markings can provide valuable information about your tires, including their size, load capacity, speed rating, and manufacturing date. CARDIAGTECH.NET helps you interpret these markings to make informed decisions about tire maintenance and replacement.
10.1 Key Tire Sidewall Markings
- Tire Size: A combination of letters and numbers that indicate the tire’s width, aspect ratio, and wheel diameter.
- Example: P215/65R15
- P: Passenger tire.
- 215: Tire width in millimeters.
- 65: Aspect ratio (the ratio of the tire’s height to its width).
- R: Radial construction.
- 15: Wheel diameter in inches.
- Example: P215/65R15
- Load Index: A numerical code that indicates the maximum weight a tire can carry.
- Example: 95
- Refers to the maximum load capacity of the tire, use online charts to find the maximum weight that the tire can support, in this case, 1521 pounds.
- Example: 95
- Speed Rating: A letter code that indicates the maximum speed at which a tire can be driven.
- Example: H
- Corresponds to a maximum speed, use online charts to find the maximum speed that the tire can handle, in this case, 130 mph.
- Example: H
- DOT Code: A series of letters and numbers that indicate the tire’s manufacturing date.
- Example: DOT U2LL LMLR 2321
- DOT: Indicates that the tire meets the safety standards of the Department of Transportation.
- U2LL: The manufacturer and plant code.
- LMLR: Tire size and type
- 2321: The week and year the tire was manufactured (23rd week of 2021).
- Example: DOT U2LL LMLR 2321
- M+S (Mud and Snow): Indicates that the tire is designed for use in mud and snow conditions.
- Treadwear Rating: A numerical code that indicates the tire’s relative wear rate.
- Higher numbers indicate longer tread life.
- Temperature Rating: A letter code that indicates the tire’s resistance to heat.
- A, B, or C, with A being the highest rating.
- Traction Rating: A letter code that indicates the tire’s ability to stop on wet pavement.
- AA, A, B, or C, with AA being the highest rating.
- Maximum Inflation Pressure: The maximum air pressure to which the tire can be inflated.
10.2 How Sidewall Markings Help Prevent Flat Tires
- Proper Inflation: Knowing the maximum inflation pressure helps you maintain proper tire pressure, which reduces the risk of punctures and blowouts.
- Load Capacity: Understanding the load index ensures that you don’t overload your tires, which can lead to premature wear and flats.
- Tire Age: The DOT code helps you determine the age of your tires, so you can replace them before they become brittle and prone to damage.
- Tire Compatibility: Sidewall markings ensure that you select the correct size and type of tires for your vehicle, which is essential for safety and performance.
10.3 CARDIAGTECH.NET: Your Source for Tire Information
CARDIAGTECH.NET provides resources and tools to help you understand tire sidewall markings and make informed decisions about tire maintenance and replacement:
- Informational Articles: Detailed articles explaining tire sidewall markings and their significance.
- Tire Guides: Comprehensive guides to help you select the right tires for your vehicle.
- Tire Pressure Gauges: Accurate and easy-to-use gauges for maintaining proper tire pressure.
By understanding tire sidewall markings and utilizing the resources available at CARDIAGTECH.NET, you can prolong the life of your tires, improve your vehicle’s safety, and reduce the risk of flat tires.
FAQ: Addressing Your Questions About Flat Tires
1. What are the most common causes of flat tires?
Sharp objects, underinflation, overloading, and tire age are frequent culprits.
2. How often should I check my tire pressure?
At least once a month and before long trips to ensure optimal inflation.
3. What should I do immediately after realizing I have a flat tire?
Safely pull over to a level surface away from traffic,