How To Fix Car Tint Bubbles: A Comprehensive Guide
Are you noticing unsightly bubbles forming on your car’s window tint? How To Fix Car Tint Bubbles is a common concern for car owners, and at CARDIAGTECH.NET, we’re here to provide a definitive solution. This guide will walk you through the causes of these bubbles and offer effective methods to remove them, ensuring your car looks its best and your tint performs optimally. Discover the best tools and techniques for a flawless finish with CARDIAGTECH.NET. Say goodbye to bubbling and hello to crystal-clear car windows.
1. Understanding Car Tint Bubbles
Window tint bubbles are a common nuisance for car owners. They not only detract from the vehicle’s appearance but can also compromise the tint’s effectiveness. To address this issue effectively, it’s crucial to understand what causes these bubbles and how they impact your window tint.
1.1. The Formation of Car Tint Bubbles
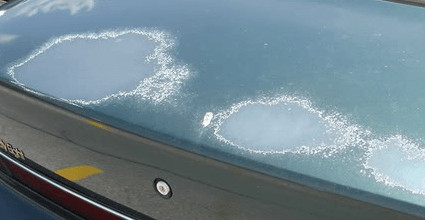
Window tint bubbles typically form due to air or moisture trapped between the tint film and the glass surface. This can occur for several reasons:
- Improper Installation: The most common cause is poor installation. If the window surface isn’t properly cleaned or if the tint film isn’t applied smoothly, air pockets can form.
- Adhesive Failure: Over time, the adhesive on the tint film can degrade, especially when exposed to extreme temperatures and UV radiation. This can lead to the film lifting away from the glass, creating bubbles.
- Contaminants: Dust, dirt, or other contaminants left on the glass surface during installation can prevent the tint film from adhering properly, resulting in bubbles.
- Low-Quality Film: Cheaper tint films are more prone to bubbling due to lower quality adhesives and materials.
1.2. Impact of Bubbles on Tint Performance
Beyond aesthetics, bubbles can significantly impact the performance of your window tint:
- Reduced UV Protection: Bubbles create gaps that allow harmful UV rays to penetrate the vehicle, reducing the tint’s ability to protect occupants and the interior from sun damage.
- Decreased Heat Rejection: The air pockets act as insulators, trapping heat and reducing the tint’s ability to reject solar heat. This can make your car’s interior hotter and less comfortable.
- Distorted Vision: Bubbles can distort your vision, especially in the rearview mirror, posing a safety hazard while driving.
- Premature Failure: The presence of bubbles can accelerate the degradation of the tint film, leading to peeling, cracking, and overall failure.
Understanding these causes and impacts is the first step in effectively addressing and preventing car tint bubbles. Next, we’ll explore various methods to fix these bubbles and maintain your window tint in top condition.
2. Identifying Different Types of Car Tint Bubbles
Not all car tint bubbles are created equal. Identifying the type of bubble you’re dealing with is crucial for choosing the right fix. Here are the common types:
2.1. Water Bubbles
- Appearance: Small, clear bubbles that often appear immediately after tint installation.
- Cause: Residual water used during the installation process gets trapped between the film and the glass.
- Resolution: These bubbles usually disappear on their own within a few days to weeks as the water evaporates. Patience is key.
2.2. Air Bubbles
- Appearance: Larger, more opaque bubbles that don’t disappear over time.
- Cause: Air trapped during installation due to improper cleaning or application techniques.
- Resolution: Require manual intervention to remove the air.
2.3. Adhesive Failure Bubbles
- Appearance: Bubbles that appear gradually over time, often accompanied by peeling or fading of the tint.
- Cause: Degradation of the adhesive due to age, heat, or UV exposure.
- Resolution: Often require replacing the tint, especially if the adhesive is severely damaged.
2.4. Contamination Bubbles
- Appearance: Small, irregular bubbles with visible specks of dirt or debris inside.
- Cause: Contaminants trapped between the film and the glass during installation.
- Resolution: Require careful cleaning and reapplication of the tint film.
Here’s a quick reference table:
| Bubble Type | Appearance | Cause | Resolution |
|---|---|---|---|
| Water Bubbles | Small, clear | Residual water | Disappear on their own within days/weeks |
| Air Bubbles | Large, opaque | Trapped air | Manual intervention required |
| Adhesive Failure | Gradual appearance, peeling/fading | Adhesive degradation | Often requires tint replacement |
| Contamination | Small, irregular, with visible debris | Trapped contaminants | Cleaning and reapplication |
3. Essential Tools and Materials for Fixing Car Tint Bubbles
Having the right tools and materials on hand is crucial for successfully fixing car tint bubbles. Using the appropriate equipment can help you achieve professional-looking results without damaging your window tint. Here’s a list of essential items:
3.1. Basic Cleaning Supplies
- Microfiber Cloths: These are lint-free and gentle on the tint film, perfect for cleaning the window surface.
- Window Cleaner: Use a high-quality, ammonia-free window cleaner to avoid damaging the tint.
- Spray Bottle: For applying water or cleaning solutions evenly.
3.2. Bubble Removal Tools
- Heat Gun or Hair Dryer: To soften the tint film and make it more pliable for bubble removal.
- Pin or Needle: A very fine pin or needle to create a small puncture for air or water to escape.
- Hard Card or Squeegee: A plastic card or squeegee wrapped in a microfiber cloth to smooth out the bubbles.
- Razor Blade (Optional): For trimming excess film or making precise cuts, use with caution and only if necessary.
3.3. Protective Gear
- Gloves: To keep your hands clean and prevent fingerprints on the tint.
- Safety Glasses: To protect your eyes from cleaning solutions or debris.
3.4. Additional Supplies
- Distilled Water: For mixing cleaning solutions or spraying on the tint.
- Rubbing Alcohol: To remove stubborn residues or contaminants.
- Tint Solution (Slip Solution): A mixture of water and a drop of mild soap to help the tint film slide into place during reapplication.
Here’s a detailed list of tools and materials:
| Tool/Material | Description | Purpose |
|---|---|---|
| Microfiber Cloths | Lint-free, soft cloths | Cleaning window surface without scratching |
| Window Cleaner | Ammonia-free formula | Removing dirt and grime from the window |
| Spray Bottle | Adjustable nozzle | Applying water or cleaning solutions evenly |
| Heat Gun/Hair Dryer | Adjustable heat settings | Softening the tint film for easier bubble removal |
| Pin/Needle | Very fine, sharp point | Creating small punctures for air or water to escape |
| Hard Card/Squeegee | Wrapped in microfiber cloth | Smoothing out bubbles without damaging the tint |
| Razor Blade | Sharp, precise blade (use with caution) | Trimming excess film or making precise cuts |
| Gloves | Latex or nitrile | Protecting hands and preventing fingerprints on the tint |
| Safety Glasses | Impact-resistant | Protecting eyes from cleaning solutions or debris |
| Distilled Water | Pure, mineral-free water | Mixing cleaning solutions or spraying on the tint |
| Rubbing Alcohol | Isopropyl alcohol | Removing stubborn residues or contaminants |
| Tint Solution | Mixture of water and mild soap | Helping the tint film slide into place during reapplication |
4. Step-by-Step Guide to Fixing Car Tint Bubbles
Follow these detailed steps to safely and effectively remove car tint bubbles. Remember to work carefully and patiently to avoid damaging the tint film.
4.1. Preparing the Area
-
Clean the Window:
- Use a microfiber cloth and ammonia-free window cleaner to thoroughly clean the window surface.
- Remove any dirt, dust, or residue that could interfere with the repair.
- Dry the window completely with a clean microfiber cloth.
-
Gather Your Tools:
- Ensure you have all the necessary tools and materials within easy reach: heat gun or hair dryer, pin or needle, hard card or squeegee, spray bottle with distilled water, and microfiber cloths.
-
Assess the Bubbles:
- Identify the type and size of the bubbles you’re dealing with.
- Determine whether they are water bubbles, air bubbles, adhesive failure bubbles, or contamination bubbles.
4.2. Removing Water Bubbles
-
Apply Heat (Optional):
- If the water bubbles are persistent, gently warm the tint film with a heat gun or hair dryer.
- Hold the heat source a few inches away from the tint and move it in a sweeping motion to avoid overheating.
-
Wait and Observe:
- In many cases, water bubbles will disappear on their own within a few days to weeks as the water evaporates.
- Monitor the bubbles and be patient.
-
Gentle Smoothing:
- If you want to speed up the process, gently smooth the area around the bubbles with a microfiber cloth.
- Avoid applying too much pressure, which could damage the tint film.
4.3. Removing Air Bubbles
-
Heat the Area:
- Use a heat gun or hair dryer to gently warm the tint film around the air bubbles.
- This will make the film more pliable and easier to work with.
-
Puncture the Bubble:
- Take a very fine pin or needle and carefully puncture the edge of the bubble.
- Make the puncture as small as possible to minimize the risk of damage.
-
Smooth Out the Bubble:
- Wrap a hard card or squeegee in a microfiber cloth to protect the tint film.
- Gently smooth the bubble towards the puncture, working the air out.
- Apply even pressure to avoid creating new bubbles.
-
Repeat if Necessary:
- If the bubble is large or persistent, repeat the heating, puncturing, and smoothing steps as needed.
- Be patient and avoid applying too much force.
4.4. Addressing Adhesive Failure Bubbles
-
Assess the Damage:
- Determine the extent of the adhesive failure.
- If the adhesive is severely damaged or the tint is peeling, replacement may be necessary.
-
Clean the Area:
- Use a microfiber cloth and rubbing alcohol to clean the area around the bubble.
- Remove any loose adhesive or residue.
-
Apply Heat:
- Gently warm the tint film with a heat gun or hair dryer.
- This will help reactivate the adhesive.
-
Smooth Out the Bubble:
- Wrap a hard card or squeegee in a microfiber cloth.
- Gently smooth the bubble towards the edge, applying even pressure.
-
Reapply Adhesive (Optional):
- If the adhesive is weak, you can apply a thin layer of tint adhesive to the back of the film.
- Use a small brush or applicator to apply the adhesive evenly.
- Smooth out the bubble as described above.
4.5. Dealing with Contamination Bubbles
-
Assess the Contamination:
- Determine the type and extent of the contamination.
- If the contamination is severe, removal and reapplication of the tint may be necessary.
-
Carefully Lift the Tint:
- Use a heat gun or hair dryer to gently warm the tint film around the bubble.
- Carefully lift the tint film from the window surface, starting at the edge of the bubble.
- Be gentle to avoid tearing or damaging the film.
-
Clean the Window and Tint:
- Use a microfiber cloth and window cleaner to thoroughly clean the window surface.
- Remove any dirt, dust, or residue.
- Clean the back of the tint film with a microfiber cloth and tint solution (slip solution).
-
Reapply the Tint:
- Spray the window surface with tint solution.
- Carefully reapply the tint film, starting at one edge and working your way across the window.
- Use a hard card or squeegee wrapped in a microfiber cloth to smooth out any bubbles or wrinkles.
4.6. Final Touches
-
Inspect Your Work:
- Carefully inspect the repaired area for any remaining bubbles or imperfections.
- Repeat the appropriate steps as needed.
-
Allow Time to Cure:
- Allow the tint film to fully cure and adhere to the window surface.
- This may take several hours or days, depending on the temperature and humidity.
-
Avoid Cleaning for a Few Days:
- Avoid cleaning the repaired area for a few days to allow the adhesive to fully set.
Here’s a table summarizing the steps:
| Bubble Type | Steps |
|---|---|
| Water Bubbles | 1. Heat the area (optional). 2. Wait and observe. 3. Gentle smoothing. |
| Air Bubbles | 1. Heat the area. 2. Puncture the bubble. 3. Smooth out the bubble. 4. Repeat if necessary. |
| Adhesive Failure | 1. Assess the damage. 2. Clean the area. 3. Apply heat. 4. Smooth out the bubble. 5. Reapply adhesive (optional). |
| Contamination Bubbles | 1. Assess the contamination. 2. Carefully lift the tint. 3. Clean the window and tint. 4. Reapply the tint. |
| Final Touches | 1. Inspect your work. 2. Allow time to cure. 3. Avoid cleaning for a few days. |
5. Advanced Techniques for Stubborn Bubbles
Sometimes, basic methods aren’t enough to eliminate stubborn car tint bubbles. Here are some advanced techniques to try:
5.1. Using a Steamer
-
How it Works: A steamer can help loosen the adhesive and make the tint film more pliable, allowing you to smooth out bubbles more effectively.
-
Steps:
- Fill a steamer with distilled water and allow it to heat up.
- Hold the steamer nozzle a few inches away from the tint film and gently apply steam to the area around the bubble.
- Use a hard card or squeegee wrapped in a microfiber cloth to smooth out the bubble while the film is still warm and pliable.
- Repeat as needed.
-
Caution: Avoid overheating the tint film, which can cause damage.
5.2. Applying a Heat-Activated Adhesive
-
How it Works: Heat-activated adhesives can help re-bond the tint film to the glass surface, especially in cases of adhesive failure.
-
Steps:
- Clean the area around the bubble with rubbing alcohol to remove any residue.
- Apply a thin layer of heat-activated adhesive to the back of the tint film.
- Use a heat gun or hair dryer to gently warm the adhesive.
- Smooth out the bubble with a hard card or squeegee wrapped in a microfiber cloth.
- Apply pressure to the area for a few minutes to ensure a strong bond.
-
Caution: Use the adhesive sparingly to avoid creating a mess.
5.3. Using a Vacuum
-
How it Works: A vacuum can help create suction that pulls the tint film against the glass, removing air bubbles.
-
Steps:
- Cut a small hole in the center of the bubble with a pin or needle.
- Place the nozzle of a vacuum cleaner over the hole, creating a tight seal.
- Turn on the vacuum and allow it to run for a few seconds, pulling the air out of the bubble.
- Quickly remove the vacuum and smooth out the area with a hard card or squeegee wrapped in a microfiber cloth.
-
Caution: Be careful not to damage the tint film with the vacuum nozzle.
5.4. Re-wetting and Reapplying
-
How it Works: This technique involves lifting the tint film, re-wetting the area, and reapplying the film to remove bubbles and contaminants.
-
Steps:
- Gently lift the tint film from the window surface, starting at the edge of the bubble.
- Clean the window surface and the back of the tint film with a microfiber cloth and tint solution (slip solution).
- Spray the window surface with tint solution.
- Carefully reapply the tint film, starting at one edge and working your way across the window.
- Use a hard card or squeegee wrapped in a microfiber cloth to smooth out any bubbles or wrinkles.
-
Caution: This technique requires patience and a steady hand to avoid tearing or damaging the tint film.
Here’s a comparison table of these techniques:
| Technique | How it Works | Steps | Caution |
|---|---|---|---|
| Using a Steamer | Loosens adhesive and makes tint pliable | 1. Apply steam. 2. Smooth out bubble. 3. Repeat as needed. | Avoid overheating the tint film |
| Applying Heat-Activated Adhesive | Re-bonds tint film to glass | 1. Clean area. 2. Apply adhesive. 3. Warm adhesive. 4. Smooth out bubble. 5. Apply pressure. | Use adhesive sparingly |
| Using a Vacuum | Creates suction to pull tint film against glass | 1. Cut hole in bubble. 2. Place vacuum nozzle over hole. 3. Turn on vacuum. 4. Remove vacuum and smooth out area. | Be careful not to damage tint film with vacuum nozzle |
| Re-wetting and Reapplying | Lifts tint, re-wets area, and reapplies film to remove bubbles | 1. Lift tint. 2. Clean surface and film. 3. Spray solution. 4. Reapply film. 5. Smooth out bubbles. | Requires patience and a steady hand to avoid tearing or damaging the tint film |
6. Preventing Car Tint Bubbles: Proactive Measures
Preventing car tint bubbles is always better than trying to fix them after they appear. Here are some proactive measures to keep your window tint bubble-free:
6.1. Professional Installation
- Importance: Hiring a professional installer is the most effective way to prevent tint bubbles. Professionals have the experience, skills, and tools to ensure a flawless installation.
- What to Look For: Choose an installer with a good reputation, positive reviews, and a warranty on their work.
6.2. Proper Window Preparation
- Cleaning: Ensure the window surface is thoroughly cleaned and free of dirt, dust, and residue before tinting.
- Techniques: Use a high-quality window cleaner and a lint-free microfiber cloth. Rubbing alcohol can be used to remove stubborn residues.
6.3. High-Quality Tint Film
- Material: Invest in high-quality tint film from a reputable brand. High-quality films are less prone to bubbling and offer better UV protection and heat rejection.
- Types: Consider ceramic or metallic tint films, which are more durable and resistant to degradation.
6.4. Regular Maintenance
- Cleaning: Clean your tinted windows regularly with a mild, ammonia-free window cleaner and a soft microfiber cloth.
- Avoid Harsh Chemicals: Avoid using harsh chemicals or abrasive cleaners, which can damage the tint film.
- Inspection: Periodically inspect your tint for signs of bubbling, peeling, or fading. Address any issues promptly to prevent further damage.
6.5. Parking Smart
- Shade: Park your car in the shade whenever possible to reduce exposure to direct sunlight.
- Garage: If you have a garage, use it to protect your car from the elements.
6.6. UV Protection
- Window Covers: Use window covers or sunshades to protect your tint from UV radiation when parking in direct sunlight.
- Tint Additives: Consider using a UV-protective tint additive to extend the life of your tint film.
Here’s a proactive measures checklist:
| Measure | Description | Benefits |
|---|---|---|
| Professional Installation | Hiring experienced installers | Ensures flawless application, reduces risk of bubbles |
| Proper Window Preparation | Thorough cleaning before tinting | Removes contaminants, improves adhesion |
| High-Quality Tint Film | Investing in reputable brands | More durable, better UV protection and heat rejection, less prone to bubbling |
| Regular Maintenance | Cleaning with mild cleaners, periodic inspections | Prevents damage, extends tint life |
| Parking Smart | Parking in shade or using a garage | Reduces exposure to direct sunlight |
| UV Protection | Using window covers or UV-protective additives | Protects tint from UV radiation, extends tint life |
7. Choosing the Right Tint Film to Prevent Bubbles
Selecting the right tint film is crucial for preventing bubbles and ensuring long-lasting performance. Here’s a guide to help you choose the best option:
7.1. Types of Tint Film
-
Dyed Tint Film:
- Description: The most affordable option, dyed tint film contains a layer of dye that absorbs sunlight.
- Pros: Cost-effective, provides basic UV protection.
- Cons: Prone to fading and bubbling, lower heat rejection.
-
Metallic Tint Film:
- Description: Contains tiny metallic particles that reflect sunlight.
- Pros: Better heat rejection than dyed film, more durable.
- Cons: Can interfere with electronic signals (e.g., GPS, radio), reflective appearance.
-
Carbon Tint Film:
- Description: Contains carbon particles that absorb heat.
- Pros: Good heat rejection, non-reflective, doesn’t interfere with electronic signals.
- Cons: More expensive than dyed or metallic films.
-
Ceramic Tint Film:
- Description: Contains ceramic particles that block a high percentage of UV and infrared rays.
- Pros: Excellent heat rejection, UV protection, and glare reduction, doesn’t interfere with electronic signals.
- Cons: The most expensive option.
-
Crystalline Tint Film:
- Description: A multi-layer optical film that rejects heat without darkening the windows.
- Pros: High heat rejection, clear appearance, doesn’t interfere with electronic signals.
- Cons: Expensive and may not provide as much privacy as darker tints.
7.2. Factors to Consider
- UV Protection: Look for films that block at least 99% of UV rays to protect your skin and car interior.
- Heat Rejection: Choose a film with high Total Solar Energy Rejection (TSER) to keep your car cool.
- Glare Reduction: Consider films with low Visible Light Transmittance (VLT) to reduce glare and improve visibility.
- Durability: Opt for films with a scratch-resistant coating for long-lasting performance.
- Warranty: Check for a warranty that covers bubbling, peeling, and fading.
7.3. Recommended Brands
- 3M: Known for their high-quality automotive films with excellent heat rejection and UV protection.
- Website: 3M Automotive Window Film
- Llumar: Offers a wide range of tint films with various features and price points.
- Website: Llumar Window Film
- Huper Optik: Specializes in ceramic tint films with superior heat rejection and UV protection.
- Website: Huper Optik
- FormulaOne: Provides high-performance films with advanced technology for maximum comfort and protection.
- Website: FormulaOne Window Film
Here’s a comparison table of tint film types:
| Film Type | Description | Pros | Cons |
|---|---|---|---|
| Dyed | Contains a layer of dye that absorbs sunlight | Cost-effective, basic UV protection | Prone to fading and bubbling, lower heat rejection |
| Metallic | Contains tiny metallic particles that reflect sunlight | Better heat rejection, more durable | Can interfere with electronic signals, reflective appearance |
| Carbon | Contains carbon particles that absorb heat | Good heat rejection, non-reflective, doesn’t interfere with electronic signals | More expensive than dyed or metallic films |
| Ceramic | Contains ceramic particles that block a high percentage of UV and infrared rays | Excellent heat rejection, UV protection, and glare reduction, doesn’t interfere with electronic signals | The most expensive option |
| Crystalline | A multi-layer optical film that rejects heat without darkening the windows | High heat rejection, clear appearance, doesn’t interfere with electronic signals | Expensive and may not provide as much privacy as darker tints |
8. The Role of Professional Window Tinting Services
While DIY methods can address minor tint bubbles, professional window tinting services offer significant advantages:
8.1. Expertise and Experience
- Knowledge: Professionals have in-depth knowledge of tint films, application techniques, and troubleshooting.
- Experience: They have years of experience working with different types of vehicles and tint films, ensuring a flawless finish.
8.2. Quality Materials and Tools
- High-Quality Films: Professionals use high-quality tint films from reputable brands.
- Specialized Tools: They have access to specialized tools and equipment for precise installation and bubble removal.
8.3. Warranty and Guarantee
- Warranty: Most professional tinting services offer a warranty on their work, covering bubbling, peeling, and fading.
- Guarantee: They stand behind their work and will fix any issues that arise after installation.
8.4. Time and Convenience
- Time-Saving: Professional installation saves you time and effort compared to DIY methods.
- Convenience: You can schedule an appointment at your convenience and have the work done quickly and efficiently.
8.5. Cost-Effectiveness
- Long-Term Savings: While professional services may cost more upfront, they can save you money in the long run by preventing costly mistakes and ensuring long-lasting results.
- Avoid Damage: Professionals can prevent damage to your windows and tint film, avoiding the need for costly repairs or replacements.
8.6. Enhanced Aesthetics
- Flawless Finish: Professionals can achieve a flawless finish with no bubbles, wrinkles, or imperfections.
- Customization: They can help you choose the right tint film to match your vehicle’s style and your personal preferences.
Here’s a comparison table:
| Feature | DIY Methods | Professional Services |
|---|---|---|
| Expertise | Limited knowledge and experience | In-depth knowledge, years of experience |
| Materials | May use lower-quality films | High-quality films from reputable brands |
| Tools | Basic tools | Specialized tools and equipment |
| Warranty | No warranty | Warranty covering bubbling, peeling, and fading |
| Time | Time-consuming | Time-saving |
| Cost | Lower upfront cost but potential for costly mistakes | Higher upfront cost but long-term savings due to quality and warranty |
| Aesthetics | May have imperfections | Flawless finish, customization options |
9. Real-World Examples: Case Studies of Car Tint Bubble Solutions
To illustrate the effectiveness of the techniques discussed, here are some real-world case studies:
9.1. Case Study 1: Air Bubbles in a New Installation
- Problem: A customer had new tint installed on their car, but several large air bubbles appeared within a few days.
- Solution: The customer contacted the installer, who re-tinted the windows under warranty. The installer used proper cleaning and application techniques to ensure a bubble-free finish.
- Outcome: The re-tinted windows looked perfect, and the customer was satisfied with the result.
9.2. Case Study 2: Adhesive Failure Bubbles in an Older Tint
- Problem: A car owner noticed bubbles appearing in their tint after several years of use. The adhesive had started to fail, causing the film to lift away from the glass.
- Solution: The owner attempted to smooth out the bubbles using a heat gun and a squeegee, but the bubbles returned. They eventually decided to have the tint removed and replaced by a professional.
- Outcome: The new tint provided improved heat rejection and UV protection, and the car looked much better.
9.3. Case Study 3: Contamination Bubbles Due to Poor Cleaning
- Problem: A customer had small, irregular bubbles with visible dirt inside their tint. The bubbles were caused by poor window cleaning during the installation process.
- Solution: The customer carefully lifted the tint, cleaned the window and the back of the film, and reapplied the tint using a tint solution.
- Outcome: The bubbles were successfully removed, and the tint looked much better.
9.4. Case Study 4: Using a Steamer for Stubborn Bubbles
- Problem: A car owner had persistent bubbles in their tint that wouldn’t go away with basic methods.
- Solution: The owner used a steamer to loosen the adhesive and make the tint film more pliable. They then smoothed out the bubbles with a hard card wrapped in a microfiber cloth.
- Outcome: The bubbles were successfully removed, and the tint looked like new.
9.5. Case Study 5: Professional Intervention for a Complex Issue
- Problem: A car owner had multiple types of bubbles in their tint, including air bubbles, adhesive failure bubbles, and contamination bubbles.
- Solution: The owner decided to hire a professional tinting service to assess the damage and provide a solution. The professional removed the old tint, cleaned the windows, and installed a new high-quality tint film with a warranty.
- Outcome: The car looked great, and the owner had peace of mind knowing that the new tint was installed correctly and protected by a warranty.
10. CARDIAGTECH.NET: Your Partner in Auto Care
At CARDIAGTECH.NET, we understand the importance of maintaining your vehicle in top condition. While we specialize in providing high-quality diagnostic tools and equipment for auto repair professionals, we also offer valuable information and resources to help car owners like you take care of their vehicles.
10.1. High-Quality Tools and Equipment
- Diagnostic Scanners: Our range of diagnostic scanners can help you identify and troubleshoot issues with your vehicle’s electronic systems.
- Specialty Tools: We offer a variety of specialty tools for specific repair tasks, including window tinting and bubble removal.
- Why Choose Us: Our tools are designed for durability, accuracy, and ease of use, ensuring that you can get the job done right.
10.2. Expert Advice and Support
- Knowledge Base: Our website features a comprehensive knowledge base with articles, guides, and videos on various auto repair and maintenance topics.
- Customer Support: Our team of experienced technicians is available to answer your questions and provide technical support.
- Community Forum: Join our community forum to connect with other car owners and share your experiences and tips.
10.3. Commitment to Quality
- Trusted Brands: We partner with leading brands in the automotive industry to bring you the best products and services.
- Quality Assurance: All of our products undergo rigorous testing to ensure they meet our high standards for quality and performance.
- Customer Satisfaction: We are committed to providing exceptional customer service and ensuring your satisfaction with our products and services.
10.4. How CARDIAGTECH.NET Can Help You
- Tool Recommendations: Contact us for personalized recommendations on the best tools and equipment for your specific needs.
- Troubleshooting Assistance: Our team can help you troubleshoot issues with your vehicle and provide guidance on repair and maintenance tasks.
- Product Support: We offer comprehensive support for all of our products, including setup, training, and troubleshooting.
We’re here to help you keep your car looking and running its best. Contact us today to learn more about our products and services.
Contact Information:
- Address: 276 Reock St, City of Orange, NJ 07050, United States
- WhatsApp: +1 (641) 206-8880
- Website: CARDIAGTECH.NET
Let CARDIAGTECH.NET be your trusted partner in auto care. Contact us today and let us help you take care of your vehicle.
FAQ: Frequently Asked Questions About Car Tint Bubbles
1. What causes car tint bubbles?
Car tint bubbles are typically caused by air or moisture trapped between the tint film and the glass surface during installation. Improper cleaning, low-quality film, and adhesive failure can also contribute.
2. Are water bubbles normal after tint installation?
Yes, small, clear water bubbles are common immediately after tint installation. They usually disappear within a few days to weeks as the water evaporates.
3. How do I remove air bubbles from my car tint?
To remove air bubbles, heat the area with a heat gun or hair dryer, puncture the edge of the bubble with a fine pin or needle, and smooth it out with a hard card or squeegee wrapped in a microfiber cloth.
4. Can I fix car tint bubbles myself, or should I hire a professional?
Minor bubbles can often be fixed DIY, but professional services are recommended for larger or more complex issues to ensure a flawless finish and avoid damage to the tint film.
5. What type of tint film is least likely to bubble?
High-quality ceramic or metallic tint films are less prone to bubbling due to their durability and better adhesive properties.
6. How can I prevent car tint bubbles?
Preventive measures include professional installation, proper window preparation, using high-quality tint film, regular maintenance, and parking in the shade to reduce UV exposure.
7. Does a warranty cover car tint bubbles?
Many professional tinting services offer a warranty that covers bubbling, peeling, and fading. Check the warranty terms before installation.
8. What tools do I need to fix car tint bubbles?
Essential tools include a heat gun or hair dryer, a fine pin or needle, a hard card or