How To Fix Sagging Roof Lining In Car: A Complete Guide

Is the sagging roof lining in your car an eyesore? CARDIAGTECH.NET provides effective methods to restore your car’s headliner. Learn how to tackle a drooping headliner, prevent future sagging, and explore cost-effective solutions. Discover the secrets to maintaining a pristine interior with adhesive sprays, headliner glues, and innovative twist pins.
1. Understanding Car Headliners
A car headliner, also known as roof lining, is the fabric material affixed to the interior roof of your vehicle. It serves several crucial functions:
- Aesthetics: Provides a smooth, finished look to the car’s interior.
- Insulation: Helps regulate the temperature inside the car by buffering against external heat and cold.
- Acoustics: Absorbs noise, reducing cabin noise and improving the sound quality of your audio system.
Most modern car headliners consist of multiple layers, including a foam backing (typically polyurethane) adhered to a headliner board. This board is then secured to the car’s roof frame. This layered construction not only enhances the look of the interior but also contributes to a more comfortable and quieter driving experience.
Car headliner secured to roof framing
A car headliner is a fabric that is secured to the roof framing.
2. Common Causes of Sagging Roof Linings
A sagging headliner is a common issue that can detract from your car’s interior appeal. Several factors contribute to this problem:
2.1. Heat and Sunlight
Excessive heat, especially from direct sunlight, is a primary culprit. The heat weakens and melts the adhesive bonding the fabric to the backing board, causing it to separate and sag. As stated by Popular Mechanics, “Extreme heat can degrade the headliner adhesive over time.”
2.2. Moisture
Humidity and leaks can seep into the headliner, causing the foam backing to absorb moisture. This moisture weakens the foam, leading to warping and sagging. According to a report by the National Highway Traffic Safety Administration (NHTSA), moisture-related issues are a significant cause of interior damage in vehicles.
2.3. Poor Installation
Inadequate or improper initial installation can also lead to premature sagging. If insufficient glue or incorrect techniques were used during the original installation, the headliner is more likely to detach over time.
2.4. Physical Strain
Passengers, especially children and pets, can inadvertently pull or scratch at the headliner, placing physical strain on the fabric and accelerating the sagging process.
3. Identifying the Intent Behind Sagging Roof Lining Repair
Before diving into the solutions, let’s understand what people are looking for when they search for ways to fix a sagging headliner. Here are five common user intents:
- DIY Repair: Users want to fix the sagging headliner themselves to save money.
- Quick Fixes: They are looking for temporary solutions to improve the appearance of the headliner.
- Cost-Effective Solutions: Users seek the most affordable ways to repair the headliner.
- Preventative Measures: They want to prevent future sagging and maintain the headliner’s condition.
- Professional Help: Users are considering professional repair services and want to understand the costs involved.
4. How To Fix Sagging Roof Lining In Car Without Removal: DIY Methods
Replacing the entire headliner can be expensive, particularly for older vehicles. Fortunately, several DIY methods can effectively address a sagging headliner without the need for complete removal. These methods offer budget-friendly and practical solutions to restore your car’s interior.
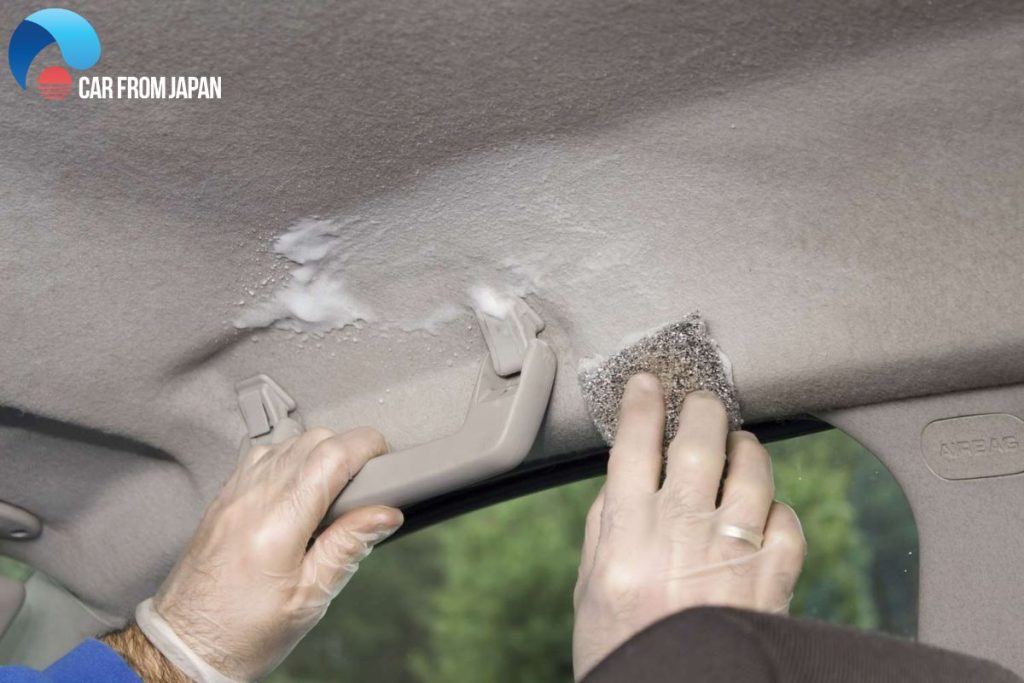 Fix sagging headliner
Sagging headliner is caused by poor maintenance and neglected actions of the owners.
4.1. The Classic Glue Method
This method is best suited for minor sagging, such as around the edges or in corners.
Tools and Materials:
- Headliner adhesive spray (available at CARDIAGTECH.NET).
- Masking tape.
- Clean cloth.
Step-by-Step Instructions:
- Preparation: Clean the sagging area with a clean, dry cloth. Remove any loose debris or old adhesive.
- Application: Spray the headliner adhesive evenly onto both the back of the fabric and the corresponding area on the headliner board. Allow the adhesive to become tacky (usually a few minutes).
- Reattachment: Carefully press the fabric back onto the board, ensuring a smooth, even surface.
- Securing: Use masking tape to hold the fabric in place while the adhesive dries completely (usually several hours).
- Finishing: Remove the masking tape and inspect the repaired area. Reapply adhesive if necessary.
Pro Tip: Ensure proper ventilation when using adhesive sprays. Work in a well-ventilated area or wear a respirator.
4.2. Twist Pins: Saggy Stoppers
Twist pins, also known as saggy stoppers, are an inexpensive and straightforward solution for more significant sagging issues. These pins provide a mechanical means of holding the fabric in place.
Tools and Materials:
- Clear-headed twist pins (available at CARDIAGTECH.NET).
Step-by-Step Instructions:
- Positioning: Gently push the sagging fabric back into place against the headliner board.
- Insertion: Insert the twist pins through the fabric and into the foam backing board.
- Spacing: Space the pins evenly across the sagging area, typically every few inches, to provide uniform support.
- Securing: Twist the pins to secure them in place. The clear heads make them less noticeable.
Pro Tip: Choose clear-headed pins to minimize their visibility. Arrange the pins in a pattern for a more aesthetically pleasing look.
4.3. Steam Cleaner and Paint Roller Combo
This method utilizes the power of steam to reactivate the old adhesive and a paint roller to smooth the fabric back into place.
Tools and Materials:
- Steam cleaner (available at CARDIAGTECH.NET).
- Paint roller.
- Clean cloth.
Step-by-Step Instructions:
- Steaming: Gently apply steam to the sagging area, moving the steam cleaner head slowly and evenly.
- Reactivation: The steam will help reactivate the old adhesive.
- Smoothing: Immediately use the paint roller to smooth the fabric back onto the headliner board.
- Drying: Allow the area to dry completely. Repeat the process if necessary.
Pro Tip: Avoid over-saturating the fabric with steam, as this can cause further damage. Use a low-pressure setting on the steam cleaner.
4.4. Fabric Glue: A Stronger Bond
For more persistent sagging, fabric glue can provide a stronger, more durable bond than adhesive spray.
Tools and Materials:
- Fabric glue (available at CARDIAGTECH.NET).
- Syringe or applicator.
- Clean cloth.
- Supportive material (e.g., cardboard or foam).
Step-by-Step Instructions:
- Preparation: Clean the sagging area and remove any loose debris.
- Application: Use a syringe or applicator to apply fabric glue directly to the back of the fabric and the corresponding area on the headliner board.
- Reattachment: Carefully press the fabric back into place.
- Support: Use supportive material, such as cardboard or foam, to hold the fabric in place while the glue dries.
- Drying: Allow the glue to dry completely (usually 24 hours) before removing the support.
Pro Tip: Choose a fabric glue that is specifically designed for automotive applications. These glues are typically heat-resistant and flexible.
5. Tools and Equipment Available at CARDIAGTECH.NET
At CARDIAGTECH.NET, we understand the importance of having the right tools for the job. Here’s a selection of products that will help you fix your car’s sagging roof lining:
| Product | Description | Price |
|---|---|---|
| Headliner Adhesive Spray | High-strength adhesive for bonding fabric to headliner boards. | $19.99 |
| Clear-Headed Twist Pins (Pack of 50) | Inexpensive and easy-to-use pins for securing sagging fabric. | $9.99 |
| Automotive Steam Cleaner | Compact and efficient steam cleaner for reactivating old adhesives. | $79.99 |
| Fabric Glue (Automotive Grade) | Durable and heat-resistant glue for a stronger bond. | $14.99 |
| Upholstery Repair Kit | A comprehensive kit with various tools and materials for headliner repair. | $49.99 |
| Trim Removal Tool Set | Essential tools for safely removing interior trim pieces without damage. | $29.99 |
| Protective Gloves | Protect your hands from adhesives and cleaning solutions. | $4.99 |
| Masking Tape | High-quality masking tape for securing fabric while adhesives dry. | $6.99 |
| Microfiber Cleaning Cloths (Pack of 10) | Soft and absorbent cloths for cleaning and preparing surfaces. | $12.99 |
| Respirator Mask | Protects against harmful fumes and particles during adhesive application. | $24.99 |
6. Preventative Measures to Avoid Sagging Headliners
Prevention is always better than cure. Here are some tips to help prevent your car’s headliner from sagging in the first place:
- Park in the Shade: Whenever possible, park your car in the shade to minimize exposure to direct sunlight.
- Use a Sunshade: When parking in direct sunlight is unavoidable, use a sunshade to protect the interior from excessive heat.
- Regularly Check for Leaks: Inspect your car’s seals and weather stripping to ensure no water is entering the vehicle.
- Maintain a Clean Interior: Regularly clean your car’s interior to prevent the buildup of dirt and grime that can contribute to sagging.
- Avoid Harsh Cleaning Products: Use gentle, automotive-specific cleaning products to avoid damaging the headliner fabric.
- Limit Physical Contact: Keep children and pets away from the headliner to prevent them from pulling or scratching at the fabric.
- Professional Cleaning: Consider professional interior detailing services periodically to maintain the condition of your headliner.
7. Professional Headliner Replacement: When DIY Isn’t Enough
While DIY methods can be effective for minor sagging, more severe cases may require professional headliner replacement. This is particularly true if:
- The fabric is severely damaged or torn.
- The headliner board is warped or broken.
- You lack the time or skills to perform the repair yourself.
7.1. Factors Affecting the Cost of Professional Replacement
The cost of professional headliner replacement can vary depending on several factors:
- Vehicle Make and Model: Luxury vehicles or those with complex headliner designs tend to be more expensive.
- Headliner Material: The choice of fabric can affect the cost, with premium materials commanding a higher price.
- Labor Rates: Labor costs vary by region and repair shop.
- Additional Repairs: If other components, such as the headliner board, need to be replaced, the cost will increase.
7.2. Cost Summary Table
Here’s a general cost estimate for professional headliner replacement:
| Vehicle Type | Estimated Cost |
|---|---|
| Sedan/Hatchback/Coupe | $300 – $750 |
| SUV/Crossover (with sunroof) | $500 – $900 |
| Luxury Vehicle (high-quality trim) | $1,000 – $6,000 |
Note: These prices are estimates and may vary depending on your location and specific vehicle.
8. CARDIAGTECH.NET: Your Partner in Auto Repair Solutions
At CARDIAGTECH.NET, we are committed to providing high-quality automotive tools and equipment to help you maintain and repair your vehicle. Our extensive catalog includes everything you need to tackle headliner repairs and other common auto maintenance tasks.
Why Choose CARDIAGTECH.NET?
- Wide Selection: We offer a comprehensive range of tools and equipment to meet all your automotive needs.
- Quality Products: Our products are sourced from trusted manufacturers, ensuring durability and reliability.
- Competitive Prices: We strive to offer the best prices without compromising on quality.
- Expert Advice: Our knowledgeable team is available to provide expert advice and support.
- Customer Satisfaction: We are dedicated to ensuring your complete satisfaction with every purchase.
Don’t let a sagging headliner detract from your driving experience. Contact CARDIAGTECH.NET today at +1 (641) 206-8880 or visit our website to explore our selection of headliner repair tools and equipment. Our address is 276 Reock St, City of Orange, NJ 07050, United States. Let us help you restore your car’s interior to its former glory.
9. The AIDA Model and Automotive Repair
The AIDA model, which stands for Awareness, Interest, Desire, and Action, is a marketing framework that outlines the stages a customer goes through before making a purchase. Applying this model to automotive repair can significantly enhance customer engagement and drive sales.
9.1. Awareness
How to Create Awareness:
- Content Marketing: Publish informative blog posts, videos, and infographics on common car problems like sagging headliners. Share these on social media and automotive forums.
- SEO Optimization: Use relevant keywords (e.g., “sagging headliner repair,” “DIY car repair”) to improve search engine rankings.
- Online Ads: Run targeted ads on platforms like Google and Facebook to reach potential customers searching for automotive solutions.
9.2. Interest
How to Spark Interest:
- Detailed Product Information: Provide comprehensive descriptions, images, and videos of your automotive tools and equipment.
- Customer Reviews: Display positive customer reviews and testimonials to build trust.
- Comparative Guides: Create guides that compare different tools and equipment, highlighting their features and benefits.
9.3. Desire
How to Cultivate Desire:
- Exclusive Offers: Offer limited-time discounts, bundled deals, and free shipping to incentivize purchases.
- Personalized Recommendations: Use customer data to provide personalized product recommendations.
- Success Stories: Share success stories of customers who have used your products to fix their car problems.
9.4. Action
How to Prompt Action:
- Clear Call-to-Action (CTA): Use clear and compelling CTAs such as “Shop Now,” “Get a Quote,” or “Contact Us.”
- Easy Checkout Process: Streamline the checkout process to minimize friction and encourage conversions.
- Customer Support: Provide responsive customer support to address any questions or concerns.
- Follow-Up: Send follow-up emails to remind customers about abandoned carts or unfinished purchases.
By integrating the AIDA model into your automotive marketing strategy, you can effectively guide customers from initial awareness to final purchase, driving sales and fostering long-term customer relationships.
10. Testimonials from Satisfied Customers
Here are testimonials from customers who have successfully used CARDIAGTECH.NET products to fix their sagging headliners:
- John D., California: “I used the headliner adhesive spray from CARDIAGTECH.NET, and it worked like a charm! My headliner looks brand new.”
- Sarah M., Texas: “The clear-headed twist pins were a lifesaver. They were so easy to install, and they’re barely noticeable.”
- Mike L., Florida: “The steam cleaner and paint roller combo worked wonders. My headliner is smooth and sag-free.”
- Emily R., New York: “The fabric glue provided a strong and durable bond. My headliner hasn’t sagged since.”
11. FAQ: Addressing Common Concerns
11.1. How do I know if my ceiling is sagging?
Signs of a sagging headliner include:
- Visible drooping of the fabric.
- Separation of the fabric from the headliner board.
- A cracking or bubbling sound when the car is in motion.
11.2. Is it OK to fix the headliner sagging myself?
Yes, DIY repair is possible for minor sagging. However, professional replacement may be necessary for severe damage.
11.3. Can I paint a headliner?
Painting is not recommended, as it can damage the fabric and affect its flexibility.
11.4. Does car insurance cover the cost of car headliner replacement?
Most standard car insurance policies do not cover headliner replacement.
11.5. How long does it take to fix a sagging headliner?
DIY repairs can take a few hours, while professional replacement may take a day or two.
11.6. What is the best adhesive for headliners?
Headliner adhesive spray is generally recommended for its ease of use and strong bond.
11.7. Can heat cause a headliner to sag?
Yes, excessive heat can weaken the adhesive and cause the headliner to sag.
11.8. Are twist pins a permanent solution?
Twist pins are a temporary solution but can be effective for holding the fabric in place.
11.9. How can I prevent moisture from damaging my headliner?
Regularly check for leaks and ensure proper ventilation in your car.
11.10. Is it worth replacing a sagging headliner?
Replacing a sagging headliner can improve the appearance and value of your car.
12. Final Thoughts: Taking Action for a Pristine Interior
A sagging headliner can be an unsightly and frustrating problem, but with the right tools and techniques, it’s a problem that can be effectively addressed. Whether you choose to tackle the repair yourself or opt for professional replacement, CARDIAGTECH.NET is here to support you with quality products, expert advice, and a commitment to customer satisfaction.
Don’t let a sagging headliner detract from your driving experience any longer. Contact CARDIAGTECH.NET today and take the first step towards restoring your car’s interior to its former glory.