How To Fix Car Weather Stripping: A Comprehensive Guide
CARDIAGTECH.NET presents your definitive guide on how to fix car weather stripping, ensuring a quiet, dry, and comfortable ride. Learn how to replace worn or damaged weather stripping with our expert advice, plus discover the best tools and products to get the job done right, enhancing your vehicle’s weather seal.
1. Understanding Car Weather Stripping
Car weather stripping is the unsung hero of your vehicle, a resilient rubber or foam material strategically placed to create a seal against the elements. This seemingly simple component plays a pivotal role in maintaining your car’s comfort, integrity, and value. Weather stripping, also known as automotive weather seals or car door seals, acts as a barrier, protecting your vehicle’s interior from a variety of external factors. These seals are generally made from ethylene propylene diene monomer (EPDM) rubber or thermoplastic elastomers (TPE).
1.1. What is Car Weather Stripping?
Car weather stripping, often unnoticed, is the rubber or foam lining that seals the gaps around your car doors, windows, trunk, hood, and even the windshield. It’s designed to create a barrier between the interior of your car and the outside world.
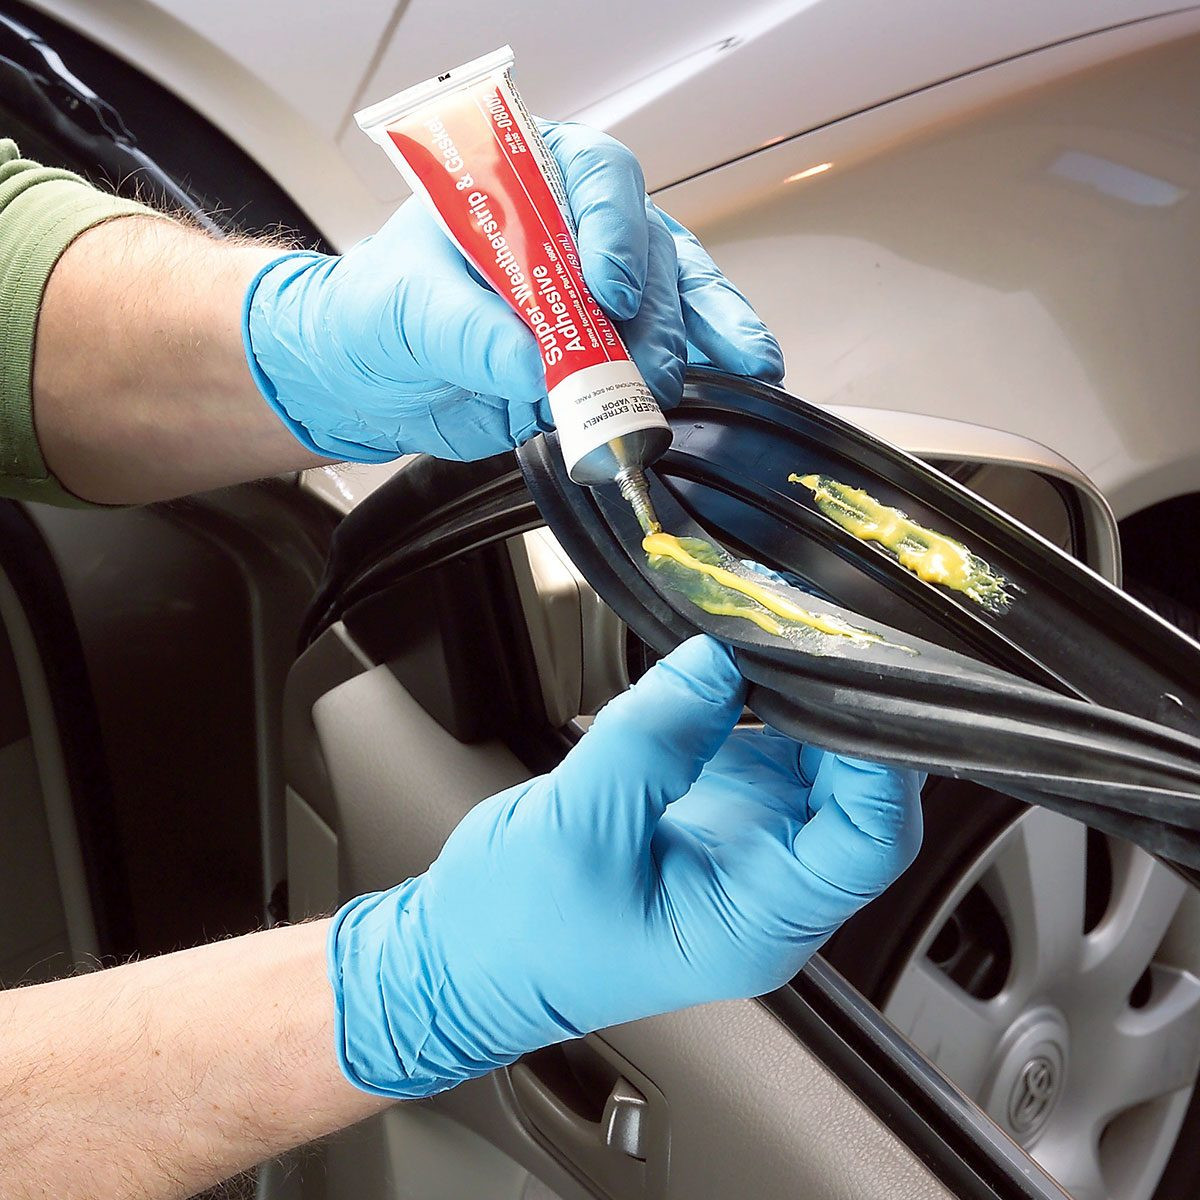
Car Door Weather Stripping Seal
Alt: Close-up of applying weather strip adhesive to a car door frame during weather stripping repair.
1.2. Functions of Weather Stripping
Weather stripping provides a multitude of benefits that contribute to the overall driving experience and the longevity of your vehicle.
- Keeps out elements: Blocks rain, snow, wind, dust, and pests from entering the vehicle.
- Prevents mold and mildew: By keeping moisture out, it prevents the growth of mold and mildew, which can cause health problems and unpleasant odors.
- Maintains air quality: Helps to keep pollutants and allergens from entering the cabin, ensuring better air quality for passengers.
- Insulates against temperature: Provides insulation against extreme hot and cold temperatures, reducing the strain on the car’s HVAC system.
- Protects against damage: Shields the vehicle from potential damage by preventing water from seeping into critical areas.
- Enhances driving comfort: Reduces wind noise and vibrations, contributing to a more comfortable and quieter ride.
- Maintains vehicle appearance and resale value: Well-maintained weather stripping helps preserve the overall appearance and value of the car.
1.3. Types of Car Weather Stripping
Various types of weather stripping cater to different vehicle areas and sealing needs. Here’s a quick overview:
| Type | Location | Characteristics |
|---|---|---|
| Door Weather Stripping | Edges of doors | Typically D-shaped or P-shaped, offering a robust seal. |
| Window Weather Stripping | Around window frames | Often a thin, flexible rubber that allows the window to move smoothly. |
| Trunk Weather Stripping | Perimeter of the trunk opening | Designed to keep moisture and debris out of the trunk. |
| Hood Weather Stripping | Along the edges of the hood | Helps to seal the engine compartment and reduce engine noise. |
| Universal Weather Stripping | Can be cut and applied to various locations | Versatile and cost-effective; suitable for DIY repairs. |
1.4. Identifying Weather Stripping Problems
Identifying weather stripping problems early can prevent more extensive damage and costly repairs.
- Visual Inspection: Check for visible signs of damage, such as cracks, tears, dry rot, or missing pieces.
- Auditory Clues: Listen for excessive wind noise while driving, which may indicate gaps in the weather stripping.
- Water Leaks: Check for water leaks inside the car after rain or washing the car.
- Dollar Bill Test: Place a dollar bill between the weather strip and the door or frame, and then close the door. If the bill slides out easily, the seal is weak and needs attention.
Expert Insight from Bob Lacivita: “To test weather stripping fit, place a dollar bill between the weather strip and the part being sealed. Feeling resistance when pulling the bill out signifies a good seal.” This simple test can save you from unnecessary replacements by accurately assessing the seal’s integrity.
2. When to Replace Car Weather Stripping
Knowing when to replace car weather stripping is crucial for maintaining your vehicle’s comfort and protecting it from the elements. Recognizing the signs of wear and tear can help you take timely action, preventing further damage and maintaining optimal performance.
2.1. Signs of Wear and Tear
Several indicators suggest that your car weather stripping needs replacement.
- Visible Damage: Obvious signs like cracks, tears, dry rot, and missing chunks indicate that the weather stripping is no longer effective.
- Wind Noise: Increased wind noise while driving, particularly around doors and windows, suggests that the seals are compromised.
- Water Leaks: Water entering the car during rain or car washes is a clear sign that the weather stripping is failing to provide a proper seal.
- Drafts: Feeling drafts inside the car, especially during cold weather, can indicate gaps in the weather stripping.
- Sticking Doors/Trunk: If doors or the trunk stick or are difficult to close, it could be due to deteriorated or misaligned weather stripping.
2.2. Factors Affecting Weather Stripping Lifespan
Several factors can influence how long your car’s weather stripping lasts.
- Climate: Exposure to extreme temperatures, UV rays, and humidity can accelerate the degradation of rubber and foam.
- Usage: Frequent use of doors, trunk, and hood can cause wear and tear on the weather stripping.
- Maintenance: Lack of regular cleaning and conditioning can lead to premature deterioration.
- Material Quality: Higher-quality weather stripping materials tend to last longer than cheaper alternatives.
2.3. Expert Opinions on Replacement Intervals
While there’s no fixed replacement interval, experts recommend inspecting weather stripping regularly. Thomas Patterson from Glass Doctor notes, “Expanding and contracting causes fatigue in the EPDM [rubber] and causes it to loosen.” Regular checks, especially after extreme weather conditions, can help identify issues early.
Bob Lacivita suggests that with proper care, weather stripping should last the lifetime of the vehicle under normal circumstances. However, if you notice any of the signs of wear and tear mentioned earlier, it’s time to consider replacement.
2.4. Why Timely Replacement Matters
- Prevents Further Damage: Replacing worn weather stripping prevents water from seeping into the car’s interior, which can cause rust, mold, and electrical issues.
- Maintains Comfort: New weather stripping restores the car’s ability to insulate against noise, wind, and temperature extremes, enhancing driving comfort.
- Saves Energy: Properly sealed doors and windows reduce the load on the car’s HVAC system, improving fuel efficiency.
- Preserves Value: Maintaining the car’s seals helps preserve its overall condition and resale value.
By understanding the signs of wear and the factors that affect weather stripping lifespan, you can take proactive steps to maintain and replace your car’s weather stripping when necessary, ensuring a comfortable and protected ride. If the job seems too complex, remember that professional assistance is always an option. Contact CARDIAGTECH.NET for expert advice and solutions tailored to your needs.
3. Tools and Materials for Car Weather Stripping Repair
Before embarking on car weather stripping repair, gather the necessary tools and materials to ensure a smooth and efficient process. Having the right equipment on hand will save time and improve the quality of the repair. Here’s a comprehensive list of what you’ll need.
3.1. Essential Tools
- Flathead Screwdriver: For gently prying off old weather stripping and removing clips.
- 90-Degree Picks: Useful for cleaning out channel retainer tracks and removing stubborn adhesive residue.
- Sandpaper: For smoothing rough surfaces and preparing areas for new adhesive.
- Clean, Dust-Free Rags: For wiping surfaces clean and applying adhesive remover.
- Microfiber Towels: For drying surfaces and removing excess product.
- Utility Knife (Optional): For trimming new weather stripping to the correct size.
3.2. Essential Materials
- Replacement Weather Stripping: Ensure you have the correct type and size for your vehicle. Generic or vehicle-specific options are available.
- Adhesive Remover: For removing old adhesive residue without damaging the paint.
- Weather Strip Adhesive: A high-quality adhesive to securely attach the new weather stripping.
- Silicone Spray: For lubricating weather stripping and preventing it from sticking to surfaces.
- Silicone Gel (Optional): For conditioning and protecting weather stripping.
- Low Adhesion Paper Tape or Clamps (Optional): For holding the new weather stripping in place while the adhesive dries.
- Foam Backer Rod (Optional): For filling gaps in damaged weather stripping.
3.3. Recommended Products and Brands
- Adhesive Remover:
- 3M General Purpose Adhesive Cleaner
- Goo Gone Automotive
- Weather Strip Adhesive:
- 3M Black Weatherstrip Adhesive (recommended by Bob Lacivita)
- Permatex Super Weatherstrip Adhesive
- Silicone Spray:
- 3M Silicone Lubricant
- DuPont Silicone Lubricant
- Silicone Gel:
- Shin-Etsu Silicone Grease
- Permatex Silicone Paste
3.4. Where to Buy Supplies
You can purchase these tools and materials from a variety of sources.
- Automotive Parts Stores:
- AutoZone
- Advance Auto Parts
- O’Reilly Auto Parts
- Online Retailers:
- Amazon
- CARDIAGTECH.NET
3.5. Tips for Selecting the Right Weather Stripping
- Vehicle-Specific vs. Universal: Vehicle-specific weather stripping is designed to fit your car perfectly but may be more expensive. Universal weather stripping is more affordable but may require trimming and fitting.
- Material Quality: Opt for high-quality rubber or foam that is resistant to UV rays and extreme temperatures.
- Adhesive Quality: Ensure that the weather strip adhesive is strong and durable, providing a long-lasting bond.
Having the right tools and materials is essential for a successful car weather stripping repair. By gathering these items beforehand, you’ll be well-prepared to tackle the job and restore your vehicle’s weather seals to their optimal condition. For top-quality tools and expert advice, contact CARDIAGTECH.NET at +1 (641) 206-8880. Our team can help you select the best products and provide guidance for your repair project.
4. Step-by-Step Guide to Repairing Car Weather Stripping
Repairing car weather stripping can save you money and maintain your vehicle’s condition. This step-by-step guide provides clear instructions for both minor repairs and full replacements.
4.1. Assessing the Damage
Before starting any repairs, carefully assess the extent of the damage to determine the best course of action.
- Minor Tears and Cuts: If you find small tears or cuts, patching them with weather strip adhesive may be sufficient.
- Loose Weather Stripping: If the weather stripping is falling or popping out slightly, a few drops of adhesive can hold it in place.
- Deformed Weather Stripping: If the weather stripping has lost its shape or folded over, you may be able to repair it by inserting a foam backer rod.
- Extensive Damage: If the weather stripping is severely damaged, cracked, or dry-rotted, it’s best to replace it entirely.
4.2. Repairing Minor Damage
For small tears, cuts, or loose sections, follow these steps.
- Clean the Area: Use a clean, dust-free rag and adhesive remover to clean the damaged area and remove any dirt or debris.
- Apply Adhesive: Apply a small amount of weather strip adhesive to the damaged area. Be careful, as this adhesive can be very sticky.
- Secure the Weather Stripping: Press the weather stripping firmly into place and hold it until the adhesive begins to set.
- Remove Excess Adhesive: Promptly wipe off any excess glue using a cloth and solvent-based liquid cleaner.
- Allow to Dry: Allow the adhesive to dry completely according to the manufacturer’s instructions, usually around 24 hours.
4.3. Replacing Weather Stripping
If the weather stripping is beyond repair, follow these steps to replace it.
Step 1: Remove the Old Strip
- Gently peel the old weather stripping from the door or opening.
- Be careful to avoid damaging the paint. Use a plastic trim removal tool if necessary.
Step 2: Clean the Area
- Spray the area where the old weather stripping was with an adhesive remover.
- Use the cloth and picks to wipe away adhesive residue and other debris. “The channel or mounting surface must be absolutely spotless of any glue, residue or old weather stripping,” says Lacivita.
- Let all areas dry completely.
Step 3: Apply New Adhesive
- Test (or dry fit) the weather stripping to ensure it fits into the area and matches the original strip’s size and shape. If it doesn’t, trim it accordingly using a utility knife.
- If your new weather stripping doesn’t come with a pre-coated adhesive attached, apply a thin and even strip of adhesive to the vehicle surface where the new strip will be attached.
- Adhere to any manufacturer instructions for adhesive application and drying recommendations.
Pro-tip: “I recommend 3M Black Weatherstrip Adhesive,” says Lacivita. “I am not a fan of 3M Yellow Weather Strip adhesive. Once it fully cures, it’s worse than contact cement to remove.”
Step 4: Install the Weather Stripping
- Carefully position the new weather stripping onto the adhesive.
- Press it firmly in place, working your way around the entire perimeter.
- Use tape or clamps to hold the strip in place until the adhesive dries. If you’re not using low-adhesion tape, apply a little silicone underneath so it doesn’t rip out the new weather stripping when you go to remove it.
“It’s vital to allow the adhesive to cure and bond to the surface of the door!” says Patterson. “During this time, do not close the door before it’s done curing as it can cause the strip to shift.”
Step 5: Test and Clean Up
- When the adhesive is set up, test it by gently opening and closing the door.
- Inspect for gaps in the adhesion.
- Use a clean cloth to remove excess adhesive.
4.4. Tips for a Successful Repair
- Work in a Clean Environment: Ensure the area is free of dirt and debris before applying any adhesive.
- Use the Right Adhesive: Choose a high-quality weather strip adhesive that is compatible with the materials being bonded.
- Apply Even Pressure: When installing new weather stripping, apply even pressure to ensure a strong and consistent bond.
- Allow Adequate Drying Time: Allow the adhesive to dry completely before exposing the weather stripping to the elements.
By following these steps, you can effectively repair or replace your car’s weather stripping, ensuring a tight seal and protecting your vehicle from the elements. If you encounter any difficulties or prefer professional assistance, contact CARDIAGTECH.NET for expert advice and services.
5. Maintaining Car Weather Stripping
Proper maintenance of your car’s weather stripping is essential for prolonging its lifespan and ensuring it continues to function effectively. Regular cleaning and conditioning can keep the rubber supple, prevent cracks, and maintain a tight seal against the elements.
5.1. Importance of Regular Cleaning
Cleaning your car’s weather stripping regularly helps remove dirt, grime, and debris that can accumulate over time. This buildup can cause the rubber to dry out, crack, and lose its flexibility, reducing its ability to seal properly.
5.2. Cleaning Procedures
Follow these steps to clean your car’s weather stripping effectively:
- Gather Supplies: You’ll need car wash soap, a soft brush, a microfiber towel, and a bucket of water.
- Prepare the Cleaning Solution: Mix car wash soap with water in the bucket according to the manufacturer’s instructions.
- Apply the Solution: Dip the soft brush into the soapy water and gently scrub the weather stripping. Pay special attention to the back side of the weather stripping where dirt and debris easily accumulate, plus any vehicle doors or other parts that come into contact with it.
- Rinse Thoroughly: Rinse the weather stripping with clean water to remove all traces of soap.
- Dry Completely: Use a microfiber towel to dry the weather stripping thoroughly.
5.3. Conditioning for Longevity
After cleaning, conditioning the weather stripping helps keep it soft and flexible, preventing it from drying out and cracking. Silicone-based rubber protectants are ideal for this purpose.
- Select a Protectant: Choose a silicone-based rubber protectant or silicone paste specifically designed for automotive use. Lacivita recommends using a spray-pump protectant vs. an aerosol-based one because some propellants in aerosols can harm rubber.
- Apply the Protectant: Apply the protectant sparingly to a clean microfiber towel. Gently wipe the weather stripping with the towel, ensuring even coverage.
- Allow to Absorb: Allow the protectant to soak into the rubber for a few minutes.
- Wipe Off Excess: Use a clean microfiber towel to wipe off any excess protectant.
- Repeat if Necessary: If the weather stripping is old and dry, apply a second coat of protectant after the first coat has been absorbed.
5.4. Additional Tips for Maintaining Weather Stripping
- Park in the Shade: When possible, park your car in the shade to protect the weather stripping from direct sunlight, which can cause it to dry out and crack.
- Avoid Harsh Chemicals: Avoid using harsh chemicals or solvents on the weather stripping, as they can damage the rubber.
- Lubricate Regularly: Regularly lubricate door hinges and latches to reduce stress on the weather stripping when opening and closing doors.
- Inspect Regularly: Periodically inspect the weather stripping for signs of damage or wear. Address any issues promptly to prevent further deterioration.
5.5. Benefits of Regular Maintenance
- Prolongs Lifespan: Regular cleaning and conditioning can significantly extend the life of your car’s weather stripping.
- Maintains Seal: Proper maintenance helps keep the weather stripping soft and flexible, ensuring a tight seal against the elements.
- Prevents Damage: By preventing the rubber from drying out and cracking, regular maintenance can prevent costly repairs.
- Enhances Comfort: Well-maintained weather stripping helps reduce wind noise and drafts, enhancing driving comfort.
By following these maintenance tips, you can keep your car’s weather stripping in top condition, ensuring a comfortable and protected ride. For expert advice and high-quality maintenance products, contact CARDIAGTECH.NET at +1 (641) 206-8880. Our team is here to help you keep your vehicle in optimal condition.
6. Cost of Replacing Car Weather Stripping
Understanding the cost of replacing car weather stripping is essential for budgeting and making informed decisions about vehicle maintenance. The price can vary widely depending on several factors, including the type of weather stripping, the vehicle model, and whether you choose to DIY or hire a professional.
6.1. Factors Affecting the Cost
- Type of Weather Stripping:
- Generic Weather Stripping: A roll of generic self-stick or friction weather stripping can cost less than $25. These are suitable for DIY repairs and can be cut to fit various areas.
- Vehicle-Specific Weather Stripping: These are designed to fit specific models and are generally more expensive. The cost can range from $50 to $200 per piece, depending on the make and model of the car.
- Location of Weather Stripping: The cost can also depend on the location of the weather stripping. For example, replacing weather stripping around a sunroof or windshield may be more expensive due to the complexity of the job.
- DIY vs. Professional Installation:
- DIY: If you choose to replace the weather stripping yourself, you’ll only need to pay for the parts and materials. This can save you a significant amount of money.
- Professional Installation: Hiring a professional can add labor costs, which can range from $50 to $200 per hour, depending on the shop and the complexity of the job.
6.2. Estimated Costs
Here’s a general breakdown of the estimated costs for replacing car weather stripping:
| Component | DIY Cost | Professional Installation Cost |
|---|---|---|
| Generic Weather Stripping Roll | $20 – $50 | $100 – $200 |
| Vehicle-Specific Door Seal | $50 – $200 | $150 – $400 |
| Trunk Weather Stripping | $40 – $150 | $120 – $300 |
| Hood Weather Stripping | $30 – $100 | $100 – $250 |
| Sunroof Weather Stripping | $100 – $300 | $300 – $800+ |
Expert Insight from Bob Lacivita: “On the other hand, a vehicle-specific weather strip that requires removing trim, or removing the sunroof, can run up to $800.”
6.3. Cost-Saving Tips
- DIY Installation: Save on labor costs by replacing the weather stripping yourself.
- Buy in Bulk: Purchase weather stripping in bulk to save on per-unit costs, especially if you need to replace multiple seals.
- Compare Prices: Shop around at different auto parts stores and online retailers to find the best deals.
- Use Generic Weather Stripping: If possible, use generic weather stripping to save on the cost of vehicle-specific parts.
6.4. When to Consider Professional Help
While DIY replacement can save money, there are situations where professional help is recommended:
- Complex Installations: If the weather stripping requires removing interior trim or special tools, it’s best to hire a professional.
- Difficult-to-Find Parts: If you’re having trouble locating the correct weather stripping for your vehicle, a professional can help.
- Lack of Experience: If you’re not comfortable working on cars or don’t have the necessary tools, hiring a professional can ensure the job is done correctly.
By understanding the factors that affect the cost of replacing car weather stripping, you can make informed decisions and budget accordingly. Whether you choose to DIY or hire a professional, maintaining your vehicle’s weather seals is an important investment in its longevity and comfort. Contact CARDIAGTECH.NET for expert advice and the best tools for your weather stripping needs.
7. Common Mistakes to Avoid When Fixing Car Weather Stripping
When fixing car weather stripping, it’s easy to make mistakes that can compromise the effectiveness of the repair or even damage your vehicle. Knowing these common pitfalls can help you avoid them and ensure a successful outcome.
7.1. Using the Wrong Type of Weather Stripping
One of the most common mistakes is using the wrong type of weather stripping for your vehicle. Generic weather stripping may not fit properly or provide an adequate seal.
- Solution: Always use vehicle-specific weather stripping if available, or carefully measure and select generic weather stripping that matches the original in size and shape.
7.2. Not Cleaning the Surface Properly
Failing to clean the surface thoroughly before applying new weather stripping can prevent the adhesive from bonding correctly.
- Solution: Use an adhesive remover to remove old adhesive residue, and clean the surface with a degreaser to remove dirt and grime. Allow the surface to dry completely before applying new adhesive.
7.3. Applying Too Much or Too Little Adhesive
Applying too much adhesive can create a mess, while applying too little can result in a weak bond.
- Solution: Follow the manufacturer’s instructions for adhesive application. Apply a thin, even layer of adhesive to the surface, and avoid applying too much pressure.
7.4. Installing Weather Stripping Incorrectly
Installing weather stripping incorrectly can create gaps and prevent a proper seal.
- Solution: Carefully position the weather stripping and press it firmly into place, working your way around the entire perimeter. Use tape or clamps to hold the strip in place until the adhesive dries.
7.5. Neglecting to Allow Adequate Drying Time
Rushing the drying process can prevent the adhesive from curing properly, resulting in a weak bond.
- Solution: Allow the adhesive to dry completely according to the manufacturer’s instructions, usually around 24 hours. Avoid opening and closing doors or exposing the weather stripping to the elements during this time.
7.6. Using the Wrong Cleaning Products
Using harsh chemicals or abrasive cleaners can damage the weather stripping and reduce its lifespan.
- Solution: Use a mild car wash soap and a soft brush to clean the weather stripping. Avoid using harsh chemicals or solvents.
7.7. Overlooking Minor Damage
Ignoring small tears or cracks in the weather stripping can lead to more significant problems down the road.
- Solution: Inspect the weather stripping regularly for signs of damage, and address any issues promptly to prevent further deterioration.
7.8. Not Lubricating Weather Stripping
Failing to lubricate the weather stripping can cause it to dry out and crack, reducing its effectiveness.
- Solution: Apply a silicone-based rubber protectant or silicone paste to the weather stripping regularly to keep it soft and flexible.
By avoiding these common mistakes, you can ensure a successful car weather stripping repair and maintain your vehicle’s condition. If you’re unsure about any aspect of the repair process, it’s always best to seek professional assistance. Contact CARDIAGTECH.NET for expert advice and services tailored to your needs.
8. Benefits of Properly Sealed Car Weather Stripping
Properly sealed car weather stripping provides numerous benefits that enhance your driving experience, protect your vehicle, and save you money.
8.1. Enhanced Comfort
- Reduced Wind Noise: Properly sealed weather stripping minimizes wind noise, creating a quieter and more comfortable cabin environment.
- Draft Prevention: Effective weather stripping prevents drafts from entering the car, keeping you warm in the winter and cool in the summer.
- Temperature Regulation: Properly sealed doors and windows help maintain a consistent temperature inside the car, reducing the strain on the HVAC system.
8.2. Protection Against the Elements
- Water Leak Prevention: Weather stripping prevents water from entering the car during rain or car washes, protecting the interior from water damage and mold growth.
- Dust and Debris Protection: Properly sealed weather stripping keeps dust, dirt, and debris out of the car, maintaining a cleaner interior.
- Pest Control: Effective weather stripping prevents insects and other pests from entering the car, creating a more hygienic environment.
8.3. Improved Energy Efficiency
- Reduced HVAC Load: Properly sealed doors and windows reduce the load on the car’s HVAC system, improving fuel efficiency and saving you money on energy costs.
- Better Insulation: Weather stripping provides insulation against extreme temperatures, helping to keep the car warm in the winter and cool in the summer, further reducing energy consumption.
8.4. Enhanced Vehicle Longevity
- Rust Prevention: By preventing water from entering the car, weather stripping helps prevent rust and corrosion, extending the life of your vehicle.
- Interior Protection: Properly sealed weather stripping protects the car’s interior from damage caused by moisture, sunlight, and extreme temperatures.
8.5. Increased Resale Value
- Improved Appearance: Well-maintained weather stripping enhances the overall appearance of the car, making it more attractive to potential buyers.
- Reduced Maintenance Costs: By preventing water damage and rust, properly sealed weather stripping can reduce the need for costly repairs, increasing the car’s resale value.
8.6. Health Benefits
- Mold and Mildew Prevention: Properly sealed weather stripping prevents moisture buildup, which can lead to mold and mildew growth. Mold and mildew can cause allergic reactions, respiratory problems, and other health issues. By preventing their growth, you create a healthier environment for yourself and your passengers.
- Improved Air Quality: Weather stripping helps to keep pollutants and allergens from entering the cabin, ensuring better air quality for passengers. This is especially important for people with allergies or respiratory conditions.
Investing in properly sealed car weather stripping is an investment in your comfort, health, and the longevity of your vehicle. For expert advice and high-quality weather stripping products, contact CARDIAGTECH.NET at +1 (641) 206-8880.
9. Car Weather Stripping FAQs
Here are some frequently asked questions about car weather stripping to help you better understand its importance and maintenance.
-
Can you drive without weather stripping?
Yes, but it’s not recommended. Driving without weather stripping exposes you to the elements, increases wind noise, and puts additional strain on your HVAC system.
-
How long does weather stripping last?
If cared for properly, weather stripping should last the lifetime of your vehicle under normal circumstances. However, extreme weather conditions and lack of maintenance can shorten its lifespan.
-
How do you know what kind of weather stripping to use for your car?
Check your vehicle’s manual or consult with an automotive parts specialist to determine the correct type of weather stripping for your car. You can also carefully remove a small piece to determine what type you need.
-
Is it easy to replace car weather stripping myself?
Replacing car weather stripping can be a DIY project, but it requires some mechanical skill and the right tools. If you’re not comfortable working on cars, it’s best to hire a professional.
-
What is the best adhesive for car weather stripping?
3M Black Weatherstrip Adhesive is a popular and effective choice for bonding weather stripping to your vehicle.
-
How often should I clean my car weather stripping?
You should clean your car weather stripping every few months or as needed to remove dirt and debris.
-
Can I use WD-40 to lubricate my car weather stripping?
No, WD-40 is not recommended for lubricating car weather stripping as it can dry out the rubber. Use a silicone-based lubricant instead.
-
What are the signs of bad weather stripping?
Signs of bad weather stripping include visible damage, wind noise, water leaks, and drafts.
-
How much does it cost to replace car weather stripping?
The cost of replacing car weather stripping can range from $20 for a roll of generic weather stripping to $800 or more for vehicle-specific weather stripping installed by a professional.
-
Can I repair small tears in my car weather stripping?
Yes, small tears in car weather stripping can often be repaired with weather strip adhesive.
10. Conclusion
Maintaining your car’s weather stripping is a small investment that yields significant returns. By understanding the functions of weather stripping, recognizing signs of wear, and following proper maintenance and repair procedures, you can ensure a comfortable, quiet, and protected driving experience. Whether you choose to tackle the job yourself or seek professional assistance, remember that properly sealed weather stripping is essential for your vehicle’s longevity and your personal comfort.
For all your automotive needs, including high-quality weather stripping products and expert advice, trust CARDIAGTECH.NET. Contact us today at 276 Reock St, City of Orange, NJ 07050, United States, or call +1 (641) 206-8880. Our team is ready to assist you with top-notch tools and unparalleled service. Don’t hesitate—reach out now and let CARDIAGTECH.NET help you keep your vehicle in prime condition. Your satisfaction is our priority. Click the WhatsApp button now to place your order and experience the CARDIAGTECH.NET difference!