How to Fix Broken Wires in Car Door: A Guide
Broken wires in your car door can cause a multitude of problems, from malfunctioning power windows and locks to a complete loss of control over essential functions. At CARDIAGTECH.NET, we understand the frustration this can cause. We offer expert solutions and top-quality tools to help you diagnose and repair these issues efficiently, restoring your vehicle’s functionality and ensuring your safety. Solving broken car door wires requires the right tools and techniques.
Intention:
- Troubleshooting car electrical issues
- Door wire harness repair
- Automotive wiring solutions
- DIY car repair
- Professional auto repair methods
1. Identifying the Problem: Symptoms and Causes of Broken Car Door Wires
Pinpointing the reasons behind broken car door wires is the first step towards effective repair. Several factors can contribute to this issue, each presenting unique challenges.
1.1 Common Symptoms of Broken Car Door Wires
Recognizing the telltale signs of damaged wires can help you address the problem early, preventing further complications. Here’s what to look for:
- Malfunctioning Power Windows: Windows that operate intermittently or not at all are often the first sign.
- Door Lock Issues: Difficulty locking or unlocking the door, either manually or with the key fob, is a common symptom.
- Speaker Problems: If the door speakers cut in and out, or don’t work at all, suspect broken wires.
- Mirror Control Failure: Inability to adjust side mirrors electronically can indicate wiring problems.
- Interior Light Malfunctions: Interior lights that flicker or fail to illuminate when the door is opened may point to damaged wiring.
- Warning Lights on Dashboard: Some vehicles will display a warning light indicating a door malfunction.
- Loss of Communication with Door Module (DDM): Use a diagnostic tool like VIDA to check for communication issues with the DDM.
1.2. Root Causes of Wire Damage
Understanding the underlying causes of wire damage can help you prevent future issues and implement more durable repairs.
- Fatigue from Repeated Use: Continuous opening and closing of the car door causes wires to bend and flex, leading to fatigue and eventual breakage. According to a study by the National Highway Traffic Safety Administration (NHTSA), repeated stress is a primary cause of wire failure in vehicle doors.
- Environmental Factors: Exposure to extreme temperatures, moisture, and road salts can degrade wire insulation and accelerate corrosion.
- Poor Design and Routing: In some vehicles, the wire harness may be poorly designed or routed, causing it to rub against sharp edges or get pinched.
- Accidental Damage: Wires can be damaged during maintenance or repair work if not handled carefully.
- Rodent Damage: Rodents are attracted to the warmth and shelter provided by vehicles and may chew on wires, causing significant damage. The U.S. Department of Agriculture (USDA) estimates that rodent damage costs vehicle owners millions of dollars each year.
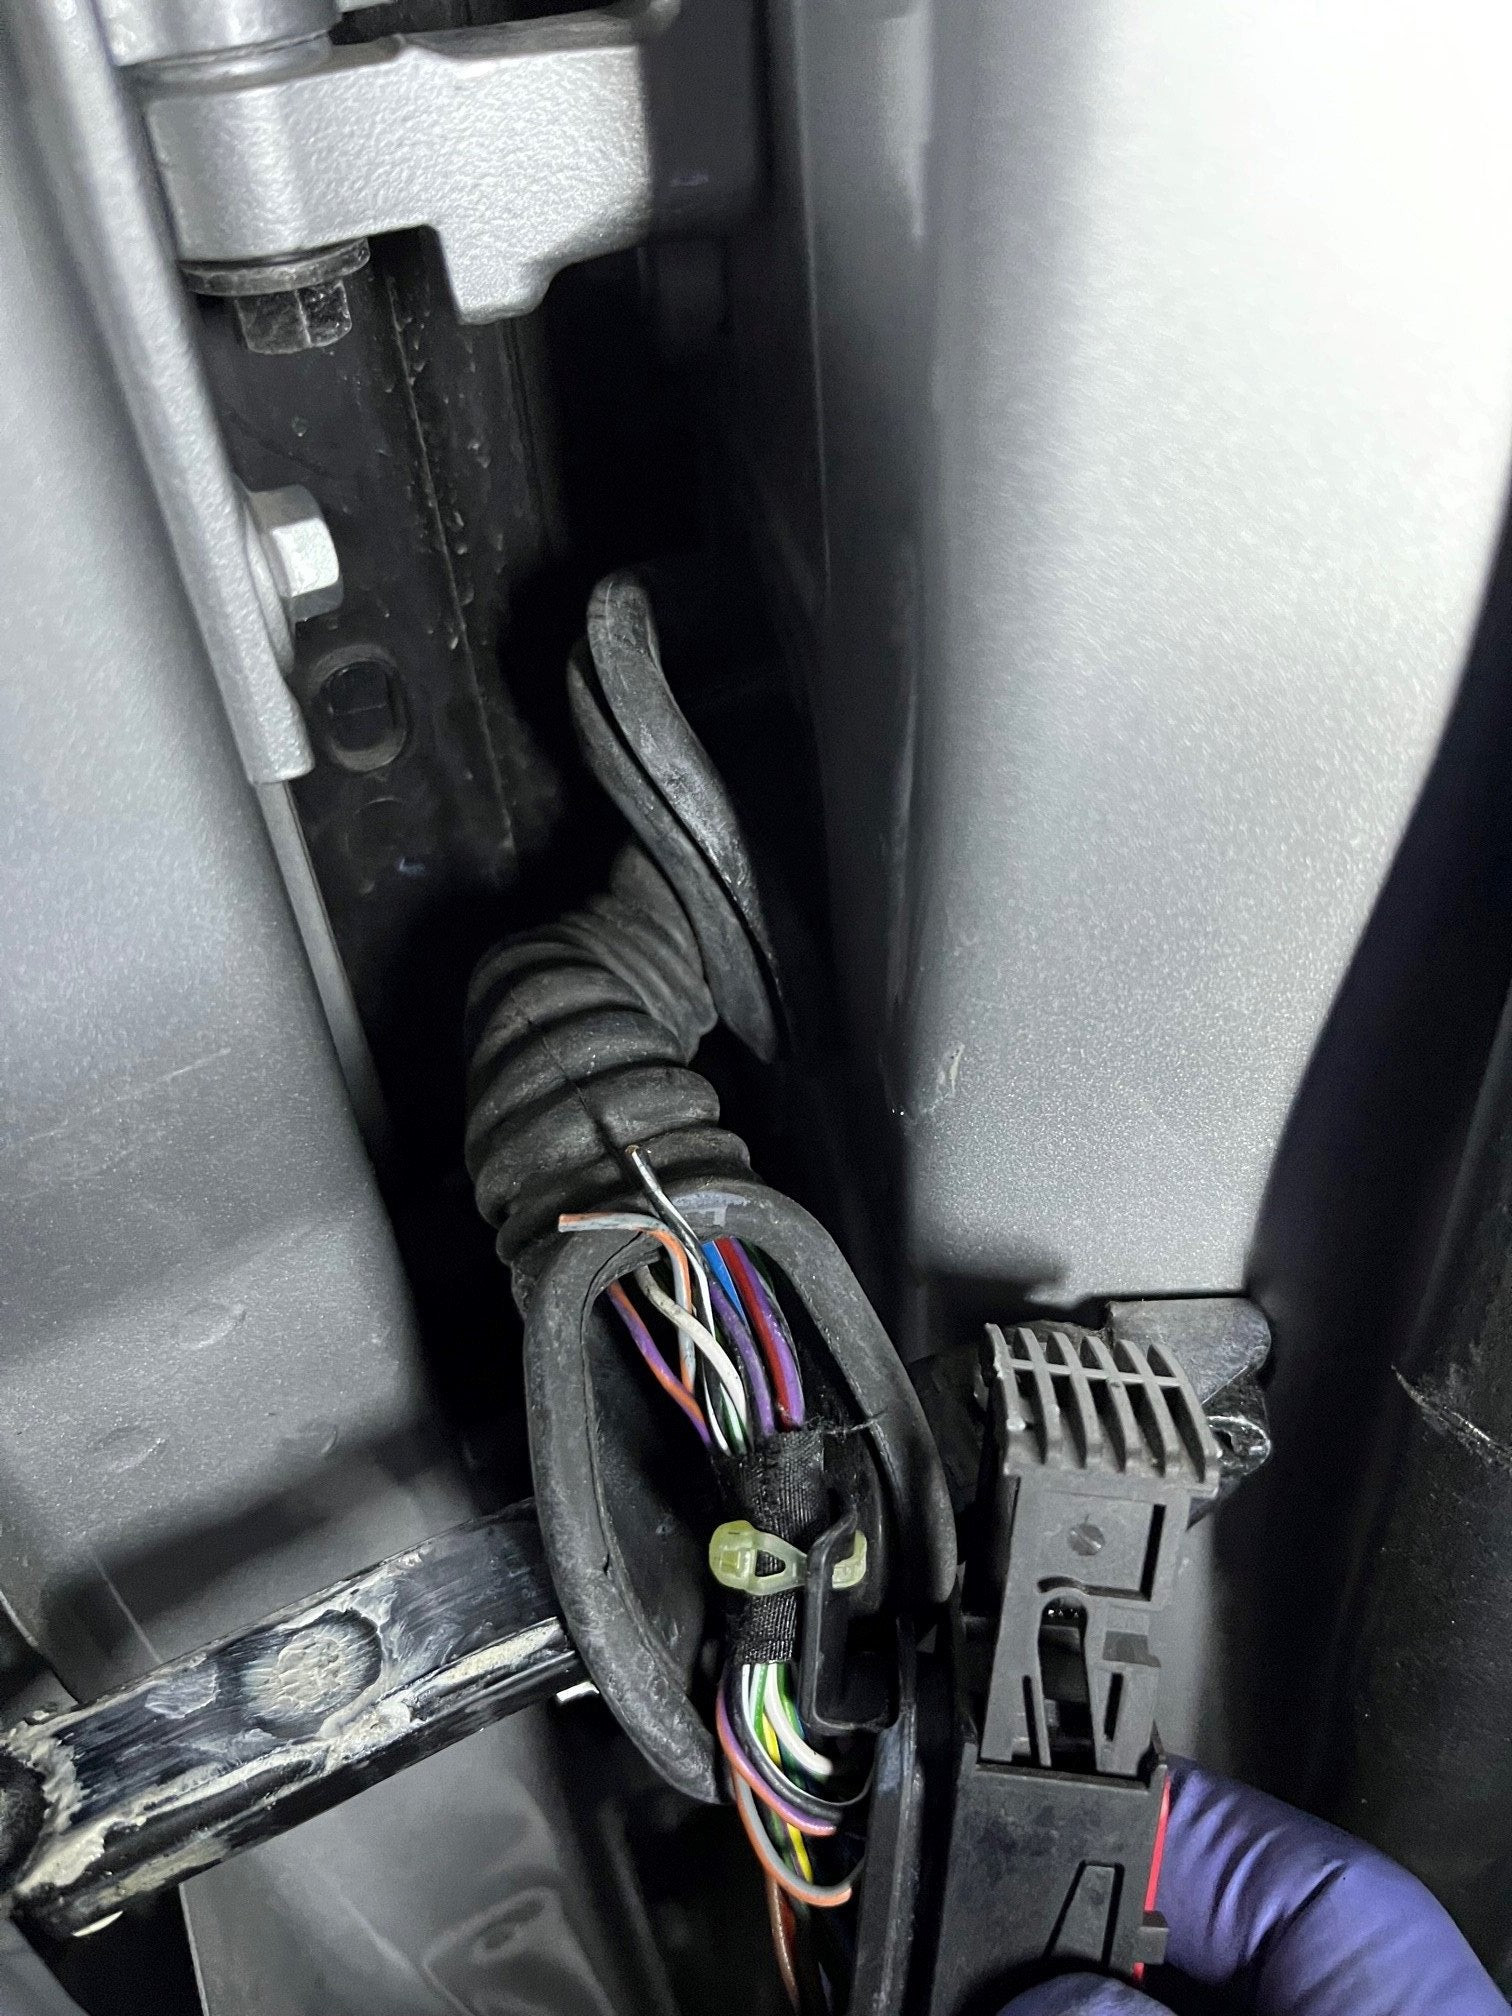
Car door wiring harness showing damaged wires alt=“Close up of car door wiring harness revealing damaged wires inside the protective sleeve due to bending and wear.“
2. Essential Tools and Materials for Car Door Wire Repair
Equipping yourself with the right tools and materials is essential for a successful and lasting repair. CARDIAGTECH.NET offers a comprehensive range of high-quality tools specifically designed for automotive electrical work.
2.1. Diagnostic Equipment
- Multimeter: A multimeter is indispensable for testing voltage, current, and resistance in electrical circuits. Look for a digital multimeter with auto-ranging capabilities for ease of use.
- Wire Tester: A wire tester can help you quickly identify broken or shorted wires without having to strip insulation.
- OBD-II Scanner: An OBD-II scanner can read diagnostic trouble codes (DTCs) and provide valuable information about the electrical system.
- VIDA (Volvo Integrated Diagnostic Adapter): If you’re working on a Volvo, VIDA is essential for diagnosing and troubleshooting electrical issues.
2.2. Repair Tools
- Wire Strippers: High-quality wire strippers are essential for removing insulation without damaging the wire.
- Crimping Tool: A crimping tool is used to securely attach connectors and terminals to wires.
- Soldering Iron and Solder: Soldering provides a strong, reliable connection for wire repairs.
- Heat Gun: A heat gun is used to shrink heat shrink tubing, providing insulation and protection for soldered connections.
- Pliers: Needle-nose pliers and regular pliers are useful for gripping and manipulating wires and connectors.
- Screwdrivers: A set of screwdrivers with various sizes and head types is necessary for removing door panels and accessing wiring.
- Panel Removal Tools: These tools help you remove door panels without damaging the trim or clips.
2.3. Repair Materials
- Replacement Wires: Use automotive-grade wire that matches the gauge and type of the original wiring. CARDIAGTECH.NET offers a variety of wire types and sizes to meet your needs.
- Connectors and Terminals: Replacement connectors and terminals ensure a secure and reliable connection.
- Heat Shrink Tubing: Heat shrink tubing provides insulation and protection for soldered connections.
- Electrical Tape: High-quality electrical tape is essential for wrapping and protecting wires.
- Wire Loom or Harness Tape: Wire loom or harness tape is used to bundle and protect wire harnesses.
- Dielectric Grease: Applying dielectric grease to connectors helps prevent corrosion and ensures a good electrical connection.
2.4 Safety Gear
- Safety Glasses: Protect your eyes from debris and chemicals.
- Gloves: Wear gloves to protect your hands from dirt, grease, and electrical shock.
3. Step-by-Step Guide to Repairing Broken Car Door Wires
Follow these detailed steps to effectively repair broken wires in your car door and restore functionality to your vehicle.
3.1. Safety Precautions
Before starting any electrical work on your vehicle, it’s crucial to take the necessary safety precautions to prevent injury or damage.
- Disconnect the Battery: Disconnect the negative terminal of the battery to prevent electrical shock and accidental short circuits.
- Wear Safety Gear: Always wear safety glasses and gloves to protect your eyes and hands.
- Work in a Well-Ventilated Area: If you’re soldering, work in a well-ventilated area to avoid inhaling harmful fumes.
3.2. Accessing the Damaged Wires
Gaining access to the damaged wires is the first step in the repair process.
- Remove the Door Panel: Use panel removal tools to carefully remove the door panel. Consult your vehicle’s repair manual for specific instructions.
- Locate the Wire Harness: The wire harness is typically located inside a rubber boot or sleeve that connects the door to the car body.
- Inspect the Wires: Carefully inspect the wires for signs of damage, such as breaks, cuts, or frayed insulation.
- Remove the Protective Sleeve: Gently remove the rubber sleeve to expose the wires. Be careful not to damage the wires further.
3.3. Repairing the Wires
Once you have access to the damaged wires, you can begin the repair process. There are two main methods for repairing broken wires: soldering and crimping.
3.3.1. Soldering
Soldering provides a strong, reliable connection and is the preferred method for repairing broken wires.
- Prepare the Wires: Strip the insulation from the ends of the broken wires, exposing about 1/2 inch of bare wire.
- Join the Wires: Twist the bare ends of the wires together to create a mechanical connection.
- Solder the Connection: Heat the joined wires with a soldering iron and apply solder to the connection. Ensure the solder flows evenly and creates a solid bond.
- Insulate the Connection: Slide a piece of heat shrink tubing over the soldered connection and use a heat gun to shrink the tubing, providing insulation and protection.
- Wrap with Electrical Tape: For added protection, wrap the repaired connection with electrical tape.
3.3.2. Crimping
Crimping is a faster method for repairing broken wires, but it’s not as reliable as soldering.
- Prepare the Wires: Strip the insulation from the ends of the broken wires, exposing about 1/2 inch of bare wire.
- Insert Wires into Connector: Insert the bare ends of the wires into a crimp connector.
- Crimp the Connector: Use a crimping tool to securely crimp the connector onto the wires.
- Insulate the Connection: Wrap the crimped connection with electrical tape.
3.4. Testing the Repair
After repairing the wires, it’s essential to test the connection to ensure it’s working properly.
- Visual Inspection: Check the repaired connection for any signs of loose wires or exposed metal.
- Continuity Test: Use a multimeter to perform a continuity test, ensuring that the circuit is complete.
- Functionality Test: Test the door’s electrical functions, such as power windows, door locks, and speakers, to ensure they are working properly.
3.5. Reassembly
Once you’ve confirmed that the repair is successful, you can reassemble the door.
- Reinstall the Protective Sleeve: Slide the rubber sleeve back over the wire harness, protecting the wires from damage.
- Reinstall the Door Panel: Carefully reinstall the door panel, ensuring that all clips and fasteners are securely in place.
4. Advanced Techniques for Complex Wire Repairs
Sometimes, the damage to the wire harness is too extensive to be repaired using basic methods. In these cases, more advanced techniques may be necessary.
4.1. Fishing New Wires
If several wires are broken or damaged, it may be easier to fish new wires through the door harness.
- Identify the Damaged Wires: Determine which wires need to be replaced.
- Remove Terminals from Housing: Remove the terminals from the connector housing using a terminal removal tool.
- Fish New Wires: Use a fish tape or wire to pull new wires through the door harness.
- Connect New Terminals: Attach new terminals to the ends of the new wires and insert them into the connector housing.
- Test the Connection: Test the new wires to ensure they are working properly.
4.2. Replacing the Entire Wire Harness
In cases of severe damage, it may be necessary to replace the entire wire harness.
- Disconnect the Old Harness: Disconnect the old wire harness from the door module and the car body.
- Remove the Old Harness: Carefully remove the old wire harness from the door.
- Install the New Harness: Install the new wire harness, connecting it to the door module and the car body.
- Test the Connection: Test all of the door’s electrical functions to ensure they are working properly.
4.3. Using Specialized Tools
Certain specialized tools can make complex wire repairs easier and more efficient.
- Terminal Removal Tools: These tools are designed to safely remove terminals from connector housings without damaging them.
- Wire Identification Tools: These tools can help you quickly identify wires in a harness, even if they are the same color.
- Insulation Displacement Connectors (IDCs): IDCs allow you to tap into existing wires without having to strip the insulation.
5. CARDIAGTECH.NET: Your Partner for Automotive Electrical Repairs
At CARDIAGTECH.NET, we are committed to providing you with the highest quality tools, equipment, and support for all your automotive electrical repair needs. We understand the challenges you face as an auto repair professional, and we are here to help you overcome them.
5.1. High-Quality Tools and Equipment
We offer a comprehensive range of tools and equipment specifically designed for automotive electrical work, including:
- Multimeters and Testers: Accurate and reliable diagnostic tools to help you identify electrical issues quickly.
- Wire Repair Tools: High-quality wire strippers, crimpers, and soldering equipment for durable and long-lasting repairs.
- Panel Removal Tools: Specialized tools to remove door panels and trim without causing damage.
- OBD-II Scanners: Advanced scanners to read diagnostic trouble codes and provide valuable information about the vehicle’s electrical system.
- Wire and Connectors: A wide selection of automotive-grade wire, connectors, and terminals to meet your specific needs.
5.2. Expert Support and Training
We provide expert support and training to help you get the most out of your tools and equipment. Our team of experienced technicians is available to answer your questions and provide guidance on complex repairs. We also offer online resources and training materials to help you stay up-to-date on the latest automotive electrical repair techniques.
5.3. Solutions for Common Challenges
We understand the challenges you face as an auto repair professional, such as:
- Physical Demands: Our tools are designed to be ergonomic and easy to use, reducing strain and fatigue.
- Exposure to Chemicals: We offer a range of safety gear, including gloves and safety glasses, to protect you from harmful chemicals.
- Keeping Up with Technology: We provide ongoing training and support to help you stay up-to-date on the latest automotive technologies.
- Time Constraints: Our tools and equipment are designed to help you work efficiently and effectively, reducing repair times and increasing productivity.
- Competition: We offer competitive pricing and high-quality products to help you stand out from the competition.
6. Maintaining Your Car Door Wires: Prevention Tips
Preventive maintenance can significantly extend the life of your car door wires, reducing the need for frequent repairs.
6.1. Regular Inspections
- Visual Checks: Periodically inspect the wire harness and connectors for signs of damage, such as cracks, fraying, or corrosion.
- Professional Inspections: Have your car’s electrical system inspected by a qualified technician during routine maintenance.
6.2. Protective Measures
- Lubricate Connectors: Apply dielectric grease to connectors to prevent corrosion and ensure a good electrical connection.
- Use Wire Loom or Harness Tape: Bundle and protect wire harnesses with wire loom or harness tape.
- Rodent Prevention: Take steps to prevent rodent damage, such as parking your car in a garage or using rodent repellent products.
6.3. Proper Usage
- Avoid Overextension: Avoid overextending the door, as this can strain the wire harness.
- Gentle Handling: Handle the door and its components gently to avoid damaging the wiring.
7. The AIDA Model: Attracting Customers to CARDIAGTECH.NET
The AIDA model (Attention, Interest, Desire, Action) is a proven marketing strategy that can help attract customers to CARDIAGTECH.NET.
7.1. Attention
- Headline: Use a compelling headline that grabs the reader’s attention, such as “How to Fix Broken Wires in Car Door: A Complete Guide”.
- Images: Use high-quality images and videos to illustrate the problem and the solution.
7.2. Interest
- Problem Statement: Clearly identify the problem that the reader is facing, such as broken wires in the car door.
- Symptoms and Causes: Explain the symptoms and causes of the problem, demonstrating your expertise and understanding.
7.3. Desire
- Solutions: Offer practical solutions to the problem, such as soldering, crimping, or replacing the wire harness.
- Benefits: Highlight the benefits of using CARDIAGTECH.NET’s tools and equipment, such as increased efficiency, reliability, and safety.
7.4. Action
- Call to Action: Encourage the reader to take action, such as visiting CARDIAGTECH.NET, contacting us for a consultation, or purchasing our products.
- Contact Information: Provide clear and easy-to-find contact information, including our address, phone number, and website.
By following the AIDA model, you can effectively attract customers to CARDIAGTECH.NET and drive sales.
8. Optimizing for Google Discovery
To ensure your article appears on Google Discovery, follow these optimization tips:
- High-Quality Content: Create informative, engaging, and well-written content that provides value to the reader.
- Visual Appeal: Use high-quality images and videos to enhance the visual appeal of your article.
- Mobile-Friendly: Ensure your website is mobile-friendly, as many Google Discovery users access content on their smartphones.
- Structured Data: Use structured data markup to help Google understand the content of your article.
- E-E-A-T: Demonstrate expertise, experience, authoritativeness, and trustworthiness in your content.
- Relevant Keywords: Use relevant keywords throughout your article, but avoid keyword stuffing.
9. Call to Action: Contact CARDIAGTECH.NET Today
Don’t let broken car door wires keep you from getting the job done efficiently and safely. Contact CARDIAGTECH.NET today to learn more about our comprehensive range of tools and equipment. Our expert team is ready to help you find the perfect solutions for your automotive electrical repair needs.
Address: 276 Reock St, City of Orange, NJ 07050, United States
WhatsApp: +1 (641) 206-8880
Website: CARDIAGTECH.NET
Let CARDIAGTECH.NET be your trusted partner for all your automotive electrical repair needs. We are committed to providing you with the highest quality tools, equipment, and support to help you succeed.
10. Statistics and Facts About Automotive Wire Repairs
- Cost of Electrical Repairs: According to AAA, the average cost of automotive electrical repairs is between $500 and $1,000.
- Frequency of Electrical Issues: Electrical problems are among the most common issues reported by vehicle owners, accounting for approximately 20% of all repairs.
- Impact of Corrosion: Corrosion is a major cause of electrical failures in vehicles, leading to increased resistance and reduced performance. A study by NACE International found that corrosion costs the automotive industry billions of dollars each year.
- Importance of Proper Tools: Using the right tools can reduce repair times by up to 50% and improve the quality of the repair.
- Benefits of Preventive Maintenance: Preventive maintenance can reduce the likelihood of electrical failures by up to 70%.
These statistics highlight the importance of addressing automotive electrical issues promptly and using the right tools and techniques to ensure lasting repairs.
11. Wire Gauge Chart
Choosing the right wire gauge is crucial for ensuring safe and reliable electrical connections in your vehicle. The following chart provides a general guideline for selecting the appropriate wire gauge based on the amperage and length of the circuit.
| Amperage (Amps) | Wire Gauge (AWG) – Distance Up to 25 Feet | Wire Gauge (AWG) – Distance Up to 50 Feet | Wire Gauge (AWG) – Distance Up to 100 Feet |
|---|---|---|---|
| 0-10 | 16 | 14 | 12 |
| 11-15 | 14 | 12 | 10 |
| 16-20 | 12 | 10 | 8 |
| 21-30 | 10 | 8 | 6 |
| 31-40 | 8 | 6 | 4 |
| 41-50 | 6 | 4 | 2 |
| 51-60 | 4 | 2 | 1 |
Note: This chart is for reference only. Always consult your vehicle’s repair manual or a qualified technician for specific wire gauge recommendations.
12. Understanding Wire Colors in Automotive Wiring
Automotive wiring systems use a variety of wire colors to help identify the function of each wire. While the specific color codes may vary depending on the vehicle manufacturer, there are some common conventions. Understanding these conventions can make it easier to troubleshoot and repair electrical issues.
| Wire Color | Common Function |
|---|---|
| Red | Power (positive) |
| Black | Ground (negative) |
| Yellow | Battery feed |
| Blue | Lighting circuits |
| Green | Turn signals |
| White | Headlight circuits |
| Brown | Accessory circuits |
| Orange | Fused power |
| Gray | Instrument panel lights |
| Purple | Ignition circuits |
Note: Always refer to your vehicle’s wiring diagram for accurate color code information.
13. Troubleshooting Flowchart for Car Door Wire Issues
To effectively diagnose and repair broken wires in your car door, follow this troubleshooting flowchart:
- Identify the Symptoms: What electrical functions are not working properly (e.g., power windows, door locks, speakers)?
- Check the Fuse: Is the fuse for the affected circuit blown? If yes, replace the fuse and test the circuit. If the fuse blows again, there is likely a short circuit.
- Inspect the Wire Harness: Visually inspect the wire harness in the door jamb for signs of damage, such as breaks, cuts, or frayed insulation.
- Test for Continuity: Use a multimeter to test for continuity in the affected wires. If there is no continuity, the wire is broken.
- Repair or Replace the Wire: Repair the broken wire using soldering or crimping techniques. If the damage is too extensive, replace the entire wire harness.
- Test the Repair: Test the repaired circuit to ensure it is working properly.
- Reassemble the Door: Reinstall the door panel and other components.
14. FAQ: Frequently Asked Questions About Car Door Wire Repair
- Why do car door wires break? Car door wires break due to repeated bending and flexing as the door is opened and closed, leading to fatigue and eventual breakage.
- What are the symptoms of broken car door wires? Symptoms include malfunctioning power windows, door lock issues, speaker problems, mirror control failure, and interior light malfunctions.
- Can I repair broken car door wires myself? Yes, with the right tools and knowledge, you can repair broken car door wires yourself. However, if you are not comfortable working with electrical systems, it’s best to consult a qualified technician.
- What tools do I need to repair broken car door wires? Essential tools include a multimeter, wire strippers, crimping tool, soldering iron, heat gun, pliers, screwdrivers, and panel removal tools.
- What materials do I need to repair broken car door wires? Essential materials include replacement wires, connectors, terminals, heat shrink tubing, electrical tape, wire loom, and dielectric grease.
- Is soldering or crimping better for repairing car door wires? Soldering provides a stronger, more reliable connection and is the preferred method for repairing broken car door wires.
- How can I prevent car door wires from breaking? Preventative measures include regular inspections, lubricating connectors, using wire loom, and avoiding overextension of the door.
- How much does it cost to have car door wires repaired by a professional? The cost of professional car door wire repair can range from $200 to $500, depending on the extent of the damage and the labor rates in your area.
- Can broken car door wires affect my car’s safety? Yes, broken car door wires can affect your car’s safety by causing malfunctions in critical systems such as door locks and airbags.
- Where can I find high-quality tools and equipment for car door wire repair? CARDIAGTECH.NET offers a comprehensive range of high-quality tools and equipment specifically designed for automotive electrical work.
By addressing these frequently asked questions, you can provide valuable information to your readers and establish yourself as an authority on car door wire repair.
Repairing broken wires in your car door can seem daunting, but with the right tools, knowledge, and a systematic approach, it’s a manageable task. Whether you’re a seasoned mechanic or a DIY enthusiast, CARDIAGTECH.NET is here to support you with top-quality products and expert advice. Our comprehensive range of tools and equipment, combined with our commitment to customer satisfaction, makes us your ideal partner for all your automotive electrical repair needs. Don’t hesitate to reach out to us for personalized assistance and guidance. Contact us today to learn more about how we can help you get the job done right, the first time.