How To Fix A Ripped Leather Seat In A Car

Fixing a ripped leather seat in your car is manageable. CARDIAGTECH.NET offers solutions to restore your car’s interior. We will guide you through the process, using advanced techniques and quality tools, ensuring a durable and visually appealing repair. Restore, repair, and revitalize your car’s leather interiors.
1. Understanding Leather Damage In Car Seats
Leather car seats, while luxurious, are prone to wear and tear. Understanding the types of damage is the first step in effective repair. Common issues include:
- Rips: Tears in the leather, ranging from small cuts to large gashes.
- Cracks: Surface fissures due to drying and lack of maintenance.
- Fading: Loss of color from sun exposure.
- Stains: Discoloration from spills and dirt.
- Scratches: Superficial damage from keys, pets, or other sharp objects.
Identifying the type and extent of the damage is crucial for selecting the right repair method and products. Regular cleaning and conditioning can prevent many of these issues. CARDIAGTECH.NET provides tools and products for assessing and addressing these common leather problems.
1.1. Causes of Ripped Leather Car Seats
Several factors contribute to ripped leather car seats. Understanding these causes helps prevent future damage:
- Wear and Tear: Daily use causes friction, leading to weakening and eventual tearing.
- Sun Exposure: UV rays dry out leather, making it brittle and prone to rips.
- Temperature Fluctuations: Extreme temperatures can cause leather to expand and contract, leading to cracks and tears.
- Lack of Maintenance: Neglecting regular cleaning and conditioning dries out the leather.
- Accidental Damage: Sharp objects, pets, or sudden impacts can cause immediate rips.
Regular maintenance and protective measures can extend the life of your leather seats. Addressing these issues promptly with the right tools and products from CARDIAGTECH.NET will keep your car interior in top condition.
1.2. Assessing The Damage
Before starting any repair, it’s important to assess the extent of the damage. Here’s a step-by-step guide:
- Clean the Area: Use a leather cleaner to remove dirt and grime. This provides a clear view of the damage.
- Inspect the Rip: Check the size, location, and shape of the rip. Determine if there are any loose or frayed edges.
- Check the Surrounding Leather: Look for additional cracks, fading, or weak spots. These may need attention during the repair process.
- Evaluate the Backing: Assess the condition of the material underneath the leather. A weak backing may require additional support.
- Document Your Findings: Take photos and notes to guide your repair process.
This thorough assessment ensures you address all issues for a lasting repair. With the right diagnostic tools and products from CARDIAGTECH.NET, you’ll have your leather seats looking new again in no time.
2. Essential Tools And Materials For Leather Repair
Having the right tools and materials is crucial for a successful leather repair. Here’s a list of essential items:
- Leather Cleaner: Removes dirt and grease.
- Leather Prep: Prepares the surface for repair by removing the factory finish.
- Leather Glue: Bonds the leather to the backing patch.
- Leather Repair Filler: Fills the rip to create an even surface.
- Leather Colorant: Restores the color of the leather.
- Leather Finish: Seals and protects the repaired area.
- Backing Patch: Provides support behind the rip.
- Abrasive Pad: Gently removes the top layer of the leather for better adhesion.
- Palette Knife: Applies the filler smoothly.
- Tweezers: Helps position the backing patch.
- Scissors or Scalpel: Trims frayed edges.
- Spray Gun or Sponge: Applies the colorant and finish evenly.
- Heat Gun or Hair Dryer: Speeds up the drying process.
Investing in quality tools and materials ensures a professional-looking repair. CARDIAGTECH.NET offers a range of high-quality products designed for leather repair.
2.1. Selecting The Right Leather Repair Kit
Choosing the right leather repair kit can simplify the repair process. Consider these factors when selecting a kit:
- Type of Leather: Different leathers (e.g., aniline, semi-aniline, pigmented) require different products.
- Color Matching: Ensure the kit includes colorants that match your car seat’s color.
- Size of Repair: Larger repairs may require more filler and colorant.
- Quality of Materials: Opt for kits with high-quality fillers, colorants, and finishes.
- Completeness: Check that the kit includes all necessary tools and materials.
A well-chosen kit saves time and ensures a professional result. CARDIAGTECH.NET offers a variety of leather repair kits tailored to different needs.
2.2. Purchasing High-Quality Materials From CARDIAGTECH.NET
Purchasing high-quality materials from CARDIAGTECH.NET ensures a durable and professional repair. Here’s why:
- Superior Quality: CARDIAGTECH.NET provides products made with premium ingredients.
- Color Accuracy: Our colorants are formulated for precise color matching.
- Durability: Our fillers and finishes are designed to withstand wear and tear.
- Comprehensive Selection: Find everything you need for leather repair in one place.
- Expert Advice: Our team offers expert guidance on product selection and usage.
Using high-quality materials is essential for a long-lasting and visually appealing repair. Trust CARDIAGTECH.NET for all your leather repair needs. Contact us at +1 (641) 206-8880 for personalized assistance.
3. Step-By-Step Guide: How To Repair A Ripped Leather Car Seat
Follow this step-by-step guide to repair a ripped leather car seat effectively:
3.1. Step 1: Preparing The Leather Surface
Proper preparation is crucial for a successful repair. Here’s how to prepare the leather surface:
- Clean the Leather: Use a leather cleaner to remove dirt, grease, and grime. Apply the cleaner to a soft cloth and gently wipe the area.
Cleaning Leather Seat
Alt text: Cleaning process on the leather seat to remove dirt using a cloth and cleaning liquid, ensuring the leather is ready for the next repair steps.
- Apply Leather Prep: Use leather prep to remove the factory finish. This ensures the colorant adheres properly. Apply the prep to an abrasive pad and gently rub the surface.
- Wipe With Alcohol Cleaner: Use an alcohol cleaner to remove any remaining residue. This ensures a clean surface for the repair.
- Allow to Dry: Let the leather dry completely before moving on to the next step.
Proper preparation ensures the repair materials bond effectively with the leather.
3.2. Step 2: Trimming Frayed Edges
Trimming frayed edges creates a clean surface for the repair. Follow these steps:
- Inspect the Rip: Look for any loose or frayed edges around the rip.
- Use Scissors or Scalpel: Carefully trim the frayed edges using scissors or a scalpel. Cut away any loose fibers or uneven edges.
- Create a Clean Edge: Ensure the edges of the rip are clean and even. This makes the repair less noticeable.
Trimming frayed edges provides a smooth surface for the filler to adhere to.
3.3. Step 3: Applying The Backing Patch
A backing patch provides support behind the rip. Here’s how to apply it:
- Cut the Patch: Cut a piece of backing patch material slightly larger than the rip. It should overlap the edges by about 1 cm.
- Apply Leather Glue: Apply a small amount of leather glue to the edges of the rip.
- Insert the Patch: Use tweezers to carefully insert the backing patch under the leather. Ensure it lies flat and covers the entire rip.
- Press and Hold: Press down on the patch to bond it to the leather. Hold for a few minutes to allow the glue to set.
The backing patch provides a solid foundation for the repair.
3.4. Step 4: Filling The Rip With Leather Filler
Filling the rip creates an even surface. Follow these steps:
- Apply a Thin Layer: Use a palette knife to apply a thin layer of leather filler over the backing patch. Ensure the filler covers the entire rip.
 Filling Leather With Leather Filler
Alt text: Using a knife to apply a thin layer of leather filler over the ripped area of the leather seat, ensuring the area is covered.
- Smooth the Surface: Use the palette knife to smooth the surface of the filler. Remove any excess filler.
- Allow to Dry: Let the filler dry for about 20 minutes. Use a heat gun or hair dryer to speed up the drying process.
- Apply Additional Layers: Apply additional thin layers of filler, allowing each layer to dry before applying the next.
- Build Up the Filler: Continue applying layers until the filler is level with the surrounding leather.
Applying thin layers prevents cracking and ensures a smooth finish.
3.5. Step 5: Sanding The Filled Area
Sanding the filled area creates a smooth, even surface. Follow these steps:
- Use Fine-Grit Sandpaper: Use fine-grit sandpaper (e.g., 400-grit) to gently sand the filled area.
- Smooth the Surface: Sand the surface until it is smooth and even with the surrounding leather.
- Remove Dust: Use a clean cloth to remove any sanding dust.
Sanding ensures the colorant adheres properly and provides a seamless finish.
3.6. Step 6: Applying Leather Colorant
Applying leather colorant restores the color of the repaired area. Here’s how:
- Match the Color: Ensure the colorant matches the color of your car seat.
- Apply a Base Coat: Use a sponge or spray gun to apply a thin, even base coat of colorant.
 Leather Colorant Application
Alt text: Applying the final layer of filler to the damaged area, bringing the fill level up to the level of the surrounding leather to ensure a smooth surface.
- Allow to Dry: Let the base coat dry completely.
- Apply Additional Coats: Apply additional thin coats of colorant, allowing each coat to dry before applying the next.
- Blend the Color: Blend the colorant into the surrounding leather for a seamless finish.
Applying thin coats prevents streaking and ensures an even color.
3.7. Step 7: Applying Leather Finish
Applying leather finish seals and protects the repaired area. Follow these steps:
- Apply a Thin Coat: Use a spray gun to apply a thin, even coat of leather finish.
- Allow to Dry: Let the coat dry completely.
- Apply Additional Coats: Apply additional thin coats of finish, allowing each coat to dry before applying the next.
Applying multiple thin coats provides maximum protection.
3.8. Step 8: Final Inspection and Touch-Ups
Perform a final inspection and touch up any imperfections. Follow these steps:
- Inspect the Repair: Look for any uneven areas, color discrepancies, or other imperfections.
- Touch Up Imperfections: Use a small brush to touch up any imperfections with colorant or finish.
- Allow to Cure: Allow the repair to cure for 24 hours before using the car seat.
Final inspection ensures a professional-looking repair.
4. Advanced Techniques For Complex Repairs
For more complex repairs, consider these advanced techniques:
4.1. Dealing With Large Rips
Large rips require additional support. Here’s how to handle them:
- Reinforce the Backing: Use a larger backing patch or multiple layers of backing material.
- Use a Stronger Adhesive: Use a stronger leather adhesive to bond the backing to the leather.
- Apply Filler in Stages: Apply the filler in multiple stages, allowing each stage to dry completely.
- Consider Professional Help: For extremely large rips, consider seeking professional help.
Reinforcing the backing ensures the repair is strong and durable.
4.2. Matching Leather Grain
Matching leather grain is essential for a seamless repair. Here’s how:
- Use a Grain Pattern: Use a grain pattern to imprint a matching grain onto the filler.
- Apply Texture: Apply texture to the filler using a specialized tool.
- Blend the Edges: Blend the edges of the repair into the surrounding leather to hide the repair.
Matching the grain makes the repair virtually invisible.
4.3. Blending Colors Seamlessly
Blending colors seamlessly is crucial for a natural look. Here’s how:
- Use Multiple Shades: Use multiple shades of colorant to match the color of the leather.
- Apply in Thin Layers: Apply the colorant in thin layers, blending the edges as you go.
- Use a Soft Brush: Use a soft brush to blend the colors together.
Blending colors seamlessly ensures a natural and professional finish.
5. Preventing Future Damage To Leather Car Seats
Preventing future damage extends the life of your leather car seats. Here’s how:
5.1. Regular Cleaning And Conditioning
Regular cleaning and conditioning are essential. Follow these steps:
- Clean Regularly: Clean your leather seats every 1-2 months using a leather cleaner.
- Condition Regularly: Condition your leather seats every 3-4 months using a leather conditioner.
- Use Quality Products: Use high-quality leather cleaners and conditioners from CARDIAGTECH.NET.
Regular maintenance keeps the leather supple and prevents cracking.
5.2. Protecting From Sun Exposure
Protecting from sun exposure prevents fading and drying. Here’s how:
- Park in the Shade: Park your car in the shade whenever possible.
- Use a Sunshade: Use a sunshade to block UV rays.
- Apply Leather Protectant: Apply a leather protectant with UV inhibitors.
Protecting from the sun prevents premature aging of the leather.
5.3. Avoiding Sharp Objects
Avoiding sharp objects prevents accidental damage. Here’s how:
- Be Careful: Be careful when placing sharp objects on the seats.
- Use Seat Covers: Use seat covers to protect the leather from scratches and tears.
- Trim Pet Nails: Keep your pet’s nails trimmed to prevent scratches.
Avoiding sharp objects minimizes the risk of rips and scratches.
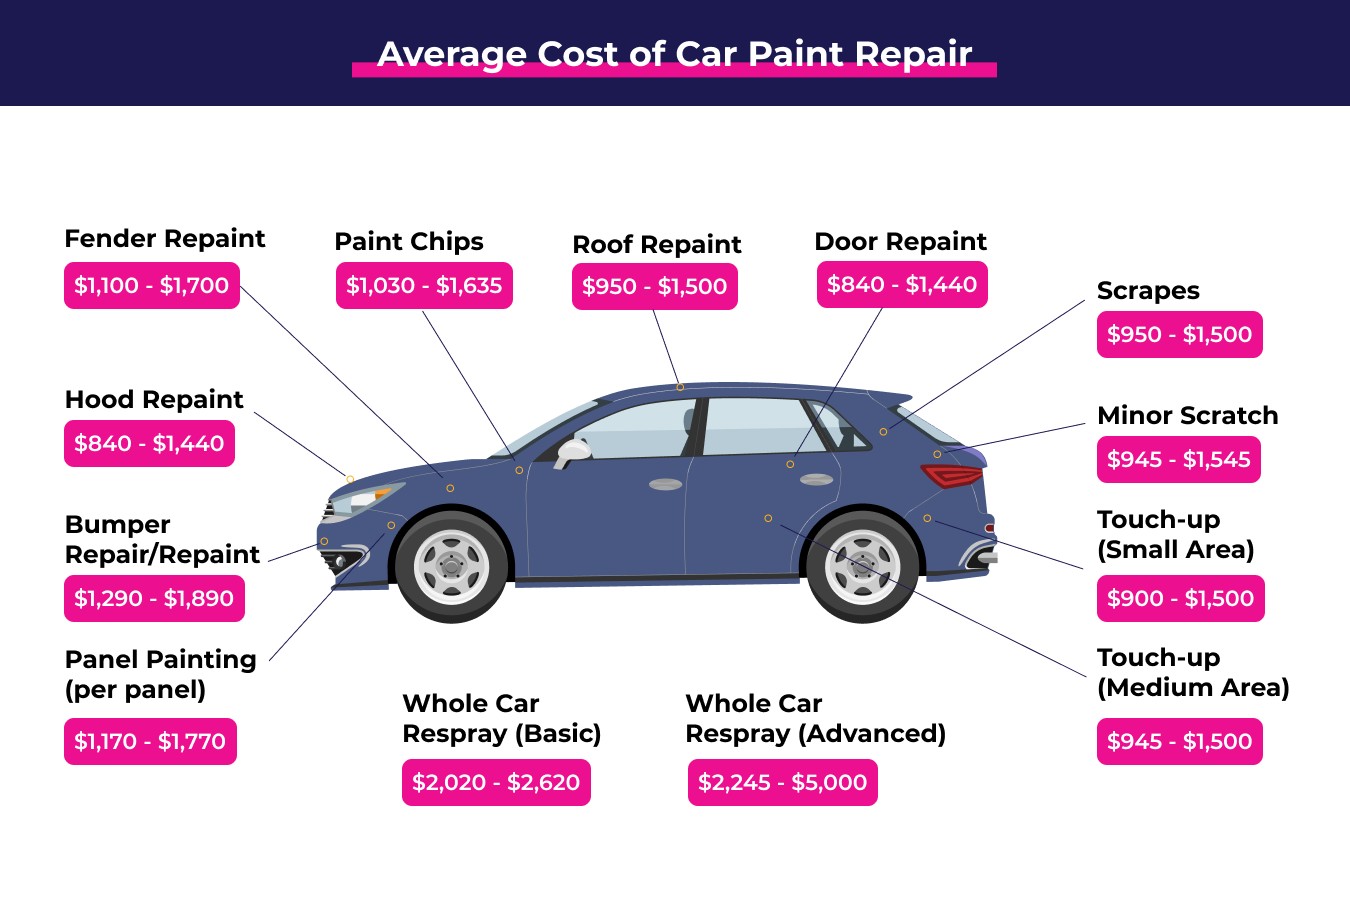
6. Cost Analysis: DIY vs. Professional Repair
Deciding between DIY and professional repair involves a cost analysis. Here’s a breakdown:
6.1. Cost Of DIY Leather Repair
DIY leather repair costs include:
- Repair Kit: $30 – $100
- Additional Materials: $20 – $50
- Tools: $0 – $50 (if you don’t already have them)
Total cost: $50 – $200
DIY repair is cost-effective for small repairs.
6.2. Cost Of Professional Leather Repair
Professional leather repair costs:
- Small Rip: $100 – $200
- Large Rip: $200 – $500
- Full Seat Restoration: $500 – $1500
Professional repair ensures a high-quality result but is more expensive.
6.3. Weighing The Options
Consider these factors when deciding:
- Size of the Rip: Small rips are suitable for DIY; large rips may require professional help.
- Your Skill Level: DIY repair requires some skill and patience.
- Budget: DIY repair is more affordable but may not provide the same level of quality.
Weighing these factors helps you make an informed decision.
7. Why Choose CARDIAGTECH.NET For Your Leather Repair Needs
CARDIAGTECH.NET offers superior products and expertise for your leather repair needs.
7.1. High-Quality Products
CARDIAGTECH.NET provides:
- Premium Leather Cleaners
- Durable Leather Fillers
- Accurate Color Matching
- Protective Leather Finishes
Our products ensure a long-lasting and professional repair.
7.2. Expert Guidance And Support
CARDIAGTECH.NET offers:
- Detailed Tutorials
- Expert Advice
- Personalized Assistance
Our team helps you choose the right products and techniques.
7.3. Convenient Online Shopping
CARDIAGTECH.NET provides:
- Easy-to-Navigate Website
- Secure Online Ordering
- Fast Shipping
Shop for all your leather repair needs from the comfort of your home.
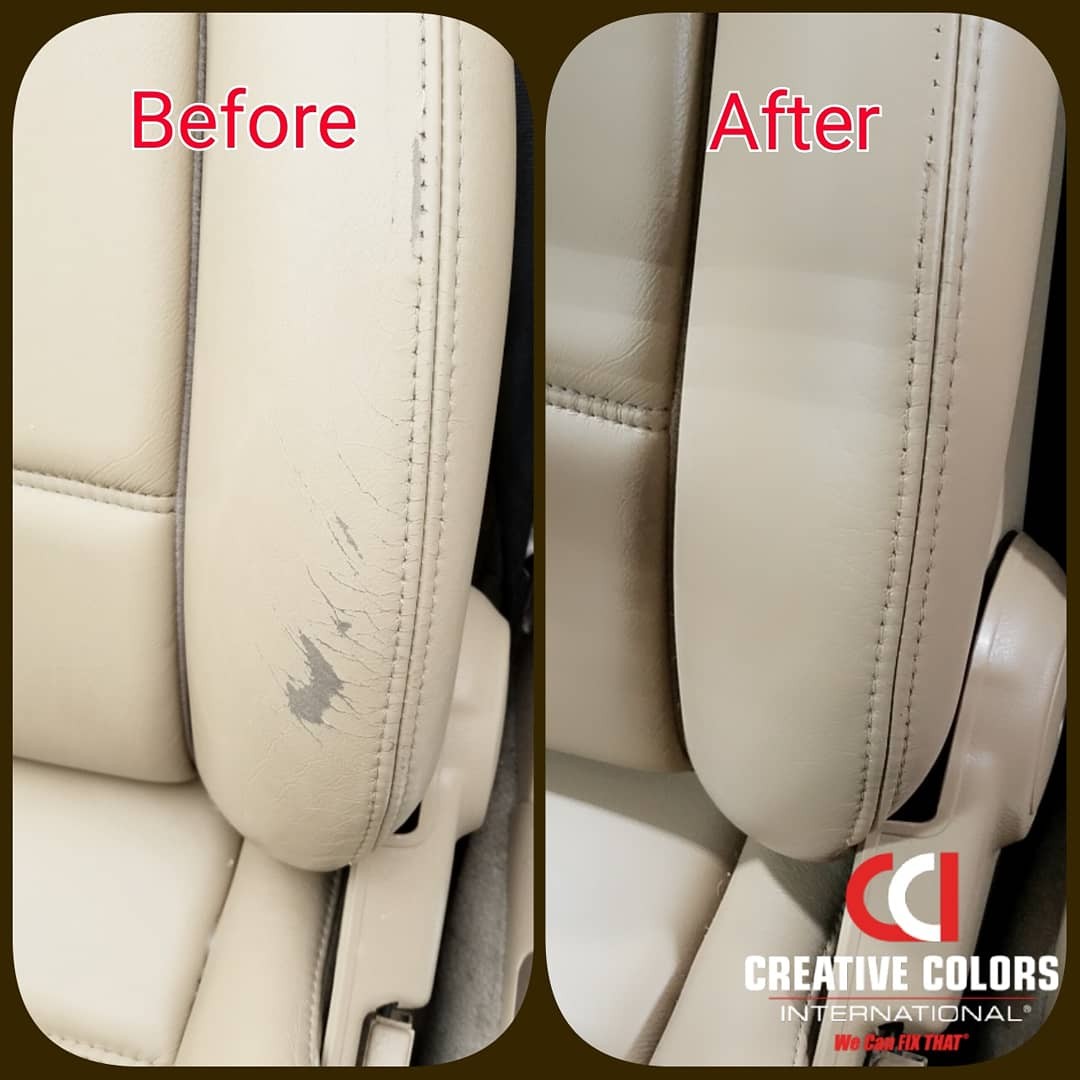
8. Real-World Examples: Before And After
See the difference with these real-world examples:
8.1. Small Rip Repair
Before: A small rip on the seat cushion.
After: A seamless repair with matched color and texture.
8.2. Large Rip Restoration
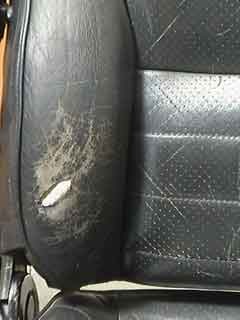
Before: A large tear on the seat back.
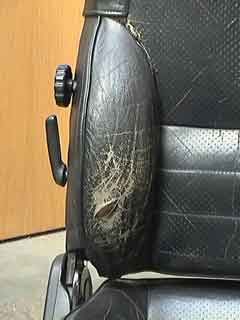 Damaged Car Seat
Alt text: A damaged leather car seat with a visible rip on the side, showing the original state before the repair process.
After: A fully restored seat with reinforced backing and color blending.
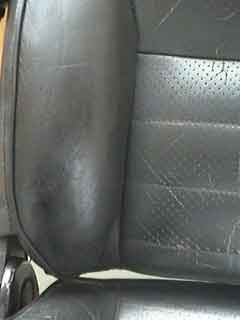 Repaired Car Seat
Alt text: The same leather car seat after the repair process, showcasing a seamless finish and restored condition.
8.3. Fading And Cracking Correction
Before: Faded and cracked leather seat.
After: Restored color and smooth, supple leather.
These examples demonstrate the effectiveness of using CARDIAGTECH.NET products and techniques.
9. Testimonials And Success Stories
Hear from satisfied customers:
9.1. Customer Review 1
“I used CARDIAGTECH.NET’s leather repair kit to fix a rip in my car seat. The color match was perfect, and the repair looks great!” – John D.
9.2. Customer Review 2
“The expert guidance from CARDIAGTECH.NET helped me choose the right products for my leather restoration project. I’m thrilled with the results!” – Sarah M.
9.3. Customer Review 3
“CARDIAGTECH.NET’s products are top-notch. My leather seats look like new again!” – Mike L.
These testimonials highlight the quality and effectiveness of CARDIAGTECH.NET’s products and services.
10. Conclusion: Maintaining The Beauty Of Your Car’s Leather
Maintaining the beauty of your car’s leather requires regular care and prompt attention to damage. Follow these guidelines:
- Assess the Damage: Identify the type and extent of the damage.
- Use the Right Tools and Materials: Choose high-quality products from CARDIAGTECH.NET.
- Follow Step-by-Step Instructions: Use our detailed guides for effective repair.
- Prevent Future Damage: Clean, condition, and protect your leather regularly.
By following these steps, you can keep your car’s leather seats looking their best for years to come. Trust CARDIAGTECH.NET for all your leather repair needs.
Don’t let ripped leather seats detract from your car’s value and appearance. Contact CARDIAGTECH.NET at +1 (641) 206-8880 or visit our website at CARDIAGTECH.NET for expert advice and high-quality leather repair products. Our address is 276 Reock St, City of Orange, NJ 07050, United States. Reach out via WhatsApp for immediate assistance and transform your car’s interior today.
FAQ: How To Fix A Ripped Leather Seat In A Car
1. What causes leather car seats to rip?
Leather car seats rip due to wear and tear, sun exposure, temperature fluctuations, lack of maintenance, and accidental damage from sharp objects.
2. Can I repair a ripped leather car seat myself?
Yes, you can repair a ripped leather car seat yourself with the right tools, materials, and guidance. CARDIAGTECH.NET offers comprehensive repair kits and tutorials.
3. What tools and materials do I need to repair a ripped leather car seat?
You’ll need a leather cleaner, leather prep, leather glue, leather repair filler, leather colorant, leather finish, backing patch, abrasive pad, palette knife, tweezers, scissors or scalpel, spray gun or sponge, and a heat gun or hair dryer.
4. How do I prepare the leather surface before repairing it?
Clean the leather with a leather cleaner, apply leather prep to remove the factory finish, and wipe with an alcohol cleaner. Allow the leather to dry completely.
5. How do I trim frayed edges on the ripped leather?
Carefully trim the frayed edges using scissors or a scalpel to create a clean, even surface for the repair.
6. What is the purpose of a backing patch?
A backing patch provides support behind the rip, creating a solid foundation for the repair.
7. How do I apply leather filler to the rip?
Apply thin layers of leather filler over the backing patch, smoothing the surface with a palette knife. Allow each layer to dry before applying the next.
8. How do I match the color of the leather when repairing it?
Use a leather colorant that matches the color of your car seat. Apply thin, even coats and blend the colorant into the surrounding leather for a seamless finish.
9. How do I protect the repaired area after fixing the rip?
Apply a leather finish to seal and protect the repaired area. Apply multiple thin coats, allowing each coat to dry before applying the next.
10. When should I consider professional leather repair services?
Consider professional services for large rips, complex repairs, or if you lack the skill and patience for DIY repair.