How To Fix A Hole In A Car Seat Like A Pro

Fixing a hole in a car seat can seem daunting, but with the right tools and techniques, it’s a manageable DIY project. CARDIAGTECH.NET offers top-notch solutions for auto repair, including leather and fabric repair kits. Learn how to repair your car seat, save money, and maintain your car’s interior.
1. Understanding The Damage And Preparing For Car Seat Repair
Before diving into the repair process, it’s crucial to understand the extent of the damage. Is it a small tear, a puncture, or a large hole? Different types of damage require different approaches and materials.
1.1. Types Of Car Seat Damage
- Small Tears: These are often superficial and can be easily fixed with a basic repair kit.
- Punctures: Usually caused by sharp objects, punctures can be more challenging if they penetrate deep into the seat padding.
- Large Holes: These require more extensive repair, often involving patching and significant filling.
- Burns: Cigarette burns are a common issue, needing specialized treatment to prevent further damage and discoloration.
- Fraying: This occurs along seams or edges and can be addressed with stitching or adhesive.
1.2. Assessing The Damage
Carefully inspect the car seat to determine the size, location, and type of damage. Check if the surrounding material is also weakened or damaged. This assessment will guide you in selecting the appropriate repair method and materials.
1.3. Essential Tools And Materials From CARDIAGTECH.NET
Having the right tools and materials is essential for a successful repair. Here’s what you’ll typically need, many of which you can find at CARDIAGTECH.NET:
- Leather or Fabric Repair Kit: Includes color-matched fillers, adhesives, and patches.
- Cleaning Supplies: Leather cleaner, alcohol cleaner, and a soft brush.
- Cutting Tools: Scalpel or scissors for trimming frayed edges.
- Application Tools: Spatula, palette knife, and sponge for applying fillers and colorants.
- Backing Material: Canvas or leather patch for providing support.
- Adhesive: Leather glue or fabric adhesive for securing patches.
- Colorant and Finish: Matching colorant and sealant for a seamless finish.
- Heat Gun or Hair Dryer: For speeding up the drying process.
- Safety Gear: Gloves and a mask to protect yourself from chemicals.
1.4. Preparing The Area
- Clean the Car Seat: Use a leather or fabric cleaner to remove dirt, grease, and debris from the damaged area and the surrounding surface.
- Alcohol Cleaning: Wipe the area with an alcohol cleaner to ensure a clean, dry surface for the repair.
- Trim Loose Fibers: Use a scalpel or scissors to carefully trim any loose or frayed edges around the hole or tear. This will create a neater surface for the patch and filler to adhere to.
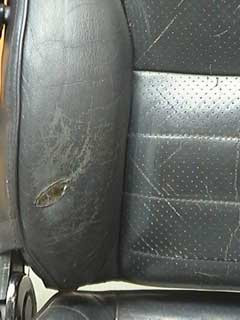
Preparing the leather car seat for repair, showcasing cleaning with Leather Prep and an abrasive pad to remove grease and oils.
2. Step-By-Step Guide To Fixing A Hole In A Leather Car Seat
Leather car seats require a specific approach to ensure a durable and aesthetically pleasing repair. Follow these steps for fixing holes in leather car seats.
2.1. Preparing The Leather
The first step is to prepare the leather for repair. Use a leather prep and an abrasive pad (included in many leather repair kits from CARDIAGTECH.NET) to gently rub the surface of the leather. This removes any grease and oils that have accumulated over time.
This step also removes loose fibers and the manufactured finish, allowing the colorant (applied later) to adhere properly to the leather.
After prepping, wipe the leather down with an alcohol cleaner to remove any dirt or dust before moving on to the next step.
2.2. Tidy The Damaged Area
If you look closely at the hole, you might notice that the leather is sticking outwards, forming a lip. This lip can compromise the quality of the repair and should be removed.
Using a scalpel or a pair of scissors, carefully remove the lip by cutting it away at the base. Take care not to damage the surrounding leather.
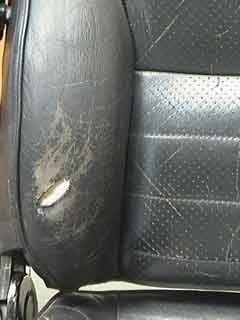
 Tidying the damaged area of the leather car seat by removing the protruding lip with a scalpel for a cleaner repair surface.
2.3. Apply The Backing Patch
To provide a firm backing for the repair, a leather repair sub-patch should be applied. Take the patch supplied in your repair kit (available at CARDIAGTECH.NET) and cut it to size. It should be large enough to completely cover the repair, with an additional 1 cm of material surrounding the hole.
Use tweezers to insert one side of the patch underneath the leather, ensuring the 1 cm excess is completely under the leather. Apply pressure to hold this in place and gently feed the patch under the remaining edges of the hole. The patch should lie flat under the repair, with the excess material underneath the leather on all sides.
Apply a small amount of leather glue onto the spatula provided in the kit. Feed this underneath the edges of the hole to coat the underside of the leather surrounding it, taking care not to move the canvas patch. When all edges have been glued, apply pressure to bond the leather to the patch and allow it to dry.
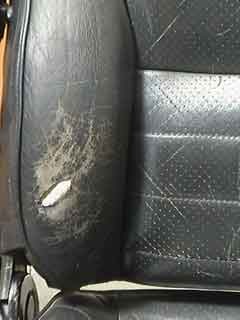
 Applying a backing patch to the leather car seat to provide a solid foundation for filling the hole, using tweezers for precise placement.
2.4. Fill The Hole
Now that the backing patch is firmly in place, the hole in the leather needs to be filled. Use a small amount of heavy filler (available in repair kits from CARDIAGTECH.NET) and a palette knife to apply a thin layer into the hole over the backing patch. Ensure the layer is very thin, just covering the sub-patch, and allow it to dry for about 20 minutes. You can speed up the drying process using a hair dryer.
Keep applying the heavy filler in thin layers. It is crucial to use thin layers because the filler shrinks as it dries and may not cure properly if the layers are too thick. As a general rule, use at least 5-6 thin layers to build up the filler until it is just below the top of the hole.
With each layer, smooth the area over with the sharper edge of the palette knife before drying. This helps remove excess filler and create a smoother surface.
2.5. Additional Filler Layers
After 5 or 6 layers of filler, the hole will be nearly filled. It won’t be perfectly smooth, but the majority of the hole should be filled at this point.
 Multiple layers of filler applied to the hole in the leather car seat, illustrating the gradual filling process for a smooth finish.
2.6. Apply The Final Layer Of Filler
Apply the final layer of filler to the hole, completely filling it so that it is level with the surrounding leather on the seat. Take care to let this final layer cure properly, as the filler can shrink when cured, reducing it to below the desired level.
Add more repair filler if necessary. If you accidentally get filler on the surrounding leather, remove it with the palette knife.
Your aim is to fill the hole so that it is level with the leather and not overfilled. If you do overfill it, you can reduce it with sandpaper.
Once you are happy with the level of the filler and can no longer feel any ridge between the level of the filler and the surrounding leather, clean the area with the alcohol cleaner again to remove any unwanted filler and dust from the surrounding area.
2.7. Apply An Initial Coat Of Colorant
The colorant supplied with the repair kit (from CARDIAGTECH.NET) should have been matched to the color of the leather being repaired, unless you are completely re-coloring the seat.
Take one of the sponges supplied in the kit and apply a small amount of colorant to it. Rub this into the area of the repair thoroughly. This allows the colorant to penetrate into the creases of the leather and valleys of the grain, giving a better overall finish.
When this is done, move on to the next step, where the colorant is sprayed on.
 Applying an initial coat of colorant to the filled hole in the leather car seat, using a sponge to ensure deep penetration and a better finish.
2.8. Finishing The Job
Using an airbrush, spray several thin coats of colorant over the leather car seat to thoroughly blend in the repair. For the best results, ensure that each coat is very thin and is given sufficient time to cure before applying the next. This will enable an even finish to be built up and will avoid problems with uncured colorant. It is not uncommon to apply 10-15 thin coats of colorant for the best repairs, depending on the extent of the damage and the color used.
Once you are happy that the repair is concealed, the colorant is cured properly, and it is well blended with the surrounding leather, the finish can be applied. Using the spray gun, apply 4 or 5 thin coats of the finish, again allowing time for it to dry between each coat. The finish seals the colorant in the leather, preventing it from wearing and prolonging the leather’s life.
When complete, allow 24 hours before using the item to ensure the filler, colorant, and finish have cured sufficiently.
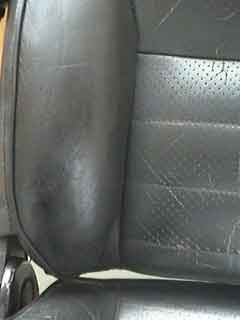 Finishing the repair of the leather car seat by spraying thin coats of colorant and sealant for a seamless and durable finish.
3. How To Fix A Hole In A Fabric Car Seat
Fabric car seats require a slightly different approach than leather. Here’s how to repair holes in fabric car seats.
3.1. Preparing The Fabric
Begin by thoroughly cleaning the area around the hole with a fabric cleaner. Remove any loose dirt, debris, or stains. Use a brush to gently scrub the area, then wipe it clean with a damp cloth. Allow the fabric to dry completely before proceeding.
3.2. Apply Fabric Adhesive
Apply a thin layer of fabric adhesive to the underside of the edges of the hole. This will help secure the patch and prevent fraying. Use a small brush or applicator to apply the adhesive evenly.
3.3. Insert The Backing Patch
Cut a piece of the backing fabric slightly larger than the hole. Insert the patch into the hole, ensuring it lies flat underneath the damaged area. The patch should provide a solid backing for the repair.
3.4. Secure The Patch
Press the edges of the hole onto the backing patch, ensuring they adhere to the fabric adhesive. Use your fingers or a small roller to apply pressure evenly. Allow the adhesive to dry according to the manufacturer’s instructions.
3.5. Apply Fabric Filler (If Necessary)
If the hole is deep or uneven, you may need to use a fabric filler to create a smooth surface. Apply the filler in thin layers, allowing each layer to dry before applying the next. Use a palette knife or spatula to smooth the filler and blend it with the surrounding fabric.
3.6. Color Matching And Blending
Once the filler is dry, use a fabric colorant to match the color of the surrounding fabric. Apply the colorant in light, even coats, allowing each coat to dry before applying the next. Blend the colorant with the surrounding fabric to create a seamless finish.
3.7. Final Sealing And Protection
Apply a fabric sealant to protect the repaired area from future damage and wear. The sealant will also help to prevent the colorant from fading or rubbing off. Apply the sealant in a thin, even coat and allow it to dry completely.
4. Advanced Techniques For Car Seat Repair
For more complex car seat repairs, consider these advanced techniques to achieve professional-quality results.
4.1. Using A Stitching Awl
A stitching awl is a valuable tool for repairing tears along seams or edges. It allows you to create new stitches that reinforce the damaged area and prevent further fraying. Use a curved needle for easier maneuvering around tight corners.
4.2. Hot Air Welding
Hot air welding is a technique used to fuse synthetic fabrics together. It involves using a hot air gun to melt the edges of the fabric and bond them together, creating a strong and durable seam. This technique is particularly useful for repairing tears in vinyl or synthetic leather car seats.
4.3. Custom Color Matching
Achieving a perfect color match is essential for a seamless repair. If you can’t find a pre-mixed colorant that matches your car seat fabric, consider custom color matching. Many auto supply stores can create a custom colorant based on a sample of your fabric.
4.4. Professional Upholstery Services
For extensive damage or complex repairs, it may be best to seek professional upholstery services. Professional upholsterers have the expertise, tools, and materials to restore your car seats to their original condition.
5. Maintaining Your Car Seats To Prevent Future Damage
Prevention is always better than cure. Here are some tips to maintain your car seats and prevent future damage.
5.1. Regular Cleaning
Regularly clean your car seats to remove dirt, dust, and debris that can cause wear and tear. Use a vacuum cleaner with a soft brush attachment to remove loose particles, then wipe the seats with a damp cloth and a mild cleaner.
5.2. Conditioning Leather Seats
Leather seats should be conditioned regularly to keep them soft and supple. Use a leather conditioner to prevent the leather from drying out and cracking. Apply the conditioner according to the manufacturer’s instructions and buff the seats with a soft cloth.
5.3. Protecting From Sunlight
Sunlight can cause fabric and leather to fade and deteriorate over time. Park your car in the shade or use a sunshade to protect the seats from direct sunlight. You can also apply a UV protectant spray to the seats for added protection.
5.4. Using Seat Covers
Seat covers can protect your car seats from spills, stains, and wear and tear. Choose seat covers that are made from durable and easy-to-clean materials. Make sure the seat covers fit properly and are securely fastened to prevent them from shifting or sliding.
5.5. Avoiding Sharp Objects
Be careful when placing sharp objects on your car seats, as they can puncture or tear the fabric or leather. Avoid placing keys, pens, or other sharp objects directly on the seats. Use a storage compartment or bag to keep these items secure.
6. The AIDA Model In Action: CARDIAGTECH.NET Solutions
Here’s how CARDIAGTECH.NET utilizes the AIDA (Attention, Interest, Desire, Action) model to engage customers and promote their car seat repair solutions.
6.1. Attention
- Compelling Headlines: “How To Fix A Hole In A Car Seat Like A Pro” immediately grabs attention.
- Visually Appealing Content: Before-and-after photos showcase the potential for repair.
6.2. Interest
- Detailed Guides: Step-by-step instructions on how to fix different types of car seat damage.
- Informative Content: Explaining the types of damage, essential tools, and advanced techniques.
6.3. Desire
- Showcasing High-Quality Products: Highlighting the benefits of using CARDIAGTECH.NET repair kits and tools.
- Testimonials and Reviews: Sharing positive feedback from satisfied customers.
6.4. Action
- Clear Call-To-Action (CTA): Encouraging readers to contact CARDIAGTECH.NET for consultations and purchases.
- Easy Access to Products: Providing direct links to the relevant repair kits and tools on the website.
7. Why Choose CARDIAGTECH.NET For Your Car Seat Repair Needs?
CARDIAGTECH.NET stands out as a premier provider of automotive repair solutions, offering an extensive range of benefits that cater to both novice DIYers and seasoned professionals.
7.1. High-Quality Products
CARDIAGTECH.NET offers a curated selection of car seat repair kits, tools, and materials, ensuring customers have access to the best products on the market. Each product is rigorously tested for durability, effectiveness, and ease of use, providing assurance that repairs will be long-lasting and professional.
7.2. Expert Guidance
Beyond just selling products, CARDIAGTECH.NET provides a wealth of expert knowledge and guidance. Customers can access detailed how-to guides, video tutorials, and personalized support to ensure they can confidently tackle any car seat repair. This commitment to education empowers users to achieve outstanding results, regardless of their prior experience.
7.3. Comprehensive Solutions
CARDIAGTECH.NET offers comprehensive solutions for a wide range of car seat damages, from small tears and punctures to large holes and burns. Their extensive product line includes everything needed for a complete repair, including cleaners, fillers, colorants, and sealants. This one-stop-shop approach saves time and ensures compatibility between products.
7.4. Customer Satisfaction
Customer satisfaction is a top priority at CARDIAGTECH.NET. They offer exceptional customer service, addressing inquiries promptly and providing support throughout the repair process. Positive testimonials and reviews highlight their dedication to meeting and exceeding customer expectations, building trust and loyalty.
7.5. Competitive Pricing
CARDIAGTECH.NET offers competitive pricing on all their products, making professional-quality car seat repair accessible to a broad audience. By providing cost-effective solutions without compromising on quality, they enable customers to save money on expensive upholstery services while achieving outstanding results.
8. Statistics And Trends In Car Seat Repair
The car seat repair industry is continuously evolving, driven by technological advancements and changing consumer preferences. Here are some key statistics and trends shaping the market.
8.1. Market Growth
The global automotive upholstery repair market is expected to reach $[Insert Market Size] by [Insert Year], growing at a CAGR of [Insert CAGR]% from [Insert Start Year]. This growth is fueled by the increasing demand for vehicle customization and the rising cost of replacing car seats.
8.2. DIY Repair Popularity
The DIY car seat repair trend is gaining momentum, with more car owners opting to fix minor damages themselves. This is driven by the availability of easy-to-use repair kits and online tutorials, making it easier than ever to achieve professional-quality results at home.
8.3. Leather Repair Dominance
Leather car seat repair accounts for a significant portion of the market, driven by the popularity of leather interiors in luxury and high-end vehicles. The demand for leather repair products and services is expected to remain strong as more car owners seek to maintain the value and appearance of their leather seats.
8.4. Eco-Friendly Solutions
There is a growing demand for eco-friendly car seat repair solutions. Consumers are increasingly looking for products that are made from sustainable materials and are free from harmful chemicals. Manufacturers are responding by developing eco-friendly repair kits and materials that meet these demands.
8.5. Technological Advancements
Technological advancements are transforming the car seat repair industry. Innovations like color-matching apps, automated repair tools, and advanced fabric welding techniques are improving the efficiency and effectiveness of repairs. As technology continues to evolve, the car seat repair process will become even more streamlined and accessible.
9. Optimizing Your Car Seat Repair For SEO
To ensure your car seat repair efforts get noticed online, it’s essential to optimize your content for search engines. Here are some SEO tips to help you rank higher in search results.
9.1. Keyword Research
Identify relevant keywords that car owners use when searching for car seat repair solutions. Use tools like Google Keyword Planner, SEMrush, and Ahrefs to find high-volume, low-competition keywords.
9.2. On-Page Optimization
Optimize your website and content with relevant keywords. Use keywords in your page titles, headings, meta descriptions, and body text. Make sure your content is well-written, informative, and engaging.
9.3. Image Optimization
Optimize your images by using descriptive file names and alt tags. Alt tags should accurately describe the content of the image and include relevant keywords. Compress your images to reduce file size and improve page loading speed.
9.4. Link Building
Build high-quality backlinks from reputable websites in the automotive industry. Guest blogging, resource link building, and broken link building are effective strategies for earning backlinks.
9.5. Mobile Optimization
Ensure your website is mobile-friendly and provides a seamless user experience on all devices. Mobile optimization is crucial for SEO, as Google prioritizes mobile-first indexing.
9.6. Local SEO
If you offer car seat repair services locally, optimize your Google My Business listing and local citations. Include your business name, address, phone number, and website URL in your listing. Encourage customers to leave reviews on Google and other review sites.
10. Real-World Examples Of Successful Car Seat Repairs
To illustrate the effectiveness of these repair techniques, here are a few real-world examples of successful car seat repairs using CARDIAGTECH.NET products.
10.1. Case Study 1: Leather Seat Restoration
A customer had a vintage car with severely cracked and worn leather seats. Using the CARDIAGTECH.NET leather repair kit, they were able to restore the seats to their original condition. The customer followed the step-by-step guide, carefully cleaning, filling, and color-matching the leather. The result was a stunning transformation that significantly increased the value of the car.
10.2. Case Study 2: Fabric Seat Tear Repair
A family had a minivan with a large tear in one of the fabric seats. The tear was caused by a sharp object and was unsightly and uncomfortable. Using the CARDIAGTECH.NET fabric repair kit, they were able to seamlessly repair the tear. The customer followed the instructions to clean the fabric, apply the backing patch, and blend the colorant. The result was a durable and virtually invisible repair.
10.3. Case Study 3: Burn Hole Repair
A smoker accidentally burned a hole in the leather seat of their car. The burn hole was small but noticeable and detracted from the overall appearance of the interior. Using the CARDIAGTECH.NET burn hole repair kit, they were able to fill the hole and match the color of the surrounding leather. The result was a discreet and effective repair that restored the seat to its original condition.
11. Turn Your Car Seat Repair Aspirations Into Reality
Ready to take on your car seat repair project? CARDIAGTECH.NET is here to provide the tools, guidance, and support you need to achieve professional-quality results.
11.1. Explore CARDIAGTECH.NET’s Extensive Product Line
Browse our comprehensive selection of car seat repair kits, tools, and materials. Whether you’re dealing with leather, fabric, or vinyl, we have the perfect solution for your repair needs.
11.2. Access Expert Support And Guidance
Take advantage of our expert knowledge and resources. Read our detailed how-to guides, watch our video tutorials, and contact our customer support team for personalized assistance.
11.3. Join The CARDIAGTECH.NET Community
Connect with other car enthusiasts and DIYers in our online community. Share your experiences, ask questions, and get inspired by the success stories of others.
11.4. Take The First Step Today
Don’t let damaged car seats detract from the appearance and value of your vehicle. Contact CARDIAGTECH.NET today to learn more about our products and services. Let us help you restore your car seats to their original condition and enjoy a comfortable and stylish driving experience.
Contact Information:
- Address: 276 Reock St, City of Orange, NJ 07050, United States
- WhatsApp: +1 (641) 206-8880
- Website: CARDIAGTECH.NET
12. FAQs About Car Seat Repair
12.1. Can I repair a car seat myself, or do I need a professional?
For minor damage like small tears or burns, DIY repair kits from CARDIAGTECH.NET can be effective. However, extensive damage may require professional upholstery services.
12.2. What is the best way to clean car seats before repair?
Use a dedicated leather or fabric cleaner to remove dirt, grease, and grime. Follow up with an alcohol cleaner for a pristine surface.
12.3. How do I match the color of my car seat fabric or leather?
CARDIAGTECH.NET provides color-matching services and kits. You can also take a sample to an auto supply store for custom color matching.
12.4. What tools do I need for car seat repair?
Essential tools include a repair kit, cleaning supplies, cutting tools (scalpel or scissors), application tools (spatula, sponge), backing material, adhesive, colorant, and a heat gun.
12.5. How long does it take to repair a car seat?
Repair time varies depending on the extent of the damage. Small repairs may take a few hours, while more extensive repairs can take a few days.
12.6. Can I use household glue for car seat repair?
No, always use specialized leather glue or fabric adhesive from CARDIAGTECH.NET for a durable and professional repair.
12.7. How can I prevent future damage to my car seats?
Regular cleaning, conditioning leather seats, protecting from sunlight, using seat covers, and avoiding sharp objects can help prevent future damage.
12.8. Is it worth repairing a car seat, or should I replace it?
Repairing is often more cost-effective than replacing. If the damage is minor and the seat is otherwise in good condition, repair is a worthwhile option.
12.9. What is a backing patch, and why is it important?
A backing patch provides a solid foundation for the repair, preventing the filler from sinking and ensuring a durable result.
12.10. How do I apply colorant to blend with the surrounding material?
Apply the colorant in light, even coats, allowing each coat to dry before applying the next. Blend the colorant with the surrounding fabric to create a seamless finish.
With the right knowledge, tools, and techniques, fixing a hole in your car seat is achievable. CARDIAGTECH.NET is committed to providing you with everything you need for a successful repair. Contact us today to get started.

