How To Fix a Paint Scratch on a Car Like A Pro

Fixing a paint scratch on a car doesn’t have to be a daunting task. At CARDIAGTECH.NET, we provide the tools and expertise you need to effectively repair those unsightly blemishes and restore your car’s flawless finish. Explore various scratch removal techniques and discover the best products for achieving professional-quality results, ensuring your vehicle looks its best with automotive paint repair, auto body repair, and car detailing.
Table of Contents
1. Understanding Car Paint and Scratches
- 1.1. Anatomy of Car Paint
- 1.2. Types of Car Scratches
- 1.3. Assessing the Damage
2. Essential Tools and Materials
- 2.1. Cleaning Supplies
- 2.2. Sanding Tools
- 2.3. Polishing Compounds
- 2.4. Touch-Up Paint
- 2.5. Applicators and Buffers
- 2.6. Safety Gear
- 2.7. Why Choose CARDIAGTECH.NET for Your Tools?
3. Step-by-Step Guide to Fixing Minor Scratches (Clear Coat)
- 3.1. Cleaning the Area
- 3.2. Applying Rubbing Compound
- 3.3. Polishing
- 3.4. Waxing
4. Repairing Moderate Scratches (Base Coat)
- 4.1. Cleaning the Area
- 4.2. Applying Touch-Up Paint
- 4.3. Wet Sanding
- 4.4. Polishing and Blending
- 4.5. Waxing
5. Fixing Deep Scratches (Primer or Metal)
- 5.1. Cleaning the Area
- 5.2. Sanding the Scratch
- 5.3. Applying Primer
- 5.4. Applying Touch-Up Paint
- 5.5. Wet Sanding
- 5.6. Polishing and Blending
- 5.7. Waxing
6. Advanced Techniques and Tips
- 6.1. Using a Paint Thickness Gauge
- 6.2. Color Matching
- 6.3. Blending Techniques
- 6.4. Dealing with Large Areas
7. Preventing Car Scratches
- 7.1. Regular Washing and Waxing
- 7.2. Protective Coatings
- 7.3. Safe Parking Habits
- 7.4. Avoiding Automatic Car Washes
8. When to Seek Professional Help
- 8.1. Assessing Your Skills
- 8.2. Complex Damage
- 8.3. Cost Analysis
9. Cost of DIY vs. Professional Repair
- 9.1. DIY Costs
- 9.2. Professional Repair Costs
- 9.3. Making the Right Choice
10. Maintaining Your Car’s Paint
- 10.1. Regular Cleaning
- 10.2. Waxing and Sealing
- 10.3. Inspecting for Damage
11. Frequently Asked Questions (FAQs)
12. Conclusion
1. Understanding Car Paint and Scratches
Before diving into the methods of scratch repair, it’s crucial to understand the composition of your car’s paint and the different types of scratches that can occur. This knowledge will guide you in selecting the appropriate repair technique.
1.1. Anatomy of Car Paint
Car paint typically consists of several layers, each serving a specific purpose:
-
Clear Coat: The outermost layer, providing gloss and protection against UV rays and environmental factors.
-
Base Coat: The layer that contains the color of your car.
-
Primer: An undercoat that helps the paint adhere to the metal and provides corrosion resistance.
-
Metal/Body Panel: The actual metal structure of the car.
1.2. Types of Car Scratches
Understanding the type of scratch is the first step in determining the best course of action. Here’s a breakdown:
-
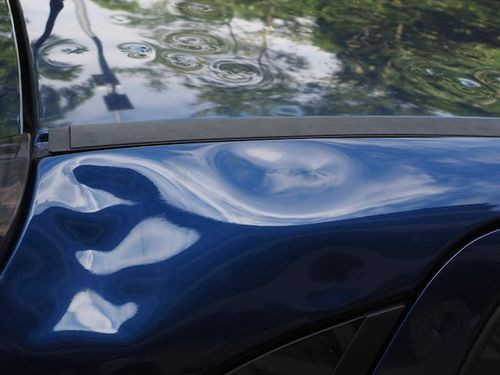
Clear Coat Scratches: These are light scratches that only affect the clear coat layer. They often appear as swirl marks or minor imperfections.
Clear coat scratch on a car panel -
Base Coat Scratches: These scratches penetrate through the clear coat and into the base coat (color layer). They are more noticeable and require more extensive repair.
-
Primer Scratches: These are deep scratches that go through the clear coat and base coat, reaching the primer layer. Repairing these scratches often involves filling and painting.
-
Deep Scratches (Metal): These are the most severe type, penetrating all the layers and exposing the bare metal. These require immediate attention to prevent rust and corrosion.
1.3. Assessing the Damage
To accurately assess the damage, start by cleaning the affected area. Use soap and water to remove any dirt or debris. Once clean, dry the area and inspect the scratch in good lighting. Run your fingernail gently over the scratch. If your nail catches, the scratch is likely deeper than the clear coat.
2. Essential Tools and Materials
Having the right tools and materials is crucial for a successful scratch repair. Here’s a comprehensive list of what you’ll need:
2.1. Cleaning Supplies
- Car Wash Soap: To clean the area before and after repairs.
- Microfiber Cloths: Soft cloths to avoid adding more scratches during cleaning and polishing.
- Detailing Spray: For removing residue and enhancing shine.
2.2. Sanding Tools
- Sandpaper: Various grits (2000, 2500, 3000) for wet sanding.
- Sanding Block: To ensure even pressure and a flat surface.
2.3. Polishing Compounds
- Rubbing Compound: For removing scratches and imperfections.
- Polishing Compound: For refining the finish after using rubbing compound.
- Finishing Polish: For adding gloss and depth to the paint.
2.4. Touch-Up Paint
- Touch-Up Paint: Matching your car’s color code for seamless repairs.
- Primer: For preparing bare metal surfaces.
- Clear Coat: To protect the touch-up paint and blend it with the existing clear coat.
2.5. Applicators and Buffers
- Microfiber Applicator Pads: For applying compounds and polishes.
- Foam Buffing Pads: For use with a polishing machine.
- Polishing Machine (Optional): For faster and more effective polishing.
- Detail Brushes: For cleaning tight areas and applying touch-up paint.
2.6. Safety Gear
- Gloves: To protect your hands from chemicals.
- Safety Glasses: To protect your eyes from splashes and debris.
- Mask: To avoid inhaling harmful fumes.
2.7. Why Choose CARDIAGTECH.NET for Your Tools?
At CARDIAGTECH.NET, we understand the importance of quality tools in achieving professional-grade results. Our selection of car scratch repair tools and materials are carefully curated to meet the needs of both DIY enthusiasts and professional auto technicians. Here’s why you should choose us:
- High-Quality Products: We offer products from trusted brands known for their performance and durability.
- Expert Advice: Our team provides expert advice and support to help you choose the right tools and techniques for your specific needs.
- Competitive Prices: We offer competitive prices to make quality tools accessible to everyone.
- Comprehensive Selection: From cleaning supplies to advanced polishing machines, we have everything you need for car scratch repair.
- Convenient Shopping Experience: Shop online at CARDIAGTECH.NET and enjoy fast shipping and hassle-free returns.
By choosing CARDIAGTECH.NET, you can be confident that you are investing in tools that will help you achieve professional-quality results and keep your car looking its best. Contact us today at +1 (641) 206-8880 or visit our store at 276 Reock St, City of Orange, NJ 07050, United States for personalized assistance.
3. Step-by-Step Guide to Fixing Minor Scratches (Clear Coat)
Clear coat scratches are the easiest to fix and often can be removed with just a few simple steps.
3.1. Cleaning the Area
Start by thoroughly cleaning the area around the scratch with car wash soap and water. This removes any dirt, wax, or contaminants that could interfere with the repair process. Rinse the area well and dry it with a clean microfiber cloth.
3.2. Applying Rubbing Compound
Apply a small amount of rubbing compound to a microfiber applicator pad. Gently rub the compound over the scratch using a circular motion. Apply moderate pressure and work the compound into the scratch for several minutes. This process helps to level the clear coat and remove the scratch.
3.3. Polishing
After using the rubbing compound, switch to a polishing compound. Apply a small amount to a clean microfiber pad and polish the area using a circular motion. This step refines the finish and removes any swirl marks left by the rubbing compound.
3.4. Waxing
To protect the repaired area and enhance the shine, apply a coat of car wax. Use a clean microfiber applicator pad to apply the wax in a thin, even layer. Allow the wax to dry according to the manufacturer’s instructions, then buff it off with a clean microfiber cloth.
4. Repairing Moderate Scratches (Base Coat)
Base coat scratches require a bit more work, as they penetrate through the clear coat and into the color layer.
4.1. Cleaning the Area
As with minor scratches, start by cleaning the area with car wash soap and water. Dry the area thoroughly with a clean microfiber cloth.
4.2. Applying Touch-Up Paint
Use a fine-tipped detail brush to carefully apply touch-up paint to the scratch. Apply thin layers, allowing each layer to dry completely before applying the next. This prevents the paint from clumping or running. Apply just enough paint to fill the scratch to the level of the surrounding paint.
4.3. Wet Sanding
Once the touch-up paint is completely dry (usually after 24-48 hours), wet sand the area to level the paint with the surrounding surface. Soak a piece of 2500-grit sandpaper in water and wrap it around a sanding block. Gently sand the area using light pressure and a back-and-forth motion. Keep the sandpaper wet throughout the process.
4.4. Polishing and Blending
After wet sanding, use a rubbing compound to remove the sanding marks and blend the touch-up paint with the surrounding paint. Follow this with a polishing compound to refine the finish. If necessary, use a finishing polish to add extra gloss and depth.
4.5. Waxing
Finish by applying a coat of car wax to protect the repaired area and enhance the shine. Apply the wax in a thin, even layer, allow it to dry, and buff it off with a clean microfiber cloth.
5. Fixing Deep Scratches (Primer or Metal)
Deep scratches that reach the primer or metal layer require the most extensive repair process.
5.1. Cleaning the Area
Clean the area thoroughly with car wash soap and water. Dry the area with a clean microfiber cloth.
5.2. Sanding the Scratch
Use 400-grit sandpaper to remove any rust or rough edges from the scratch. Sand until the area is smooth and even. If there is rust, use a rust converter to treat the area before proceeding.
5.3. Applying Primer
Apply a thin layer of automotive primer to the sanded area. This will help the touch-up paint adhere properly and provide a uniform base. Allow the primer to dry completely, according to the manufacturer’s instructions.
5.4. Applying Touch-Up Paint
Apply touch-up paint to the primed area, using a fine-tipped detail brush. Apply thin layers, allowing each layer to dry completely before applying the next. Fill the scratch to the level of the surrounding paint.
5.5. Wet Sanding
Once the touch-up paint is completely dry, wet sand the area with 2500-grit sandpaper to level the paint with the surrounding surface. Use light pressure and a back-and-forth motion, keeping the sandpaper wet throughout the process.
5.6. Polishing and Blending
After wet sanding, use a rubbing compound to remove the sanding marks and blend the touch-up paint with the surrounding paint. Follow this with a polishing compound to refine the finish. Use a finishing polish for extra gloss and depth.
5.7. Waxing
Apply a coat of car wax to protect the repaired area and enhance the shine. Apply the wax in a thin, even layer, allow it to dry, and buff it off with a clean microfiber cloth.
6. Advanced Techniques and Tips
For those looking to achieve truly professional results, here are some advanced techniques and tips:
6.1. Using a Paint Thickness Gauge
A paint thickness gauge can help you measure the thickness of the paint layers on your car. This is useful for determining how much material you can safely remove during sanding and polishing without damaging the underlying layers.
6.2. Color Matching
Ensure that the touch-up paint matches your car’s color code precisely. You can find the color code on a sticker located in the door jamb, glove box, or engine compartment. If you’re unsure, consult with an automotive paint supplier to get the correct match.
6.3. Blending Techniques
To seamlessly blend the repaired area with the surrounding paint, use a blending solvent. Apply the solvent to the edges of the repaired area after applying touch-up paint, and gently feather the edges with a soft cloth.
6.4. Dealing with Large Areas
For large areas of damage, consider using an aerosol spray can of touch-up paint. This allows for more even coverage and a smoother finish. Follow the manufacturer’s instructions carefully, and apply several thin coats rather than one thick coat.
7. Preventing Car Scratches
Prevention is always better than cure. Here are some tips to minimize the risk of scratches on your car:
7.1. Regular Washing and Waxing
Regularly washing your car removes dirt and debris that can cause scratches. Waxing provides a protective layer that helps to shield the paint from environmental factors and minor abrasions.
7.2. Protective Coatings
Consider applying a ceramic coating or paint protection film (PPF) to your car. These coatings provide a durable, scratch-resistant barrier that can protect your paint for years.
7.3. Safe Parking Habits
Park your car in covered areas whenever possible to protect it from the sun, rain, and other environmental factors. Avoid parking near trees or bushes that could scratch the paint.
7.4. Avoiding Automatic Car Washes
Automatic car washes can be harsh on your car’s paint, as the brushes can cause scratches and swirl marks. Opt for touchless car washes or hand washing whenever possible.
8. When to Seek Professional Help
While many scratches can be repaired at home, some situations warrant professional assistance.
8.1. Assessing Your Skills
Be honest about your skills and experience. If you’re not comfortable with sanding, painting, or polishing, it’s best to leave the job to a professional.
8.2. Complex Damage
If the scratch is very deep, covers a large area, or is located in a difficult-to-reach spot, professional repair may be necessary.
8.3. Cost Analysis
Consider the cost of tools and materials versus the cost of professional repair. In some cases, the cost may be similar, and it may be worth it to pay for professional expertise.
9. Cost of DIY vs. Professional Repair
Understanding the cost implications can help you make an informed decision about whether to tackle the repair yourself or seek professional help.
9.1. DIY Costs
The cost of DIY scratch repair can vary depending on the severity of the scratch and the quality of the tools and materials you use. Here’s a general breakdown:
| Item | Estimated Cost |
|---|---|
| Car Wash Soap | $10 – $20 |
| Microfiber Cloths | $10 – $20 |
| Sandpaper (Various Grits) | $10 – $20 |
| Rubbing Compound | $15 – $30 |
| Polishing Compound | $15 – $30 |
| Touch-Up Paint | $20 – $40 |
| Primer | $10 – $20 |
| Wax | $15 – $30 |
| Applicator Pads | $5 – $10 |
| Total | $110 – $220 |
If you already have some of these items, your cost will be lower. However, for deep scratches requiring more extensive materials like rust converters or specialized tools, the cost can increase.
9.2. Professional Repair Costs
Professional scratch repair costs can vary based on the type of scratch, the size of the affected area, and the labor rates in your area. Here’s a general estimate:
| Type of Scratch | Estimated Cost |
|---|---|
| Clear Coat | $50 – $150 |
| Base Coat | $150 – $300 |
| Primer/Deep | $300 – $700+ |
These prices are estimates and can vary. For example, a deep scratch that requires bodywork or extensive painting can easily exceed $700.
9.3. Making the Right Choice
Consider these factors when deciding whether to DIY or hire a professional:
- Severity of the Scratch: Minor clear coat scratches are ideal for DIY, while deep scratches may require professional attention.
- Your Skill Level: If you’re comfortable with basic auto detailing, DIY can be a cost-effective option.
- Cost: Compare the cost of DIY materials with professional repair estimates.
- Time: DIY repairs can be time-consuming. Consider whether you have the time and patience to do the job properly.
10. Maintaining Your Car’s Paint
Maintaining your car’s paint is an ongoing process that can help prevent scratches and keep your car looking its best.
10.1. Regular Cleaning
Wash your car regularly to remove dirt, grime, and other contaminants that can damage the paint. Use a high-quality car wash soap and a soft microfiber wash mitt.
10.2. Waxing and Sealing
Apply a coat of wax or sealant to your car every few months to protect the paint from UV rays, acid rain, and other environmental factors. Wax also adds shine and helps to repel water and dirt.
10.3. Inspecting for Damage
Regularly inspect your car’s paint for scratches, chips, and other damage. Address any issues promptly to prevent them from worsening.
11. Frequently Asked Questions (FAQs)
Q1: How can I find my car’s paint code?
A: Your car’s paint code is typically located on a sticker in the door jamb, glove box, or engine compartment. Consult your owner’s manual for the exact location.
Q2: Can I use toothpaste to remove scratches?
A: Toothpaste can sometimes remove very minor clear coat scratches, but it is not a substitute for proper rubbing compound and polishing.
Q3: How long does it take for touch-up paint to dry?
A: Touch-up paint typically takes 24-48 hours to dry completely before wet sanding and polishing.
Q4: Can I use a household cleaner to wash my car?
A: No, household cleaners can damage your car’s paint. Always use a high-quality car wash soap.
Q5: What is the best way to protect my car from scratches in the winter?
A: Apply a coat of wax or sealant before winter to protect your car from salt and other road chemicals. Wash your car regularly to remove any buildup.
Q6: Is it better to hand wash or use a touchless car wash?
A: Hand washing is generally better, as you can control the pressure and avoid harsh brushes. Touchless car washes are a good alternative if you don’t have time to hand wash.
Q7: What is the difference between rubbing compound and polishing compound?
A: Rubbing compound is more abrasive and is used to remove scratches and imperfections. Polishing compound is less abrasive and is used to refine the finish and remove swirl marks.
Q8: How often should I wax my car?
A: You should wax your car every 3-4 months, or as needed to maintain the shine and protection.
Q9: Can I use a clay bar to remove scratches?
A: Clay bars can remove embedded contaminants that can cause scratches, but they will not remove existing scratches.
Q10: What should I do if my car gets scratched in a parking lot?
A: If possible, try to identify the person who caused the damage. File a police report and contact your insurance company.
12. Conclusion
Fixing a paint scratch on your car is a manageable task with the right knowledge, tools, and patience. Whether you’re dealing with minor clear coat scratches or deeper imperfections, following the steps outlined in this guide will help you restore your car’s finish and maintain its value. Remember, CARDIAGTECH.NET is your trusted partner for all your automotive tool and equipment needs. Contact us at +1 (641) 206-8880 or visit our store at 276 Reock St, City of Orange, NJ 07050, United States, and let our experts assist you in finding the perfect solutions for your car care needs. Don’t let scratches diminish your car’s appeal – take action today and keep your vehicle looking its best!