How Do You Fix Leather Seats In A Car?

Fixing leather car seats is achievable with the right tools and techniques. CARDIAGTECH.NET provides top-quality auto repair tools for professionals and DIY enthusiasts alike. Addressing wear and tear, small tears, or significant damage can restore your car’s interior to its original glory. By using leather repair kits and following a methodical approach, you can maintain and enhance the value of your vehicle. Let’s explore proven methods for leather car seat repair, including leather conditioning and upholstery repair.
1. Understanding Leather Car Seat Damage
Leather car seats, while luxurious, are susceptible to various types of damage. Identifying the type of damage is the first step in determining the appropriate repair method.
1.1 Types of Leather Damage
- Cracks: Small surface splits caused by dryness or wear.
- Fading: Loss of color due to sun exposure.
- Stains: Discoloration from spills or dyes.
- Tears: Rips in the leather, ranging from small to large.
- Holes: Punctures or significant damage requiring patching.
- Scuffs: Surface abrasions from friction.
- Wear and Tear: General aging and degradation of the leather.
Understanding these types of damage helps in selecting the right repair products and techniques from CARDIAGTECH.NET.
1.2 Factors Contributing to Damage
Several factors can contribute to the damage of leather car seats:
- UV Exposure: Sunlight can fade and dry out leather.
- Temperature Fluctuations: Extreme temperatures can cause leather to crack.
- Lack of Maintenance: Neglecting regular cleaning and conditioning.
- Spills and Stains: Untreated spills can cause permanent discoloration.
- Friction: Constant rubbing from clothing can wear down the leather.
- Age: Natural aging processes degrade leather over time.
Preventative measures and timely repairs can mitigate these factors, extending the life of your leather car seats.
2. Essential Tools and Materials for Leather Repair
Having the right tools and materials is crucial for effective leather car seat repair. CARDIAGTECH.NET offers a wide range of high-quality products designed for this purpose.
2.1 Basic Repair Kit Contents
A basic leather repair kit should include:
- Leather Cleaner: To remove dirt and grime.
- Leather Conditioner: To moisturize and protect the leather.
- Leather Filler: For filling cracks and small holes.
- Leather Glue: To adhere patches and secure edges.
- Colorant or Dye: To match the original color of the leather.
- Sealant: To protect the repaired area.
- Applicators: Sponges, brushes, and palette knives for applying products.
- Sandpaper: Fine-grit sandpaper for smoothing surfaces.
- Scissors or Scalpel: For trimming and preparing the repair area.
- Sub-Patch Material: To provide a backing for larger repairs.
These components ensure a comprehensive approach to leather repair, addressing both cosmetic and structural issues.
2.2 Advanced Tools for Professional Results
For more complex repairs, consider these advanced tools:
- Heat Gun: To accelerate drying and curing processes.
- Airbrush: For applying colorant evenly and professionally.
- Leather Sewing Kit: For stitching tears and reinforcing seams.
- Texture Pads: To replicate the original leather grain.
- Steamer: To remove wrinkles and soften leather.
Investing in these tools can elevate the quality of your repairs, providing results that are both durable and aesthetically pleasing.
3. Step-by-Step Guide to Fixing Minor Leather Damage
Minor leather damage, such as cracks, scuffs, and fading, can often be repaired with simple techniques. Here’s a step-by-step guide:
3.1 Cleaning the Leather Surface
- Prepare the Area: Park your car in a shaded area to avoid direct sunlight.
- Vacuum: Use a vacuum cleaner with a soft brush attachment to remove loose dirt and debris.
- Apply Leather Cleaner: Spray a small amount of leather cleaner onto a microfiber cloth.
- Wipe Gently: Gently wipe the leather surface in a circular motion, avoiding excessive saturation.
- Buff Dry: Use a clean, dry microfiber cloth to buff the surface and remove any remaining cleaner.
Cleaning is essential for removing contaminants that can interfere with the repair process.
3.2 Repairing Cracks and Scuffs
- Apply Leather Filler: Use a palette knife to apply a thin layer of leather filler to the cracked or scuffed area.
- Smooth the Filler: Smooth the filler with the palette knife, ensuring it is level with the surrounding leather.
- Dry the Filler: Allow the filler to dry completely, typically for 20-30 minutes.
- Sand Lightly: Use fine-grit sandpaper to lightly sand the filled area, creating a smooth surface.
- Apply Colorant: Use a sponge or airbrush to apply colorant that matches the original leather color.
- Seal the Repair: Apply a leather sealant to protect the repaired area and blend it with the surrounding leather.
This method effectively addresses minor imperfections, restoring the leather’s appearance and preventing further damage.
3.3 Addressing Fading
- Clean the Leather: Thoroughly clean the leather surface to remove any dirt or protectants.
- Apply Leather Dye: Use a sponge or airbrush to apply leather dye evenly over the faded area.
- Allow to Dry: Allow the dye to dry completely, following the manufacturer’s instructions.
- Apply Leather Conditioner: Apply a leather conditioner to moisturize the leather and enhance the color.
- Buff the Surface: Use a clean microfiber cloth to buff the surface, creating a uniform finish.
Restoring color to faded leather can significantly improve the overall appearance of your car seats.
4. Repairing Tears and Holes in Leather Car Seats
Repairing tears and holes requires a more involved process, but it is still manageable with the right tools and techniques.
4.1 Preparing the Damaged Area
- Clean the Area: Clean the leather around the tear or hole to remove any dirt or debris.
- Trim Loose Edges: Use scissors or a scalpel to trim any loose or frayed edges around the damage.
- Create a Backing: Insert a sub-patch beneath the tear or hole, ensuring it extends at least 1 cm beyond the edges.
- Secure the Patch: Use leather glue to secure the sub-patch to the underside of the leather, creating a stable backing for the repair.
Preparing the area properly ensures a strong and seamless repair.
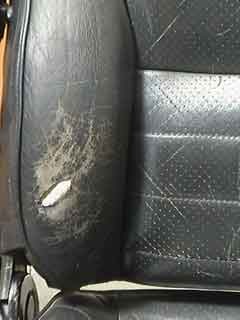
Preparing the leather car seat for repair by cleaning and trimming damaged edges.
4.2 Filling the Tear or Hole
- Apply Leather Filler: Use a palette knife to apply leather filler in thin layers, building up the filler to the level of the surrounding leather.
- Dry Each Layer: Allow each layer of filler to dry completely before applying the next, typically for 20-30 minutes.
- Smooth the Surface: Smooth each layer of filler with the palette knife, removing any excess and ensuring a level surface.
- Sand Lightly: Once the final layer is dry, use fine-grit sandpaper to lightly sand the filled area, creating a smooth, even surface.
Building up the filler in thin layers prevents shrinkage and ensures a durable repair.
4.3 Color Matching and Sealing
- Apply Colorant: Use a sponge or airbrush to apply colorant that matches the original leather color, blending it seamlessly with the surrounding leather.
- Apply Multiple Coats: Apply multiple thin coats of colorant, allowing each coat to dry before applying the next, until the repair is fully concealed.
- Seal the Repair: Apply a leather sealant to protect the repaired area and blend it with the surrounding leather, ensuring a uniform finish.
Color matching and sealing are crucial for achieving a professional-looking repair that is both durable and aesthetically pleasing.
5. Advanced Repair Techniques for Leather Car Seats
For more complex damage, such as large tears or significant wear, advanced repair techniques may be necessary.
5.1 Using a Leather Sewing Kit
- Prepare the Edges: Align the edges of the tear as closely as possible.
- Stitch the Tear: Use a leather sewing kit to stitch the tear together, creating a strong and durable seam.
- Apply Leather Glue: Apply leather glue along the seam to further secure the edges.
- Fill Gaps: Fill any remaining gaps with leather filler, following the steps outlined above.
- Color and Seal: Color match and seal the repaired area to blend it seamlessly with the surrounding leather.
Stitching provides additional strength and stability for larger tears, ensuring a long-lasting repair.
5.2 Replacing Leather Panels
- Remove the Damaged Panel: Carefully remove the damaged leather panel from the car seat.
- Create a Template: Use the old panel to create a template for the new panel.
- Cut the New Panel: Cut a new leather panel from a matching piece of leather, using the template as a guide.
- Install the New Panel: Install the new leather panel onto the car seat, securing it with leather glue and stitching if necessary.
- Blend the Repair: Blend the repaired area with the surrounding leather, using colorant and sealant to ensure a uniform finish.
Replacing leather panels is a more extensive repair, but it can restore the car seat to its original condition.
 Applying leather filler to repair a hole in a car seat.
5.3 Restoring Heavily Worn Leather
- Thorough Cleaning: Begin with a thorough cleaning to remove all surface contaminants.
- Leather Rejuvenator: Apply a leather rejuvenator to replenish lost oils and moisture.
- Filler Application: Address cracks and worn areas with multiple thin layers of leather filler.
- Sanding and Smoothing: Carefully sand and smooth the filled areas to match the original texture.
- Professional Coloring: Apply a custom-matched colorant with an airbrush for uniform coverage.
- Protective Sealant: Finish with a high-quality sealant to protect the restored leather.
This process can revitalize heavily worn leather, extending the life and appearance of your car seats.
6. Maintaining Leather Car Seats to Prevent Damage
Preventative maintenance is key to extending the life of your leather car seats. Regular cleaning and conditioning can prevent many types of damage.
6.1 Regular Cleaning and Conditioning
- Clean Regularly: Clean your leather car seats every 1-3 months, depending on usage and environmental factors.
- Use Leather Cleaner: Use a pH-balanced leather cleaner to remove dirt, grime, and spills.
- Condition After Cleaning: Apply a leather conditioner after cleaning to moisturize the leather and prevent it from drying out.
- Apply Sparingly: Apply conditioner sparingly, using a microfiber cloth to work it into the leather.
- Buff the Surface: Buff the surface with a clean, dry microfiber cloth to remove any excess conditioner.
Regular cleaning and conditioning keep the leather supple and prevent cracks and fading.
6.2 Protecting from UV Exposure
- Park in the Shade: Park your car in a shaded area whenever possible to reduce UV exposure.
- Use a Sunshade: Use a sunshade to protect the interior of your car from direct sunlight.
- Apply UV Protectant: Apply a leather UV protectant to your car seats to block harmful UV rays.
Protecting your leather from UV exposure can prevent fading and cracking, preserving its appearance and integrity.
6.3 Addressing Spills Promptly
- Blot Immediately: Blot spills immediately with a clean, dry cloth to prevent staining.
- Avoid Rubbing: Avoid rubbing the spill, as this can spread the stain and damage the leather.
- Use Leather Cleaner: Use a leather cleaner to gently clean the affected area, following the manufacturer’s instructions.
- Condition After Cleaning: Apply a leather conditioner to restore moisture to the leather.
Promptly addressing spills can prevent permanent stains and damage, keeping your leather car seats looking their best.
7. Choosing the Right Leather Repair Products
Selecting the right leather repair products is essential for achieving professional-quality results. CARDIAGTECH.NET offers a curated selection of products designed for various types of leather damage.
7.1 Types of Leather Cleaners
- pH-Balanced Cleaners: Gentle cleaners that remove dirt and grime without damaging the leather.
- Heavy-Duty Cleaners: Stronger cleaners for removing stubborn stains and buildup.
- Foam Cleaners: Easy-to-use cleaners that provide a deep clean without excessive saturation.
Choose a cleaner that is appropriate for the type of leather in your car and the severity of the dirt and grime.
7.2 Types of Leather Conditioners
- Cream Conditioners: Rich conditioners that provide deep moisturization and protection.
- Liquid Conditioners: Lightweight conditioners that are easy to apply and absorb quickly.
- UV Protectant Conditioners: Conditioners that contain UV protectants to prevent fading and cracking.
Choose a conditioner that meets the specific needs of your leather, considering its age, condition, and exposure to the elements.
7.3 Selecting Leather Fillers and Colorants
- Flexible Fillers: Fillers that remain flexible after drying, preventing cracks and maintaining a natural feel.
- Color-Matching Services: Services that provide custom-matched colorants to ensure a seamless repair.
- Water-Based Colorants: Environmentally friendly colorants that are easy to apply and clean up.
Selecting the right fillers and colorants ensures a repair that is both durable and aesthetically pleasing, seamlessly blending with the surrounding leather.
8. Professional vs. DIY Leather Repair: Which is Right for You?
Deciding whether to tackle leather repair yourself or hire a professional depends on the extent of the damage, your skill level, and your budget.
8.1 Assessing the Damage and Your Skills
- Minor Damage: Small cracks, scuffs, and minor fading can often be handled with a DIY repair kit.
- Moderate Damage: Larger tears, holes, and significant fading may require more advanced skills and tools.
- Extensive Damage: Severely worn leather, large panel replacements, and complex repairs are best left to professionals.
Consider your comfort level with DIY projects and your ability to invest time and effort into the repair.
8.2 Cost Comparison
- DIY Repair: Costs range from $20 to $100 for basic repair kits and tools.
- Professional Repair: Costs can range from $100 to $500 or more, depending on the extent of the damage and the complexity of the repair.
While DIY repairs can save money, professional repairs often provide superior results and long-term durability.
8.3 Benefits of Professional Repair
- Expertise: Professionals have the knowledge and experience to assess and repair leather damage effectively.
- Quality Materials: Professionals use high-quality materials and tools that are not always available to consumers.
- Guaranteed Results: Professional repairs often come with a guarantee, providing peace of mind.
- Time Savings: Hiring a professional saves you time and effort, allowing you to focus on other tasks.
For complex or extensive damage, professional repair is often the best option for achieving long-lasting and aesthetically pleasing results.
9. Common Mistakes to Avoid When Repairing Leather Car Seats
Avoiding common mistakes can ensure a successful and durable leather repair.
9.1 Over-Saturating the Leather
- Use Products Sparingly: Apply leather cleaners, conditioners, and colorants sparingly to avoid over-saturation.
- Wipe Excess Product: Wipe away any excess product with a clean, dry microfiber cloth.
- Allow Adequate Drying Time: Allow the leather to dry completely between applications.
Over-saturation can damage the leather and lead to discoloration or cracking.
9.2 Using Harsh Chemicals
- Avoid Abrasive Cleaners: Avoid using abrasive cleaners, solvents, or harsh chemicals that can strip the leather’s natural oils and damage its surface.
- Use pH-Balanced Products: Use pH-balanced leather cleaners and conditioners to protect the leather’s integrity.
- Test Products First: Test any new product on an inconspicuous area of the leather before applying it to the entire surface.
Harsh chemicals can cause irreversible damage to leather, so it’s essential to use products specifically designed for leather care.
9.3 Neglecting Preparation
- Clean Thoroughly: Thoroughly clean the leather surface before applying any repair products.
- Remove Loose Fibers: Remove any loose fibers or debris from the damaged area.
- Create a Stable Backing: Create a stable backing for tears and holes to ensure a durable repair.
Proper preparation is essential for achieving a strong and seamless repair.
9.4 Applying Filler Too Thickly
- Apply Thin Layers: Apply leather filler in thin layers, allowing each layer to dry completely before applying the next.
- Smooth Each Layer: Smooth each layer of filler with a palette knife, removing any excess and ensuring a level surface.
- Avoid Shrinkage: Applying filler too thickly can lead to shrinkage and cracking, compromising the repair.
Applying filler in thin layers prevents shrinkage and ensures a durable, long-lasting repair.
10. The Future of Leather Repair Technology
The field of leather repair is continually evolving, with new technologies and techniques emerging to improve the efficiency and effectiveness of repairs.
10.1 Advanced Materials and Techniques
- Self-Healing Leather: Research is underway to develop self-healing leather that can repair minor damage automatically.
- 3D-Printed Leather: 3D printing technology is being used to create custom leather patches and panels for seamless repairs.
- Laser Repair: Laser technology is being used to repair and restore leather surfaces with precision and minimal damage.
These advancements promise to revolutionize the field of leather repair, making it easier and more effective to restore and maintain leather products.
10.2 Sustainable Repair Solutions
- Eco-Friendly Products: Manufacturers are developing eco-friendly leather cleaners, conditioners, and repair products that are safe for the environment and human health.
- Recycled Leather: Recycled leather is being used to create new products and repair existing ones, reducing waste and promoting sustainability.
- Water-Based Technologies: Water-based technologies are being used to reduce the use of harmful solvents and chemicals in leather repair processes.
Sustainable repair solutions are becoming increasingly important as consumers seek to reduce their environmental impact and support responsible manufacturing practices.
10.3 Smart Technologies
- AI-Powered Color Matching: Artificial intelligence is being used to develop color-matching systems that can accurately identify and replicate leather colors.
- Smart Repair Tools: Smart repair tools are being equipped with sensors and data analytics to provide real-time feedback and guidance during the repair process.
- Online Diagnostic Tools: Online diagnostic tools are being developed to help consumers assess leather damage and identify the appropriate repair solutions.
Smart technologies are transforming the leather repair industry, making it easier for consumers and professionals to achieve high-quality results.
11. Real-World Examples of Leather Car Seat Repair
Examining real-world examples can provide valuable insights and inspiration for your own leather repair projects.
11.1 Case Study 1: Restoring a Vintage Car Seat
- The Challenge: A vintage car seat with extensive cracking, fading, and wear.
- The Solution: A combination of thorough cleaning, leather rejuvenation, filler application, color matching, and protective sealing.
- The Result: A beautifully restored car seat that looks and feels like new, preserving the value and authenticity of the vintage car.
11.2 Case Study 2: Repairing a Modern Car Seat Tear
- The Challenge: A large tear in a modern car seat caused by accidental damage.
- The Solution: Stitching the tear, applying leather glue, filling gaps with leather filler, and color matching to blend the repair.
- The Result: A seamless repair that is both durable and aesthetically pleasing, restoring the car seat to its original condition.
11.3 Case Study 3: Preventing Damage with Regular Maintenance
- The Challenge: Maintaining the pristine condition of new leather car seats.
- The Solution: Regular cleaning, conditioning, UV protection, and prompt attention to spills.
- The Result: Leather car seats that remain in excellent condition for years, preserving their appearance and value.
These real-world examples demonstrate the effectiveness of various leather repair techniques and the importance of preventative maintenance.
12. Frequently Asked Questions (FAQs) About Leather Car Seat Repair
Addressing common questions can provide clarity and confidence for those undertaking leather car seat repair.
12.1 Can I use household cleaners on leather car seats?
No, household cleaners can damage leather. Use pH-balanced leather cleaners specifically designed for car interiors.
12.2 How often should I condition my leather car seats?
Condition your leather car seats every 1-3 months to maintain their moisture and prevent cracking.
12.3 What is the best way to protect leather car seats from sun damage?
Use a sunshade, park in the shade, and apply a UV protectant to your leather car seats.
12.4 Can I repair a tear in a leather car seat myself?
Yes, small tears can be repaired with a leather repair kit. Larger tears may require professional assistance.
12.5 How do I match the color of my leather car seats?
Use a color-matching service or take a sample of your leather to a professional for custom color mixing.
12.6 What is leather filler?
Leather filler is a compound used to fill cracks, holes, and other imperfections in leather surfaces.
12.7 How do I apply leather filler?
Apply leather filler in thin layers, allowing each layer to dry before applying the next. Smooth each layer with a palette knife.
12.8 How do I clean a stain on a leather car seat?
Blot the stain immediately with a clean, dry cloth. Use a leather cleaner to gently clean the area.
12.9 What tools do I need to repair leather car seats?
You will need leather cleaner, leather conditioner, leather filler, colorant, sealant, applicators, sandpaper, and scissors or a scalpel.
12.10 Is it worth repairing leather car seats?
Yes, repairing leather car seats can restore their appearance, extend their lifespan, and maintain the value of your vehicle.
Repairing leather car seats is a rewarding endeavor that can restore the beauty and comfort of your car’s interior. By understanding the types of damage, using the right tools and techniques, and maintaining your leather car seats properly, you can enjoy them for years to come. CARDIAGTECH.NET is your reliable partner, providing quality tools and materials to make your auto repair projects a success.
Are you ready to restore your leather car seats to their former glory? Contact CARDIAGTECH.NET today for expert advice and the best auto repair tools on the market. Our friendly staff is here to answer all your questions and provide tailored advice to help you select the right tools for your specific needs. Reach out to us at 276 Reock St, City of Orange, NJ 07050, United States, call or WhatsApp us at +1 (641) 206-8880, or visit our website at CARDIAGTECH.NET. We’re here to help you achieve professional-quality results and ensure your complete satisfaction. Don’t hesitate—contact us today and let us help you transform your leather car seats!