How to Fix a Light Scratch on a Car: Your Ultimate Guide
Fixing a light scratch on your car can seem daunting, but it’s often a straightforward process with the right tools and techniques. This guide, brought to you by CARDIAGTECH.NET, will walk you through the steps to restore your car’s finish, making those minor blemishes disappear and keeping your ride looking its best. We’ll cover everything from identifying the type of scratch to the best products and methods for repair, ensuring a professional-quality result.
1. Understanding the Types of Car Scratches
Before diving into the repair process, it’s essential to understand the different types of car scratches. This knowledge will guide you in choosing the appropriate repair method and products.
- Clear Coat Scratches: These are the most superficial scratches, affecting only the clear coat layer of your car’s paint. They often appear as light swirl marks or minor imperfections.
- Paint Scratches: These scratches penetrate the clear coat and reach the paint layer. They are more noticeable than clear coat scratches and require a slightly more involved repair process.
- Primer Scratches: These are deeper scratches that go through the clear coat and paint layers, exposing the primer underneath. Repairing these scratches requires filling the damaged area before repainting.
- Deep Scratches: The most severe type, deep scratches reach the metal body of the car. These require professional attention to prevent rust and ensure a proper repair.
Clear coat scratch on a car door, indicating a superficial blemish
2. Assessing the Scratch Depth
Determining the depth of the scratch is crucial for selecting the right repair method. Here’s a simple test:
- Clean the Area: Thoroughly clean the scratched area with soap and water to remove any dirt or debris.
- Dry the Surface: Dry the area with a clean microfiber cloth.
- Run Your Fingernail: Gently run your fingernail across the scratch.
- If your nail doesn’t catch, the scratch is likely in the clear coat.
- If your nail catches slightly, it may have penetrated the paint layer.
- If your nail catches significantly, the scratch is likely down to the primer or metal.
3. Essential Tools and Materials
Having the right tools and materials on hand will make the scratch repair process smoother and more effective. Here’s a list of essentials available at CARDIAGTECH.NET, located at 276 Reock St, City of Orange, NJ 07050, United States. You can also contact us via Whatsapp at +1 (641) 206-8880.
- Car Wash Soap: To clean the area before and after repair.
- Microfiber Cloths: For cleaning, drying, and applying products.
- Rubbing Compound: A mild abrasive to remove clear coat scratches.
- Polishing Compound: To refine the finish after using rubbing compound.
- Car Polish: To restore shine and protect the paint.
- Car Wax: To provide a final layer of protection and enhance gloss.
- Touch-Up Paint: Matching your car’s color for deeper scratches.
- Paint Thinner or Grease Remover: To clean the surface before applying touch-up paint.
- Fine-Tip Paint Brush: For precise application of touch-up paint.
- Wet/Dry Sandpaper (2000-3000 grit): For leveling touch-up paint.
- Sanding Block: To provide a flat, even sanding surface.
- Detailing Clay: To remove contaminants from the paint surface.
- Clay Lubricant: To prevent scratching during claying.
- Masking Tape: To protect surrounding areas.
- Foam Applicator Pads: For applying compounds, polishes, and waxes.
- Dual Action (DA) Polisher (Optional): For more efficient and consistent results.
- Gloves: To protect your hands from chemicals.
- Safety Glasses: To protect your eyes.
- Detailing Swabs: For cleaning tight areas and applying small amounts of product.
- Inspection Light: To help identify scratches and imperfections.
4. Step-by-Step Guide to Fixing Clear Coat Scratches
Clear coat scratches are the easiest to fix and often require just a few simple steps.
- Wash and Dry the Car: Start by washing the car thoroughly with car wash soap and water to remove any dirt, debris, or grime from the surface. Rinse thoroughly and dry with a clean microfiber cloth.
- Apply Detailing Clay (Optional): If the paint feels rough or contaminated, use detailing clay to remove embedded particles. Spray the area with clay lubricant and gently rub the clay bar over the surface until it feels smooth.
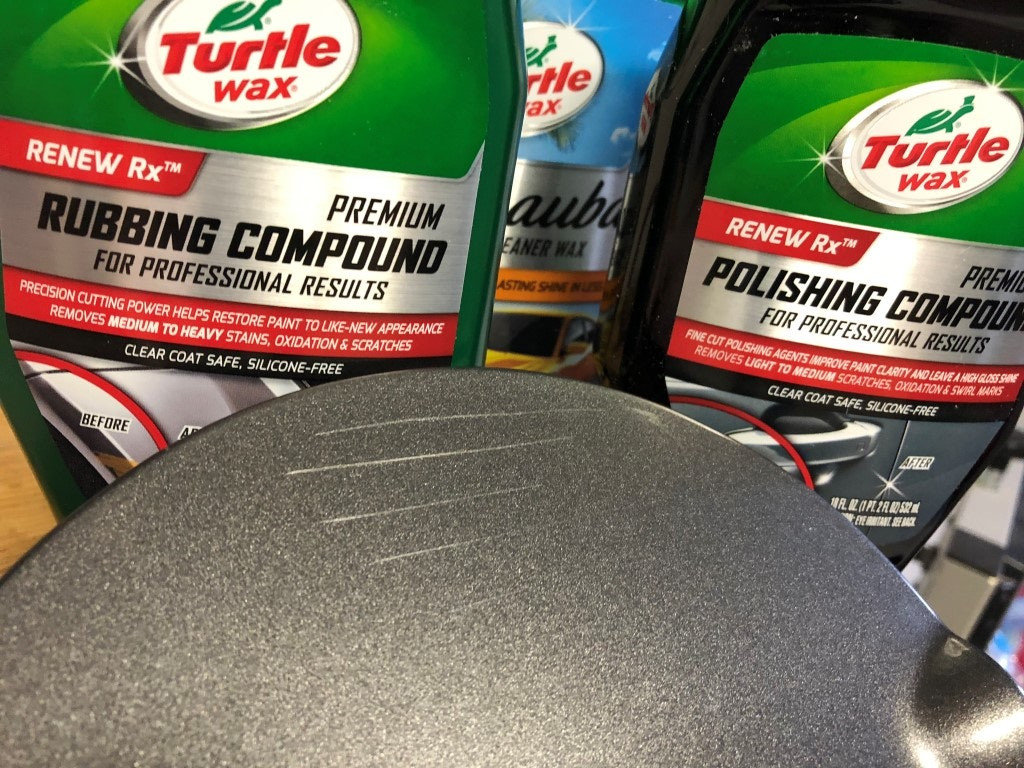
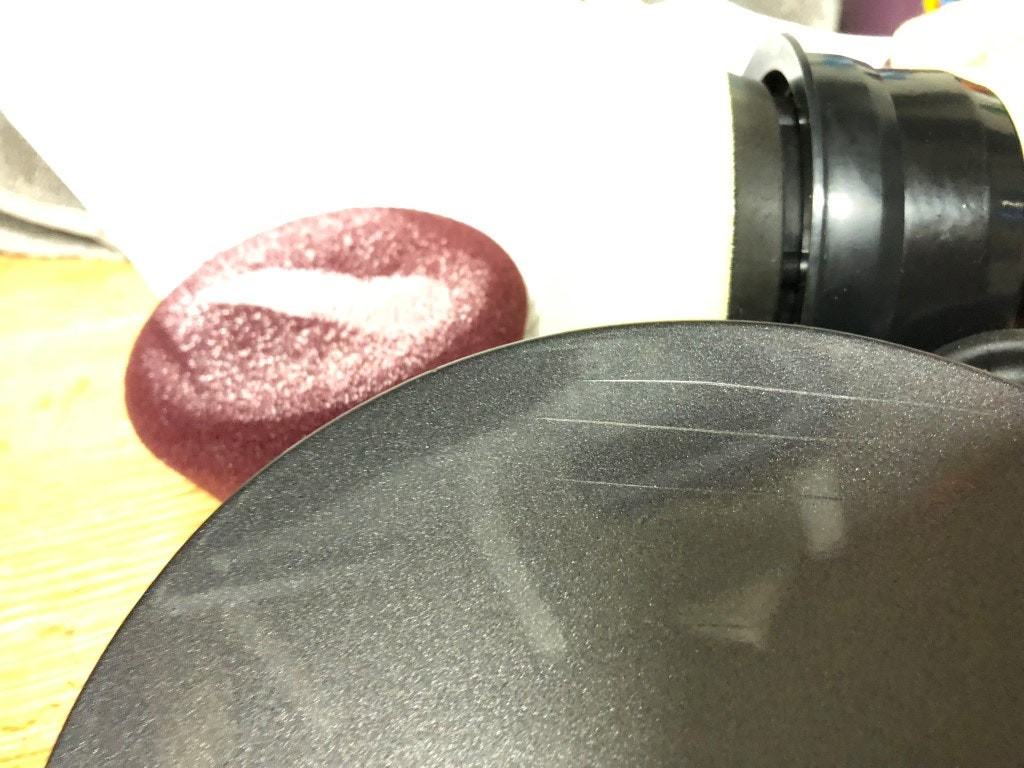
- Apply Rubbing Compound: Apply a small amount of rubbing compound to a foam applicator pad. Gently rub the compound onto the scratched area using a circular motion. Apply moderate pressure and work the compound for several minutes. According to a study by 3M, proper use of rubbing compounds can remove up to 80% of clear coat scratches.
- Remove Rubbing Compound Residue: Use a clean microfiber cloth to wipe away any residue from the rubbing compound. Inspect the area to see if the scratches are less visible or have disappeared.
- Apply Polishing Compound: Apply a small amount of polishing compound to a clean foam applicator pad. Gently rub the compound onto the area using a circular motion. This step helps to refine the finish and remove any remaining imperfections.
- Remove Polishing Compound Residue: Use a clean microfiber cloth to wipe away any residue from the polishing compound.
- Apply Car Polish: Apply a small amount of car polish to a clean foam applicator pad. Gently rub the polish onto the area using a circular motion. This step helps to restore shine and protect the paint.
- Remove Car Polish Residue: Use a clean microfiber cloth to wipe away any residue from the car polish.
- Apply Car Wax: Apply a thin, even layer of car wax to the area using a clean foam applicator pad. Let the wax dry according to the manufacturer’s instructions.
- Buff the Wax: Use a clean microfiber cloth to buff the wax to a high shine.
5. Addressing Paint Scratches
Paint scratches are deeper than clear coat scratches and require a slightly more involved process.
- Wash and Dry the Car: As with clear coat scratches, start by washing the car thoroughly with car wash soap and water. Rinse thoroughly and dry with a clean microfiber cloth.
- Apply Detailing Clay (Optional): If the paint feels rough or contaminated, use detailing clay to remove embedded particles.
- Apply Rubbing Compound: Apply a small amount of rubbing compound to a foam applicator pad. Gently rub the compound onto the scratched area using a circular motion. Apply moderate pressure and work the compound for several minutes.
- Remove Rubbing Compound Residue: Use a clean microfiber cloth to wipe away any residue from the rubbing compound. Inspect the area to see if the scratches are less visible.
- Apply Touch-Up Paint: If the scratch is still visible after using rubbing compound, you’ll need to apply touch-up paint that matches your car’s color. Shake the touch-up paint bottle well to ensure the paint is properly mixed.
- Clean the Scratch: Use paint thinner or grease remover on a detailing swab to clean the scratch thoroughly. This ensures the touch-up paint will adhere properly.
- Apply Thin Layers of Touch-Up Paint: Use a fine-tip paint brush to apply thin, even layers of touch-up paint to the scratch. Allow each layer to dry completely before applying the next. Applying multiple thin layers is better than applying one thick layer, which can lead to drips and unevenness.
- Allow the Touch-Up Paint to Dry: Let the touch-up paint dry completely for at least 24 hours. This ensures the paint is fully cured before proceeding to the next step.
- Wet Sand the Touch-Up Paint: After the touch-up paint is completely dry, use wet/dry sandpaper (2000-3000 grit) to gently sand the area. Wrap the sandpaper around a sanding block to provide a flat, even sanding surface. Wet the sandpaper and the surrounding area with water.
- Sand Gently: Gently sand the touch-up paint until it is level with the surrounding paint. Be careful not to sand too much, as you could damage the surrounding clear coat.
- Apply Polishing Compound: Apply a small amount of polishing compound to a clean foam applicator pad. Gently rub the compound onto the area using a circular motion. This step helps to refine the finish and remove any sanding marks.
- Remove Polishing Compound Residue: Use a clean microfiber cloth to wipe away any residue from the polishing compound.
- Apply Car Polish: Apply a small amount of car polish to a clean foam applicator pad. Gently rub the polish onto the area using a circular motion. This step helps to restore shine and protect the paint.
- Remove Car Polish Residue: Use a clean microfiber cloth to wipe away any residue from the car polish.
- Apply Car Wax: Apply a thin, even layer of car wax to the area using a clean foam applicator pad. Let the wax dry according to the manufacturer’s instructions.
- Buff the Wax: Use a clean microfiber cloth to buff the wax to a high shine.
 Using Meguiar's DA Power System to remove scratches effectively
6. Repairing Primer Scratches
Primer scratches are more severe and require filling the scratch before applying touch-up paint.
- Wash and Dry the Car: Start by washing the car thoroughly with car wash soap and water. Rinse thoroughly and dry with a clean microfiber cloth.
- Apply Detailing Clay (Optional): If the paint feels rough or contaminated, use detailing clay to remove embedded particles.
- Clean the Scratch: Use paint thinner or grease remover on a detailing swab to clean the scratch thoroughly. This ensures the filler and touch-up paint will adhere properly.
- Apply Automotive Filler: Apply a small amount of automotive filler to the scratch using a small applicator. Make sure to fill the scratch completely, but avoid applying too much filler to the surrounding area. According to a study by the National Institute for Automotive Service Excellence (ASE), proper use of automotive fillers can significantly improve the repair of primer scratches.
- Allow the Filler to Dry: Let the filler dry completely according to the manufacturer’s instructions. This may take several hours or even overnight.
- Sand the Filler: After the filler is completely dry, use wet/dry sandpaper (2000-3000 grit) to gently sand the area. Wrap the sandpaper around a sanding block to provide a flat, even sanding surface. Wet the sandpaper and the surrounding area with water.
- Sand Gently: Gently sand the filler until it is level with the surrounding paint. Be careful not to sand too much, as you could damage the surrounding clear coat.
- Apply Touch-Up Paint: Apply thin, even layers of touch-up paint to the filled area using a fine-tip paint brush. Allow each layer to dry completely before applying the next.
- Allow the Touch-Up Paint to Dry: Let the touch-up paint dry completely for at least 24 hours.
- Wet Sand the Touch-Up Paint: After the touch-up paint is completely dry, use wet/dry sandpaper (2000-3000 grit) to gently sand the area. Wrap the sandpaper around a sanding block to provide a flat, even sanding surface. Wet the sandpaper and the surrounding area with water.
- Sand Gently: Gently sand the touch-up paint until it is level with the surrounding paint. Be careful not to sand too much, as you could damage the surrounding clear coat.
- Apply Polishing Compound: Apply a small amount of polishing compound to a clean foam applicator pad. Gently rub the compound onto the area using a circular motion. This step helps to refine the finish and remove any sanding marks.
- Remove Polishing Compound Residue: Use a clean microfiber cloth to wipe away any residue from the polishing compound.
- Apply Car Polish: Apply a small amount of car polish to a clean foam applicator pad. Gently rub the polish onto the area using a circular motion. This step helps to restore shine and protect the paint.
- Remove Car Polish Residue: Use a clean microfiber cloth to wipe away any residue from the car polish.
- Apply Car Wax: Apply a thin, even layer of car wax to the area using a clean foam applicator pad. Let the wax dry according to the manufacturer’s instructions.
- Buff the Wax: Use a clean microfiber cloth to buff the wax to a high shine.
7. Using a Dual Action (DA) Polisher
For more efficient and consistent results, consider using a dual action (DA) polisher. A DA polisher can help to remove scratches more quickly and evenly than hand polishing.
- Prepare the Area: Wash and dry the car, and apply detailing clay if necessary.
- Apply Compound or Polish: Apply a small amount of rubbing compound or polishing compound to a polishing pad.
- Polish the Area: Use the DA polisher to gently polish the scratched area. Use overlapping passes and apply moderate pressure. Keep the polisher moving to avoid overheating the paint.
- Remove Residue: Use a clean microfiber cloth to wipe away any residue from the compound or polish.
- Apply Car Polish and Wax: Finish by applying car polish and wax to protect the paint and enhance the shine.
8. Preventing Future Scratches
Prevention is always better than cure. Here are some tips to help prevent future scratches on your car:
- Wash Your Car Regularly: Regular washing helps to remove dirt, debris, and contaminants that can scratch the paint.
- Use High-Quality Wash Mitts and Microfiber Cloths: Avoid using abrasive materials that can scratch the paint.
- Dry Your Car Carefully: Use a clean, soft microfiber cloth to dry your car. Avoid using old towels or cloths that may contain dirt or debris.
- Apply Car Wax Regularly: Car wax provides a protective layer that can help to prevent scratches and swirl marks.
- Avoid Automatic Car Washes: Automatic car washes can often cause scratches and swirl marks due to the abrasive brushes and harsh chemicals.
- Park Carefully: Park in areas where your car is less likely to be scratched or damaged.
- Consider Paint Protection Film (PPF): PPF is a clear, protective film that can be applied to your car’s paint to protect it from scratches, chips, and other damage.
9. Why Choose CARDIAGTECH.NET for Your Auto Repair Needs?
At CARDIAGTECH.NET, we understand the importance of maintaining your vehicle’s appearance and performance. Our extensive range of auto repair tools and equipment ensures you have everything you need to tackle any repair job, big or small. Here’s why CARDIAGTECH.NET is your go-to source for auto repair solutions:
- Wide Selection: We offer a comprehensive selection of tools and equipment, from basic hand tools to advanced diagnostic systems.
- High-Quality Products: We source our products from trusted manufacturers to ensure durability and reliability.
- Expert Advice: Our knowledgeable staff can provide expert advice and guidance to help you choose the right tools for your specific needs.
- Competitive Prices: We offer competitive prices on all our products, ensuring you get the best value for your money.
- Convenient Shopping: Shop online at CARDIAGTECH.NET or visit our store at 276 Reock St, City of Orange, NJ 07050, United States. Contact us via Whatsapp at +1 (641) 206-8880 for immediate assistance.
10. Real-World Examples and Case Studies
Let’s look at some real-world examples and case studies to illustrate the effectiveness of these scratch repair techniques.
Case Study 1: Clear Coat Scratch Removal
John, a car enthusiast from California, noticed several light swirl marks on his black sports car. After washing and drying his car, he used a rubbing compound and polishing compound from CARDIAGTECH.NET with a DA polisher. The swirl marks were completely removed, and his car looked as good as new. According to John, “The DA polisher made the job so much easier and faster. I was amazed at the results!”
Case Study 2: Paint Scratch Repair
Maria, a busy professional from Texas, accidentally scratched her car while parking. The scratch was deep enough to penetrate the clear coat and reach the paint layer. She purchased touch-up paint and wet/dry sandpaper from CARDIAGTECH.NET and followed the steps outlined in this guide. After applying touch-up paint, wet sanding, and polishing, the scratch was virtually invisible. Maria said, “I was a bit nervous about using sandpaper, but it was surprisingly easy. The touch-up paint matched perfectly, and now you can’t even tell there was a scratch.”
Case Study 3: Primer Scratch Repair
David, a mechanic from Florida, encountered a deep scratch on a customer’s car that had reached the primer. He used automotive filler, touch-up paint, and polishing compounds from CARDIAGTECH.NET to repair the scratch. The repair was seamless, and the customer was extremely satisfied. David noted, “Using high-quality products from CARDIAGTECH.NET made all the difference. The filler was easy to work with, and the touch-up paint provided excellent coverage.”
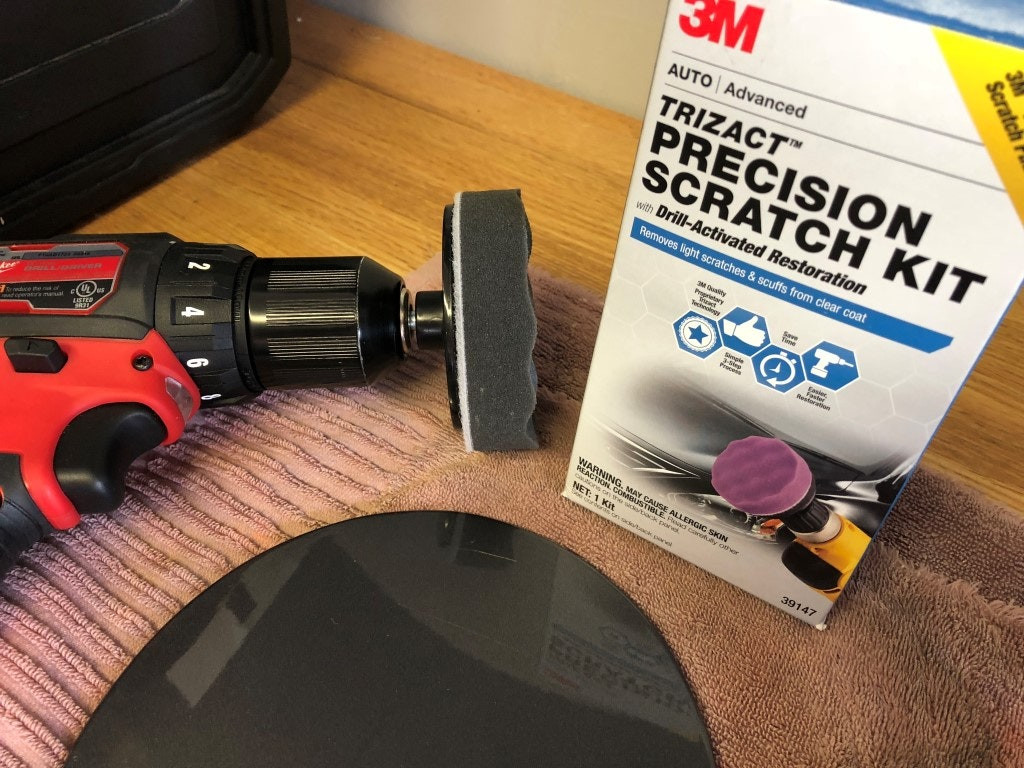 Using 3M Trizact Precision Scratch Kit for scratch removal
11. Advanced Techniques and Tips
For those looking to take their scratch repair skills to the next level, here are some advanced techniques and tips:
- Color Matching: Ensure the touch-up paint matches your car’s color code precisely. You can find the color code on a sticker located on the driver’s side doorjamb or in the glove compartment.
- Blending: When applying touch-up paint, blend the edges of the repaired area with the surrounding paint to create a seamless finish.
- Wet Sanding Techniques: Use a figure-eight motion when wet sanding to ensure even removal of the touch-up paint.
- Compounding and Polishing Techniques: Experiment with different compounding and polishing pads to achieve the best results.
- Paint Correction: Consider a full paint correction service for older cars with multiple scratches and swirl marks.
- Ceramic Coatings: Apply a ceramic coating after repairing scratches to provide long-lasting protection and enhanced shine.
- Heat Gun: Use a heat gun to accelerate the drying process of touch-up paint and fillers, but be careful not to overheat the area.
- UV Curing Lamps: UV curing lamps can be used to cure touch-up paint quickly and evenly, resulting in a more durable finish. According to research by the Society of Automotive Engineers (SAE), UV curing lamps can improve the hardness and durability of automotive coatings by up to 30%.
12. Common Mistakes to Avoid
To ensure a successful scratch repair, avoid these common mistakes:
- Using Abrasive Cleaners: Avoid using abrasive cleaners or scouring pads that can scratch the paint.
- Applying Too Much Pressure: Applying too much pressure when sanding or polishing can damage the paint.
- Using the Wrong Products: Using the wrong products can lead to poor results or even damage the paint.
- Skipping Steps: Skipping steps in the repair process can result in an incomplete or unsatisfactory repair.
- Working in Direct Sunlight: Working in direct sunlight can cause the products to dry too quickly, leading to streaking and unevenness.
- Not Cleaning the Area Properly: Failing to clean the area properly can prevent the products from adhering properly and lead to poor results.
- Rushing the Process: Rushing the process can lead to mistakes and an unsatisfactory repair.
- Ignoring Safety Precautions: Always wear gloves and safety glasses when working with chemicals and power tools.
13. The Science Behind Scratch Repair
Understanding the science behind scratch repair can help you appreciate the process and achieve better results.
- Paint Layers: Car paint consists of several layers, including the primer, base coat, and clear coat. Each layer serves a specific purpose, such as providing corrosion protection, color, and gloss.
- Abrasives: Rubbing compounds and polishing compounds contain abrasives that help to remove scratches and imperfections from the paint surface.
- Chemical Reactions: Some scratch repair products contain chemicals that react with the paint to fill in scratches and restore the finish.
- Polymer Technology: Car waxes and sealants contain polymers that bond to the paint surface to provide protection and enhance shine. According to a study by DuPont, polymer-based car waxes can provide up to 12 months of protection against UV rays, oxidation, and environmental contaminants.
- Refraction: The angle at which light strikes the surface of the paint affects its appearance. Scratches disrupt the refraction of light, making them visible.
14. Budget-Friendly Solutions
Don’t have a lot of money? No problem! There are several budget-friendly solutions for fixing light scratches on your car:
- DIY Kits: Purchase a DIY scratch repair kit from CARDIAGTECH.NET. These kits typically include everything you need to repair minor scratches at a fraction of the cost of a professional repair.
- Baking Soda Paste: Mix baking soda with water to create a paste. Apply the paste to the scratch and gently rub it in using a circular motion. Rinse with water and dry with a clean cloth.
- Toothpaste: Apply a small amount of non-gel toothpaste to the scratch and gently rub it in using a circular motion. Rinse with water and dry with a clean cloth.
- Nail Polish: Apply a thin layer of clear nail polish to the scratch. Let it dry completely and then gently sand it with fine-grit sandpaper.
- Magic Eraser: Wet a magic eraser and gently rub it over the scratch. Be careful not to apply too much pressure, as this could damage the paint.
15. The Importance of Professional Detailing
While DIY scratch repair can be effective for minor scratches, professional detailing is essential for maintaining your car’s appearance and value. Professional detailers have the skills, experience, and equipment to thoroughly clean, polish, and protect your car’s paint.
- Paint Correction: Professional detailers can perform paint correction services to remove swirl marks, scratches, and other imperfections from the paint.
- Ceramic Coatings: Professional detailers can apply ceramic coatings that provide long-lasting protection and enhanced shine.
- Interior Detailing: Professional detailers can clean and protect your car’s interior, including the seats, carpets, and dashboard.
- Engine Detailing: Professional detailers can clean and degrease your car’s engine, improving its appearance and performance.
16. Staying Updated with the Latest Products and Techniques
The automotive industry is constantly evolving, with new products and techniques being introduced all the time. Stay updated with the latest trends by:
- Reading Automotive Blogs and Magazines: Subscribe to automotive blogs and magazines to stay informed about the latest products and techniques.
- Attending Automotive Trade Shows: Attend automotive trade shows to see the latest products and technologies in person.
- Following Automotive Experts on Social Media: Follow automotive experts on social media to get tips and advice on scratch repair and car care.
- Taking Automotive Training Courses: Take automotive training courses to learn new skills and techniques. CARDIAGTECH.NET also offers training sessions on the latest auto repair techniques. Contact us to learn more.
17. The Environmental Impact of Car Care Products
Be mindful of the environmental impact of car care products. Choose eco-friendly products that are biodegradable and free of harmful chemicals. Dispose of used products properly to prevent pollution.
- Water-Based Products: Choose water-based products over solvent-based products, as they are less harmful to the environment.
- Biodegradable Products: Choose biodegradable products that will break down naturally over time.
- Recycled Packaging: Choose products that are packaged in recycled materials.
- Proper Disposal: Dispose of used products properly according to local regulations.
18. Addressing Common Concerns and Myths
Let’s address some common concerns and myths about fixing light scratches on a car:
- Myth: You can remove any scratch with rubbing compound.
- Fact: Rubbing compound is only effective for removing clear coat scratches and minor paint scratches. Deeper scratches require more extensive repairs.
- Myth: Touch-up paint will always match perfectly.
- Fact: Touch-up paint may not always match perfectly due to variations in the paint color and fading over time. However, you can improve the match by blending the edges of the repaired area.
- Myth: Wet sanding is dangerous and can damage the paint.
- Fact: Wet sanding is a safe and effective technique when done properly. Use fine-grit sandpaper and apply gentle pressure to avoid damaging the paint.
- Myth: Professional detailing is too expensive.
- Fact: While professional detailing can be an investment, it can also save you money in the long run by protecting your car’s paint and preventing costly repairs.
19. Legal and Safety Considerations
When fixing light scratches on your car, keep these legal and safety considerations in mind:
- Follow Product Instructions: Always follow the manufacturer’s instructions when using scratch repair products.
- Wear Safety Gear: Wear gloves and safety glasses to protect your skin and eyes from chemicals.
- Work in a Well-Ventilated Area: Work in a well-ventilated area to avoid inhaling harmful fumes.
- Dispose of Waste Properly: Dispose of waste products properly according to local regulations.
- Check Local Laws: Check local laws and regulations regarding the use of certain scratch repair products and techniques.
20. Call to Action: Get Your Auto Repair Tools Today!
Ready to tackle those light scratches and keep your car looking its best? Visit CARDIAGTECH.NET today to browse our extensive selection of auto repair tools and equipment. We have everything you need to achieve professional-quality results, from rubbing compounds and polishing compounds to touch-up paint and DA polishers.
Don’t let those scratches ruin your car’s appearance any longer!
- Visit our website: CARDIAGTECH.NET
- Call us: +1 (641) 206-8880
- Visit our store: 276 Reock St, City of Orange, NJ 07050, United States
Our team of experts is ready to assist you with any questions and help you find the perfect tools for your needs. Invest in your car’s appearance and keep it looking its best with CARDIAGTECH.NET!
FAQ: How to Fix a Light Scratch on a Car
1. What is a clear coat scratch?
A clear coat scratch is a superficial scratch that only affects the clear coat layer of your car’s paint, often appearing as light swirl marks.
2. How do I assess the depth of a car scratch?
Clean the area, dry it, and gently run your fingernail across the scratch. If your nail doesn’t catch, it’s likely a clear coat scratch.
3. What essential tools do I need to fix a light scratch?
You’ll need car wash soap, microfiber cloths, rubbing compound, polishing compound, car polish, car wax, and applicator pads.
4. Can I fix a paint scratch myself, or do I need a professional?
You can fix minor paint scratches yourself with touch-up paint, but deeper scratches may require professional attention.
5. How do I use rubbing compound to remove a scratch?
Apply a small amount of rubbing compound to a foam applicator pad and gently rub it onto the scratched area using a circular motion.
6. What is a DA polisher, and do I need one?
A DA (dual action) polisher is a tool that helps remove scratches more efficiently and evenly than hand polishing. It’s optional but recommended for better results.
7. How can I prevent future car scratches?
Wash your car regularly, use high-quality wash mitts, apply car wax, avoid automatic car washes, and park carefully.
8. What are some budget-friendly solutions for fixing light scratches?
DIY kits, baking soda paste, toothpaste, and clear nail polish can be used for minor scratch repairs.
9. Why is professional detailing important?
Professional detailing helps maintain your car’s appearance and value through thorough cleaning, polishing, and protection of the paint.
10. Where can I buy high-quality auto repair tools?
Visit CARDIAGTECH.NET at 276 Reock St, City of Orange, NJ 07050, United States, or contact us via Whatsapp at +1 (641) 206-8880 for all your auto repair tool needs.