How To Check The Operation Of The Brake Pedal: Free Play, Travel?
Checking the operation of the brake pedal, including free play and travel, is crucial for ensuring your vehicle’s safety and optimal braking performance. CARDIAGTECH.NET provides the tools and expertise to help you accurately assess and maintain your brake system, improving overall vehicle safety and performance. By understanding the nuances of brake pedal operation, you can ensure effective braking and prevent potential accidents.
1. What is Brake Pedal Free Play and Why Is It Important?
Brake pedal free play refers to the distance the brake pedal moves before you feel any resistance. According to a study by the National Highway Traffic Safety Administration (NHTSA), proper brake system maintenance significantly reduces the risk of accidents. Brake pedal free play is the amount of travel the brake pedal has before the master cylinder piston begins to move. Excessively reduced or absent free play could result in the brakes being applied when they are not actually needed.
Why is Proper Brake Pedal Free Play Important?
- Prevents Brake Drag: Too little free play can cause the brakes to drag, leading to overheating and premature wear.
- Ensures Effective Braking: Too much free play can delay brake engagement, reducing stopping power.
- Maintains System Integrity: Proper free play ensures the entire braking system operates within its intended parameters, preventing component stress and failure.
How to Check Brake Pedal Free Play?
- Locate the Brake Pedal: Identify the brake pedal in your vehicle.
- Measure the Initial Movement: Use a ruler to measure the distance the pedal moves freely before you feel resistance.
- Compare to Specifications: Consult your vehicle’s service manual for the manufacturer’s specified range of free play. A typical range is 0.1 to 0.4 inches (2.5 to 10 mm).
- Inspect the Pedal Linkage: Check for any obstructions or mechanical issues that may affect the pedal’s movement.
- Adjust if Necessary: If the free play is outside the specified range, adjust the brake pedal linkage following the manufacturer’s instructions.
Tools Needed for Checking Brake Pedal Free Play
| Tool | Description | Benefits |
|---|---|---|
| Ruler or Measuring Tape | Used to measure the distance the brake pedal moves freely. | Provides accurate measurements for comparison against manufacturer specifications. |
| Service Manual | Contains manufacturer’s specifications for brake pedal free play. | Ensures adjustments are made according to the vehicle’s requirements. |
| Wrench Set | Needed to adjust the brake pedal linkage. | Allows for precise adjustments to achieve the correct free play. |
| Flashlight | Helps to illuminate the area around the brake pedal and linkage for better visibility. | Aids in identifying obstructions or mechanical issues that may affect the pedal’s movement. |
What are Common Issues That Affect Brake Pedal Free Play?
- Worn Linkage Components: Over time, the bushings and joints in the brake pedal linkage can wear out, increasing free play.
- Improper Adjustments: Previous repairs or adjustments may not have been performed correctly, leading to incorrect free play.
- Corrosion: Rust and corrosion can seize components, restricting movement and affecting free play.
Why Choose CARDIAGTECH.NET for Your Brake System Needs?
CARDIAGTECH.NET offers a wide range of diagnostic tools and repair equipment designed to help you accurately assess and adjust brake pedal free play. Our products ensure precise measurements and adjustments, helping you maintain the safety and performance of your vehicle’s braking system.
2. Understanding Brake Pedal Travel: What It Is and How to Check It
Brake pedal travel refers to the total distance the brake pedal moves from its resting position to the point where the brakes are fully engaged. According to the Society of Automotive Engineers (SAE), consistent brake pedal travel is essential for predictable braking performance. Brake pedal travel is the distance the pedal moves from its resting position to when the brakes are fully applied.
Why is Brake Pedal Travel Important?
- Indicates Brake System Health: Excessive travel can indicate worn brake pads, air in the brake lines, or a faulty master cylinder.
- Ensures Adequate Stopping Power: Sufficient travel ensures the brakes can generate enough force to stop the vehicle safely.
- Maintains Driver Confidence: Consistent pedal feel and travel provide drivers with confidence in their vehicle’s braking ability.
How to Check Brake Pedal Travel?
- Park on a Level Surface: Ensure the vehicle is parked on a level surface with the engine off.
- Measure Initial Position: With a ruler or measuring tape, note the distance from the pedal to a fixed point, such as the floor or dashboard.
- Apply the Brake Pedal: Firmly press the brake pedal until it stops.
- Measure Final Position: Measure the distance from the pedal to the same fixed point.
- Calculate the Travel: Subtract the final measurement from the initial measurement to determine the total pedal travel.
- Compare to Specifications: Consult your vehicle’s service manual for the manufacturer’s specified range of brake pedal travel. A typical range is 2 to 4 inches (50 to 100 mm).
- Check for Sponginess: Note if the pedal feels spongy or soft, which can indicate air in the brake lines.
Tools Needed for Checking Brake Pedal Travel
| Tool | Description | Benefits |
|---|---|---|
| Ruler or Measuring Tape | Used to measure the distance the brake pedal travels. | Provides accurate measurements for comparison against manufacturer specifications. |
| Service Manual | Contains manufacturer’s specifications for brake pedal travel. | Ensures measurements are evaluated against the vehicle’s requirements. |
| Assistant | Helps to apply the brake pedal while you measure. | Simplifies the measurement process, especially when precise measurements are needed. |
What are Common Issues That Affect Brake Pedal Travel?
- Worn Brake Pads: As brake pads wear down, the pistons in the calipers must travel further to make contact with the rotors, increasing pedal travel.
- Air in Brake Lines: Air bubbles in the brake lines compress when the pedal is pressed, leading to a spongy feel and increased travel.
- Faulty Master Cylinder: A leaking or failing master cylinder can reduce the hydraulic pressure in the system, resulting in increased pedal travel.
- Brake Fluid Leaks: Leaks in the brake lines or wheel cylinders can reduce hydraulic pressure and increase pedal travel.
- Improperly Adjusted Rear Brakes: If the rear brakes are not properly adjusted, the pedal may need to travel further to engage them.
Why Choose CARDIAGTECH.NET for Your Brake System Needs?
CARDIAGTECH.NET provides high-quality tools and equipment for diagnosing and repairing brake system issues. Our products, including brake bleeders and master cylinder testers, help you identify and resolve problems that affect brake pedal travel, ensuring your vehicle’s braking system operates safely and effectively.
Brake pedal free play
3. Step-by-Step Guide to Inspecting Brake Pedal Operation
Inspecting brake pedal operation involves checking both free play and travel to ensure the braking system functions correctly. According to a study by the University of Michigan Transportation Research Institute, regular brake system inspections can prevent up to 30% of brake-related accidents. This evaluation involves checking both free play and travel to ensure the braking system functions correctly.
Tools and Materials Needed
- Ruler or measuring tape
- Vehicle service manual
- Wrench set
- Flashlight
- Brake fluid
- Brake bleeder kit (if bleeding is required)
- Wheel chocks
Step 1: Preliminary Checks
- Park the Vehicle: Park the vehicle on a level surface and engage the parking brake.
- Consult the Service Manual: Refer to your vehicle’s service manual for specific brake pedal free play and travel specifications.
- Gather Tools: Collect all necessary tools and materials.
Step 2: Checking Brake Pedal Free Play
- Locate the Brake Pedal: Identify the brake pedal.
- Measure Initial Movement: Use a ruler to measure the distance the pedal moves freely before you feel resistance.
- Compare to Specifications: Ensure the measured free play is within the manufacturer’s specified range (typically 0.1 to 0.4 inches).
- Inspect the Pedal Linkage: Check for any obstructions or mechanical issues that may affect the pedal’s movement.
- Adjust if Necessary: If the free play is outside the specified range, adjust the brake pedal linkage following the manufacturer’s instructions.
Step 3: Checking Brake Pedal Travel
- Measure Initial Position: With the engine off, measure the distance from the pedal to a fixed point (e.g., floor or dashboard).
- Apply the Brake Pedal: Firmly press the brake pedal until it stops.
- Measure Final Position: Measure the distance from the pedal to the same fixed point.
- Calculate the Travel: Subtract the final measurement from the initial measurement to determine the total pedal travel.
- Compare to Specifications: Ensure the calculated travel is within the manufacturer’s specified range (typically 2 to 4 inches).
- Check for Sponginess: Note if the pedal feels spongy or soft, which can indicate air in the brake lines.
Step 4: Addressing Common Issues
- Worn Brake Pads:
- Symptoms: Excessive pedal travel, squealing or grinding noises.
- Solution: Replace worn brake pads.
- Air in Brake Lines:
- Symptoms: Spongy pedal feel, reduced braking power.
- Solution: Bleed the brake lines to remove air.
- Faulty Master Cylinder:
- Symptoms: Increased pedal travel, gradual loss of braking power.
- Solution: Replace the master cylinder.
- Brake Fluid Leaks:
- Symptoms: Low brake fluid level, soft pedal feel.
- Solution: Locate and repair the leak, then bleed the brakes.
- Improperly Adjusted Rear Brakes:
- Symptoms: Excessive pedal travel, weak rear braking.
- Solution: Adjust the rear brakes according to the manufacturer’s specifications.
Step 5: Final Inspection and Test Drive
- Inspect Brake Lines and Hoses: Check for any signs of leaks, cracks, or damage.
- Check Brake Fluid Level: Ensure the brake fluid reservoir is filled to the proper level.
- Test Drive: Perform a test drive in a safe area to ensure the brakes are functioning correctly. Pay attention to pedal feel, stopping power, and any unusual noises.
Why Choose CARDIAGTECH.NET for Your Brake System Needs?
CARDIAGTECH.NET offers a comprehensive range of brake system tools and equipment to facilitate accurate inspections and repairs. Our high-quality products help you ensure the safety and reliability of your vehicle’s braking system.
4. Symptoms of Brake Pedal Problems: What to Look For
Recognizing the symptoms of brake pedal problems is crucial for maintaining your vehicle’s safety. According to a report by the National Transportation Safety Board (NTSB), brake system failures are a significant cause of vehicle accidents. Prompt identification of these symptoms and subsequent repairs can prevent potential accidents and ensure optimal braking performance.
Common Symptoms of Brake Pedal Problems
| Symptom | Description | Potential Causes |
|---|---|---|
| Spongy Brake Pedal | The brake pedal feels soft and compressible when pressed. | Air in the brake lines, low brake fluid, or a faulty master cylinder. |
| Excessive Pedal Travel | The brake pedal travels further than usual before the brakes engage. | Worn brake pads, air in the brake lines, a faulty master cylinder, or improperly adjusted rear brakes. |
| Hard Brake Pedal | The brake pedal requires excessive force to engage the brakes. | A faulty brake booster, vacuum leak, or seized brake components. |
| Brake Pedal Vibration | The brake pedal vibrates or pulsates when pressed. | Warped brake rotors, uneven brake pad wear, or a faulty anti-lock braking system (ABS). |
| Brake Pedal Sinking | The brake pedal slowly sinks to the floor when held down. | A leaking master cylinder, brake fluid leak, or internal bypass in the brake system. |
| Squealing or Grinding Noises | Unusual noises are heard when the brake pedal is pressed. | Worn brake pads, damaged rotors, or debris in the brake system. |
| Pulling to One Side | The vehicle pulls to one side when braking. | Uneven brake pad wear, a stuck caliper, or a collapsed brake hose. |
| ABS Warning Light On | The anti-lock braking system (ABS) warning light illuminates on the dashboard. | A faulty ABS sensor, hydraulic unit, or electronic control unit. |
| Decreased Braking Power | The vehicle takes longer to stop than usual. | Worn brake pads, contaminated brake fluid, or a faulty brake booster. |
| Brake Fluid Leaks | Visible leaks of brake fluid around the wheels or master cylinder. | Damaged brake lines, hoses, wheel cylinders, or master cylinder seals. |
Why is it Important to Address Brake Pedal Problems Promptly?
- Safety: Faulty brakes can significantly increase the risk of accidents.
- Cost Savings: Addressing minor issues early can prevent more extensive and costly repairs later.
- Vehicle Performance: Proper brake function ensures optimal vehicle handling and control.
Why Choose CARDIAGTECH.NET for Your Brake System Needs?
CARDIAGTECH.NET provides a comprehensive range of diagnostic tools and repair equipment to help you identify and resolve brake pedal problems quickly and efficiently. Our high-quality products ensure your vehicle’s braking system operates safely and reliably.
5. How to Adjust Brake Pedal Free Play: A Detailed Guide
Adjusting brake pedal free play involves modifying the linkage between the brake pedal and the master cylinder. According to a technical bulletin from General Motors, proper adjustment of brake pedal free play is crucial for optimal braking performance and preventing brake drag. Improper brake pedal free play may lead to brake drag, overheating, and premature wear.
Tools and Materials Needed
- Wrench set
- Ruler or measuring tape
- Vehicle service manual
- Penetrating oil (if necessary)
- Wheel chocks
- Gloves
Step 1: Preliminary Steps
- Park the Vehicle: Park the vehicle on a level surface and engage the parking brake.
- Consult the Service Manual: Refer to your vehicle’s service manual for specific brake pedal free play specifications and adjustment procedures.
- Gather Tools: Collect all necessary tools and materials.
Step 2: Locating the Adjustment Point
- Identify the Adjustment Point: Locate the adjustment point on the brake pedal linkage. This is typically a threaded rod or clevis near the master cylinder.
- Clean the Area: Clean the adjustment point and surrounding area to remove dirt and debris. Apply penetrating oil if any components are seized or difficult to move.
Step 3: Measuring Initial Free Play
- Measure Initial Movement: Use a ruler to measure the distance the brake pedal moves freely before you feel resistance.
- Record the Measurement: Note the initial free play measurement for comparison after the adjustment.
Step 4: Adjusting the Free Play
- Loosen the Lock Nut: If there is a lock nut on the adjustment rod, loosen it using a wrench.
- Adjust the Rod: Turn the adjustment rod to increase or decrease the free play. Turning the rod in one direction will increase free play, while turning it in the opposite direction will decrease it.
- Check the Free Play: After each adjustment, measure the brake pedal free play to see if it is within the specified range.
- Tighten the Lock Nut: Once the free play is properly adjusted, tighten the lock nut to secure the adjustment rod in place.
Step 5: Verifying the Adjustment
- Measure Final Free Play: After tightening the lock nut, measure the brake pedal free play again to ensure it is still within the specified range.
- Test the Brakes: Start the engine and test the brakes to ensure they engage properly and there is no brake drag.
- Adjust if Necessary: If the free play is not within the specified range or there is brake drag, repeat the adjustment process.
Common Issues During Adjustment
- Seized Components: If the adjustment rod or lock nut is seized, apply penetrating oil and allow it to soak for several minutes before attempting to loosen it.
- Stripped Threads: Be careful not to strip the threads on the adjustment rod or lock nut. Use the correct size wrench and avoid excessive force.
- Incorrect Specifications: Always refer to the vehicle’s service manual for the correct brake pedal free play specifications.
Why Choose CARDIAGTECH.NET for Your Brake System Needs?
CARDIAGTECH.NET offers a range of high-quality tools and equipment to facilitate accurate brake pedal adjustments. Our products ensure precise adjustments, helping you maintain the safety and performance of your vehicle’s braking system.
6. The Role of Brake Fluid in Pedal Feel and Travel
Brake fluid plays a critical role in the operation of the braking system, affecting both pedal feel and travel. According to a study by the U.S. Department of Transportation, contaminated or low brake fluid can significantly reduce braking efficiency. Maintaining the correct type and level of brake fluid is essential for ensuring consistent and reliable braking performance.
How Brake Fluid Affects Pedal Feel and Travel
- Hydraulic Pressure: Brake fluid transmits hydraulic pressure from the master cylinder to the wheel cylinders or calipers. Any issues with the fluid can affect the pressure and, consequently, the pedal feel and travel.
- Compressibility: Brake fluid is designed to be incompressible. If air or moisture contaminates the fluid, it becomes compressible, leading to a spongy pedal feel and increased travel.
- Lubrication: Brake fluid lubricates the moving parts within the braking system, such as the master cylinder pistons and caliper pistons. Contaminated or old fluid can lose its lubricating properties, causing increased friction and affecting pedal feel.
Common Brake Fluid Issues
| Issue | Description | Effects on Pedal Feel and Travel |
|---|---|---|
| Air in Brake Lines | Air enters the brake lines due to leaks, improper bleeding, or a low fluid level. | Spongy pedal feel, increased pedal travel, and reduced braking power. |
| Moisture Contamination | Brake fluid is hygroscopic, meaning it absorbs moisture from the air. Over time, this moisture can corrode brake components and reduce the fluid’s boiling point. | Spongy pedal feel, reduced braking efficiency, and increased risk of brake fade. |
| Contamination with Debris | Dirt, rust, or other contaminants can enter the brake fluid, causing wear and damage to brake components. | Reduced braking performance, increased pedal travel, and potential damage to the master cylinder and calipers. |
| Low Brake Fluid Level | Leaks or worn brake components can cause the brake fluid level to drop. | Increased pedal travel, reduced braking power, and potential brake failure. |
| Incorrect Brake Fluid Type | Using the wrong type of brake fluid can damage brake components and reduce braking efficiency. | Reduced braking performance, damage to seals and hoses, and potential brake failure. |
How to Maintain Proper Brake Fluid Levels and Condition
- Check the Fluid Level Regularly: Inspect the brake fluid reservoir at least once a month and ensure the fluid is at the proper level.
- Use the Correct Type of Fluid: Refer to your vehicle’s service manual for the correct type of brake fluid.
- Flush the Brake Fluid Periodically: Follow the manufacturer’s recommended interval for flushing the brake fluid (typically every two to three years).
- Inspect for Leaks: Check for any signs of brake fluid leaks around the wheels, master cylinder, and brake lines.
- Bleed the Brakes: If the brake pedal feels spongy, bleed the brakes to remove any air from the system.
Why Choose CARDIAGTECH.NET for Your Brake System Needs?
CARDIAGTECH.NET offers a comprehensive range of brake system tools and equipment, including brake fluid testers and brake bleeders, to help you maintain proper brake fluid levels and condition. Our high-quality products ensure your vehicle’s braking system operates safely and reliably.
7. Brake Pedal Height Adjustment: What You Need to Know
Brake pedal height adjustment involves setting the position of the brake pedal relative to the accelerator pedal and the floor. According to a safety report by the European New Car Assessment Programme (Euro NCAP), proper pedal placement enhances driver comfort and control, improving overall vehicle safety. Optimizing brake pedal height ensures comfortable and efficient braking.
Why is Brake Pedal Height Important?
- Driver Comfort: Proper pedal height reduces strain and fatigue, especially during long drives.
- Ergonomics: Correct pedal placement allows for smooth and efficient transitions between the accelerator and brake pedals.
- Safety: Optimized pedal height ensures quick and effective braking in emergency situations.
How to Check Brake Pedal Height
- Consult the Service Manual: Refer to your vehicle’s service manual for specific brake pedal height specifications.
- Measure the Height: Use a ruler to measure the distance from the top of the brake pedal to the floor or a designated reference point.
- Compare to Specifications: Ensure the measured height is within the manufacturer’s specified range.
How to Adjust Brake Pedal Height
- Locate the Adjustment Mechanism: Identify the adjustment mechanism for the brake pedal height. This is typically a threaded rod or adjustable stop near the pedal assembly.
- Loosen the Lock Nut: If there is a lock nut on the adjustment mechanism, loosen it using a wrench.
- Adjust the Height: Turn the adjustment mechanism to raise or lower the brake pedal.
- Check the Height: After each adjustment, measure the brake pedal height to see if it is within the specified range.
- Tighten the Lock Nut: Once the height is properly adjusted, tighten the lock nut to secure the adjustment mechanism in place.
Common Issues During Adjustment
- Seized Components: If the adjustment mechanism is seized, apply penetrating oil and allow it to soak for several minutes before attempting to loosen it.
- Stripped Threads: Be careful not to strip the threads on the adjustment mechanism. Use the correct size wrench and avoid excessive force.
- Incorrect Specifications: Always refer to the vehicle’s service manual for the correct brake pedal height specifications.
Benefits of Proper Brake Pedal Height
- Improved Comfort: Reduces strain on the driver’s leg and ankle.
- Enhanced Control: Allows for smoother and more precise braking.
- Increased Safety: Ensures quick and effective braking in emergency situations.
Why Choose CARDIAGTECH.NET for Your Brake System Needs?
CARDIAGTECH.NET offers a range of high-quality tools and equipment to facilitate accurate brake pedal height adjustments. Our products ensure precise adjustments, helping you maintain the safety, comfort, and performance of your vehicle’s braking system.
8. Understanding the Relationship Between Parking Brake and Hydraulic Brake Adjustment
The parking brake and hydraulic brake systems are interconnected, and proper adjustment of the parking brake can influence the performance of the hydraulic brakes, especially in vehicles with rear drum brakes. According to a technical article in “Underhood Service” magazine, a properly adjusted parking brake ensures the self-adjusters in drum brake systems function correctly. A well-maintained parking brake system supports the effectiveness of the hydraulic brakes.
How the Parking Brake Affects Hydraulic Brake Adjustment
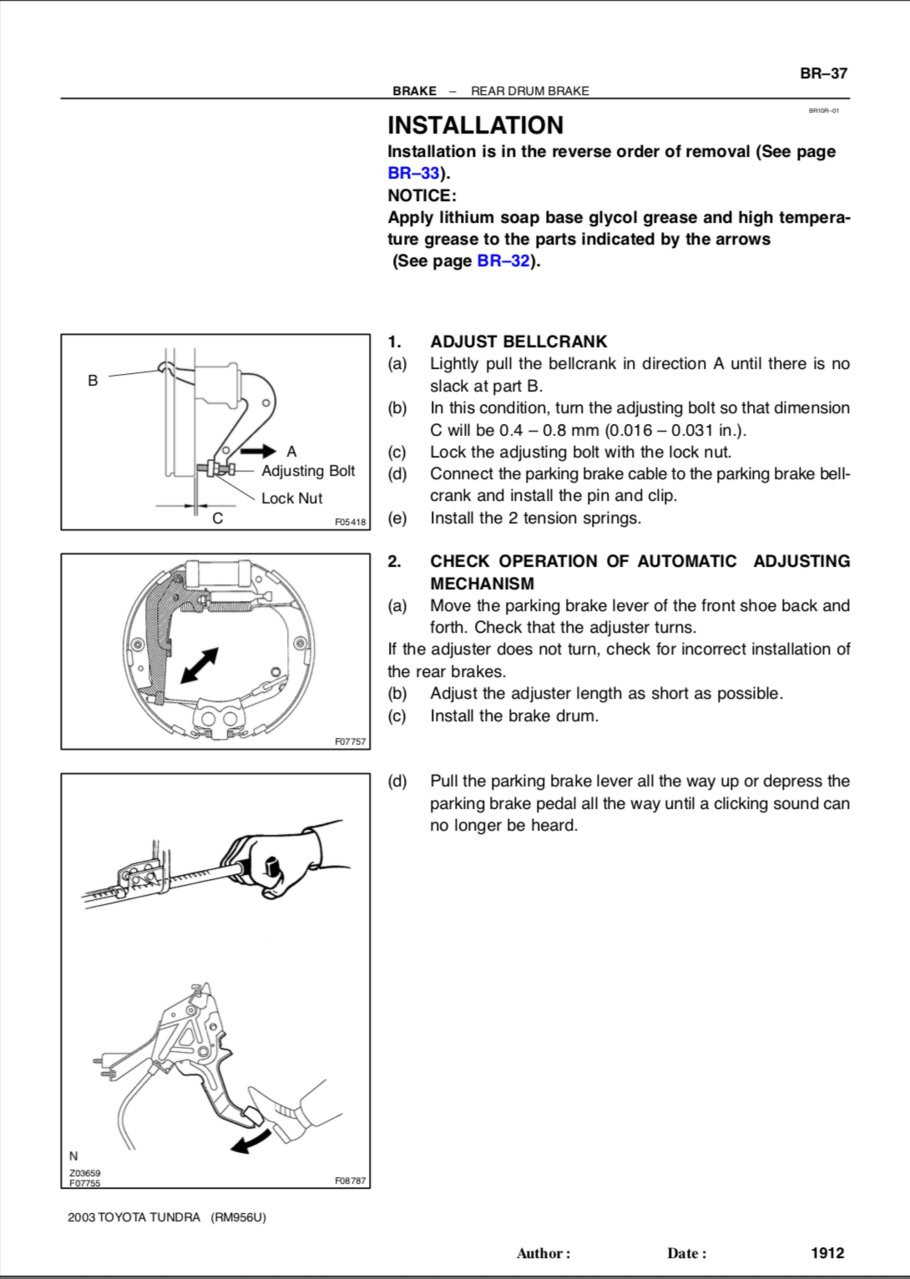
- Self-Adjusting Mechanisms: Many vehicles with rear drum brakes use a self-adjusting mechanism that is activated when the parking brake is applied. This mechanism automatically adjusts the brake shoes to maintain proper clearance between the shoes and the drum.
- Cable Tension: The parking brake cable tension affects the self-adjusting mechanism. If the cable is too loose, the self-adjuster may not activate properly, leading to excessive brake pedal travel and reduced braking performance.
- Leverage and Force: The parking brake system uses a series of levers and cables to apply force to the brake shoes. Proper adjustment ensures that the force is applied evenly and effectively.
Symptoms of an Improperly Adjusted Parking Brake
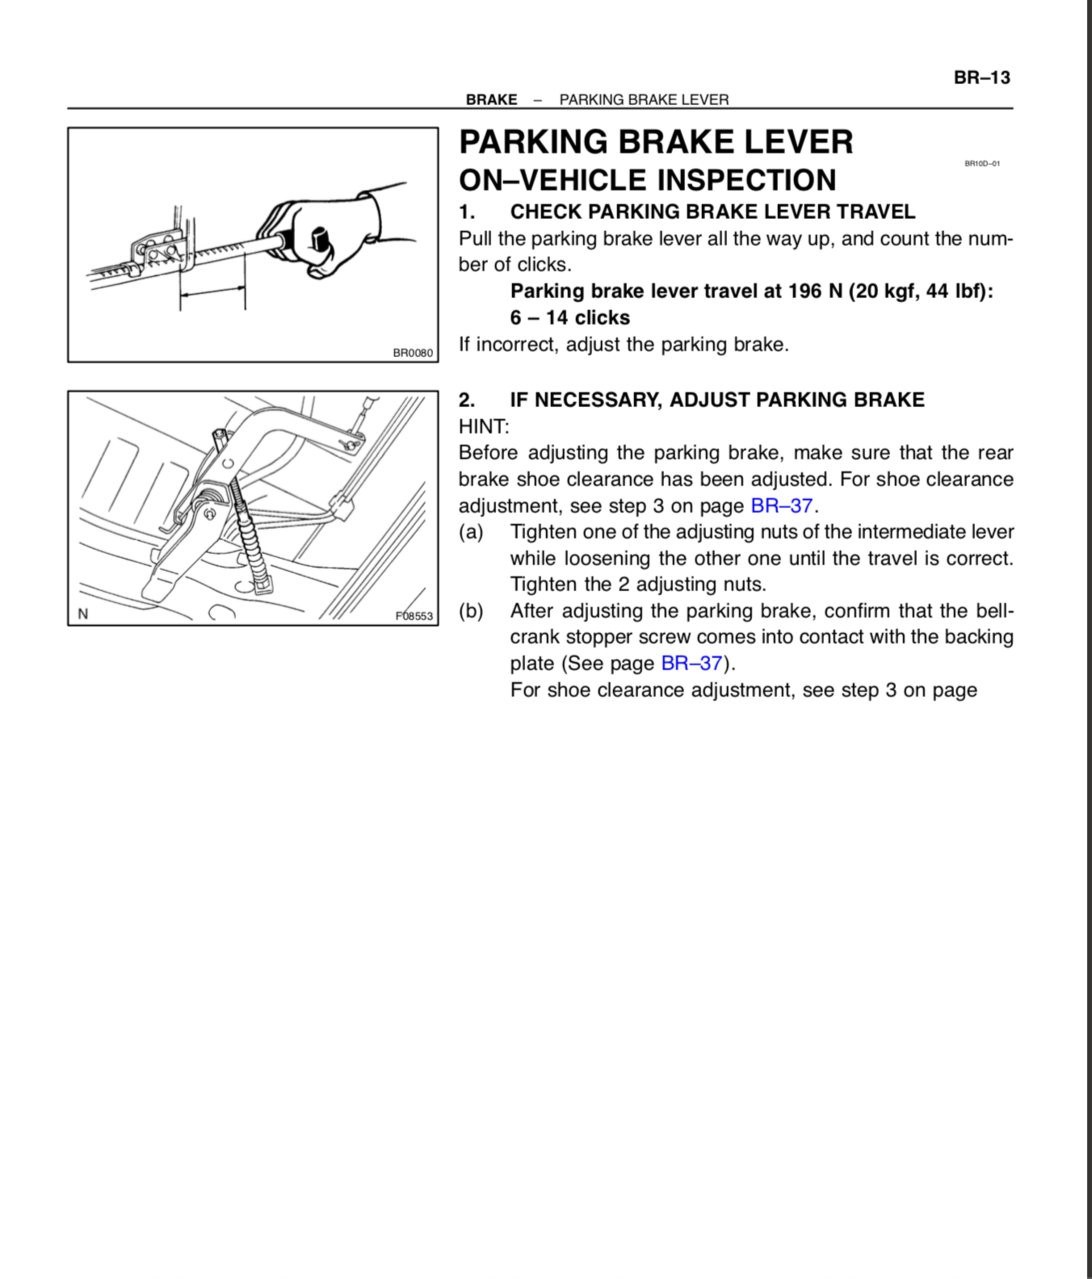
- Excessive Parking Brake Travel: The parking brake lever or pedal travels too far before the brakes engage.
- Weak Holding Power: The parking brake does not hold the vehicle securely on an incline.
- Clicking Noises: Clicking noises are heard when applying or releasing the parking brake.
- Hydraulic Brake Issues: Excessive brake pedal travel or a spongy pedal feel in the hydraulic brake system.
How to Adjust the Parking Brake
- Consult the Service Manual: Refer to your vehicle’s service manual for specific parking brake adjustment procedures.
- Locate the Adjustment Point: Identify the adjustment point for the parking brake cable. This is typically a turnbuckle or threaded rod located under the vehicle or near the parking brake lever.
- Loosen the Lock Nut: If there is a lock nut on the adjustment mechanism, loosen it using a wrench.
- Adjust the Cable Tension: Turn the adjustment mechanism to increase or decrease the cable tension.
- Check the Adjustment: After each adjustment, check the parking brake travel and holding power.
- Tighten the Lock Nut: Once the parking brake is properly adjusted, tighten the lock nut to secure the adjustment mechanism in place.
Why Choose CARDIAGTECH.NET for Your Brake System Needs?
CARDIAGTECH.NET offers a range of high-quality tools and equipment to facilitate accurate parking brake adjustments. Our products ensure precise adjustments, helping you maintain the safety and performance of your vehicle’s braking system.
 Parking brake adjustment
9. The Impact of Worn Brake Components on Pedal Operation
Worn brake components, such as brake pads, rotors, and calipers, can significantly impact brake pedal operation. According to a study by the AAA Foundation for Traffic Safety, worn brake components are a contributing factor in many vehicle accidents. Regular inspections and timely replacement of worn components are essential for maintaining optimal braking performance.
How Worn Brake Components Affect Pedal Operation
- Worn Brake Pads: As brake pads wear down, the pistons in the calipers must travel further to make contact with the rotors, increasing brake pedal travel.
- Worn Rotors: Worn or warped rotors can cause brake pedal vibration or pulsation. Uneven rotor thickness can also lead to inconsistent braking performance.
- Faulty Calipers: Calipers that are sticking or seized can cause uneven brake pad wear and pulling to one side during braking.
- Damaged Brake Hoses: Brake hoses that are cracked or damaged can expand under pressure, leading to a spongy pedal feel and reduced braking power.
- Leaking Wheel Cylinders: Leaking wheel cylinders in drum brake systems can reduce hydraulic pressure and increase brake pedal travel.
Symptoms of Worn Brake Components
| Component | Symptoms |
|---|---|
| Brake Pads | Squealing or grinding noises, increased brake pedal travel, reduced braking power. |
| Rotors | Brake pedal vibration or pulsation, squealing noises, longer stopping distances. |
| Calipers | Pulling to one side during braking, uneven brake pad wear, brake drag. |
| Brake Hoses | Spongy pedal feel, reduced braking power, visible cracks or leaks. |
| Wheel Cylinders | Increased brake pedal travel, reduced braking power, brake fluid leaks. |
Why Regular Brake Inspections are Important
- Safety: Regular inspections can identify worn components before they cause a safety hazard.
- Performance: Replacing worn components can restore optimal braking performance.
- Cost Savings: Addressing minor issues early can prevent more extensive and costly repairs later.
Why Choose CARDIAGTECH.NET for Your Brake System Needs?
CARDIAGTECH.NET offers a comprehensive range of brake components and tools to facilitate accurate inspections and repairs. Our high-quality products ensure the safety and reliability of your vehicle’s braking system.
10. FAQs About Brake Pedal Operation
Here are some frequently asked questions about brake pedal operation, covering free play, travel, and related issues. These FAQs provide quick answers to common concerns, helping you understand and maintain your vehicle’s braking system effectively.
1. What is brake pedal free play?
Brake pedal free play is the amount of movement the brake pedal has before resistance is felt, indicating the start of brake engagement.
2. Why is brake pedal free play important?
Proper free play prevents brake drag and ensures effective braking by allowing the system to operate within its intended parameters.
3. What is brake pedal travel?
Brake pedal travel is the total distance the brake pedal moves from its resting position to full brake engagement.
4. Why is brake pedal travel important?
Adequate travel ensures sufficient stopping power and indicates the overall health of the brake system, including pad wear and fluid condition.
5. What causes a spongy brake pedal?
A spongy brake pedal is typically caused by air in the brake lines, which can be resolved by bleeding the brakes.
6. What are the symptoms of worn brake pads?
Symptoms include squealing or grinding noises, increased pedal travel, and reduced braking power.
7. How often should brake fluid be changed?
Brake fluid should be changed every two to three years, according to most manufacturer recommendations, to prevent moisture contamination.
8. What does it mean if the brake pedal sinks to the floor?
This indicates a potential leak in the master cylinder or brake lines, requiring immediate attention.
9. How does the parking brake affect the hydraulic brakes?
In vehicles with rear drum brakes, the parking brake helps activate the self-adjusting mechanism, maintaining proper brake shoe clearance.
10. Can I adjust the brake pedal height?
Yes, many vehicles allow for brake pedal height adjustment to improve driver comfort and control.
Maintaining your vehicle’s brake system is critical for your safety and the safety of others on the road. At CARDIAGTECH.NET, we understand the importance of having the right tools and equipment to ensure your brakes are functioning optimally. Whether you’re a seasoned mechanic or a DIY enthusiast, we have everything you need to diagnose, repair, and maintain your brake system.
Don’t wait until it’s too late! Invest in the safety of yourself and others by ensuring your brakes are in top condition.
Ready to take the next step?
- Explore our wide selection of brake system tools and equipment.
- Contact our expert team for personalized advice and recommendations.
- Visit our website at CARDIAGTECH.NET or call us at +1 (641) 206-8880.
CARDIAGTECH.NET – Your Partner in Automotive Excellence!
Address: 276 Reock St, City of Orange, NJ 07050, United States
Whatsapp: +1 (641) 206-8880
Website: CARDIAGTECH.NET