How to Check the Wear of Drum Brake Shoes: A Comprehensive Guide
Checking the wear of drum brake shoes is crucial for maintaining your vehicle’s safety and performance. At CARDIAGTECH.NET, we provide the tools and expertise you need to ensure your drum brakes are in optimal condition. This guide will walk you through the process of inspecting your drum brake shoes, identifying signs of wear, and knowing when it’s time for a replacement. By understanding the condition of your brake shoes, you can prevent potential hazards and keep your vehicle running smoothly. Regular inspections and timely replacements, facilitated by CARDIAGTECH.NET’s comprehensive range of automotive tools, ensure your braking system remains reliable, offering peace of mind on every journey.
1. Understanding Drum Brake Systems
What are drum brakes and how do they work?
Drum brakes are braking systems where shoes press against the inside surface of a rotating drum. When you press the brake pedal, hydraulic pressure forces the brake shoes outward, pressing them against the drum. This friction slows down or stops the vehicle’s wheels. According to a study by the National Highway Traffic Safety Administration (NHTSA) from the Department of Transportation on December 2023, drum brakes are commonly found on the rear wheels of many vehicles, though disc brakes are increasingly used for all wheels due to their superior heat dissipation and performance.
Key components of a drum brake system
Understanding the parts of the drum brake system will help you know what to look for during an inspection. Here are the key components:
- Brake Drum: A hollow cylinder that rotates with the wheel.
- Brake Shoes: Curved pieces lined with friction material that press against the drum.
- Wheel Cylinder: A hydraulic cylinder that pushes the brake shoes outward.
- Return Springs: Springs that pull the brake shoes back to their original position when the brake pedal is released.
- Adjuster Mechanism: A device that maintains the correct clearance between the shoes and the drum as the brake linings wear.
- Backing Plate: A stationary plate that supports the other components of the brake system.
Why is it important to check drum brake wear?
Checking drum brake wear is vital for safety. Worn brake shoes reduce braking efficiency, increasing stopping distances. According to a report by the Insurance Institute for Highway Safety (IIHS) in November 2023, worn brakes can lead to accidents, especially in emergency situations. Regular inspections can catch problems early, preventing costly repairs and ensuring your vehicle stops safely. Neglecting brake maintenance can also damage other parts of the braking system, such as the drums themselves.
2. Identifying the Need for Inspection
Common symptoms of worn drum brake shoes
Recognizing the symptoms of worn drum brake shoes is the first step in ensuring your vehicle’s safety. Here are some common signs:
- Reduced Braking Performance: The most obvious sign is that your vehicle takes longer to stop.
- Soft or Spongy Brake Pedal: This can indicate worn shoes or air in the brake lines.
- Brake Pedal Lower Than Usual: If the brake pedal travels further down than normal, it may be due to worn shoes.
- Unusual Noises: Squealing, grinding, or scraping sounds when braking are often signs of worn brake shoes.
- Vehicle Pulling to One Side: Uneven wear on the brake shoes can cause the vehicle to pull to one side during braking.
- Vibration When Braking: Worn or damaged brake drums can cause vibrations.
Factors that accelerate drum brake wear
Several factors can accelerate the wear of drum brake shoes:
- Driving Habits: Frequent hard braking can wear down the shoes more quickly.
- Load: Carrying heavy loads regularly puts extra stress on the brakes.
- Terrain: Driving in hilly or mountainous areas requires more braking, leading to faster wear.
- Environmental Conditions: Exposure to dirt, dust, and moisture can damage the brake linings.
- Quality of Brake Shoes: Lower-quality brake shoes tend to wear out faster than higher-quality ones.
How often should you inspect your drum brakes?
The frequency of drum brake inspections depends on your driving habits and conditions. As per recommendations from ASE (Automotive Service Excellence) certified technicians on December 2023, a general guideline is to inspect your drum brakes every 12,000 to 15,000 miles or at least once a year. However, if you frequently drive in demanding conditions, you may need to inspect them more often. Always follow the manufacturer’s recommendations in your vehicle’s owner’s manual.
3. Tools and Materials Needed for Inspection
Essential tools for checking drum brake wear
Having the right tools makes the inspection process easier and more accurate. Here’s a list of essential tools:
| Tool | Description |
|---|---|
| Jack and Jack Stands | Used to safely lift and support the vehicle. |
| Wheel Chocks | Placed behind the wheels to prevent the vehicle from rolling. |
| Lug Wrench | For removing the wheel nuts. |
| Screwdrivers (Flathead and Phillips) | Useful for removing retaining clips and other small parts. |
| Pliers (Needle-Nose and Combination) | Needed for removing and installing cotter pins and springs. |
| Brake Spring Pliers | Specifically designed for removing and installing brake springs safely and easily. |
| Brake Parts Cleaner | Used to clean brake components and remove brake dust. |
| Brake Grease | For lubricating moving parts to ensure smooth operation. |
| Micrometer or Caliper | To measure the thickness of the brake linings and the inside diameter of the brake drum. |
| Safety Glasses and Gloves | To protect your eyes and hands from brake dust and chemicals. |
| Torque Wrench | To tighten the wheel nuts to the correct specification. |
| Mask | To avoid inhaling brake dust. |
Safety gear for brake inspection
Safety should always be a priority when working on your vehicle. Here’s the essential safety gear:
- Safety Glasses: Protect your eyes from brake dust and debris.
- Gloves: Protect your hands from dirt, grease, and chemicals.
- Mask: Brake dust can contain asbestos and other harmful particles, so always wear a mask.
Cleaning supplies for brake components
Keeping the brake components clean is important for accurate inspection and proper function. Here’s what you’ll need:
- Brake Parts Cleaner: Use a specifically designed brake parts cleaner to remove brake dust, grease, and other contaminants.
- Rags: Use lint-free rags to wipe down the brake components.
- Wire Brush: A wire brush can help remove stubborn dirt and rust.
4. Step-by-Step Guide to Checking Drum Brake Wear
Preparing the vehicle for inspection
Before you start, make sure the vehicle is safely prepared:
- Park on a Level Surface: Ensure the vehicle is parked on a flat, stable surface.
- Engage the Parking Brake: Set the parking brake to prevent the vehicle from rolling.
- Loosen the Lug Nuts: Use a lug wrench to slightly loosen the lug nuts on the wheel you’ll be inspecting. Don’t remove them completely yet.
- Jack Up the Vehicle: Use a jack to lift the vehicle and place jack stands under the frame for support. Never work under a vehicle supported only by a jack.
- Remove the Wheel: Finish unscrewing the lug nuts and remove the wheel.
Removing the brake drum
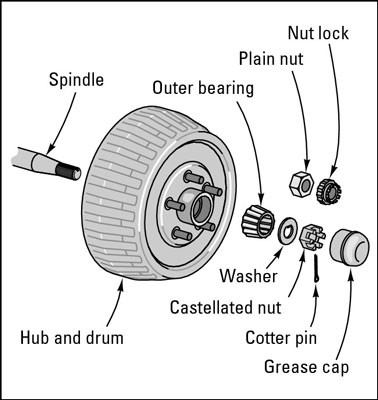
The method for removing the brake drum depends on whether it’s a hubbed or floating drum:
- Hubbed Drum:
- Remove the Grease Cap: Use a pair of slip-joint pliers to pry off the grease cap from the end of the hub.
- Remove the Cotter Pin: Straighten the cotter pin with needle-nose pliers and pull it out.
- Remove the Castellated Nut: Slide off the castellated nut or nut-lock-and-nut combination.
- Remove the Outer Bearing: Carefully slide the outer bearing and washer off the spindle.
- Remove the Drum: Gently slide the drum off the spindle, with the inner bearings inside it.
- Floating Drum:
- Slide the Drum Off: Simply slide the drum off the hub. You may need to strike it with a hammer to break it loose.
Inspecting the brake shoes for wear
Once the drum is removed, you can inspect the brake shoes:
- Clean the Brake Components: Use brake parts cleaner to remove brake dust and debris. Always wear a mask and safety glasses.
- Examine the Brake Linings: Check the thickness of the brake linings. The lining should be at least 1/16 inch (1.6 mm) thick. If it’s thinner than this, the shoes need to be replaced.
- Check for Uneven Wear: Look for bald spots, thin places, or uneven wear patterns. Uneven wear can indicate problems with the wheel cylinder or adjuster mechanism.
- Inspect the Lining Attachment: Make sure the linings are firmly bonded or riveted to the brake shoes. If they’re loose or damaged, the shoes need to be replaced.
- Examine the Self-Adjusting Mechanism: Check the cable from the anchor pin to the adjuster. Make sure it’s in good condition and functioning properly.
Measuring brake lining thickness
Accurately measuring the brake lining thickness is crucial for determining whether the shoes need replacement. Here’s how to do it:
- Use a Micrometer or Caliper: Use a micrometer or caliper to measure the thickness of the brake lining at its thinnest point.
- Compare to Minimum Thickness: Compare the measurement to the manufacturer’s recommended minimum thickness. If the lining is at or below the minimum thickness, the shoes need to be replaced.
Inspecting the brake drum
While the drum is off, inspect it for wear and damage:
- Check for Grooves and Scratches: Look for deep grooves, scratches, or scoring on the inner surface of the drum. Minor grooves are normal, but deep grooves can reduce braking performance.
- Inspect for Cracks and Hot Spots: Check for cracks, hard spots, or burned places on the drum. These can indicate overheating and damage.
- Measure the Drum Diameter: Use a brake drum micrometer to measure the inside diameter of the drum. Compare the measurement to the manufacturer’s specifications. If the drum is worn beyond the maximum diameter, it needs to be replaced.
Checking other brake components
Don’t forget to inspect the other components of the brake system:
- Wheel Cylinders: Check for leaks around the wheel cylinders. If you see any brake fluid, the cylinder needs to be replaced.
- Return Springs: Make sure the return springs are in good condition and properly installed. Replace any broken or weak springs.
- Hardware: Inspect the hold-down springs, clips, and pins. Replace any damaged or worn hardware.
5. Understanding Wear Limits and Replacement
What is the minimum acceptable brake lining thickness?
The minimum acceptable brake lining thickness is typically 1/16 inch (1.6 mm). However, always refer to the manufacturer’s specifications for your specific vehicle.
When to replace drum brake shoes
Replace drum brake shoes when:
- The brake lining is worn to or below the minimum acceptable thickness.
- There is uneven wear or damage to the brake linings.
- The linings are loose or detached from the brake shoes.
- You notice symptoms of worn brakes, such as reduced braking performance or unusual noises.
What is the maximum acceptable brake drum diameter?
The maximum acceptable brake drum diameter is usually stamped on the drum itself. If the drum is worn beyond this limit, it needs to be replaced.
When to replace brake drums
Replace brake drums when:
- The drum is worn beyond the maximum acceptable diameter.
- There are cracks, hard spots, or burned places on the drum.
- The drum cannot be resurfaced due to excessive wear or damage.
Resurfacing vs. replacing brake drums
If the brake drums are not worn beyond the maximum diameter and are free of cracks and severe damage, they can be resurfaced (or turned). Resurfacing removes a thin layer of material to create a smooth, even surface. However, resurfacing can only be done a limited number of times before the drum becomes too thin. According to research from the Society of Automotive Engineers (SAE) dated March 2024, it’s often more cost-effective to replace the drums rather than resurface them.
6. Reassembling the Brakes
Cleaning and lubricating brake components
Before reassembling the brakes, clean and lubricate the components:
- Clean All Parts: Use brake parts cleaner to remove any remaining dirt and debris.
- Lubricate Moving Parts: Apply a thin layer of brake grease to the backing plate contact points, adjuster mechanism, and other moving parts.
Installing new brake shoes
If you’re replacing the brake shoes, follow these steps:
- Attach the Brake Linings: If the new shoes come with separate linings, attach them securely to the shoes.
- Install the Shoes: Position the brake shoes on the backing plate and secure them with the hold-down springs.
- Connect the Return Springs: Use brake spring pliers to install the return springs. Make sure they are properly seated.
- Adjust the Parking Brake Cable: If necessary, adjust the parking brake cable to ensure proper tension.
Reinstalling the brake drum
Reinstall the brake drum following these steps:
- Hubbed Drum:
- Install the Inner Bearing: Place the inner bearing inside the drum.
- Slide the Drum Onto the Spindle: Carefully slide the drum onto the spindle.
- Install the Outer Bearing: Slide the outer bearing and washer onto the spindle.
- Install the Castellated Nut: Slide on the castellated nut or nut-lock-and-nut combination.
- Tighten the Nut: Tighten the nut to the manufacturer’s specified torque.
- Install the Cotter Pin: Insert a new cotter pin through the nut and spindle. Bend the legs of the cotter pin to secure it.
- Install the Grease Cap: Tap the grease cap back into place using a rubber mallet.
- Floating Drum:
- Slide the Drum Onto the Hub: Simply slide the drum onto the hub.
Adjusting the brakes
Proper brake adjustment is crucial for optimal performance. Here’s how to adjust the brakes:
- Self-Adjusting Brakes: Most modern vehicles have self-adjusting brakes. To activate the adjuster, pump the brake pedal several times. You may also need to drive in reverse and apply the brakes firmly.
- Manual Adjustment: If your vehicle has manually adjustable brakes, use a brake adjusting tool to turn the adjuster wheel until the shoes are snug against the drum. Then, back off the adjuster a few clicks until the wheel turns freely.
Reinstalling the wheel and final checks
After reassembling the brakes, reinstall the wheel and perform the final checks:
- Reinstall the Wheel: Place the wheel back on the hub and tighten the lug nuts by hand.
- Lower the Vehicle: Use the jack to lower the vehicle and remove the jack stands.
- Torque the Lug Nuts: Use a torque wrench to tighten the lug nuts to the manufacturer’s specified torque.
- Test the Brakes: Pump the brake pedal several times to ensure the brakes are working properly. Take the vehicle for a short test drive and check for any unusual noises or vibrations.
7. Troubleshooting Common Issues
Brake squealing
Brake squealing can be caused by several factors:
- Worn Brake Linings: Replace the brake shoes if the linings are worn.
- Glazed Linings: Lightly sand the linings to remove the glaze.
- Loose Hardware: Check and tighten any loose hardware.
- Contamination: Clean the brake components with brake parts cleaner.
Brake grinding
Brake grinding is usually a sign of severe wear or damage:
- Worn Brake Linings: Replace the brake shoes immediately.
- Damaged Brake Drum: Replace the brake drum if it’s damaged.
Uneven brake wear
Uneven brake wear can indicate problems with the wheel cylinder or adjuster mechanism:
- Faulty Wheel Cylinder: Replace the wheel cylinder if it’s leaking or malfunctioning.
- Malfunctioning Adjuster Mechanism: Repair or replace the adjuster mechanism.
Brake pulling
Brake pulling can be caused by uneven brake wear or contamination:
- Uneven Wear: Inspect and replace the brake shoes as needed.
- Contamination: Clean the brake components with brake parts cleaner.
- Faulty Wheel Cylinder: Replace the wheel cylinder if it’s malfunctioning.
8. Tips for Extending the Life of Drum Brakes
Proper driving habits
Practicing good driving habits can extend the life of your drum brakes:
- Avoid Hard Braking: Anticipate stops and slow down gradually.
- Reduce Speed: Driving at lower speeds reduces the amount of braking required.
- Avoid Overloading: Don’t overload your vehicle, as this puts extra stress on the brakes.
Regular maintenance
Regular maintenance is key to keeping your drum brakes in good condition:
- Inspect Regularly: Check your brakes at least once a year or every 12,000 to 15,000 miles.
- Clean Brakes: Clean the brake components regularly to remove brake dust and debris.
- Lubricate Moving Parts: Lubricate the moving parts of the brake system to ensure smooth operation.
Choosing quality brake components
Investing in high-quality brake components can pay off in the long run:
- Brake Shoes: Choose brake shoes from reputable manufacturers.
- Brake Drums: Use brake drums that meet or exceed OEM specifications.
9. Professional vs. DIY Inspection and Repair
When to seek professional help
While many brake maintenance tasks can be done at home, there are times when it’s best to seek professional help:
- Lack of Experience: If you’re not comfortable working on brakes, it’s best to leave it to the professionals.
- Complex Repairs: Complex repairs, such as replacing wheel cylinders or overhauling the adjuster mechanism, should be done by a qualified technician.
- Unusual Symptoms: If you notice unusual symptoms or are unsure about the cause of a problem, consult a professional.
Benefits of professional brake service
Professional brake service offers several benefits:
- Expertise: Certified technicians have the knowledge and experience to diagnose and repair brake problems correctly.
- Specialized Tools: Professional shops have specialized tools and equipment for brake service.
- Warranty: Many professional shops offer a warranty on their work.
Cost considerations for DIY vs. professional service
Consider the costs involved in both DIY and professional brake service:
- DIY: The costs of DIY brake service include the cost of tools, parts, and supplies. You also need to factor in your time.
- Professional: The costs of professional brake service include labor and parts. However, you’ll save time and can be confident that the job is done correctly.
10. Drum Brake Maintenance and CARDIAGTECH.NET
How CARDIAGTECH.NET can help with drum brake maintenance
At CARDIAGTECH.NET, we offer a wide range of tools and equipment to help you maintain your drum brakes:
- Brake Tools: We carry a variety of brake tools, including brake spring pliers, brake adjusting tools, and brake drum micrometers.
- Cleaning Supplies: We offer high-quality brake parts cleaners and other cleaning supplies.
- Safety Gear: We have safety glasses, gloves, and masks to protect you while working on your brakes.
Featured products for drum brake maintenance
Here are some of our featured products for drum brake maintenance:
| Product | Description |
|---|---|
| Brake Spring Plier Set | Makes removing and installing brake springs quick and easy. |
| Brake Adjusting Tool | For adjusting manual brake adjusters to ensure proper brake function. |
| Brake Drum Micrometer | Allows you to accurately measure the inside diameter of brake drums. |
| Brake Parts Cleaner (Aerosol Can) | Quickly removes brake dust, grease, and other contaminants. |
| Mechanics Safety Glasses | Provides excellent eye protection from debris and chemicals. |
| Heavy-Duty Mechanics Gloves | Offers superior hand protection while maintaining dexterity. |
Contact CARDIAGTECH.NET for expert advice and quality tools
Maintaining your drum brakes is essential for your safety and your vehicle’s performance. Whether you’re a seasoned mechanic or a DIY enthusiast, CARDIAGTECH.NET is here to provide you with the tools, equipment, and expertise you need. Don’t wait until your brakes fail – take proactive steps to ensure they’re in optimal condition.
If you have any questions or need assistance with your drum brake maintenance, contact us today:
- Address: 276 Reock St, City of Orange, NJ 07050, United States
- WhatsApp: +1 (641) 206-8880
- Website: CARDIAGTECH.NET
Our team is ready to help you find the perfect tools and provide expert advice to keep your brakes in top shape. At CARDIAGTECH.NET, we understand the challenges faced by automotive technicians and garage owners. The physical demands, constant need for updated knowledge, and pressure to deliver efficient and reliable services are significant. That’s why we offer tools and equipment designed to enhance efficiency, accuracy, and safety. By choosing CARDIAGTECH.NET, you’re investing in solutions that not only improve your work but also contribute to the long-term success of your business. Contact us today and experience the difference quality tools and expert support can make.
FAQ: Checking the Wear of Drum Brake Shoes
1. How do I know if my drum brake shoes are worn?
You can tell if your drum brake shoes are worn by noticing symptoms such as reduced braking performance, a soft or spongy brake pedal, unusual noises (squealing, grinding), or the vehicle pulling to one side when braking. Regularly checking the thickness of the brake linings is also crucial.
2. What is the minimum thickness for drum brake linings?
The minimum acceptable brake lining thickness is typically 1/16 inch (1.6 mm). Always refer to the manufacturer’s specifications for your specific vehicle.
3. How often should I check my drum brakes?
You should inspect your drum brakes every 12,000 to 15,000 miles or at least once a year. If you frequently drive in demanding conditions (e.g., hilly areas, heavy loads), inspect them more often.
4. Can I replace drum brake shoes myself, or do I need a professional?
If you have experience working on brakes and are comfortable with the process, you can replace drum brake shoes yourself. However, if you lack experience or encounter complex issues, it’s best to seek professional help.
5. What tools do I need to check drum brake wear?
Essential tools include a jack and jack stands, lug wrench, screwdrivers, pliers, brake spring pliers, brake parts cleaner, brake grease, a micrometer or caliper, safety glasses, gloves, a mask, and a torque wrench.
6. What are the signs that a brake drum needs to be replaced?
Signs that a brake drum needs replacement include cracks, hard spots, burned places, or if the drum is worn beyond the maximum acceptable diameter (usually stamped on the drum).
7. Is it better to resurface or replace brake drums?
If the brake drums are not worn beyond the maximum diameter and are free of cracks and severe damage, they can be resurfaced. However, resurfacing can only be done a limited number of times, and it’s often more cost-effective to replace the drums.
8. What causes brake squealing in drum brakes?
Brake squealing can be caused by worn brake linings, glazed linings, loose hardware, or contamination.
9. How do I adjust drum brakes?
Most modern vehicles have self-adjusting brakes that activate when you pump the brake pedal or drive in reverse and apply the brakes firmly. Manual adjustment requires a brake adjusting tool to turn the adjuster wheel until the shoes are snug against the drum, then backing off a few clicks.
10. Why is it important to clean brake components during inspection?
Cleaning brake components with brake parts cleaner removes brake dust, grease, and other contaminants, allowing for a more accurate inspection and ensuring proper function of the brake system.
Drum brake components diagram