How to Fix a Hole in Your Car Seat: A Comprehensive Guide

Fixing a hole in your car seat not only enhances the look of your vehicle’s interior but also preserves its value and comfort. CARDIAGTECH.NET provides expert guidance and top-notch tools to seamlessly repair any damage, ensuring a professional finish. By using the right techniques and materials, you can restore your car seat to its original condition, preventing further wear and tear. This guide covers everything from leather repair kits to colorant application, guaranteeing a long-lasting solution for your car seat woes.
1. Understanding the Types of Car Seat Damage
Understanding the different types of damage that can occur to your car seats is essential for choosing the right repair method and ensuring a lasting fix. Car seat damage varies widely, from minor wear and tear to significant rips and holes, each requiring a specific approach. Recognizing these types allows you to address the issues effectively and maintain the integrity of your car’s interior.
1.1. Minor Wear and Tear
Minor wear and tear on car seats often includes small scuffs, scratches, and fading of the material. These issues typically arise from everyday use, such as friction from clothing, exposure to sunlight, and general aging of the material. Addressing minor wear and tear early can prevent it from escalating into more significant damage.
- Scuffs and Scratches: These are surface-level imperfections that can usually be buffed out or covered with a specialized leather or vinyl conditioner.
- Fading: Sunlight and prolonged use can cause the color of the car seat to fade. This can be remedied with a color-matching dye or restorer.
- Small Cracks: Minor cracks in leather or vinyl can develop over time due to dryness and lack of maintenance.
1.2. Rips and Tears
Rips and tears are more significant forms of damage that require a more involved repair process. These can be caused by sharp objects, excessive wear, or accidents. The size and location of the rip will determine the complexity of the repair.
- Small Rips: These can often be repaired with a simple patching or stitching method, using a repair kit designed for the material of your car seat.
- Large Tears: Larger tears may require a backing material to provide support and structure to the repair.
- Seam Splits: Sometimes, the stitching along the seams of the car seat can come undone, causing the material to separate. This requires re-stitching the seam.
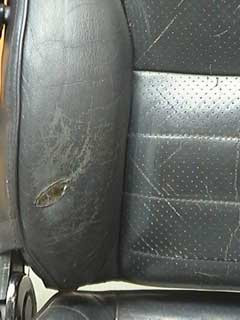
1.3. Burns and Holes
Burns and holes are typically caused by cigarettes, embers, or other sources of heat. These types of damage require careful attention to ensure a seamless repair that restores the seat’s appearance and integrity.
- Cigarette Burns: These small, circular burns can be filled with a color-matched filler and then textured to blend with the surrounding material.
- Larger Holes: Larger holes may require a backing patch and multiple layers of filler to rebuild the damaged area.
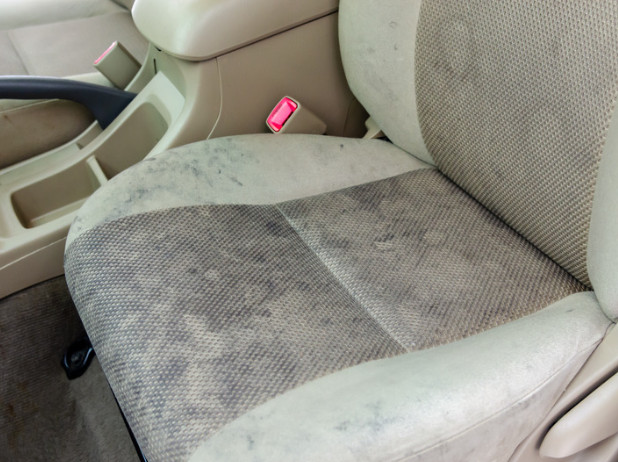
1.4. Stains and Discoloration
Stains and discoloration can detract from the overall appearance of your car seats. These can be caused by spills, dirt, or exposure to certain substances.
- Water Stains: Water stains can leave unsightly rings on fabric seats. These can often be removed with a specialized upholstery cleaner.
- Food and Drink Stains: Spills from food and drinks can cause stubborn stains that require a strong cleaning solution.
- Ink Stains: Ink stains can be particularly difficult to remove and may require professional cleaning services.
By identifying the specific type of damage to your car seat, you can choose the most appropriate repair method and products from CARDIAGTECH.NET, ensuring a professional and long-lasting result.
2. Essential Tools and Materials for Car Seat Repair
Having the right tools and materials is crucial for effectively repairing a hole in your car seat. High-quality tools ensure a professional finish and a durable repair. CARDIAGTECH.NET offers a wide range of specialized tools and materials designed for car seat repair, making the process easier and more efficient.
2.1. Leather Repair Kits
Leather repair kits are essential for fixing holes, tears, and scuffs in leather car seats. These kits typically include a variety of tools and materials designed to seamlessly repair damage and restore the leather’s appearance.
- Filler: Used to fill holes and cracks in the leather, providing a smooth base for repair.
- Adhesive: Helps to bond the leather and backing materials together, ensuring a strong and lasting repair.
- Colorant: Matched to the color of your car seat, the colorant helps to blend the repair seamlessly with the surrounding leather.
- Applicators: Sponges, brushes, and palette knives are used to apply the filler and colorant evenly and precisely.
2.2. Vinyl Repair Kits
Vinyl repair kits are specifically designed for repairing vinyl car seats, offering similar tools and materials as leather repair kits but tailored for vinyl’s unique properties.
- Heat Tool: Some vinyl repair kits include a heat tool to help bond the vinyl filler to the existing material.
- текстурные бумаги: Used to create a texture on the repaired area that matches the surrounding vinyl.
- Vinyl Compound: A specialized filler designed to bond with vinyl and provide a flexible, durable repair.
2.3. Upholstery Repair Tools
Upholstery repair tools are necessary for more extensive repairs, such as replacing sections of fabric or repairing seams.
- Seam Ripper: Used to remove old stitching without damaging the surrounding fabric.
- Upholstery Needles: Strong, curved needles designed for sewing through thick upholstery fabrics.
- Thread: Heavy-duty thread that matches the color and type of thread used in your car seat.
- Hog Ring Pliers and Rings: Used to attach upholstery to the seat frame.
2.4. Cleaning and Preparation Supplies
Proper cleaning and preparation are essential for a successful car seat repair. These supplies ensure that the repair area is clean and ready for bonding.
- Leather Cleaner: Removes dirt, oil, and grime from leather surfaces.
- Vinyl Cleaner: Specifically formulated to clean vinyl without damaging the material.
- Alcohol Cleaner: Used to remove any remaining residue and prepare the surface for bonding.
- Abrasive Pads: Help to smooth the repair area and remove any loose fibers.
2.5. Safety Equipment
When working with adhesives, solvents, and dyes, it’s important to protect yourself with the appropriate safety equipment.
- Gloves: Protect your hands from chemicals and adhesives.
- Respirator: Prevents inhalation of harmful vapors.
- Eye Protection: Safety glasses or goggles protect your eyes from splashes and debris.
By stocking up on these essential tools and materials from CARDIAGTECH.NET, you can ensure that you have everything you need to tackle any car seat repair project with confidence and achieve professional results.
3. Step-by-Step Guide to Fixing a Hole in a Leather Car Seat
Fixing a hole in a leather car seat requires a systematic approach to ensure a seamless and durable repair. This step-by-step guide will walk you through the process, from preparing the leather to applying the final coat of colorant, using products available at CARDIAGTECH.NET.
3.1. Step 1: Preparing the Leather Car Seat
The first step in repairing a leather car seat is to thoroughly prepare the surface. This involves cleaning the leather to remove any grease, oils, and dirt that may have accumulated.
- Clean the Area: Use a leather cleaner and a soft cloth to wipe down the area surrounding the hole. This removes surface contaminants and ensures better adhesion of the repair materials.
- Prep the Surface: Using a leather prep solution and an abrasive pad (included in the Leather Colourant Kit from CARDIAGTECH.NET), gently rub the surface of the leather. This step removes the manufactured finish and any loose fibers, allowing the colorant to adhere properly.
- Wipe with Alcohol Cleaner: After prepping, wipe the leather down with an alcohol cleaner to remove any remaining dirt or dust.
Preparing the Leather Car Seat
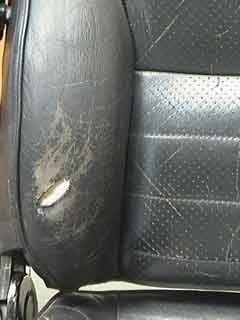
3.2. Step 2: Tidy the Area Around the Hole
Before filling the hole, it’s important to tidy up the surrounding area. This involves removing any loose or protruding edges of the leather.
- Remove the Lip: Examine the hole and identify any leather that is sticking outwards, forming a lip. This lip can compromise the quality of the repair.
- Trim Excess Leather: Using a scalpel or a pair of scissors, carefully remove the lip by cutting it away at the base. Take care not to damage the surrounding leather.
 Tidying the Area Around the Hole
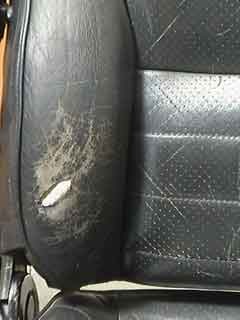
3.3. Step 3: Apply the Backing Patch
To provide a firm foundation for the repair, a leather repair sub-patch should be applied. This patch supports the filler and prevents it from sinking into the hole over time.
- Cut the Patch: Take the patch supplied in the repair kit from CARDIAGTECH.NET and cut it to size. The patch should be large enough to completely cover the hole with an additional 1cm of material surrounding it.
- Insert the Patch: Use tweezers to insert one side of the patch underneath the leather, ensuring the 1cm excess is completely under the leather.
- Secure the Patch: Apply pressure to hold the patch in place and gently feed it under the remaining edges of the hole. The patch should lie flat under the repair, with the excess material tucked under the leather on all sides.
- Apply Leather Glue: Put a small amount of leather glue onto the spatula supplied and feed it underneath the edges of the hole to coat the underside of the leather surrounding it. Be careful not to move the canvas patch.
- Bond the Leather: Apply pressure to bond the leather to the patch and allow it to dry completely.
 Applying the Backing Patch
3.4. Step 4: Fill the Hole with Heavy Filler
Now that the backing patch is in place, the hole needs to be filled with a heavy filler to bring it level with the surrounding leather.
- Apply Thin Layers: Take a small amount of the heavy filler using the end of a palette knife and place a thin layer into the hole over the backing patch.
- Ensure Thin Coverage: Make sure each layer is very thin, just covering the sub-patch. Allow 20 minutes for each layer to dry. Speed up the drying process with a hair dryer if needed.
- Apply Multiple Layers: Continue applying the heavy filler in thin layers. It’s crucial to use thin layers because the filler shrinks as it dries and may not cure properly if the layers are too thick.
- Build Up the Filler: As a general rule, apply at least 5-6 thin layers to build up the filler until it is just below the top of the hole.
- Remove Excess: With each layer, smooth the area with the sharper edge of the palette knife before drying to remove any excess filler.
 Filling the Hole with Heavy Filler
3.5. Step 5: Add the Final Layer of Filler
The final layer of filler should completely fill the hole, bringing it level with the surrounding leather.
- Apply the Final Layer: Apply the final layer of filler to the hole, completely filling it so that it is even with the surrounding leather on the seat.
- Ensure Proper Curing: Take care to let this final layer cure properly. When cured, the filler can shrink, reducing it to below the desired level.
- Add More Filler if Necessary: If the filler shrinks, add more repair filler to bring it level with the surrounding leather.
- Remove Excess Filler: If you accidentally get filler on the surrounding leather, remove it with the palette knife.
- Achieve Level Surface: Your aim is to fill the hole so that it is level with the leather and not overfilled. If you overfill it, you can reduce it with sandpaper.
- Clean the Area: When you are happy with the level of the filler and can no longer feel any ridge between the level of the filler and the surrounding leather, clean the area with the alcohol cleaner again to remove any unwanted filler and dust.
 Adding the Final Layer of Filler
3.6. Step 6: Apply an Initial Coat of Colorant
The colorant, matched to the color of your leather car seat, will blend the repair seamlessly with the surrounding area.
- Prepare the Colorant: Ensure the colorant supplied with the kit from CARDIAGTECH.NET has been matched to the color of the leather item being repaired.
- Apply the Colorant: Take one of the sponges supplied in the kit and apply a small amount of colorant to it.
- Rub into the Area: Rub the colorant into the area of the repair thoroughly. This allows the colorant to penetrate into the creases of the leather and valleys of the grain, giving a better overall finish.
3.7. Step 7: Finish the Job with Spraying
Spraying the colorant ensures an even and professional finish.
- Spray Thin Coats: Using an airbrush, spray thin coats of color over the leather car seat to thoroughly blend in the repair.
- Allow Drying Time: For the best results, ensure that each coat is very thin and is given sufficient time to cure before applying the next. This will enable an even finish to be built up and will avoid problems with uncured colorant.
- Apply Multiple Coats: It is not uncommon for the best repairs to require 10-15 thin coats of colorant, depending on the extent of the damage and the color used.
- Apply the Finish: Once you are happy that the repair is concealed and the colorant is cured properly, apply 4 or 5 thin coats of the finish using the spray gun, again allowing time for it to dry between each coat.
- Seal the Colorant: The finish seals the colorant in the leather, preventing it from wearing and prolonging the leather’s life.
- Allow Curing Time: When complete, allow 24 hours before using the item to ensure the filler, colorant, and finish have cured sufficiently.
 Finishing the Job with Spraying
By following these steps and using the high-quality products available at CARDIAGTECH.NET, you can effectively repair a hole in your leather car seat, restoring its appearance and extending its lifespan.
4. Step-by-Step Guide to Fixing a Hole in a Fabric Car Seat
Repairing a hole in a fabric car seat requires a different approach than leather, focusing on patching and blending the fabric for a seamless finish. This step-by-step guide provides a detailed process using tools and materials available at CARDIAGTECH.NET.
4.1. Step 1: Preparing the Fabric Car Seat
Proper preparation is crucial for ensuring the patching material adheres well and blends seamlessly with the existing fabric.
- Clean the Area: Use a fabric cleaner and a soft brush to thoroughly clean the area around the hole. This removes dirt, dust, and any loose particles.
- Trim Loose Fibers: Use scissors to carefully trim any loose or frayed fibers around the edges of the hole. This creates a clean edge for patching.
- Vacuum the Area: Vacuum the area to remove any remaining debris.
4.2. Step 2: Selecting and Cutting the Patch
Choosing the right fabric for the patch is essential for a seamless repair.
- Choose Matching Fabric: Select a piece of fabric that closely matches the color, texture, and pattern of your car seat. If you can’t find an exact match, consider using a piece of fabric from an inconspicuous area of the car seat, such as under the seat or from the back panel.
- Cut the Patch: Cut the fabric patch slightly larger than the hole, allowing for overlap. The patch should extend about 1 inch beyond the edges of the hole.
- Round the Corners: Round the corners of the patch to prevent them from lifting or catching on things.
4.3. Step 3: Applying the Fabric Patch
Securely attaching the patch is key to a durable and lasting repair.
- Position the Patch: Place the patch over the hole, centering it carefully.
- Use Fabric Glue: Apply a thin, even layer of fabric glue to the back of the patch.
- Adhere the Patch: Press the patch firmly onto the car seat fabric, ensuring it adheres evenly around the entire perimeter.
- Smooth the Edges: Use your fingers or a smooth tool to smooth the edges of the patch and ensure they are securely bonded to the original fabric.
- Allow to Dry: Allow the glue to dry completely according to the manufacturer’s instructions.
4.4. Step 4: Securing with Stitching (Optional)
For added durability, consider stitching the patch to the original fabric.
- Thread the Needle: Thread an upholstery needle with a thread that matches the color of the car seat fabric.
- Stitch Around the Patch: Use a small, tight stitch to sew around the entire perimeter of the patch.
- Secure the Ends: Tie off the thread securely and trim any excess.
4.5. Step 5: Blending the Patch
To make the patch blend seamlessly with the original fabric, use a fabric marker or dye.
- Select Fabric Marker: Choose a fabric marker or dye that closely matches the color of the car seat fabric.
- Apply the Marker: Carefully apply the marker or dye to the patch, blending it with the surrounding fabric.
- Allow to Dry: Allow the marker or dye to dry completely.
4.6. Step 6: Final Touches
Complete the repair with final touches to ensure a professional look.
- Trim Excess Fabric: If necessary, trim any excess fabric around the edges of the patch.
- Clean the Area: Clean the area around the patch with a fabric cleaner to remove any residue.
- Vacuum the Seat: Vacuum the entire car seat to blend the repair with the rest of the upholstery.
By following these steps and utilizing the right materials from CARDIAGTECH.NET, you can effectively repair a hole in your fabric car seat, restoring its appearance and extending its life.
5. Maintaining Your Car Seat After Repair
Proper maintenance after repairing a car seat is essential to prolong the repair’s life and keep your car’s interior looking its best. Regular cleaning and care can prevent further damage and maintain the integrity of the repaired area.
5.1. Regular Cleaning
Regular cleaning is crucial for preventing dirt and grime from accumulating on your car seats, which can lead to wear and tear.
- Vacuum Regularly: Vacuum your car seats at least once a month to remove loose dirt and debris.
- Wipe Down Surfaces: Use a damp cloth to wipe down leather and vinyl surfaces regularly.
- Use Appropriate Cleaners: Use specialized leather or fabric cleaners for deeper cleaning, following the manufacturer’s instructions.
5.2. Conditioning Leather Seats
Leather seats require regular conditioning to prevent them from drying out and cracking.
- Apply Leather Conditioner: Apply a leather conditioner every 3-6 months to keep the leather supple and prevent cracks.
- Buff the Leather: After applying the conditioner, buff the leather with a soft cloth to remove any excess and enhance its shine.
5.3. Protecting from Sunlight
Prolonged exposure to sunlight can cause fading and damage to car seats.
- Use Sunshades: Use sunshades when parking your car in direct sunlight to protect the seats from UV rays.
- Park in the Shade: Whenever possible, park your car in the shade to minimize exposure to sunlight.
5.4. Avoiding Harsh Chemicals
Harsh chemicals can damage the materials used in car seats, leading to discoloration and deterioration.
- Use Mild Cleaners: Avoid using harsh chemicals or abrasive cleaners on your car seats.
- Test Cleaners: Always test new cleaners on an inconspicuous area of the seat before applying them to the entire surface.
5.5. Promptly Addressing Spills and Stains
Addressing spills and stains promptly can prevent them from setting and causing permanent damage.
- Clean Spills Immediately: Clean up spills as soon as they occur to prevent them from soaking into the fabric or leather.
- Use Stain Removers: Use specialized stain removers for stubborn stains, following the manufacturer’s instructions.
5.6. Inspecting Regularly
Regularly inspecting your car seats can help you identify and address minor issues before they become major problems.
- Check for Wear and Tear: Regularly check your car seats for signs of wear and tear, such as small cracks, scuffs, or loose stitching.
- Address Issues Promptly: Address any issues promptly to prevent them from escalating into more significant damage.
By following these maintenance tips, you can ensure that your car seat repair lasts longer and that your car’s interior remains in top condition.
6. Common Mistakes to Avoid When Repairing Car Seats
Repairing car seats can be a straightforward process, but avoiding common mistakes is essential for achieving a professional and durable result. Here are some pitfalls to watch out for when tackling car seat repairs, with solutions offered by CARDIAGTECH.NET.
6.1. Using the Wrong Products
Using the wrong products can lead to ineffective repairs and potential damage to your car seats.
- Mistake: Using household cleaners on leather or vinyl seats.
- Solution: Use specialized leather or vinyl cleaners available at CARDIAGTECH.NET to avoid damaging the material.
- Mistake: Applying the wrong type of filler for the material.
- Solution: Ensure you select a filler specifically designed for leather, vinyl, or fabric to guarantee proper adhesion and a seamless finish.
6.2. Skipping Preparation
Skipping the preparation steps can compromise the quality and longevity of your repair.
- Mistake: Failing to clean the area before applying repair materials.
- Solution: Always clean the area thoroughly with a specialized cleaner to remove dirt, oil, and grime, ensuring better adhesion.
- Mistake: Not prepping the surface properly, such as sanding or removing loose fibers.
- Solution: Use abrasive pads and a leather prep solution from CARDIAGTECH.NET to properly prepare the surface for repair materials.
6.3. Applying Too Much Filler
Applying too much filler at once can result in uneven drying and a less durable repair.
- Mistake: Applying thick layers of filler.
- Solution: Apply filler in thin, even layers, allowing each layer to dry completely before applying the next. This prevents shrinking and ensures a smoother finish.
- Mistake: Not smoothing the filler properly.
- Solution: Use a palette knife to smooth the filler after each application, removing any excess and creating a level surface.
6.4. Not Matching Colors Correctly
A mismatched color can make the repair stand out and detract from the overall appearance of your car’s interior.
- Mistake: Using a colorant that doesn’t match the original color of the car seat.
- Solution: Use a color-matching service like the one offered by CARDIAGTECH.NET to ensure the colorant perfectly matches your car seat.
- Mistake: Not blending the colorant properly.
- Solution: Apply the colorant in thin, even coats and blend it seamlessly with the surrounding area using an airbrush for a professional finish.
6.5. Neglecting the Backing Patch
Failing to use a backing patch can result in the filler sinking into the hole over time, compromising the repair.
- Mistake: Not using a backing patch for larger holes.
- Solution: Always use a backing patch to provide a firm foundation for the filler and prevent it from sinking into the hole.
- Mistake: Using the wrong size or type of backing patch.
- Solution: Select a backing patch that is slightly larger than the hole and made of a durable material such as canvas or leather.
6.6. Rushing the Drying Process
Rushing the drying process can result in uncured materials and a less durable repair.
- Mistake: Not allowing enough time for the filler, colorant, or finish to dry completely.
- Solution: Allow each layer of material to dry completely according to the manufacturer’s instructions, using a heat gun or hair dryer to speed up the process if necessary.
- Mistake: Exposing the repaired area to moisture or extreme temperatures before it is fully cured.
- Solution: Keep the repaired area dry and protected from extreme temperatures until the materials are fully cured.
By avoiding these common mistakes and using the high-quality products available at CARDIAGTECH.NET, you can achieve professional-looking car seat repairs that stand the test of time.
7. When to Seek Professional Car Seat Repair Services
While many car seat repairs can be handled as DIY projects, there are situations where seeking professional services is the best option. Knowing when to enlist the help of experts ensures high-quality results and prevents potential damage to your vehicle’s interior.
7.1. Extensive Damage
Extensive damage, such as large tears, multiple holes, or significant wear and tear, may require professional expertise to restore the car seat to its original condition.
- Large Tears: Tears that are several inches long or located in high-stress areas may require specialized techniques and equipment to repair properly.
- Multiple Holes: If your car seat has multiple holes or burns, a professional can ensure a uniform and seamless repair across the entire surface.
- Significant Wear and Tear: Car seats with extensive fading, cracking, or peeling may require complete reupholstering, which is best left to professionals.
7.2. Complex Repairs
Complex repairs, such as those involving intricate stitching, unique materials, or advanced techniques, may be beyond the scope of a DIY project.
- Intricate Stitching: Repairs that require matching complex stitching patterns or repairing damaged seams may require specialized sewing equipment and expertise.
- Unique Materials: Car seats made from rare or delicate materials may require specialized cleaning and repair techniques to avoid damage.
- Advanced Techniques: Repairs that involve advanced techniques such as color matching, текстурирование, or heat welding may require professional training and equipment.
7.3. Lack of Experience
If you lack experience in car seat repair or are uncomfortable tackling the project yourself, it’s best to seek professional assistance.
- Unfamiliarity with Techniques: If you are unfamiliar with the techniques required for car seat repair, such as patching, filling, or color matching, a professional can ensure a high-quality result.
- Hesitation to Proceed: If you are hesitant to proceed with the repair due to concerns about damaging the car seat, it’s best to entrust the project to an experienced professional.
7.4. Time Constraints
If you have limited time to dedicate to car seat repair, hiring a professional can save you valuable time and effort.
- Busy Schedule: If you have a busy schedule, finding the time to properly repair your car seat may be challenging.
- Quick Turnaround: Professionals can often complete the repair in a fraction of the time it would take for a DIY project, allowing you to get back on the road quickly.
7.5. Desired for Professional Results
If you desire professional-quality results that are virtually indistinguishable from the original condition of the car seat, hiring a professional is the best option.
- Seamless Repairs: Professionals have the skills and equipment to perform seamless repairs that blend seamlessly with the surrounding material.
- Attention to Detail: Professionals pay close attention to detail, ensuring that every aspect of the repair is perfect, from color matching to texture matching.
7.6. Cost-Effectiveness
In some cases, hiring a professional can be more cost-effective than attempting a DIY repair, especially if you factor in the cost of materials, tools, and potential mistakes.
- Avoiding Mistakes: Professionals can avoid costly mistakes that can occur during a DIY repair, such as using the wrong materials or damaging the car seat.
- Guaranteed Results: Professionals often offer a guarantee on their work, providing peace of mind and ensuring that you are satisfied with the results.
Knowing when to seek professional car seat repair services ensures that your vehicle’s interior is restored to its best condition, providing comfort, style, and value for years to come.
8. Cost-Effective Solutions for Car Seat Repair
Repairing your car seats doesn’t have to break the bank. There are several cost-effective solutions available that can help you restore your car’s interior without spending a fortune.
8.1. DIY Repair Kits
DIY repair kits offer an affordable way to fix minor damage to your car seats, such as small holes, tears, and scuffs.
- Leather Repair Kits: These kits typically include filler, adhesive, colorant, and applicators, providing everything you need to repair leather car seats.
- Vinyl Repair Kits: Similar to leather repair kits, vinyl repair kits include materials specifically designed for repairing vinyl car seats.
- Fabric Repair Kits: Fabric repair kits include patches, adhesive, and fabric markers for repairing fabric car seats.
8.2. Salvage Yards
Salvage yards can be a great source of inexpensive replacement parts, such as fabric, leather, and even entire car seats.
- Matching Fabric: You may be able to find matching fabric to repair your car seats at a fraction of the cost of buying new material.
- Replacement Seats: In some cases, you may be able to find a used car seat that is in good condition and matches your car’s interior.
8.3. Online Marketplaces
Online marketplaces like eBay and Craigslist can offer a wide variety of used car seat repair materials and tools at discounted prices.
- Used Tools: You may be able to find used upholstery tools, such as needles, thread, and seam rippers, at a fraction of the cost of buying new ones.
- Discounted Materials: Online marketplaces often offer discounted prices on car seat repair materials, such as leather, vinyl, and fabric.
8.4. Local Upholstery Shops
Local upholstery shops may offer affordable repair services for car seats, especially for minor damage.
- Small Repairs: Upholstery shops may be willing to perform small repairs, such as patching a hole or repairing a seam, at a lower cost than a full reupholstering job.
- Custom Solutions: Upholstery shops can also provide custom solutions for car seat repair, such as creating a custom patch or matching a difficult color.
8.5. Preventive Maintenance
Preventive maintenance is the most cost-effective way to keep your car seats in good condition and avoid costly repairs.
- Regular Cleaning: Regularly clean your car seats to remove dirt, dust, and spills, which can cause wear and tear over time.
- Conditioning: Condition leather seats regularly to prevent them from drying out and cracking.
- Sun Protection: Protect your car seats from sunlight by using sunshades or parking in the shade.
By utilizing these cost-effective solutions, you can keep your car seats in good condition and avoid expensive repairs, saving you money and maintaining the value of your vehicle.
9. Benefits of Choosing CARDIAGTECH.NET for Car Seat Repair Solutions
When it comes to car seat repair, selecting the right provider is essential for achieving high-quality results and ensuring customer satisfaction. CARDIAGTECH.NET offers a range of benefits that make it the ideal choice for all your car seat repair needs.
9.1. Wide Range of Products
CARDIAGTECH.NET offers a comprehensive selection of products for car seat repair, including leather repair kits, vinyl repair kits, fabric repair kits, upholstery tools, and cleaning supplies.
- Everything You Need: You can find everything you need for your car seat repair project in one convenient location.
- High-Quality Materials: CARDIAGTECH.NET sources its products from trusted manufacturers, ensuring that you receive high-quality materials that deliver lasting results.
9.2. Expert Advice and Support
CARDIAGTECH.NET provides expert advice and support to help you choose the right products and techniques for your car seat repair project.
- Knowledgeable Staff: The knowledgeable staff at CARDIAGTECH.NET can answer your questions and provide guidance on all aspects of car seat repair.
- Online Resources: CARDIAGTECH.NET offers a variety of online resources, including tutorials, guides, and FAQs, to help you with your repair project.
9.3. Competitive Pricing
CARDIAGTECH.NET offers competitive pricing on all its products, making car seat repair affordable for everyone.
- Affordable Solutions: You can find cost-effective solutions for repairing your car seats without breaking the bank.
- Value for Money: CARDIAGTECH.NET provides high-quality products at competitive prices, ensuring that you receive excellent value for your money.
9.4. Convenient Online Shopping
CARDIAGTECH.NET offers a convenient online shopping experience, allowing you to browse and purchase products from the comfort of your own home.
- Easy Navigation: The CARDIAGTECH.NET website is easy to navigate, making it simple to find the products you need.
- Secure Transactions: CARDIAGTECH.NET uses secure payment processing to protect your financial information.
9.5. Fast Shipping
CARDIAGTECH.NET offers fast shipping on all orders, ensuring that you receive your products quickly and can get started on your car seat repair project right away.
- Timely Delivery: You can expect your order to arrive promptly, allowing you to complete your repair project without delay.
- Reliable Shipping Partners: CARDIAGTECH.NET partners with reliable shipping companies to ensure that your order arrives safely and on time.
9.6. Customer Satisfaction Guarantee
CARDIAGTECH.NET is committed to customer satisfaction and offers a guarantee on all its products.
- Quality Assurance: You can be confident that you are receiving high-quality products that will meet your expectations.
- Hassle-Free Returns: If you are not satisfied with your purchase, CARDIAGTECH.NET offers hassle-free returns.
By choosing CARDIAGTECH.NET for your car seat repair solutions, you can be confident that you are receiving the best products, advice, and support available, ensuring a successful and satisfying repair experience.
10. Real-Life Examples of Successful Car Seat Repairs
Seeing successful car seat repairs can provide inspiration and confidence for your own projects. Here are a few real-life examples of how car seat repairs can restore the look and feel of your vehicle’s interior.
10.1. Example 1: Restoring a Vintage Leather Seat
A classic car enthusiast had a vintage leather seat with significant wear and tear, including cracks, fading, and a small hole. Using a leather repair kit from CARDIAGTECH.NET, they were able to restore the seat to its former glory.
- Before: The seat had deep cracks, faded color, and a noticeable hole.
- Process: They cleaned the seat, applied leather filler to the cracks and hole, matched the color using a custom colorant service, and applied a leather conditioner.
- After: The seat looked almost new, with the cracks filled, the color restored, and a supple, smooth finish.
10.2. Example 2: Repairing a Burn Hole in a Fabric Seat
A smoker accidentally burned a hole in the fabric seat of their car. They used a fabric repair kit from CARDIAGTECH.NET to patch the hole and blend the repair seamlessly with the surrounding fabric.
- Before: The seat had a noticeable burn hole.
- **Process