**How to Fix a Small Car Scratch: A Comprehensive Guide**
Fixing a small car scratch involves several techniques, and this guide from CARDIAGTECH.BIZ provides you with the knowledge and tools to restore your vehicle’s finish. Whether you’re dealing with minor surface blemishes or slightly deeper scratches, understanding the right methods and products, like scratch removers and polishing compounds, will help you achieve professional-looking results. Explore effective scratch repair solutions to maintain your car’s aesthetic appeal, utilizing advanced car detailing and paint correction methods.
1. Understanding Car Scratches
What are the different types of car scratches, and how do you identify them?
Car scratches vary in severity, influencing the repair approach. According to a study by the University of Michigan’s Transportation Research Institute, understanding the type of scratch is crucial for effective repair. Here’s a breakdown:
- Clear Coat Scratches: These are light scratches that only affect the clear coat layer of your car’s paint. They often appear as faint lines and can usually be fixed with polishing compounds.
- Paint Scratches: These go through the clear coat and into the paint layer. They are more visible than clear coat scratches and may require a touch-up paint application.
- Primer Scratches: These penetrate the clear coat and paint layers, reaching the primer. These scratches are typically more noticeable and need a more involved repair process, including sanding and repainting.
- Deep Scratches: These go all the way down to the metal of the car. They are the most severe type of scratch and require professional repair to prevent rust and further damage.
Identifying the depth of the scratch is the first step in determining the appropriate repair method.
2. Essential Tools and Materials for Scratch Repair
What tools and materials are needed to fix car scratches effectively?
Having the right tools and materials is essential for successful scratch repair. Here’s a list of what you’ll need, readily available at CARDIAGTECH.BIZ:
| Tool/Material | Description | Purpose |
|---|---|---|
| Car Wash Soap | A specialized soap designed to clean car surfaces without damaging the paint. | To clean the area around the scratch and remove any dirt or debris. |
| Microfiber Towels | Soft, lint-free towels that won’t scratch the paint. | For washing, drying, and applying products to the car’s surface. |
| Rubbing Compound | An abrasive compound used to remove clear coat scratches and minor paint imperfections. | To level the surface around the scratch by removing a small layer of the clear coat. |
| Polishing Compound | A less abrasive compound used after rubbing compound to refine the finish and restore shine. | To smooth out the surface after using rubbing compound and enhance the paint’s gloss. |
| Scratch Remover | A specialized product designed to remove or minimize the appearance of light scratches. | To blend the edges of the scratch with the surrounding paint, making it less visible. |
| Touch-Up Paint | Paint that matches your car’s color, used to fill in deeper scratches. | To fill in scratches that have penetrated the clear coat and paint layers. |
| Clear Coat | A protective layer applied over the touch-up paint to seal and protect it. | To provide a glossy finish and protect the touch-up paint from the elements. |
| Sandpaper | Fine-grit sandpaper (2000-3000 grit) used for wet sanding. | To smooth out imperfections and blend the touch-up paint with the surrounding paint. |
| Sanding Block | A block used to hold sandpaper, providing a flat, even surface for sanding. | To ensure even pressure and prevent gouging during sanding. |
| Masking Tape | Tape used to protect surrounding areas from accidental damage. | To protect the areas around the scratch from being affected by rubbing compound, polishing compound, or paint. |
| Applicator Pads | Soft pads used to apply rubbing compound, polishing compound, and wax. | To evenly distribute the product and prevent scratching the paint. |
| Wax | A protective coating that adds shine and protects the paint from the elements. | To seal the paint and provide a protective layer against UV rays, water, and other contaminants. |
| Paint Cleaner | Removes contaminants, oil, and wax that may have accumulated on the car’s surface. | To prep the surface for repair |
| Buffing Machine/Pads | Electric tool used with polishing pads to correct paint imperfections. | To improve scratch repair outcome, especially with deeper scratches. |
| Detail Brush | Small brush used to clean tight spots and remove residue. | Useful for reaching hard-to-access areas. |
| Clay Bar | A resin mixture used to remove contaminants from the surface of your car’s paint, glass, fiberglass and metal. | To prep the surface by removing any tiny contaminants |
| Tack Cloth | A sticky cloth used to remove any loose particles before painting or applying clear coat. | To ensure a clean, smooth surface for the final layer of protection. |
| Degreaser | Chemical solutions designed to remove grease, wax, and silicone contaminants before painting. | To remove any oils or contaminants that could affect paint adhesion. |
| Primer | This is a base coat that helps the paint adhere better to the surface and provides additional protection. | To prepare the surface for painting and prevent rust. |
| Color-Matching Tool | Electronic devices that scan your car’s paint and provide the exact paint formula for a perfect match. | To confirm that the touch-up paint is the correct color before application. |
| UV Curing Light | Special lights used to quickly cure automotive paint and clear coat. | To accelerate the drying time of the paint or clear coat. |
| Magnifying Glass/Light | Helps in closely inspecting the repaired area for any remaining imperfections. | To ensure quality control and spot any blemishes. |
| Respirator/Mask | Essential for safety when sanding, spraying, or using chemical compounds. | To protect from inhaling harmful particles or vapors. |
Having these tools and materials on hand will ensure you can tackle most minor car scratches effectively. You can find all these items at CARDIAGTECH.BIZ.
3. Preparing the Area for Scratch Repair
How should you prepare the car’s surface before fixing a scratch?
Proper preparation is crucial for achieving the best results. According to a study by the National Institute for Automotive Service Excellence (ASE), surface preparation accounts for up to 50% of the final quality of paint repairs. Follow these steps:
- Wash the Car: Begin by thoroughly washing the area around the scratch with car wash soap and water. This removes dirt, grime, and other contaminants that could interfere with the repair process.
- Dry the Area: Use a clean, soft microfiber towel to dry the area completely. Make sure there is no moisture left, as it can affect the adhesion of repair products.
- Decontaminate the Surface: Use a clay bar to remove any embedded contaminants from the paint surface. Spray the area with a clay bar lubricant and gently rub the clay bar over the surface until it feels smooth. This step ensures a clean surface for the repair products to adhere to.
- Mask the Surrounding Area: Use masking tape to protect the areas around the scratch. This prevents accidental damage from rubbing compound, polishing compound, or sandpaper. Apply the tape carefully, ensuring it adheres well to the surface.
By following these preparation steps, you create an ideal surface for scratch repair, ensuring better adhesion and a smoother finish.
4. Removing Light Scratches with Rubbing Compound
How can you remove light scratches using rubbing compound?
Rubbing compound is effective for removing light scratches that only affect the clear coat. A study by the Society of Automotive Engineers (SAE) found that using the correct abrasive can significantly reduce the appearance of minor scratches. Here’s how to use it:
- Apply Rubbing Compound: Apply a small amount of rubbing compound to a clean applicator pad.
- Rub the Scratch: Gently rub the compound over the scratch using a circular motion. Apply moderate pressure and work in small sections.
- Buff the Area: Use a clean microfiber towel to buff the area, removing any excess rubbing compound.
- Inspect the Scratch: Check the scratch to see if it has been reduced or removed. If necessary, repeat the process.
Rubbing compound works by gently abrading the clear coat, leveling the surface and reducing the visibility of the scratch. Be careful not to apply too much pressure, as this can damage the paint.
5. Polishing the Area After Using Rubbing Compound
Why is polishing necessary after using rubbing compound, and how do you do it?
Polishing is a crucial step after using rubbing compound to restore the shine to the clear coat. According to research from the International Detailing Association (IDA), polishing refines the surface, removing any haze left by the rubbing compound. Here’s how to polish:
- Apply Polishing Compound: Apply a small amount of polishing compound to a clean applicator pad.
- Polish the Area: Gently polish the area using a circular motion, similar to how you applied the rubbing compound. Use light to moderate pressure.
- Buff the Area: Use a clean microfiber towel to buff the area, removing any excess polishing compound.
- Inspect the Finish: Check the finish to ensure it is smooth and glossy. If necessary, repeat the process.
Polishing compound is less abrasive than rubbing compound and is designed to refine the surface and enhance the paint’s gloss.
6. Using Scratch Remover Products
What are scratch remover products, and how effective are they?
Scratch remover products are designed to minimize the appearance of light scratches. According to a Consumer Reports study, some scratch removers can be quite effective on minor imperfections. Here’s how to use them:
- Apply Scratch Remover: Apply a small amount of scratch remover to a clean applicator pad.
- Rub the Scratch: Gently rub the product over the scratch using a circular motion. Follow the manufacturer’s instructions for the recommended pressure and duration.
- Buff the Area: Use a clean microfiber towel to buff the area, removing any excess product.
- Inspect the Results: Check the scratch to see if it has been reduced or removed. Repeat if necessary.
Scratch removers work by filling in the scratch with polymers and smoothing the edges to make it less visible. They are best suited for very light scratches and swirl marks.
7. Repairing Deeper Scratches with Touch-Up Paint
How do you repair deeper scratches that go beyond the clear coat?
Deeper scratches that penetrate the clear coat and paint layers require touch-up paint for effective repair. According to automotive paint experts at PPG Industries, using touch-up paint can significantly improve the appearance of deeper scratches and prevent rust. Here’s how to use it:
- Clean the Scratch: Make sure the scratch is clean and free of any debris. Use a degreaser to remove any oils or contaminants.
- Apply Primer: If the scratch has reached the metal, apply a thin layer of automotive primer to prevent rust. Let it dry completely.
- Apply Touch-Up Paint: Using a fine brush or the applicator provided with the touch-up paint, carefully apply thin layers of paint to the scratch. Allow each layer to dry before applying the next.
- Allow to Dry: Let the touch-up paint dry completely, usually for several hours or overnight.
- Wet Sand the Area: Use fine-grit sandpaper (2000-3000 grit) wrapped around a sanding block to gently wet sand the area. This will help blend the touch-up paint with the surrounding paint.
- Polish the Area: After sanding, use polishing compound to restore the shine to the area.
- Apply Clear Coat: Apply a thin layer of clear coat over the touch-up paint to protect it and provide a glossy finish.
- Final Buff: After the clear coat has dried, use a clean microfiber towel to buff the area and blend it seamlessly with the surrounding paint.
Using touch-up paint requires patience and precision, but it can significantly improve the appearance of deeper scratches.
8. Wet Sanding Techniques for Blending Paint
What is wet sanding, and how does it help in scratch repair?
Wet sanding is a technique used to smooth out imperfections and blend touch-up paint with the surrounding paint. According to a study by the American Society for Testing and Materials (ASTM), wet sanding can significantly improve the finish quality of paint repairs. Here’s how to do it:
- Prepare the Sandpaper: Soak a piece of fine-grit sandpaper (2000-3000 grit) in water for several minutes.
- Wrap the Sandpaper: Wrap the sandpaper around a sanding block to provide a flat, even surface.
- Sand the Area: Gently sand the area with light pressure, using a back-and-forth motion. Keep the sandpaper and the surface wet at all times.
- Inspect the Surface: Check the surface frequently to ensure you are not removing too much paint.
- Clean the Area: Use a clean microfiber towel to wipe the area clean.
Wet sanding helps to level the surface and remove any imperfections, creating a smooth, even finish.
9. Applying Clear Coat for Protection and Shine
Why is clear coat important, and how should it be applied?
Clear coat is a protective layer that adds shine and protects the paint from the elements. According to automotive paint experts at DuPont, applying a clear coat is essential for long-lasting paint repairs. Here’s how to apply it:
- Clean the Area: Make sure the area is clean and dry before applying clear coat.
- Apply Clear Coat: Apply a thin, even layer of clear coat over the repaired area. Use smooth, consistent strokes.
- Allow to Dry: Let the clear coat dry completely, usually for several hours or overnight.
- Wet Sand (Optional): If necessary, wet sand the clear coat to remove any imperfections.
- Polish the Area: Use polishing compound to restore the shine to the clear coat.
Clear coat provides a glossy finish and protects the paint from UV rays, water, and other contaminants, ensuring a long-lasting repair.
10. Final Polishing and Waxing for a Professional Finish
How do you achieve a professional finish after scratch repair?
Final polishing and waxing are essential for achieving a professional finish after scratch repair. According to the International Detailing Association (IDA), these steps enhance the paint’s gloss and provide added protection. Here’s how to do it:
- Polish the Area: Use polishing compound to refine the surface and remove any swirl marks or imperfections.
- Buff the Area: Use a clean microfiber towel to buff the area, removing any excess polishing compound.
- Apply Wax: Apply a thin, even layer of wax to the area. Use a clean applicator pad and follow the manufacturer’s instructions.
- Buff the Wax: Use a clean microfiber towel to buff the wax, revealing a deep, glossy shine.
Wax provides a protective layer that seals the paint and protects it from the elements, ensuring a long-lasting, professional finish.
11. Preventing Future Scratches
What steps can you take to prevent car scratches in the future?
Preventing scratches is better than having to repair them. Here are some tips to help you protect your car’s paint:
- Wash Your Car Regularly: Regular washing removes dirt, grime, and other contaminants that can scratch the paint.
- Use Quality Washing Products: Use car wash soap and microfiber towels to avoid scratching the paint.
- Apply Wax Regularly: Wax provides a protective layer that helps prevent scratches.
- Avoid Automatic Car Washes: Automatic car washes can scratch the paint with their abrasive brushes.
- Park Carefully: Park away from other cars to avoid accidental scratches.
- Use a Car Cover: A car cover can protect your car from scratches, dust, and other environmental hazards.
By following these tips, you can help keep your car’s paint looking its best and avoid the need for frequent scratch repairs.
12. Choosing the Right Products for Your Car
How do you select the best scratch repair products for your vehicle?
Choosing the right products is essential for effective scratch repair. Here are some factors to consider:
- Type of Scratch: Different products are designed for different types of scratches. Make sure to choose a product that is appropriate for the depth and severity of the scratch.
- Paint Color: Some products are designed for specific paint colors. Check the product label to ensure it is compatible with your car’s paint.
- Product Quality: Choose high-quality products from reputable brands. These products are more likely to deliver effective results and avoid damaging the paint.
- User Reviews: Read user reviews to get an idea of the product’s performance and effectiveness.
By considering these factors, you can choose the right products for your car and achieve the best possible results. All the products mentioned in this guide are available at CARDIAGTECH.BIZ.
13. Understanding the Cost of DIY vs. Professional Repair
What are the cost implications of repairing scratches yourself versus hiring a professional?
Deciding whether to repair car scratches yourself or hire a professional depends on the severity of the damage and your comfort level. Here’s a cost comparison:
| Repair Method | Cost | Pros | Cons |
|---|---|---|---|
| DIY Repair | $20 – $100 (for materials like rubbing compound, polishing compound, touch-up paint, sandpaper, and applicators) | Cost-effective, convenient, can be done at your own pace | Requires time and effort, results may not be as good as professional repair, potential for mistakes |
| Professional Repair | $150 – $500+ (depending on the severity of the scratch and the shop’s rates) | High-quality results, professional expertise, saves time and effort | More expensive, requires scheduling an appointment, potential for additional costs if the damage is more extensive than initially assessed |
| Mobile Scratch Repair | $100 – $300 (depending on the scratch depth and the complexity of the repair) | Convenient, comes to your location, often more affordable than traditional body shops | Quality can vary, may not be able to handle very deep or complex scratches |
| Paintless Dent Repair | $75 – $150 per panel (if the scratch is accompanied by a dent and can be addressed with PDR techniques) | Preserves the original factory paint, often faster than traditional repair methods, environmentally friendly | Only suitable for certain types of dents and scratches, not effective for deep scratches that require paintwork |
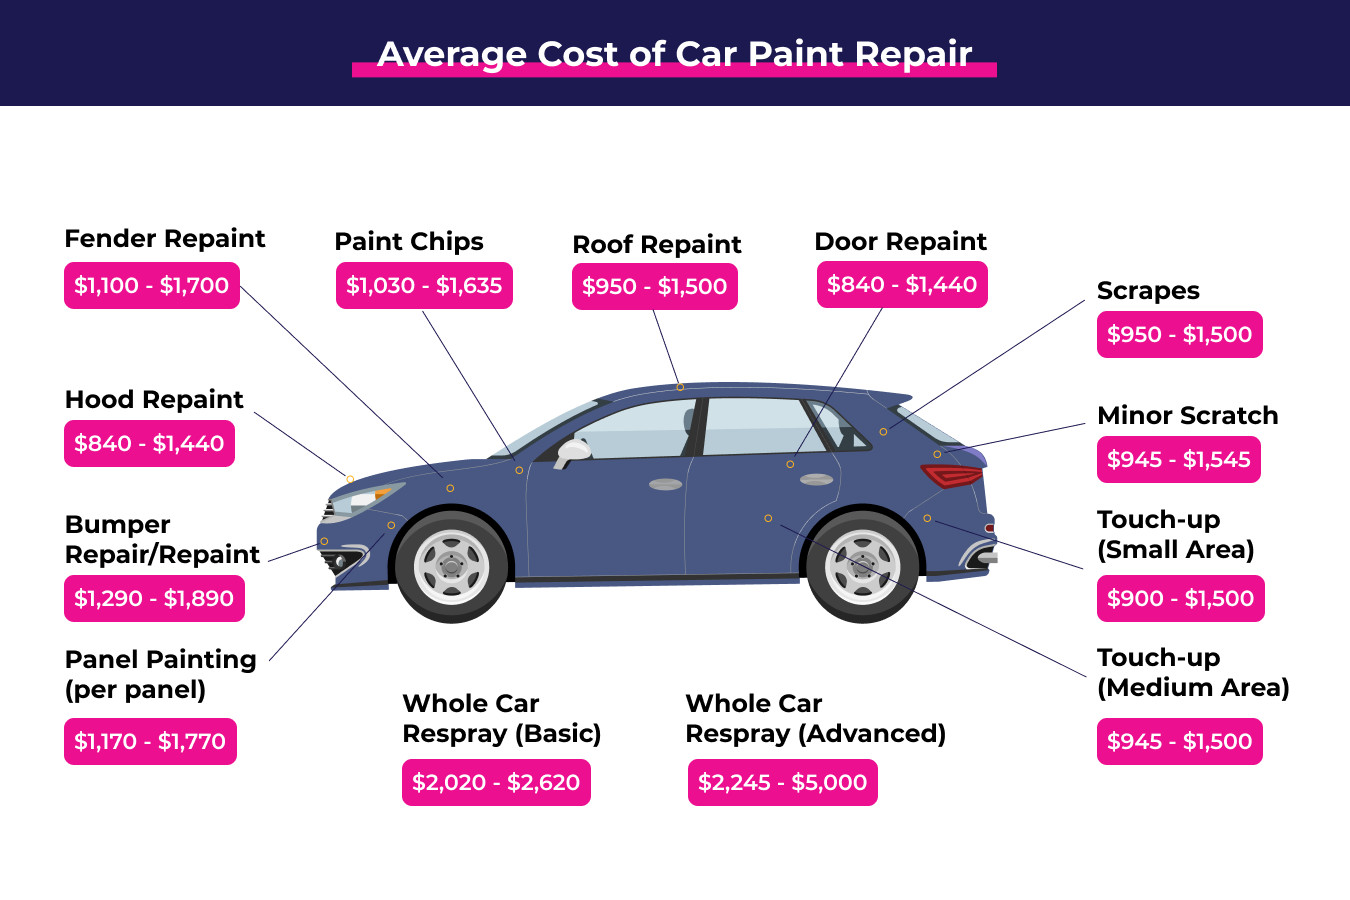
| Full Repaint | $1,000 – $5,000+ (for repainting the entire car or a large section of it) | Provides a fresh, new finish, can address multiple scratches and imperfections at once | Most expensive option, can affect the car’s resale value if not done properly |
| Ceramic Coating | $500 – $2,000+ (for applying a ceramic coating to protect the car’s paint from future scratches and environmental damage) | Long-lasting protection, hydrophobic properties make washing easier, enhances the paint’s gloss and shine | Expensive upfront cost, requires professional application for best results |
| Paint Protection Film | $1,000 – $5,000+ (for installing PPF on high-impact areas or the entire car) | Provides a physical barrier against scratches, rock chips, and other road hazards, self-healing properties can repair minor scratches | Expensive, requires professional installation, can change the appearance of the car slightly |
Ultimately, the decision depends on your budget, skills, and the desired outcome. For minor scratches, DIY repair can be a cost-effective option. For deeper or more extensive scratches, professional repair may be the best choice.
14. Using a Buffing Machine for Enhanced Results
When is it appropriate to use a buffing machine, and how does it improve scratch repair?
A buffing machine can significantly enhance the results of scratch repair, especially for larger areas or more stubborn scratches. According to a study by the Society of Automotive Engineers (SAE), using a buffing machine can improve the efficiency and effectiveness of paint correction. Here’s when and how to use it:
- When to Use: A buffing machine is ideal for removing swirl marks, oxidation, and moderate scratches. It is also useful for polishing larger areas quickly and efficiently.
- Choose the Right Pad: Use a cutting pad for removing scratches, a polishing pad for refining the finish, and a finishing pad for applying wax.
- Apply Compound: Apply a small amount of rubbing compound or polishing compound to the pad.
- Buff the Area: Gently buff the area using a back-and-forth motion, overlapping each pass. Apply moderate pressure and keep the machine moving to avoid overheating the paint.
- Inspect the Finish: Check the finish frequently to ensure you are not removing too much paint.
- Clean the Area: Use a clean microfiber towel to wipe the area clean.
A buffing machine can significantly improve the appearance of your car’s paint, but it is important to use it carefully to avoid damaging the finish.
15. Safety Precautions During Scratch Repair
What safety measures should you take when repairing car scratches?
Safety should always be a priority when working on your car. Here are some safety precautions to keep in mind:
- Wear Safety Glasses: Protect your eyes from flying debris and chemical splashes.
- Wear Gloves: Protect your hands from chemicals and sharp objects.
- Work in a Well-Ventilated Area: Avoid inhaling fumes from chemicals and paints.
- Read Product Labels: Follow the manufacturer’s instructions for the safe use of all products.
- Use a Respirator: When sanding, spraying, or using chemical compounds, wear a respirator to protect from inhaling harmful particles or vapors.
- Keep Products Away from Children: Store all products in a safe place, out of reach of children.
By following these safety precautions, you can minimize the risk of injury and ensure a safe and successful scratch repair process.
16. Advanced Techniques for Deep Scratch Repair
What advanced methods can be used for repairing deep scratches that reach the metal?
Repairing deep scratches that reach the metal requires more advanced techniques to prevent rust and restore the car’s finish. Here are some methods:
- Rust Removal: If there is any rust present, use a rust remover or a wire brush to remove it completely.
- Body Filler: For deep scratches, you may need to use body filler to fill in the gap. Apply the filler in thin layers, allowing each layer to dry before applying the next.
- Sanding: After the filler has dried, use sandpaper to smooth it out and blend it with the surrounding paint. Start with a coarse grit and gradually move to finer grits.
- Primer: Apply a layer of automotive primer to protect the metal and provide a smooth surface for the paint.
- Touch-Up Paint: Apply thin layers of touch-up paint, allowing each layer to dry before applying the next.
- Clear Coat: Apply a layer of clear coat to protect the paint and provide a glossy finish.
- Polishing and Waxing: Polish and wax the area to restore the shine and protect the paint.
These advanced techniques require more skill and experience, but they can effectively repair deep scratches and restore your car’s finish.
17. Maintaining Your Car’s Paint for Longevity
How can you maintain your car’s paint to ensure it lasts longer?
Proper maintenance is essential for keeping your car’s paint looking its best for years to come. Here are some tips:
- Wash Regularly: Regular washing removes dirt, grime, and other contaminants that can damage the paint.
- Wax Regularly: Wax provides a protective layer that helps prevent scratches and protects the paint from the elements.
- Park in the Shade: Parking in the shade can protect your car from UV rays, which can fade and damage the paint.
- Use a Car Cover: A car cover can protect your car from scratches, dust, and other environmental hazards.
- Avoid Harsh Chemicals: Avoid using harsh chemicals or abrasive cleaners on your car’s paint, as they can damage the finish.
- Address Scratches Promptly: Repair scratches promptly to prevent rust and further damage.
By following these maintenance tips, you can keep your car’s paint looking its best for years to come.
18. Understanding Paint Correction Techniques
What are paint correction techniques, and when are they necessary?
Paint correction involves removing imperfections from your car’s paint, such as swirl marks, scratches, and oxidation. According to the International Detailing Association (IDA), paint correction can significantly improve the appearance of your car’s paint. Here’s when it’s necessary:
- Swirl Marks: If your car’s paint has swirl marks from washing or polishing, paint correction can remove them and restore a smooth, glossy finish.
- Scratches: Paint correction can remove or minimize the appearance of scratches, depending on their severity.
- Oxidation: If your car’s paint is faded or oxidized, paint correction can restore its original color and shine.
- Water Spots: Paint correction can remove water spots and other blemishes from your car’s paint.
Paint correction typically involves using a buffing machine with various pads and compounds to level the surface and remove imperfections. It is a more advanced technique that requires skill and experience, but it can significantly improve the appearance of your car’s paint.
19. Exploring Ceramic Coatings for Scratch Protection
What are ceramic coatings, and how do they protect against scratches?
Ceramic coatings are a liquid polymer applied to a vehicle’s exterior to protect it from environmental hazards, scratches, and other damage. According to a study by NanoTech Coatings, ceramic coatings provide a durable, long-lasting layer of protection that enhances the paint’s gloss and makes it easier to clean. Here’s how they protect against scratches:
- Hardness: Ceramic coatings are much harder than the factory clear coat, providing a physical barrier against scratches.
- Scratch Resistance: While not scratch-proof, ceramic coatings are highly scratch-resistant, reducing the likelihood of scratches from washing, drying, and everyday use.
- Self-Healing Properties: Some ceramic coatings have self-healing properties that can repair minor scratches and swirl marks.
- Hydrophobic Properties: Ceramic coatings are hydrophobic, meaning they repel water and dirt, making it easier to keep your car clean and reducing the need for frequent washing.
Ceramic coatings are a great option for protecting your car’s paint and keeping it looking its best.
20. Considering Paint Protection Film (PPF) for Ultimate Defense
What is Paint Protection Film (PPF), and how does it offer the ultimate defense against scratches?
Paint Protection Film (PPF) is a transparent, self-adhesive film applied to a vehicle’s exterior to protect it from scratches, rock chips, and other damage. According to a study by 3M, PPF provides the ultimate defense against scratches and other road hazards. Here’s how:
- Physical Barrier: PPF provides a physical barrier between your car’s paint and the environment, protecting it from scratches, rock chips, and other damage.
- Self-Healing Properties: Many PPF films have self-healing properties that can repair minor scratches and swirl marks.
- UV Protection: PPF can protect your car’s paint from UV rays, preventing fading and oxidation.
- Long-Lasting Protection: PPF can last for several years, providing long-lasting protection for your car’s paint.
PPF is a great option for protecting your car’s paint and keeping it looking its best, especially in areas prone to scratches and rock chips.
If you’re facing challenges with car scratches and need expert advice or quality tools, don’t hesitate to reach out to CARDIAGTECH.BIZ. We’re here to help you restore your vehicle’s finish and keep it looking its best. Contact us at 276 Reock St, City of Orange, NJ 07050, United States, via WhatsApp at +1 (641) 206-8880, or visit our website CARDIAGTECH.BIZ for more information and assistance. Let us help you achieve a professional-quality repair!
FAQ: How to Fix a Small Car Scratch
1. What are the different types of car scratches?
Car scratches can be categorized into clear coat scratches (light), paint scratches (deeper, into the paint layer), primer scratches (reaching the primer), and deep scratches (down to the metal). Understanding the type helps determine the appropriate repair.
2. What tools and materials do I need to fix a car scratch?
Essential items include car wash soap, microfiber towels, rubbing compound, polishing compound, scratch remover, touch-up paint, clear coat, sandpaper, masking tape, and applicator pads. CARDIAGTECH.BIZ provides all these materials.
3. How do I prepare the area before fixing a scratch?
Start by washing and drying the area. Use a clay bar to remove contaminants. Mask the surrounding area with tape to protect it from accidental damage during the repair process.
4. Can rubbing compound remove light scratches?
Yes, rubbing compound is effective for light scratches that only affect the clear coat. Apply it gently in a circular motion, then buff the area with a clean microfiber towel.
5. Why is polishing necessary after using rubbing compound?
Polishing refines the surface after using rubbing compound and restores shine to the clear coat. Apply polishing compound in a circular motion and buff with a clean microfiber towel.
6. How effective are scratch remover products?
Scratch remover products can minimize the appearance of light scratches by filling them with polymers and smoothing the edges. They are best for very minor imperfections.
7. How do I repair deeper scratches with touch-up paint?
Clean the scratch, apply primer if needed, and carefully apply thin layers of touch-up paint, allowing each layer to dry. Wet sand, polish, and apply clear coat for protection and a glossy finish.
8. What is wet sanding, and how does it help?
Wet sanding involves using fine-grit sandpaper with water to smooth out imperfections and blend touch-up paint with the surrounding paint. It creates a smooth, even finish.
9. Why is clear coat important?
Clear coat provides a protective layer that adds shine and protects the paint from UV rays, water, and contaminants, ensuring a long-lasting repair.
10. How can I prevent future car scratches?
Wash your car regularly, use quality washing products, apply wax, avoid automatic car washes, park carefully, and use a car cover to protect the paint from scratches and environmental hazards.
Unlock Expert Car Scratch Repair with CARDIAGTECH.BIZ
Ready to tackle those unsightly car scratches? At CARDIAGTECH.BIZ, we understand the frustration of seeing your vehicle marred by imperfections. That’s why we offer a comprehensive range of tools, materials, and expert guidance to help you achieve professional-quality scratch repairs right at home.
Whether you’re a seasoned auto enthusiast or a first-time DIYer, our high-quality products and detailed instructions will empower you to restore your car’s finish to its original glory. From rubbing compounds and polishing compounds to touch-up paints and clear coats, we have everything you need to address scratches of all types and depths.
But we’re more than just a supplier of tools and materials. At CARDIAGTECH.BIZ, we’re committed to providing you with the knowledge and support you need to succeed. Our team of experienced professionals is always available to answer your questions, offer personalized recommendations, and guide you through the repair process.
Don’t let car scratches diminish your vehicle’s appearance and value any longer. Visit CARDIAGTECH.BIZ today and discover the satisfaction of achieving flawless scratch repairs with our expert assistance. Contact us at 276 Reock St, City of Orange, NJ 07050, United States, via WhatsApp at +1 (641) 206-8880, or visit our website CARDIAGTECH.BIZ for more information and assistance. We look forward to helping you achieve a showroom-worthy finish for your car.