How to Replace the Oil Filter Housing Gasket (OFHG): A Comprehensive Guide
Replacing the oil filter housing gasket (OFHG) is essential for maintaining your vehicle’s engine health and preventing oil leaks. This comprehensive guide from CARDIAGTECH.BIZ will walk you through the process, ensuring a successful DIY repair. BMW Diagnostic Trouble Codes
1. What is an Oil Filter Housing Gasket (OFHG)?
The oil filter housing gasket (OFHG) is a critical seal that prevents oil leaks from the oil filter housing, which is attached to the engine block. According to a study by the American Automobile Association (AAA), oil leaks are a common cause of vehicle maintenance issues, often leading to more severe engine problems if left unaddressed.
- Function: The OFHG seals the connection between the oil filter housing and the engine block, maintaining oil pressure and preventing leaks.
- Importance: A faulty OFHG can lead to significant oil leaks, reduced engine lubrication, and potential engine damage. Regular inspection and timely replacement are crucial.
2. Identifying the Need for Oil Filter Housing Gasket Replacement
Recognizing the signs of a failing oil filter housing gasket can save you from costly engine repairs. Here are some telltale indicators:
- Visible Oil Leaks: One of the most obvious signs is oil pooling under your car or visible leaks around the oil filter housing.
- Oil Consumption: If you notice that your car is consuming more oil than usual, it could be due to a leak caused by a faulty OFHG.
- Burning Oil Smell: Oil leaking onto hot engine components can produce a distinct burning smell.
- Low Oil Pressure Warning: A significant oil leak can lead to a drop in oil pressure, triggering a warning light on your dashboard.
According to a report by the National Institute for Automotive Service Excellence (ASE), addressing oil leaks promptly can prevent more severe engine issues, such as overheating and engine seizure.
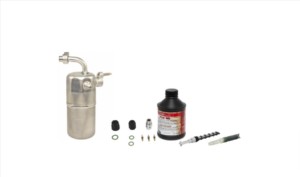
3. Essential Tools and Materials for OFHG Replacement
Having the right tools and materials on hand is crucial for a smooth and efficient OFHG replacement. Here’s a comprehensive list:
| Tool/Material | Description |
|---|---|
| New Oil Filter Housing Gasket | Ensure it matches your vehicle’s make and model |
| Socket Set | Various sizes for removing bolts and nuts |
| Wrench Set | Combination wrenches for different bolt sizes |
| Torque Wrench | For tightening bolts to the manufacturer’s specified torque |
| Screwdrivers | Both flathead and Phillips head |
| Carburetor or Brake Cleaner | For cleaning mating surfaces |
| E-10 External Torx Socket | For OFH bolts |
| E-12 External Torx Socket | For OFCH bolts (10mm 12-point socket may also work) |
| 8mm 12-point Ratcheting Wrench | For front-lower OFH bolt |
| 12mm Socket | For oil cooler line H-plate clamp |
| Air Ratchet (Optional) | For fast and easy work |
| Air Compressor (Optional) | To power the air ratchet |
| Razor Blade | To help remove old gaskets |
| Oil Filter Wrench | For removing and installing the oil filter |
| Drain Pan | To catch draining oil |
| Funnel | For adding new oil |
| Rags or Shop Towels | For cleaning up spills |
| New Engine Oil | The correct type and amount for your vehicle |
| Distilled Water or Coolant Mix | As needed |
| Gloves | To protect your hands |
| Safety Glasses | To protect your eyes |
| Jack and Jack Stands | To safely lift and support the vehicle |
| Wheel Chocks | To prevent the vehicle from rolling |
| Magnetic Pick-Up Tool (Optional) | To retrieve dropped fasteners |
Investing in high-quality tools from CARDIAGTECH.BIZ ensures durability and precision, making the job easier and safer. According to a survey by the U.S. Bureau of Labor Statistics, using appropriate tools and safety equipment significantly reduces the risk of injury during automotive repairs.
4. Step-by-Step Guide: Replacing the Oil Filter Housing Gasket
Follow these detailed steps to replace your oil filter housing gasket effectively.
4.1. Preparation
- Safety First: Ensure the vehicle is parked on a level surface, engage the parking brake, and use wheel chocks.
- Gather Tools and Materials: Have all necessary tools and materials within reach.
- Protect Your Work Area: Use fender covers to protect your vehicle’s paint.
4.2. Draining the Engine Oil
- Locate the Oil Drain Plug: Typically found on the bottom of the oil pan.
- Position the Drain Pan: Place the drain pan under the oil drain plug.
- Remove the Drain Plug: Use the correct size wrench to loosen and remove the drain plug. Be careful as the oil may be hot.
- Allow Oil to Drain Completely: This may take 15-30 minutes.
4.3. Removing the Oil Filter Housing
- Disconnect Electrical Connectors: Disconnect any electrical connectors attached to the oil filter housing.
- Remove the Oil Filter Cap: Use an oil filter wrench to remove the oil filter cap.
- Remove the Oil Filter: Take out the oil filter and set it aside.
- Remove the Oil Filter Housing Bolts: Use the appropriate socket to remove the bolts securing the oil filter housing to the engine block.
- Detach the Oil Filter Housing: Carefully detach the oil filter housing from the engine block. There may be some residual oil, so be prepared with rags.
4.4. Cleaning the Mating Surfaces
- Remove the Old Gasket: Use a razor blade or gasket scraper to carefully remove the old gasket from the oil filter housing and the engine block.
- Clean the Surfaces: Use carburetor or brake cleaner to thoroughly clean the mating surfaces, removing any residual oil or debris.
4.5. Installing the New Oil Filter Housing Gasket
- Position the New Gasket: Place the new oil filter housing gasket onto the oil filter housing. Ensure it is properly aligned.
- Reattach the Oil Filter Housing: Carefully reattach the oil filter housing to the engine block, aligning the bolt holes.
- Install the Bolts: Install the oil filter housing bolts and tighten them by hand.
- Torque the Bolts: Use a torque wrench to tighten the bolts to the manufacturer’s specified torque. This is crucial to ensure a proper seal.
4.6. Reassembling and Final Steps
- Install the Oil Filter: Place the new oil filter into the oil filter housing.
- Reinstall the Oil Filter Cap: Screw the oil filter cap back onto the oil filter housing, tightening it with an oil filter wrench.
- Reconnect Electrical Connectors: Reconnect any electrical connectors that were disconnected earlier.
- Replace the Oil Drain Plug: Install the oil drain plug with a new crush washer and tighten it to the manufacturer’s specified torque.
- Add New Engine Oil: Use a funnel to add the correct amount and type of new engine oil.
- Check for Leaks: Start the engine and check for any oil leaks around the oil filter housing and oil drain plug.
- Verify Oil Level: Check the oil level using the dipstick and add more oil if necessary.
Following these steps carefully will ensure a successful oil filter housing gasket replacement.
5. Common Mistakes to Avoid During OFHG Replacement
Even experienced mechanics can make mistakes. Here are some common pitfalls to avoid:
- Over-tightening Bolts: Over-tightening bolts can damage the oil filter housing or engine block. Always use a torque wrench to tighten bolts to the manufacturer’s specified torque.
- Using the Wrong Gasket: Ensure you are using the correct oil filter housing gasket for your vehicle’s make and model.
- Skipping Surface Cleaning: Failing to thoroughly clean the mating surfaces can prevent the new gasket from sealing properly.
- Forgetting to Replace the Oil Filter: Since you’re already performing the task, it’s best to replace the oil filter at the same time.
According to a survey by the Automotive Service Association (ASA), avoiding these common mistakes can significantly improve the success rate of DIY automotive repairs.
6. The Role of CARDIAGTECH.BIZ in Your Automotive Repairs
CARDIAGTECH.BIZ offers a wide range of high-quality tools and equipment to assist with your automotive repairs, including oil filter housing gasket replacements. Here’s how we can help:
- Wide Selection of Tools: We offer a variety of socket sets, wrench sets, torque wrenches, and other tools needed for OFHG replacement.
- High-Quality Materials: Our products are made from durable materials, ensuring they can withstand the demands of automotive repair.
- Expert Advice: Our team of experts can provide guidance and support to help you choose the right tools for the job.
- Convenient Online Shopping: Our website, CARDIAGTECH.BIZ, makes it easy to browse and purchase the tools you need from the comfort of your home.
7. Understanding the OEM Oil Cooler and OFCH Gasket Replacement
For vehicles equipped with an OEM Oil Cooler (also known as the S840A High-Speed Synchronization package), replacing the Oil Filter Control Housing (OFCH) gasket is an essential part of the OFHG replacement process.
7.1. Identifying the OEM Oil Cooler
The OEM Oil Cooler is designed to help regulate oil temperature, especially in high-performance vehicles. It’s typically located near the oil filter housing and connected by oil lines.
7.2. Tools and Materials for OFCH Gasket Replacement
In addition to the tools and materials listed earlier, you will need:
- Oil Filter Control Housing Gasket: Ensure it matches your vehicle’s make and model (PN 11427525335).
- E-12 External Torx Socket: For OFCH bolts (10mm 12-point socket may also work).
- 12mm Socket: For oil cooler line H-plate clamp.
7.3. Step-by-Step Guide: OFCH Gasket Replacement
Follow these steps in conjunction with the OFHG replacement process:
- Step A: Remove Oil Cooler Lines: Place rags below the OFCH to catch dripping oil. Remove the oil cooler lines from the OFCH by unbolting the H-plate clamp with a 12mm socket, then pull the fittings down evenly.
- Step B: Secure the Hoses: Wrap the hose ends in clean rags and lay them on top of the radiator support. Invert the ends to empty residual oil.
- Step C: Loosen OFCH Bolts: Using an E-12 Torx socket or 12-point 10mm socket, loosen the 3 OFCH bolts.
- Step D: Remove OFCH Bolts: Remove the OFCH bolts and separate the housings.
- Step E: Remove Old Gaskets: Use a razor blade and pick awl to pry out the old gaskets.
- Step F: Clean Mating Surfaces: Clean all housings and mating surfaces with carb/brake cleaner.
- Step G: Install New Gaskets: Install the new gaskets.
- Step H: Assemble OFCH to OFH: Assemble the OFCH to the OFH and hand-tighten the bolts.
- Step I: Mount OFH Assembly: Attach the OFH assembly to the engine block.
- Step J: Torque OFCH Bolts: Torque the OFCH bolts to the specified torque (24 Nm for an M8x25 8.8 grade bolt).
- Step K: Attach Oil Cooler Lines: Attach the oil cooler lines to the OFCH and torque the H-plate clamp bolt to 19 Nm.
8. Advanced Tips for a Successful OFHG and OFCH Gasket Replacement
To ensure a successful and long-lasting repair, consider these advanced tips:
- Use a Magnetic Pick-Up Tool: When loosening fasteners, especially in tight spaces, use a magnetic pick-up tool to prevent them from dropping and getting lost.
- Cleanliness is Key: Thoroughly clean all mating surfaces to ensure a proper seal.
- Inspect the Oil Cooler Lines: Check the oil cooler lines for any signs of damage or wear. Replace them if necessary.
- Use High-Quality Gaskets: Invest in high-quality gaskets from reputable suppliers like CARDIAGTECH.BIZ to ensure durability and reliability.
- Document Your Work: Take photos or videos of each step to help you remember the process and ensure everything is reassembled correctly.
9. Why Choose CARDIAGTECH.BIZ for Your Automotive Tool Needs?
Choosing the right supplier for your automotive tools is crucial for ensuring quality, reliability, and performance. Here’s why CARDIAGTECH.BIZ stands out:
- Extensive Product Range: CARDIAGTECH.BIZ offers a wide variety of tools and equipment, catering to both professional mechanics and DIY enthusiasts.
- Quality Assurance: We source our products from trusted manufacturers, ensuring they meet the highest standards of quality and durability.
- Competitive Pricing: We offer competitive pricing on all our products, making it affordable to get the tools you need.
- Expert Support: Our team of knowledgeable professionals is always available to provide expert advice and support.
- Customer Satisfaction: We are committed to ensuring customer satisfaction and strive to provide the best possible shopping experience.
10. FAQs About Oil Filter Housing Gasket Replacement
Here are some frequently asked questions about oil filter housing gasket replacement:
- What happens if I don’t replace the oil filter housing gasket?
If you don’t replace a faulty oil filter housing gasket, it can lead to significant oil leaks, reduced engine lubrication, and potential engine damage. - How often should I replace the oil filter housing gasket?
The oil filter housing gasket should be replaced when you notice signs of a leak or during routine maintenance, typically every 75,000 to 100,000 miles. - Can I replace the oil filter housing gasket myself?
Yes, with the right tools and knowledge, you can replace the oil filter housing gasket yourself. This guide provides a detailed step-by-step process. - What tools do I need to replace the oil filter housing gasket?
You will need a socket set, wrench set, torque wrench, screwdrivers, carburetor cleaner, E-10 and E-12 Torx sockets, and other basic tools. - How do I know if my car has an OEM Oil Cooler?
Check your vehicle’s specifications or look for oil cooler lines connected to the oil filter housing. - What is the torque specification for the OFCH bolts?
The torque specification for the OFCH bolts is typically 24 Nm for an M8x25 8.8 grade bolt. - Can I reuse the old oil after replacing the oil filter housing gasket?
No, it is recommended to use new engine oil after replacing the oil filter housing gasket. - How long does it take to replace the oil filter housing gasket?
The replacement process typically takes 2-4 hours, depending on your experience and the complexity of the vehicle. - What is the cost of replacing the oil filter housing gasket?
The cost can range from $100 to $500, depending on whether you do it yourself or hire a professional mechanic. - Where can I buy high-quality tools for oil filter housing gasket replacement?
You can purchase high-quality tools from CARDIAGTECH.BIZ, which offers a wide range of automotive tools and equipment.
Conclusion
Replacing the oil filter housing gasket and, if applicable, the OFCH gasket is a crucial maintenance task that can prevent costly engine repairs. By following this comprehensive guide and using high-quality tools from CARDIAGTECH.BIZ, you can confidently perform this task yourself. Remember, if you encounter any difficulties or are unsure about any step, it’s always best to consult a professional mechanic.
Ready to tackle your OFHG replacement? Contact CARDIAGTECH.BIZ today at +1 (641) 206-8880 or visit our website at CARDIAGTECH.BIZ to get expert advice and order the tools you need. Our address is 276 Reock St, City of Orange, NJ 07050, United States. Let us help you keep your vehicle running smoothly! Don’t let a faulty gasket cause you headaches; get in touch with CARDIAGTECH.BIZ now for all your automotive tool needs!