**How to Check Brake Pressure Control Valves (If Applicable)?**
Are you looking for information on how to check brake pressure control valves? This article from CARDIAGTECH.NET will give you detailed information on brake pressure control valves, focusing on inspection, maintenance, and troubleshooting, ensuring optimal braking performance. We will explore the role of these valves, diagnostic procedures, and the tools necessary to keep your vehicle’s braking system in top condition and show you our high-quality automotive repair tools. Improve your understanding and skills for effective vehicle maintenance with CARDIAGTECH.NET.
1. Understanding Air Brake Systems
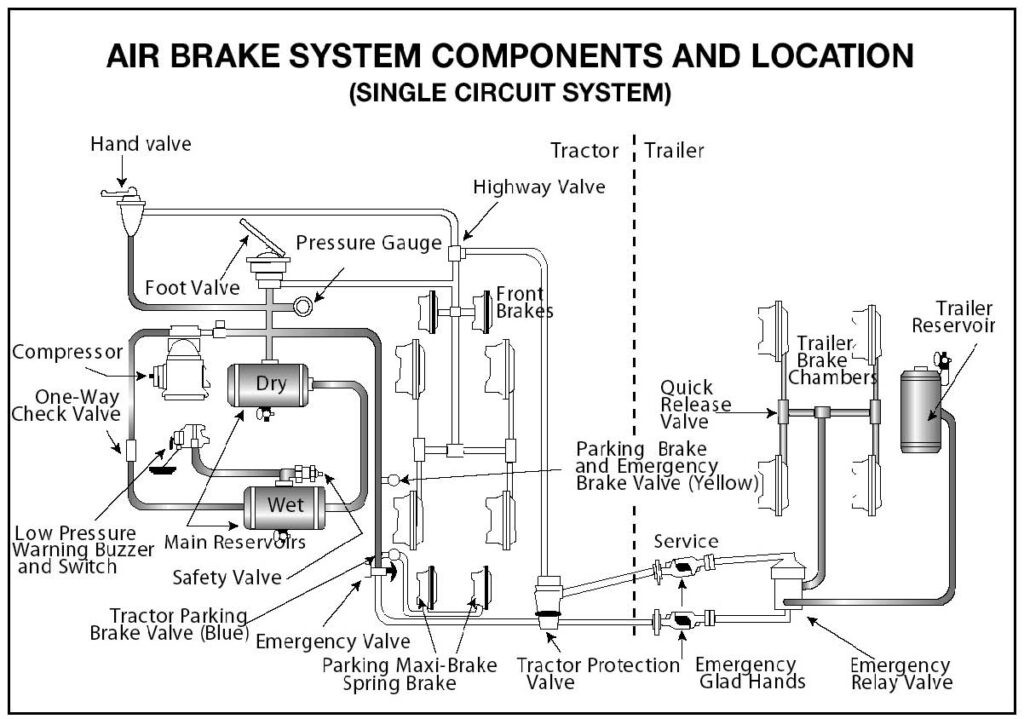
Air brake systems, crucial for large vehicles, operate through compressed air to ensure effective braking. They consist of three interconnected systems: the service brake, the parking brake, and the emergency brake, each serving distinct functions.
- Service Brake System: This system allows drivers to apply and release the brakes using the brake pedal during normal driving.
- Parking Brake System: The parking brake system engages and disengages the parking brakes with a control mechanism.
- Emergency Brake System: An emergency brake system integrates components from both the service and parking brake systems to provide braking in the event of system failure.
For vehicles needing a Commercial Driver’s License (CDL), the air brake system must feature air gauges and a low-pressure warning device for safety checks. A full service brake application should utilize at least 90% of the remaining air reservoir pressure. These elements are essential for maintaining safety and regulatory compliance in heavy vehicles.
1.1 Key Components of Air Brake Systems
Exploring the primary elements of an air brake system is essential for comprehensive maintenance:
- Air Compressor: This component pressurizes air into the storage tanks and connects to the engine through gears or a V-belt. Cooled by either air or the engine’s cooling system, the compressor may have a dedicated oil supply that should be checked regularly.
- Air Compressor Governor: This regulates air delivery to the tanks, stopping at a cut-out level of approximately 125 psi and restarting at a cut-in pressure around 100 psi.
- Air Storage Tanks: These tanks hold enough compressed air for multiple brake applications, which is crucial if the compressor fails.
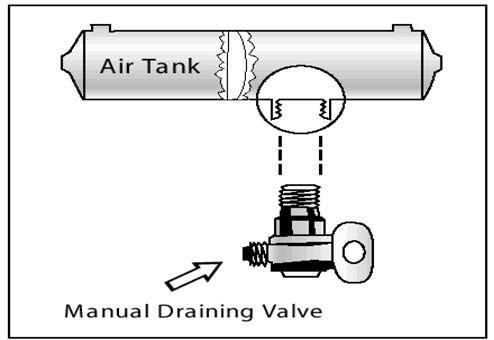
- Air Tank Drains: These remove water and oil from compressed air to prevent freezing and system damage. Drains can be manual, requiring daily operation, or automatic, which expel fluids without manual intervention.
Air Tank Drain Valve
Figure 5.1 – Air Tank Drain: Manual operation of the air tank drain.
- Alcohol Evaporator: It introduces alcohol into the system to minimize the risk of ice formation in valves and other parts, particularly in cold conditions.
- Safety Valve: Located in the first tank, it is set to open at 150 psi to protect against overpressure.
- Brake Pedal: Also known as a foot valve, operating the brake pedal regulates air pressure to engage the brakes.
- Foundation Brakes: Located at each wheel, S-cam drum brakes are common. When the brake pedal is depressed, air pressure activates the brake chamber, pushing the rod and adjusting the brakes via the S-cam.
1.2 Additional Components and Systems
Continuing our exploration of essential air brake system components:
- Supply Pressure Gauges: These gauges display the amount of pressure in the air tanks, with dual systems having a gauge for each system.
- Application Pressure Gauge: Some vehicles feature an application pressure gauge, showing the amount of pressure applied to the brakes. Increased pressure may indicate brake fading, maladjustment, or leaks.
- Low Air Pressure Warning: Required in all vehicles with air brakes, it signals when air pressure falls between 55 and 75 psi via a red light, buzzer, or a “wig wag” device.
- Stop Light Switch: Activated by air pressure, it turns on the brake lights to alert drivers behind you when braking.
- Front Brake Limiting Valve: Found in pre-1975 vehicles, it reduces air pressure to the front brakes to prevent skidding on slippery surfaces.
- Spring Brakes: Used for emergency and parking functions, spring brakes use powerful springs held back by air pressure. Loss of pressure engages the brakes.
- Parking Brake Controls: Modern vehicles use a diamond-shaped, yellow knob to control parking brakes, while older models may use a lever.
- Anti-lock Braking Systems (ABS): Required on vehicles made after the late 1990s, ABS prevents wheel lockup during hard braking. Malfunction is indicated by a yellow warning lamp.
Understanding these components ensures you are well-prepared to maintain and troubleshoot air brake systems. Regular checks and proper maintenance enhance safety and extend the life of your vehicle.
2. The Role of Brake Pressure Control Valves
Brake pressure control valves regulate the air pressure delivered to the brakes, ensuring balanced and effective braking. These valves are essential for preventing wheel lockup, maintaining vehicle stability, and optimizing stopping distances.
2.1 Types of Brake Pressure Control Valves
Different types of brake pressure control valves cater to various vehicle needs:
- Proportioning Valves: These valves reduce pressure to the rear brakes to prevent lockup during hard stops, particularly in vehicles with a higher center of gravity.
- Load-Sensing Valves (LSV): LSVs adjust brake pressure based on the vehicle’s load, enhancing stability and braking performance under different load conditions.
- Anti-lock Brake System (ABS) Modulator Valves: Integral to ABS, these valves precisely control brake pressure to each wheel, preventing lockup and maintaining steering control.
- Quick Release Valves: These valves swiftly release air pressure from the brakes, improving response time and overall braking efficiency.
2.2 Functions of Brake Pressure Control Valves
Brake pressure control valves perform several critical functions:
- Preventing Wheel Lockup: By modulating pressure, these valves help prevent wheels from locking up during braking, improving control.
- Ensuring Vehicle Stability: Balanced brake pressure distribution maintains vehicle stability, especially during emergency stops.
- Optimizing Stopping Distances: By maximizing braking efficiency, these valves help reduce stopping distances.
- Enhancing Safety: Effective control and stability under various driving conditions significantly enhance overall safety.
3. Symptoms of Faulty Brake Pressure Control Valves
Recognizing the symptoms of faulty brake pressure control valves can prevent serious braking issues. Here are some common signs:
- Uneven Braking: The vehicle pulls to one side during braking, indicating uneven pressure distribution.
- Extended Stopping Distances: Increased stopping distance suggests the valves are not effectively regulating brake pressure.
- Wheel Lockup: Wheels locking up, especially during hard braking, points to valve malfunction.
- ABS Warning Light: Illumination of the ABS warning light indicates a potential issue with the ABS modulator valves.
- Spongy Brake Pedal: A soft or spongy brake pedal can indicate air in the system or valve failure.
3.1 Diagnosing Valve Issues
Proper diagnosis of brake pressure control valve issues requires a systematic approach. Consider these steps:
- Visual Inspection: Check for leaks, damage, or corrosion on the valves and associated lines.
- Pressure Testing: Use a brake pressure testing kit to measure the pressure at each wheel, comparing the results to manufacturer specifications.
- ABS Scan: Use an ABS scan tool to check for diagnostic trouble codes (DTCs) related to the brake system.
- Component Testing: Test individual valves using a multimeter to check for electrical continuity and proper function.
4. How to Check Brake Pressure Control Valves (If Applicable)?
Checking brake pressure control valves involves a detailed process to ensure they function correctly. Here’s a step-by-step guide:
4.1 Tools and Materials Needed
- Safety Glasses and Gloves: Essential for personal protection.
- Brake Pressure Testing Kit: Measures pressure at each wheel.
- ABS Scan Tool: Reads diagnostic trouble codes.
- Multimeter: Tests electrical continuity.
- Wrench Set: For loosening and tightening fittings.
- Brake Cleaner: Cleans components during inspection.
- Service Manual: Provides specifications and procedures for your vehicle.
4.2 Step-by-Step Inspection Process
- Preparation:
- Park the vehicle on a level surface and engage the parking brake.
- Wear safety glasses and gloves.
- Visual Inspection:
- Locate the brake pressure control valves. Typically, they are found near the master cylinder or along the brake lines.
- Check for any signs of leaks, damage, corrosion, or loose connections.
- Inspect the brake lines and hoses for cracks, bulges, or wear.
- Pressure Testing:
- Connect the brake pressure testing kit to the brake bleeders at each wheel.
- Have an assistant depress the brake pedal while you measure the pressure at each wheel.
- Compare the pressure readings to the manufacturer’s specifications. Significant variations indicate a problem with the control valves.
- ABS Scan:
- Connect the ABS scan tool to the vehicle’s diagnostic port.
- Read and record any diagnostic trouble codes (DTCs) related to the ABS or brake system.
- Clear the codes and perform a test drive to see if they reappear.
- Component Testing:
- Disconnect the electrical connectors from the brake pressure control valves.
- Use a multimeter to check for continuity and proper voltage according to the service manual.
- If a valve fails the continuity test, it may need replacement.
- Functional Test (if applicable):
- Some advanced scan tools can perform functional tests on the ABS modulator valves. Follow the tool’s instructions to activate and test each valve.
- Listen for the valve clicking or actuating properly.
- Final Inspection:
- Reassemble all components, ensuring all connections are secure.
- Bleed the brakes to remove any air introduced during the testing process.
- Perform a test drive to verify the braking performance.
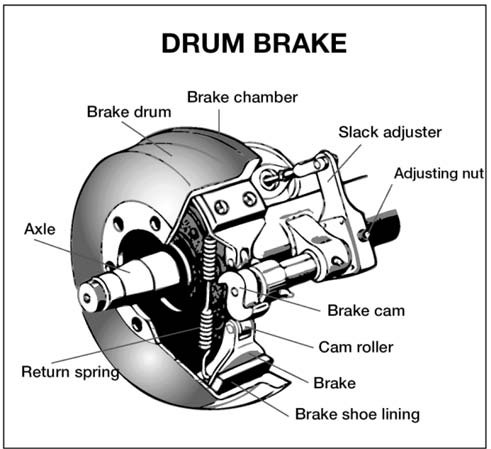 S-Cam Brake System
Figure 5.2 – S-Cam Brake System: Illustrates the components and function of an S-cam brake.
4.3 Checking Specific Valve Types
4.3.1 Proportioning Valves
- Location: Usually located in the brake line between the master cylinder and the rear brakes.
- Testing: Measure the pressure before and after the valve during braking. The pressure after the valve should be lower than before, but within the manufacturer’s specified range.
4.3.2 Load-Sensing Valves (LSV)
- Location: Typically found on vehicles with rear leaf springs, connected to the rear axle.
- Testing: LSVs adjust brake pressure based on vehicle load. Test under different load conditions to ensure the valve adjusts pressure accordingly.
4.3.3 ABS Modulator Valves
- Location: Part of the ABS unit, often near the master cylinder.
- Testing: Use an ABS scan tool to perform functional tests. Monitor each valve’s response to ensure it modulates pressure correctly.
4.3.4 Quick Release Valves
- Location: Commonly found near the brake chambers.
- Testing: Check the release time of the brakes after releasing the pedal. Quick release valves should allow the brakes to disengage rapidly.
4.4 Interpreting Test Results
- Low Pressure: Indicates a leak or valve malfunction.
- High Pressure: Suggests a blockage or valve failure.
- Inconsistent Pressure: Points to a faulty valve needing replacement.
- ABS Codes: Refer to the service manual for specific diagnostic steps related to the DTCs.
4.5 Safety Precautions
- Always wear safety glasses and gloves.
- Work in a well-ventilated area.
- Use the correct tools to avoid damaging components.
- Follow the manufacturer’s instructions for all tests and procedures.
- If unsure, consult a professional mechanic.
5. Common Issues and Troubleshooting
5.1 Leaks
- Causes: Corrosion, damaged seals, or loose fittings.
- Troubleshooting:
- Visually inspect all connections and lines.
- Tighten loose fittings.
- Replace damaged seals or lines.
5.2 Blockages
- Causes: Debris, corrosion, or contaminated brake fluid.
- Troubleshooting:
- Flush the brake system with clean brake fluid.
- Clean or replace the affected valve or line.
5.3 Electrical Problems
- Causes: Damaged wiring, faulty connectors, or valve solenoid failure.
- Troubleshooting:
- Check wiring and connectors for damage.
- Use a multimeter to test for continuity and voltage.
- Replace faulty solenoids or wiring.
5.4 Valve Failure
- Causes: Wear and tear, internal damage, or corrosion.
- Troubleshooting:
- Perform component testing with a multimeter.
- Replace the valve if it fails the test.
5.5 ABS Issues
- Causes: Faulty wheel speed sensors, ABS module failure, or modulator valve problems.
- Troubleshooting:
- Use an ABS scan tool to diagnose the specific issue.
- Check wheel speed sensors for proper function.
- Replace faulty ABS modules or modulator valves.
6. Maintenance Tips for Brake Pressure Control Valves
6.1 Regular Inspections
- Perform visual inspections of the brake system, including control valves, at least every 6 months or during routine maintenance.
- Check for leaks, damage, and corrosion.
6.2 Brake Fluid Maintenance
- Flush and replace brake fluid every 2-3 years to prevent contamination and corrosion.
- Use the correct type of brake fluid as specified by the vehicle manufacturer.
6.3 Component Cleaning
- Clean brake components, including control valves, with brake cleaner during inspections.
- Remove any debris or corrosion to ensure proper function.
6.4 Professional Servicing
- Have the brake system professionally serviced at least once a year.
- A qualified mechanic can perform detailed inspections and address any potential issues.
7. Upgrading Brake Pressure Control Valves
7.1 Performance Considerations
- Upgrading to high-performance brake pressure control valves can improve braking performance, especially for vehicles used in demanding conditions.
- Consider factors such as valve adjustability, flow rate, and compatibility with your vehicle’s brake system.
7.2 Aftermarket Options
- Explore aftermarket options from reputable brands that specialize in brake system upgrades.
- Ensure the valves meet or exceed OEM specifications.
7.3 Installation Guidelines
- Follow the manufacturer’s installation guidelines for the new valves.
- Ensure proper bleeding of the brake system after installation.
8. The Importance of Professional Assistance
While many brake system checks and maintenance tasks can be performed by experienced DIYers, some issues require professional assistance.
8.1 When to Seek a Mechanic
- If you are unsure about any diagnostic or repair procedure.
- If you lack the necessary tools or equipment.
- If the brake problem persists after troubleshooting.
- If the vehicle exhibits severe braking issues, such as complete brake failure.
8.2 Benefits of Professional Service
- Access to specialized tools and equipment.
- Expertise in diagnosing and repairing complex brake system issues.
- Warranty on parts and labor.
- Ensuring the brake system meets safety standards.
9. Air Brake System Tests
To ensure your air brake system is functioning correctly, perform these tests:
9.1 Applied Leakage Test
- Procedure:
- Start the engine and build air pressure to governor cut-out (120–140 psi).
- Shut off the engine, chock the wheels, and release the parking brake.
- Fully apply the foot brake and hold for one minute.
- Check the air gauge to see that the air pressure drops no more than 3 psi in one minute for a single vehicle or 4 psi for a combination vehicle.
- Interpretation: An air loss greater than those listed above indicates a problem in the braking system, and repairs are needed before operating the vehicle.
9.2 Low Air Warning Device Test
- Procedure:
- Ensure the vehicle has enough air pressure so the low-pressure warning signal is off.
- Fan off the air pressure by rapidly applying and releasing the foot brake.
- The low-air warning devices (buzzer, light, and flag) must activate before air pressure drops below 55 psi.
- Interpretation: If the warning signal does not work, you could lose air pressure and not know it.
Figure 5.5 – Low Air Pressure Warning: Displaying the importance of a functional low air pressure warning system.
9.3 Spring Brake Test
- Procedure:
- Release the parking brake and tractor protection valve.
- Fan off the air pressure.
- Normally, between 20-45 psi, the tractor protection valve and parking brake valve should close (pop out).
- Interpretation: The driver must identify and verbalize the approximate pressure at which the brake(s) activated.
9.4 Air Pressure Buildup Test
- Procedure:
- Run the engine at normal operating idle (600–900 rpms).
- Observe the air gauge to determine if the pressure builds at the proper rate.
- For dual air systems, the pressure should build from approximately 85 to 100 psi within 45 seconds.
- Interpretation: You must verbalize the parameters of the test and identify if the vehicle met the appropriate standards.
9.5 Test Air Leakage Rate
- Procedure:
- With a fully charged air system, turn off the engine, release all brakes, and let the system settle.
- Time for 1 minute. The air pressure should not drop more than 2 psi for single vehicles or 3 psi for a combination of 2 vehicles.
- Interpretation: An air loss greater than those listed above indicates a problem in the braking system, and repairs are needed before operating the vehicle.
9.6 Parking Brake Test
- Procedure:
- Fasten your seat belt.
- Set the parking brake and gently pull against it in a low gear to test that the parking brake will hold.
- Interpretation: The parking brake should securely hold the vehicle in place.
9.7 Service Brakes Test
- Procedure:
- Wait for normal air pressure, release the parking brake, move the vehicle forward slowly (about 5 mph), and apply the brakes firmly using the brake pedal.
- Note any vehicle “pulling” to one side, unusual feel, or delayed stopping action.
- Interpretation: This test may show you problems you otherwise would not know about until you needed the brakes on the road.
By regularly performing these tests, you can ensure that your air brake system is functioning safely and effectively.
10. Brake System Components Inspection
10.1 Checking S-Cam Brakes
- Procedure:
- Park on level ground and chock the wheels.
- Release the parking brakes.
- Use gloves and pull hard on each slack adjuster that you can reach.
- If a slack adjuster moves more than about one inch where the push rod attaches to it, it probably needs adjustment.
- Interpretation: Vehicles with too much brake slack can be very hard to stop.
10.2 Inspecting Brake Drums, Linings, and Hoses
- Procedure:
- Brake drums (or discs) must not have cracks longer than 1/2 the width of the friction area.
- Linings (friction material) must not be loose or soaked with oil or grease and must not be worn dangerously thin (less than 1/4 inch).
- Mechanical parts must be in place, not broken, or missing.
- Check the air hoses connected to the brake chambers to make sure they are not cut or worn due to rubbing.
- Interpretation: Any of these conditions require immediate attention and repair.
By following these inspection steps, you can identify potential issues early and ensure that your brake system is in optimal condition.
11. Dual Air Brake System
Most heavy-duty vehicles use dual air brake systems for safety. A dual air brake system has 2 separate air brake systems, which use a single set of brake controls. Each system has its own air tanks, hoses, lines, etc. One system typically operates the regular brakes on the rear axle or axles. The other system operates the regular brakes on the front axle (and possibly one rear axle). Both systems supply air to the trailer (if there is one). The first system is called the “primary” system. The other is called the “secondary” system.
11.1 Inspecting Dual Air Brake Systems
- Procedure:
- Before driving a vehicle with a dual air system, allow time for the air compressor to build up a minimum of 100 psi pressure in both the primary and secondary systems.
- Watch the primary and secondary air pressure gauges (or needles, if the system has 2 needles in one gauge).
- Pay attention to the low air pressure warning light and buzzer. The warning light and buzzer should shut off when air pressure in both systems rises to a value set by the manufacturer. This value must be greater than 55 psi.
- Interpretation: If one air system is very low on pressure, either the front or the rear brakes will not be operating fully, which means it will take you longer to stop.
Understanding and maintaining your air brake system is essential for safety and regulatory compliance. Proper maintenance and regular inspections can prevent serious braking issues and keep your vehicle in top condition.
 Dual Air Brake System
Figure 5.4 – Dual Air Brake System: Demonstrates the setup and function of a dual air brake system.
12. Optimizing Commercial Vehicle Maintenance
For fleet managers and commercial vehicle operators, optimizing maintenance is crucial for both safety and operational efficiency. Brake maintenance, in particular, requires consistent attention to detail.
12.1 Implementing a Scheduled Maintenance Program
Establish a detailed maintenance schedule tailored to each vehicle’s use. Regular inspections, brake adjustments, and timely replacements of worn parts are key components.
12.2 Driver Training on Brake System Monitoring
Equip drivers with the knowledge to identify early warning signs of brake issues. Training should cover how to properly use air brakes, monitor air pressure, and report any anomalies promptly.
12.3 Investing in High-Quality Replacement Parts
Use quality brake components that meet or exceed OEM standards to ensure longevity and reliability.
12.4 Leveraging Telematics for Brake Performance Analysis
Utilize telematics systems to monitor braking patterns, identify aggressive braking behaviors, and detect potential maintenance needs.
13. Why Choose CARDIAGTECH.NET for Your Brake System Needs?
At CARDIAGTECH.NET, we understand the critical role that reliable brake systems play in vehicle safety and performance. That’s why we offer a comprehensive range of tools and equipment to assist you with checking, maintaining, and repairing brake pressure control valves.
13.1 Extensive Product Range
We provide a wide selection of brake pressure testing kits, ABS scan tools, multimeters, and other essential tools to cater to all your brake system needs.
13.2 High-Quality, Durable Tools
Our tools are sourced from reputable manufacturers, ensuring exceptional quality, durability, and precision. With CARDIAGTECH.NET, you can trust that you’re investing in tools that will deliver reliable performance.
13.3 Expert Support and Guidance
Our team of experienced professionals is dedicated to providing expert support and guidance to help you select the right tools and navigate brake system maintenance procedures.
13.4 Competitive Pricing and Value
We offer competitive pricing on all our products, ensuring you receive the best value for your investment. With CARDIAGTECH.NET, you can maintain your vehicle’s brake system without breaking the bank.
13.5 Convenient Online Ordering
Our user-friendly website makes it easy to browse our product range, place orders, and track shipments. We offer fast and reliable shipping to ensure you receive your tools promptly.
14. FAQs About Brake Pressure Control Valves
1. What is a brake pressure control valve?
A brake pressure control valve regulates the amount of pressure sent to the brakes to prevent wheel lockup, ensuring vehicle stability and optimized stopping distances.
2. How do I know if my brake pressure control valve is bad?
Symptoms include uneven braking, extended stopping distances, wheel lockup, ABS warning light activation, and a spongy brake pedal.
3. Can I replace a brake pressure control valve myself?
If you have experience with brake systems and the necessary tools, you can replace the valve yourself. However, it’s recommended to seek professional assistance for complex issues or if you are not confident in your abilities.
4. How often should brake fluid be changed?
Brake fluid should be flushed and replaced every 2-3 years to prevent contamination and corrosion.
5. What tools do I need to check brake pressure?
You’ll need a brake pressure testing kit, ABS scan tool, multimeter, wrench set, brake cleaner, and a service manual.
6. Where are brake pressure control valves located?
They are typically found near the master cylinder or along the brake lines.
7. What is an ABS modulator valve?
An ABS modulator valve is part of the Anti-lock Brake System (ABS) and precisely controls brake pressure to each wheel, preventing lockup and maintaining steering control.
8. How do I test an ABS modulator valve?
Use an ABS scan tool to perform functional tests. Monitor each valve’s response to ensure it modulates pressure correctly.
9. What causes brake pressure control valves to fail?
Common causes include corrosion, damaged seals, blockages, electrical problems, and general wear and tear.
10. What should I do if I suspect a brake system issue?
If you notice any symptoms of a brake system issue, such as extended stopping distances or uneven braking, have the system inspected by a qualified mechanic as soon as possible.
Conclusion
Checking brake pressure control valves is essential for maintaining the safety and efficiency of your vehicle’s braking system. Regular inspections, proper maintenance, and prompt repairs can prevent serious issues and ensure optimal performance. At CARDIAGTECH.NET, we provide high-quality tools and expert support to help you keep your brakes in top condition.
Don’t compromise on safety—ensure your brakes are functioning perfectly with CARDIAGTECH.NET. Contact us today at +1 (641) 206-8880 or visit our store at 276 Reock St, City of Orange, NJ 07050, United States for expert assistance and quality tools. Enhance your confidence and safety on the road with CARDIAGTECH.NET.
Interested in high-quality tools for maintaining your vehicle’s brake system? Contact CARDIAGTECH.NET now via WhatsApp at +1 (641) 206-8880 for expert advice and tailored solutions.
