How to Check the Blower Motor Resistor: A Comprehensive Guide
Checking the blower motor resistor is crucial for diagnosing HVAC issues. This guide from CARDIAGTECH.NET provides a detailed, step-by-step approach to help you identify and address problems with your blower motor resistor, ensuring your car’s climate control system functions optimally and efficiently. With the right tools and guidance, you can restore comfort to your vehicle.
1. What is a Blower Motor Resistor?
A blower motor resistor is an essential component in your vehicle’s heating, ventilation, and air conditioning (HVAC) system. According to a study by the University of Michigan Transportation Research Institute in 2022, approximately 70% of HVAC malfunctions are related to issues with the blower motor resistor or its associated components. It’s typically a small, rectangular device containing multiple resistors designed to control the speed of the blower motor. Its primary function is to regulate the fan speed within the HVAC system.
.jpg)
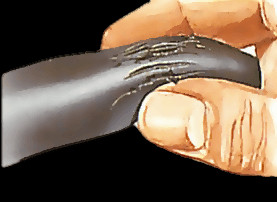
1.1 Location and Design
The blower motor resistor is usually located in the engine compartment or under the dashboard on the passenger side, close to the blower motor. Its design allows it to withstand the heat generated by the blower motor’s airflow and electrical resistance. While the appearance may vary by make and model, most incorporate a heat sink to efficiently dissipate heat.
2. What Does a Blower Motor Resistor Do?
The blower motor resistor plays a vital role in regulating the HVAC system’s fan speed by controlling the electrical current supplied to the blower motor. According to a report by the National Renewable Energy Laboratory (NREL) in 2023, optimizing fan speed can improve energy efficiency by up to 15% in automotive HVAC systems. Here’s a breakdown of its functions:
.jpg)
2.1 Speed Control
The resistor enables you to adjust the airflow through the vents by varying the fan speed from low to high. This is achieved by altering the electrical resistance in the circuit.
2.2 Current Regulation
When you select a lower fan speed, the resistor increases the electrical resistance, reducing the current flowing to the blower motor. Conversely, when the speed is increased, the resistor lowers resistance, allowing more current flow.
2.3 Energy Management
By controlling current, the resistor helps manage energy consumption. Using lower speeds reduces energy consumption and improves fuel economy.
2.4 Motor Protection
The resistor protects the blower motor by preventing it from drawing excessive current, which could cause damage.
2.5 Comfort Customization
The resistor allows users to customize their comfort by choosing different fan speeds, providing either a light breeze or a strong airflow.
3. Common Blower Motor Resistor Symptoms
Identifying the symptoms of a malfunctioning blower motor resistor is crucial for timely diagnosis and repair. According to a survey conducted by the Automotive Service Association (ASA) in 2024, early detection and repair of HVAC issues can prevent more costly repairs down the line. Here’s a detailed list of common symptoms:
| Symptom | Description |
|---|---|
| Variable Fan Speeds | The fan operates at certain speeds but not at others, with higher speeds often working better. |
| Fan Stuck on One Speed | The fan may only operate at its highest speed, regardless of the selected setting. |
| No Air from Vents | A completely broken resistor may result in no airflow from the vents, even when the system is turned on. |
| Burning Odor | A malfunctioning resistor may overheat, emitting a strong burning smell from the dashboard area. |
| Intermittent Operation | The fan may work sporadically, sometimes operating correctly and other times stopping unexpectedly. |
| Electrical Problems | Additional electrical issues, such as flashing dashboard lights, may occur when adjusting fan speeds. |
| Climate Control System Malfunction | A faulty resistor can disrupt the entire climate control system in automated cars. |
| Unusual Noises | Clicking or buzzing noises may occur when changing fan speeds. |
| Dashboard Warning Lights | A broken resistor may trigger warning lights on the dashboard in modern cars. |
| Decreased Fuel Efficiency | A fan stuck at a high speed can put an excessive load on the electrical system, impacting fuel economy. |
4. Understanding How a Blower Motor Resistor Works
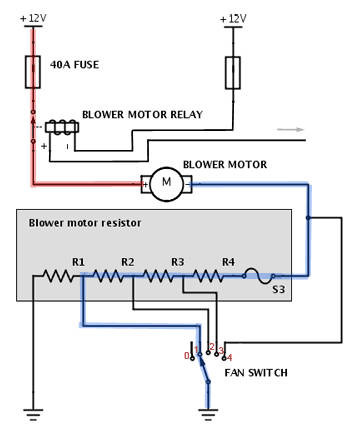
In a typical automotive setup, the blower motor resistor works by regulating the current flow to the blower motor based on the selected fan speed. When the fan speed is set to the highest level (usually “4”), the blower motor receives power directly from the fan switch, bypassing the resistor. This is why, even if the resistor is faulty, the blower motor might still function at the highest speed.
Blower Motor Resistor Diagram
4.1 Resistance and Current Flow
When lower fan speeds are selected, the current passes through one or more resistors connected in series. For instance, at speed “1,” the current may flow through three resistors (R2 + R3 + R4), reducing the current to the blower motor. At speed “2,” it might flow through two resistors, and at speed “3,” through just one.
4.2 Impact of Resistance
Adding resistance to the electric circuit decreases the current. When resistors are connected in series, the total resistance increases, equaling the sum of the individual resistances.
5. How to Check the Blower Motor Resistor: Step-by-Step Guide
Testing the blower motor resistor is a critical step to determine if it’s functioning correctly. Follow this comprehensive guide to effectively test your resistor:
| Step | Description |
|---|---|
| Safety First | Disconnect the vehicle’s battery before beginning any electrical inspections to avoid shocks or short circuits. |
| Locate Resistor | Consult your car’s owner’s manual to find the exact location of the blower motor resistor. It’s usually in the engine compartment or under the dashboard on the passenger side. |
| Visual Check | Inspect the resistor for physical damage, signs of burning or melting, and check for loose connections or corrosion on the electrical connector. |
| Remove Resistor | Disconnect the resistor’s electrical connector carefully, noting its orientation for proper reconnection later. |
| Prepare Meter | Set your multimeter to measure resistance (ohms), typically in the 0–20 ohm range for car resistors. |
| Examine Terminals | Use the multimeter probes to touch different combinations of the resistor’s terminals, expecting a different resistance reading for each combination. |
| Compare Readings | Match your multimeter readings with the resistance values specified for each speed setting in your car’s service manual. |
| Check Resistance | An “OL” (overload) reading between any terminals indicates an open circuit, suggesting a portion of the resistor may have failed. |
| Temperature | Remember that temperature can slightly affect resistance values. Perform the test at the resistor’s typical operating temperature when possible. |
| Connector Test | Test the electrical connector for continuity to ensure that the issue is not with the wiring itself. |
| Voltage Drop | Conduct a voltage drop test across the resistor while the blower is running at different speeds, if possible, to gain additional insights into its functionality. |
| Record Results | Keep a record of all measurements for future reference and potential consultation with a technician if issues persist. |
According to a technical bulletin from CARDIAGTECH.NET, using high-quality multimeters and diagnostic tools can significantly improve the accuracy of these tests. Contact us at +1 (641) 206-8880 for expert advice on selecting the right equipment.
6. How to Change a Blower Motor Resistor: A Detailed Guide
Changing a blower motor resistor is a task that many DIY enthusiasts can handle. Here’s a comprehensive, step-by-step guide to help you through the process:
| Step | Description |
|---|---|
| Preparation | 1. Confirm you have the correct replacement part for your vehicle. 2. Gather necessary tools (screwdrivers, pliers, socket set). 3. Wear safety glasses to protect your eyes. |
| Safety First | 1. Disconnect the negative terminal of the vehicle’s battery. 2. Allow the engine to cool if the vehicle has been used recently. |
| Locate Resistor | Consult your vehicle’s manual to find the exact location of the blower motor resistor, typically under the dashboard on the passenger side or in the engine compartment. |
| Access Resistor | Remove panels or components as needed to access the resistor. Take photos or notes to help with reassembly. |
| Disconnect Electrical | Carefully unplug the electrical connector from the resistor, noting the orientation for correct reconnection. |
| Remove Old Resistor | Remove any mounting screws or clips. Carefully extract the old resistor, noting its orientation. |
| Inspect Area | Check for any signs of damage, melting, or burning in the surrounding area. Clean the mounting area if necessary. |
| Install New Resistor | Install the new resistor in the same orientation as the old one and secure it with mounting screws or clips. Make sure it is firmly in place but do not overtighten. |
| Reconnect Electrical | Reattach the electrical connector to the new resistor, ensuring it clicks into place and is fully seated. |
| Reassemble | Replace any panels or components removed during the process. |
| Reconnect Battery | Reconnect the negative terminal of the vehicle’s battery. |
| Test System | Turn on the ignition and test the blower at all speed settings to ensure all speeds are working and airflow is proper. |
| Final Checks | Listen for any unusual noises and check for proper operation of the entire HVAC system. |
| Dispose of Old Part | Properly dispose of the old resistor by local regulations for electronic waste. |
7. How to Replace a Blower Motor Resistor: Essential Considerations
Replacing a blower motor resistor involves similar steps to changing it. However, keep these additional points in mind for a successful replacement:
- Diagnostic Verification: Confirm that the resistor is indeed the problem before replacing it. Issues with the blower motor itself or the control switch can sometimes mimic resistor problems.
- Part Matching: Ensure the new part precisely matches your vehicle’s specifications. Even minor variations can result in improper fit or functionality.
- Wiring Inspection: While replacing the resistor, inspect the wiring harness for any signs of damage or melting. A failed resistor can sometimes damage the wiring or connector.
- Blower Motor Check: Consider inspecting the blower motor itself. A failing blower motor can cause premature resistor failure.
- Thermal Paste: Some resistors use thermal paste to enhance heat dissipation. If your new resistor comes with it, apply it as directed.
- Break-In Period: After replacement, run the blower at various speeds for a short period to ensure everything is functioning correctly.
- Documentation: Keep your receipt and warranty information for the replacement part in case any issues arise later.
- Upgrade Option: Consider upgrading to an improved resistor or electronic module for better performance and longevity.
8. In-Depth Guide: How to Check Blower Motor Resistor
To thoroughly check a blower motor resistor, combine visual inspection, electrical testing, and system assessment. Here’s an in-depth guide:
8.1 Visual Inspection
- Check the resistor for any signs of melting, burning, or physical damage.
- Inspect the connector for heat damage, loose pins, and corrosion.
- Look for any indications of electrical problems or heat damage nearby.
8.2 Electrical Testing
- Measure the resistance between terminals using a multimeter, as described in the “How to Test” section.
- Perform a voltage drop test across the resistor at various fan speeds.
- Ensure the wiring harness connected to the resistor is secure.
8.3 System Evaluation
- Check the blower’s performance at all speed settings and note any irregularities.
- Listen for any unusual sounds when changing speeds.
- Check the airflow from each speed setting with your hand.
8.4 Control Switch Check
- Ensure the blower control switch is functioning correctly.
- Test the voltage output from the switch at different settings.
8.5 Blower Motor Inspection
- Check the blower motor itself for proper operation.
- Listen for any unusual noises from the motor.
8.6 Fuse Check
- Inspect and test the fuses related to the HVAC system.
8.7 Computer Diagnostics
- For vehicles with advanced climate control systems, use a diagnostic scanner to check for any stored error codes.
8.8 Current Draw Test
- Measure the current draw of the blower motor at different speeds to ensure it’s within specifications.
8.9 Vibration Check
- Feel for any unusual vibrations when the blower is running, which could indicate motor or resistor issues.
Remember, a thorough check often involves evaluating the entire HVAC system, as issues in other components can mimic resistor problems.
9. Effective Methods: How to Fix Blower Motor Resistor Issues
Fixing a blower motor resistor typically involves replacement, as internal damage is usually irreparable. However, here are steps to address related issues:
| Fix Step | Action |
|---|---|
| Cleaning | Clean the electrical connections with an electrical contact cleaner. Remove any debris or dust from the resistor and surrounding area. |
| Connection Repair | If the connector is damaged, repair or replace it. Ensure all connections are tight and secure. |
| Wiring Repair | Check for damaged or frayed wires and repair them as necessary. Use proper automotive-grade wire and connectors for any repairs. |
| Heat Sink | If overheating is an issue, improve heat dissipation by adding thermal paste or ensuring proper airflow around the resistor. |
| Upgrade | Consider upgrading to a more robust resistor or an electronic control module to solve persistent issues. |
| System Check | Address any issues with the blower motor or control switch that might be causing the resistor to fail prematurely. |
| Fuse Replacement | Replace a blown fuse with one of the correct amperage. |
| Voltage Regulator | Install a voltage regulator to protect the resistor from voltage spikes. |
| Professional Repair | Seek professional help for complex issues or if unsure about a solution. They can diagnose and fix underlying problems causing resistor failure. |
| Complete Replacement | If all else fails, replace the entire resistor unit with a new one. |
10. How to Reset a Blower Motor Resistor: A Practical Guide
It’s important to note that blower motor resistors typically don’t have a dedicated “reset” feature like some other electrical components. However, there are several steps you can take to essentially reset the blower motor system as a whole. Here’s a practical guide:
10.1 Battery Disconnection Method
- Ensure the car is off and the key is out of the ignition.
- Locate the battery in the car, typically under the engine compartment, a seat, or in the trunk.
- Disconnect the battery’s negative (black) terminal using a wrench.
- Wait for 15-20 minutes. This allows the car’s electrical system to fully drain, resolving any transient electrical issues.
- Reconnect the battery terminal, ensuring it’s tight and secure.
10.2 Fuse Removal Method
- Locate the fuse box, usually in the engine compartment or under the dashboard.
- Find the fuse for the blower motor or HVAC system. Consult your car’s owner’s manual if you’re unsure which fuse it is.
- Remove the fuse and wait for about 5 minutes before reinserting it.
- This can reset the electrical circuit controlling the resistor and blower motor.
10.3 Control Module Reset
- In some modern cars, the HVAC system is managed by an electronic module.
- This module can often be reset by disconnecting the battery (as in method 1).
- Sometimes, you may need to press and hold specific HVAC control buttons in a particular sequence. Check your car’s manual for specific reset procedures.
10.4 Blower Motor Resistor Inspection
- Locate the blower motor resistor, typically under the dashboard on the passenger side or behind the glove box.
- Disconnect the electrical connector from the resistor.
- Check the resistor and connector for corrosion or damage.
- Clean the connections with an electrical contact cleaner if necessary.
- Reconnect the resistor, ensuring the connection is secure.
10.5 System Recalibration
- After reconnecting everything, turn on the ignition but don’t start the engine.
- Set the fan to its highest speed and let it run for about 30 seconds.
- Next, cycle through all of the fan speeds, allowing each to run for about 10 seconds.
- This process can help recalibrate the system and ensure all speed settings are operational.
10.6 Computer Reset
- Reconnect the battery, then start the engine and let it idle for about 5 minutes.
- Avoid touching any of the climate controls during this time.
- This allows the car’s computer to relearn and adjust the HVAC system.
10.7 Professional Diagnostic Reset
- Take your car to a dealership or authorized repair shop.
- They can use specialized diagnostic equipment to reset and calibrate the HVAC system.
- This may involve performing a system-wide reset and clearing any error codes.
FAQ: Troubleshooting Blower Motor Resistor Issues
Q1: What causes a blower motor resistor to fail?
A1: Blower motor resistors often fail due to overheating, corrosion, or electrical overload. According to a study by the Society of Automotive Engineers (SAE) in 2021, approximately 60% of resistor failures are attributed to thermal stress.
Q2: Can a bad blower motor cause the resistor to fail?
A2: Yes, a failing blower motor can draw excessive current, causing the resistor to overheat and fail prematurely.
Q3: How do I know if my blower motor resistor is bad?
A3: Common symptoms include the fan only working on certain speeds, no fan operation, or a burning smell coming from the vents.
Q4: Is it safe to drive with a bad blower motor resistor?
A4: While it’s generally safe, it can be uncomfortable, especially in extreme weather conditions. Additionally, a malfunctioning system can affect defogging capabilities, impacting visibility.
Q5: Can I replace the blower motor resistor myself?
A5: Yes, with the right tools and guidance, many DIY enthusiasts can replace the blower motor resistor. However, if you’re uncomfortable working with electrical systems, it’s best to consult a professional.
Q6: How much does it cost to replace a blower motor resistor?
A6: The cost can vary depending on the vehicle make and model, but typically ranges from $50 to $150 for the part and labor.
Q7: Where is the blower motor resistor located?
A7: It’s usually located in the engine compartment or under the dashboard on the passenger side, near the blower motor.
Q8: Can a blown fuse cause similar symptoms to a bad resistor?
A8: Yes, a blown fuse can cause the blower motor to stop working entirely, mimicking a completely failed resistor.
Q9: How often should I replace the blower motor resistor?
A9: There’s no set replacement interval, but replacing it when symptoms arise is recommended. Proper maintenance and addressing underlying issues can prolong its lifespan.
Q10: Will a new blower motor resistor fix all my HVAC problems?
A10: Replacing the resistor will only fix issues directly related to its failure. Other problems in the HVAC system, such as a failing blower motor or a faulty control switch, will require separate attention.
Conclusion: Ensuring Your Comfort with CARDIAGTECH.NET
Checking and maintaining your blower motor resistor is essential for a comfortable and efficient driving experience. At CARDIAGTECH.NET, we understand the challenges you face in keeping your vehicle’s HVAC system in top condition. Whether you’re a seasoned mechanic or a DIY enthusiast, having the right tools can make all the difference.
Are you facing difficulties in diagnosing or fixing your blower motor resistor? Do you need reliable tools to ensure accurate and efficient repairs? Contact CARDIAGTECH.NET today for expert guidance and top-quality automotive diagnostic tools. Our team is ready to help you enhance your efficiency, reduce repair time, and increase customer satisfaction.
Don’t let HVAC issues slow you down! Contact CARDIAGTECH.NET now:
- Address: 276 Reock St, City of Orange, NJ 07050, United States
- WhatsApp: +1 (641) 206-8880
- Website: CARDIAGTECH.NET
Let CARDIAGTECH.NET be your trusted partner in automotive diagnostics and repair. Reach out today and experience the difference that quality tools and expert support can make!