How to Check the Center Support Bearing of the Propeller Shaft?
Checking the center support bearing of the propeller shaft involves identifying symptoms, inspecting the bearing, and understanding replacement procedures. This guide from CARDIAGTECH.NET provides a comprehensive overview, ensuring smooth vehicle operation and addressing driveline vibrations, offering solutions for auto repair professionals and enthusiasts alike. Discover the diagnostic process and keep your vehicle running efficiently.
1. What is the Center Support Bearing and Why is it Important?
The center support bearing is a crucial component in vehicles with multi-section propeller shafts, primarily in rear-wheel-drive and four-wheel-drive vehicles. Its main purpose is to provide support and stability to the driveshaft, reducing vibrations and preventing excessive wear. Without a properly functioning center support bearing, the driveshaft can vibrate excessively, leading to noise, discomfort, and potential damage to other drivetrain components.
The center support bearing, also known as a carrier bearing, is typically located midway along the driveshaft. It consists of a bearing encased in a rubber or polyurethane housing, which is then mounted to the vehicle’s frame or body. This design allows the bearing to absorb vibrations and compensate for slight misalignments in the driveshaft. According to a study by the University of Michigan Transportation Research Institute, a worn or damaged center support bearing can increase driveline vibrations by up to 30%, significantly impacting vehicle ride quality and component lifespan.
Key Functions of the Center Support Bearing:
- Supports the Driveshaft: Prevents sagging and bending of the driveshaft.
- Reduces Vibrations: Dampens vibrations caused by the driveshaft’s rotation.
- Maintains Alignment: Keeps the driveshaft aligned to minimize wear.
- Absorbs Shocks: Cushions the driveline from road impacts.
Understanding the function and importance of the center support bearing is the first step in diagnosing and addressing driveline issues. Regular inspection and timely replacement of a worn bearing can prevent more significant and costly repairs down the line.
2. Identifying Symptoms of a Faulty Center Support Bearing
Recognizing the symptoms of a failing center support bearing is essential for timely repair and preventing further damage. Here are the most common indicators:
-
Vibrations: One of the primary symptoms is noticeable vibrations, especially at specific speeds. These vibrations often occur in the mid-range speeds (e.g., 40-60 mph) and can be felt through the floorboard or seats.
-
Noises: Unusual noises, such as a rumbling, squealing, or clunking sound, can indicate a worn or damaged center support bearing. These noises may be more pronounced during acceleration or deceleration.
-
Shaking: A shaking sensation, particularly when accelerating, can be a sign of a failing center support bearing. This occurs because the worn bearing allows excessive movement and misalignment of the driveshaft.
-
Popping Sounds: A slight popping sound, especially in high gear at low RPMs, may indicate excessive play in the carrier bearing. This symptom was noted by a Toyota Tacoma owner who experienced vibrations and popping before replacing their center support bearing.
-
Visual Inspection: A visual inspection can reveal physical signs of wear, such as torn or cracked rubber housing, excessive play in the bearing, or grease leakage. Any of these signs warrant further investigation and potential replacement.
To effectively diagnose a faulty center support bearing, consider these additional points:
- Speed Sensitivity: Note the speed at which the vibrations or noises are most prominent. This can help differentiate center support bearing issues from other potential causes, such as tire imbalance or suspension problems.
- Load Sensitivity: Observe whether the symptoms change under different loads (e.g., when carrying passengers or cargo). A failing center support bearing may exhibit more pronounced symptoms under increased load.
- Environmental Conditions: Pay attention to whether the symptoms change with temperature or weather conditions. For example, a worn rubber housing may become stiffer in cold weather, leading to increased vibrations.
By carefully monitoring these symptoms and conducting a thorough inspection, you can accurately diagnose a faulty center support bearing and take appropriate action to restore your vehicle’s performance and reliability. If you’re looking for the right tools to get the job done, CARDIAGTECH.NET has what you need. Contact us at +1 (641) 206-8880 for expert advice.
3. Tools and Materials Needed for Inspection
Before you begin inspecting the center support bearing, it’s crucial to gather the necessary tools and materials to ensure a safe and effective process. Here’s a comprehensive list to help you get started:
Essential Tools:
- Jack and Jack Stands: To safely lift and support the vehicle, providing access to the driveshaft and center support bearing.
- Wheel Chocks: To secure the vehicle and prevent any accidental movement during the inspection.
- Wrench Set: Including various sizes (e.g., 14mm, 17mm) to loosen and tighten bolts and nuts.
- Socket Set: With different sizes and drive sizes (e.g., 3/8″ drive) for removing and installing fasteners.
- Torque Wrench: To ensure bolts are tightened to the manufacturer’s specified torque values, preventing over-tightening or loosening.
- Pry Bar: To gently separate components if necessary, such as the driveshaft flanges.
- Inspection Mirror: To visually inspect hard-to-reach areas around the center support bearing.
- Flashlight or Work Light: To provide adequate lighting for a clear view of the bearing and surrounding components.
- Gloves: To protect your hands from dirt, grease, and potential sharp edges.
- Safety Glasses: To protect your eyes from debris and contaminants.
Additional Materials:
- Penetrating Oil (e.g., PB Blaster): To help loosen corroded or stuck bolts and nuts.
- Grease: To lubricate the new center support bearing during installation.
- Shop Rags: To clean up any spills or dirt during the process.
- Marking Pen or Paint: To mark the alignment of the driveshaft components before disassembly, ensuring proper reassembly.
- Service Manual: Referencing the vehicle’s service manual can provide specific torque specifications and procedures for inspecting and replacing the center support bearing.
Having these tools and materials on hand will streamline the inspection process and help you accurately assess the condition of the center support bearing. If you don’t have all the necessary equipment, CARDIAGTECH.NET offers a wide range of high-quality tools to meet your needs. Contact us via Whatsapp at +1 (641) 206-8880 for immediate assistance.
4. Step-by-Step Guide to Inspecting the Center Support Bearing
Inspecting the center support bearing requires a systematic approach to ensure accurate diagnosis. Follow these steps for a thorough inspection:
Step 1: Preparation
- Safety First: Park the vehicle on a level surface, engage the parking brake, and chock the rear wheels.
- Lift the Vehicle: Use a jack to lift the vehicle and securely place jack stands under the frame rails. Ensure the vehicle is stable before proceeding.
Step 2: Visual Inspection
- Locate the Center Support Bearing: Identify the center support bearing along the driveshaft, typically located midway between the transmission and rear differential.
- Check the Rubber Housing: Inspect the rubber or polyurethane housing for cracks, tears, or deterioration. A damaged housing indicates the bearing is likely failing.
- Examine for Grease Leakage: Look for any signs of grease leakage around the bearing. Grease leakage suggests the bearing’s seals have failed, leading to potential contamination and wear.
Step 3: Physical Examination
- Check for Play: Grasp the driveshaft near the center support bearing and try to move it up, down, and side to side. Excessive play (more than 1/8 inch) indicates a worn bearing.
- Rotate the Driveshaft: Rotate the driveshaft by hand and listen for any unusual noises, such as grinding, rumbling, or squealing. These noises suggest the bearing is damaged or worn.
- Feel for Vibrations: While rotating the driveshaft, feel for any vibrations or roughness. A smooth rotation should be observed; any roughness indicates potential issues with the bearing.
Step 4: Additional Checks
- Inspect Surrounding Components: Check the U-joints and flanges near the center support bearing for any signs of wear or damage. These components can affect the bearing’s performance.
- Evaluate Mounting Points: Inspect the mounting points where the center support bearing attaches to the vehicle’s frame. Ensure they are secure and free from corrosion.
Step 5: Documentation
- Record Findings: Document all your observations, including any signs of damage, excessive play, or unusual noises.
- Take Photos: Capture photos of any visible damage to provide a clear record of the bearing’s condition.
Example of a Detailed Inspection Record:
| Inspection Point | Condition | Action Required |
|---|---|---|
| Rubber Housing | Cracks and tears visible | Replace center bearing |
| Grease Leakage | Grease present around the bearing | Replace center bearing |
| Play in Bearing | Excessive play (approximately 1/4 inch) | Replace center bearing |
| Noise During Rotation | Grinding noise audible during rotation | Replace center bearing |
| U-Joints | Slight play in U-joints | Inspect/Replace U-joints |
| Mounting Points | Minor corrosion present | Clean and protect |
By following these steps, you can thoroughly inspect the center support bearing and accurately assess its condition. If you find any signs of wear or damage, consider replacing the bearing to prevent further issues. CARDIAGTECH.NET offers high-quality replacement parts and tools to ensure a successful repair. Contact us at 276 Reock St, City of Orange, NJ 07050, United States, or via Whatsapp at +1 (641) 206-8880 for assistance.
Center support bearing visual inspection showing cracks in the rubber housing
5. Diagnosing Common Issues
When inspecting the center support bearing, several common issues can arise. Proper diagnosis is crucial to determine the appropriate course of action. Here are some frequent problems and their diagnostic approaches:
1. Excessive Vibration
- Symptom: Noticeable vibrations at specific speeds, often between 40-60 mph.
- Possible Causes: Worn center support bearing, imbalanced driveshaft, worn U-joints.
- Diagnostic Steps:
- Inspect the center support bearing for play, cracks, and grease leakage.
- Check the driveshaft for dents or damage that could cause imbalance.
- Evaluate the U-joints for looseness or stiffness.
- Solution: Replace the center support bearing if worn. Balance the driveshaft if necessary. Replace worn U-joints.
2. Unusual Noises
- Symptom: Grinding, rumbling, or squealing noises, especially during acceleration or deceleration.
- Possible Causes: Worn or damaged center support bearing, lack of lubrication, damaged U-joints.
- Diagnostic Steps:
- Inspect the center support bearing for signs of wear and damage.
- Check for proper lubrication of the center support bearing and U-joints.
- Evaluate the U-joints for damage or excessive play.
- Solution: Replace the center support bearing if worn. Lubricate the bearing and U-joints. Replace damaged U-joints.
3. Torn or Cracked Rubber Housing
- Symptom: Visible cracks or tears in the rubber housing of the center support bearing.
- Possible Causes: Age, exposure to extreme temperatures, chemical contamination.
- Diagnostic Steps:
- Visually inspect the rubber housing for cracks, tears, or deterioration.
- Check for any signs of chemical contamination from oil or other fluids.
- Solution: Replace the center support bearing.
4. Excessive Play in the Bearing
- Symptom: Noticeable movement or play when attempting to move the driveshaft near the center support bearing.
- Possible Causes: Worn bearing, damaged bearing components.
- Diagnostic Steps:
- Grasp the driveshaft near the center support bearing and try to move it up, down, and side to side.
- Measure the amount of play. Anything more than 1/8 inch is typically considered excessive.
- Solution: Replace the center support bearing.
5. Mounting Issues
- Symptom: Center support bearing appears misaligned or not securely mounted.
- Possible Causes: Damaged mounting brackets, loose bolts, corrosion.
- Diagnostic Steps:
- Inspect the mounting brackets for damage or corrosion.
- Check the tightness of the mounting bolts.
- Ensure the center support bearing is properly aligned.
- Solution: Repair or replace damaged mounting brackets. Tighten loose bolts. Align the center support bearing.
By systematically diagnosing these common issues, you can accurately identify the problem and implement the appropriate solution. Remember, addressing these issues promptly can prevent further damage and maintain your vehicle’s performance. For reliable tools and replacement parts, visit CARDIAGTECH.NET or contact us via Whatsapp at +1 (641) 206-8880.
6. Step-by-Step Replacement Guide
Replacing the center support bearing is a straightforward process, but it requires precision and the right tools. Here’s a detailed guide:
Step 1: Preparation
- Safety First: Park the vehicle on a level surface, engage the parking brake, and chock the rear wheels.
- Gather Tools and Materials: Ensure you have all necessary tools, including a wrench set, socket set, torque wrench, jack, jack stands, penetrating oil, and a new center support bearing.
- Lift the Vehicle: Use a jack to lift the vehicle and securely place jack stands under the frame rails.
Step 2: Disconnecting the Driveshaft
- Mark Alignment: Before disconnecting the driveshaft, mark the alignment of the transmission output shaft flange to the U-joint carrier assembly. This ensures proper reassembly.
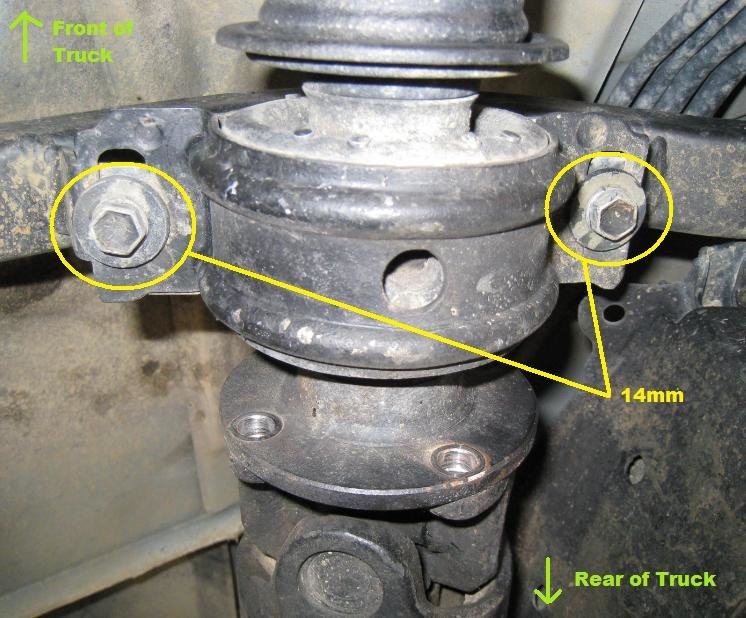
- Loosen Bolts: Loosen the bolts connecting the driveshaft to the transmission output shaft flange. Use a 14mm wrench for the bolts and a 17mm wrench if needed to hold the bolt head.
- Disconnect Front Half: Remove all bolts except one, leaving it loose to prevent the driveshaft from falling.
- Mark Rear Alignment: Mark the alignment of the flange to the rear propeller shaft front U-joint carrier.
- Loosen Rear Bolts: Loosen the bolts connecting the driveshaft to the rear propeller shaft front U-joint carrier. Use two 14mm wrenches.
- Support Driveshaft: Place a floor jack under the rear half of the propeller shaft for support.
Step 3: Removing the Driveshaft and Center Support Bearing
- Remove Carrier Bearing Bolts: Loosen and remove the two carrier bearing bolts.
- Remove Driveshaft: Carefully remove the front half of the driveshaft. Use penetrating oil and a dead blow hammer if necessary to break the U-joint carriers free from the flanges.
- Secure Rear Half: Support the rear half of the propeller shaft with a jack stand.
- Prepare for Bearing Removal: Take the driveshaft with the carrier bearing to your workbench. Secure the driveshaft in a bench vise, being careful not to warp it.
Step 4: Removing the Old Center Support Bearing
- Un-stake Nut: Un-stake the nut on the driveshaft using a small screwdriver and hammer. Pry the metal up slightly without over-prying.
- Remove Flange Nut: Use an impact wrench and a 24mm socket to remove the flange nut.
- Remove Carrier Bearing: Use a jaw puller to remove the old carrier bearing. Hook the puller to the assembly and pull it off. If the rubber tears, hook the puller to the bearing itself and remove it.
Step 5: Installing the New Center Support Bearing
- Slide on New Bearing: Slide the new center support bearing onto the driveshaft in the correct orientation.
- Reinstall Flange Nut: Replace the washers and nut in the correct order. Tighten the nut to 134 ft-lbs to seat the bearing properly.
- Torque Nut: Loosen the nut and re-torque to 51 ft-lbs.
- Stake Nut: Stake the nut using a screwdriver and ball-peen hammer, tapping the nut over the cut-out in the shaft.
Step 6: Reinstalling the Driveshaft
- Reinstall Driveshaft: Take the driveshaft assembly back under the truck and reinstall it in the reverse order of removal. Align the flanges using the marks you made earlier.
- Tighten Bolts: Loosely tighten all bolts until everything is aligned. You may need to push the truck forward or backward slightly to get everything to line up.
- Torque Bolts: Torque the 8, 14mm bolts to 54 ft-lbs.
- Align Carrier Bearing: Align the carrier bearing based on the previous dirt line or its original position. Tighten the carrier bearing bolts.
- Double Check: Double-check every bolt to ensure it is tight.
Step 7: Final Checks
- Lower Vehicle: Carefully lower the vehicle from the jack stands.
- Test Drive: Take the vehicle for a test drive to ensure the vibrations and noises are gone.
Following these steps will help you successfully replace the center support bearing, restoring your vehicle’s performance and ride quality. CARDIAGTECH.NET offers all the tools and parts you need for this job. Contact us at +1 (641) 206-8880 for expert advice and quality products.
 Center support bearing installation showing the correct orientation
7. Common Mistakes to Avoid
Replacing a center support bearing can be a straightforward process, but avoiding common mistakes is crucial for a successful outcome. Here are some pitfalls to watch out for:
1. Neglecting Safety Precautions
- Mistake: Failing to use jack stands or wheel chocks, leading to potential injury or damage.
- Solution: Always use jack stands to support the vehicle after lifting it with a jack. Ensure wheel chocks are in place to prevent any accidental movement.
2. Skipping Alignment Marks
- Mistake: Not marking the alignment of the driveshaft components before disassembly, causing vibration issues after reassembly.
- Solution: Before disconnecting any parts, use a marking pen or paint to mark the alignment of the transmission output shaft flange and the U-joint carrier assembly.
3. Over or Under-Tightening Bolts
- Mistake: Failing to use a torque wrench and either over-tightening or under-tightening bolts, leading to damage or loosening.
- Solution: Always use a torque wrench to tighten bolts to the manufacturer’s specified torque values. Refer to the vehicle’s service manual for correct specifications.
4. Improper Bearing Installation
- Mistake: Installing the new center support bearing in the wrong orientation or without proper seating, causing premature wear or failure.
- Solution: Ensure the new bearing is installed in the correct orientation, matching the original bearing’s position. Tighten the flange nut to the specified torque to properly seat the bearing.
5. Reusing Old Hardware
- Mistake: Reusing old nuts, bolts, or washers, which may be worn or damaged, leading to loosening or failure.
- Solution: Replace any worn or damaged hardware with new components to ensure a secure and reliable connection.
6. Neglecting U-Joints
- Mistake: Failing to inspect or lubricate the U-joints while replacing the center support bearing, leading to continued vibration or noise issues.
- Solution: Inspect the U-joints for any signs of wear or damage. Lubricate them if necessary or replace them if worn.
7. Using Incorrect Tools
- Mistake: Using the wrong tools, such as pliers instead of a proper wrench, leading to damaged components or injury.
- Solution: Use the correct tools for the job, including the right size wrenches, sockets, and a torque wrench.
8. Forgetting to Stake the Nut
- Mistake: Omitting the step of staking the nut after torquing it, allowing the nut to loosen over time.
- Solution: After torquing the flange nut to the specified value, stake the nut using a screwdriver and ball-peen hammer to secure it in place.
By avoiding these common mistakes, you can ensure a smooth and successful center support bearing replacement. CARDIAGTECH.NET provides high-quality tools and parts to help you do the job right. Contact us at 276 Reock St, City of Orange, NJ 07050, United States, or via Whatsapp at +1 (641) 206-8880 for all your automotive repair needs.
8. Understanding Driveshaft Balance and Alignment
Driveshaft balance and alignment are critical for maintaining smooth vehicle operation and preventing premature wear of drivetrain components. A properly balanced and aligned driveshaft minimizes vibrations, reduces stress on bearings and U-joints, and ensures efficient power transfer from the transmission to the rear differential.
Importance of Driveshaft Balance:
- Reduced Vibrations: An unbalanced driveshaft can cause noticeable vibrations, especially at higher speeds. These vibrations can lead to discomfort for the driver and passengers.
- Extended Component Life: Excessive vibrations can accelerate wear on the center support bearing, U-joints, and differential components.
- Improved Ride Quality: A balanced driveshaft contributes to a smoother and more comfortable ride.
Causes of Driveshaft Imbalance:
- Manufacturing Imperfections: Slight variations in material density or shape during manufacturing can cause imbalance.
- Wear and Tear: Over time, wear on the driveshaft, U-joints, or center support bearing can lead to imbalance.
- Damage: Dents, bends, or other damage to the driveshaft can disrupt its balance.
Importance of Driveshaft Alignment:
- Minimized Stress: Proper alignment ensures that the driveshaft operates within its designed parameters, reducing stress on the center support bearing and U-joints.
- Efficient Power Transfer: Correct alignment ensures that power is transferred smoothly and efficiently from the transmission to the rear differential.
- Reduced Wear: Misalignment can cause excessive wear on the center support bearing, U-joints, and differential components.
Checking Driveshaft Alignment:
- Visual Inspection: Inspect the driveshaft for any signs of bending or damage.
- U-Joint Angles: Ensure that the U-joint angles are within the manufacturer’s specifications. Excessive angles can cause vibration and wear.
- Center Support Bearing Alignment: Verify that the center support bearing is properly aligned and securely mounted to the vehicle’s frame.
Balancing and Aligning the Driveshaft:
- Professional Balancing: If you suspect the driveshaft is out of balance, it should be professionally balanced by a qualified technician using specialized equipment.
- U-Joint Replacement: Replace worn or damaged U-joints to maintain proper alignment and reduce vibration.
- Center Support Bearing Replacement: Ensure the new center support bearing is correctly aligned during installation.
By understanding the importance of driveshaft balance and alignment, you can take steps to maintain your vehicle’s performance and reliability. Regular inspection and timely maintenance can prevent costly repairs and ensure a smooth and comfortable ride. CARDIAGTECH.NET offers a wide range of tools and replacement parts for driveshaft maintenance. Contact us at +1 (641) 206-8880 for expert assistance and quality products.
9. Maintenance Tips for Center Support Bearings
Proper maintenance of the center support bearing can significantly extend its lifespan and prevent costly repairs. Here are some essential tips to keep your center support bearing in good condition:
1. Regular Inspection
- Frequency: Inspect the center support bearing at least every 6 months or 12,000 miles, or during regular vehicle maintenance.
- Procedure: Check the rubber housing for cracks, tears, or deterioration. Look for signs of grease leakage. Grasp the driveshaft near the bearing and check for excessive play.
2. Proper Lubrication
- U-Joints: Ensure that the U-joints near the center support bearing are properly lubricated. Lack of lubrication can cause premature wear and vibration.
- Bearing Grease: While the center support bearing itself is typically sealed, maintaining the surrounding components can help prolong its life.
3. Avoid Overloading
- Weight Limits: Avoid overloading your vehicle, as excessive weight can put additional stress on the driveshaft and center support bearing.
- Towing: When towing, adhere to the manufacturer’s recommended towing capacity.
4. Smooth Driving Habits
- Acceleration and Deceleration: Avoid abrupt acceleration and deceleration, as these can cause sudden stress on the driveline components.
- Off-Road Driving: If driving off-road, be cautious of rough terrain that can damage the driveshaft or center support bearing.
5. Prompt Repairs
- Address Symptoms: If you notice any symptoms of a failing center support bearing, such as vibrations or noises, address them promptly.
- Component Replacement: Replace worn or damaged components, such as U-joints or the center support bearing itself, to prevent further damage.
6. Protect from Contaminants
- Chemical Exposure: Avoid exposing the center support bearing to harsh chemicals, such as road salt or degreasers, which can deteriorate the rubber housing.
- Cleaning: If cleaning the undercarriage of your vehicle, use mild soap and water and avoid direct high-pressure spraying near the center support bearing.
7. Check Mounting Points
- Secure Mounting: Ensure that the mounting points where the center support bearing attaches to the vehicle’s frame are secure and free from corrosion.
- Tighten Bolts: Periodically check the tightness of the mounting bolts and tighten them if necessary.
By following these maintenance tips, you can help ensure the longevity and reliability of your center support bearing. Regular care and attention to detail can prevent costly repairs and keep your vehicle running smoothly. CARDIAGTECH.NET offers a wide range of automotive maintenance products and tools to help you keep your vehicle in top condition. Visit our website or contact us at 276 Reock St, City of Orange, NJ 07050, United States, or via Whatsapp at +1 (641) 206-8880 for more information.
10. When to Seek Professional Help
While many aspects of center support bearing maintenance and replacement can be handled by experienced DIYers, there are situations where seeking professional help is the best course of action. Here are some indicators that it’s time to consult a qualified mechanic:
1. Lack of Experience
- Limited Knowledge: If you have limited experience working on driveline components or are unfamiliar with the procedures involved, it’s best to seek professional assistance.
- Safety Concerns: Working on the driveline can be dangerous if not done correctly. A professional mechanic has the training and experience to perform the job safely.
2. Specialized Tools Required
- Jaw Puller: Removing the center support bearing often requires a specialized jaw puller tool. If you don’t have access to this tool, a professional mechanic can provide it.
- Balancing Equipment: Balancing the driveshaft requires specialized equipment that is typically only available at professional repair shops.
3. Complex Symptoms
- Unclear Diagnosis: If you are unsure about the cause of the vibrations or noises, a professional mechanic can perform a thorough inspection and provide an accurate diagnosis.
- Multiple Issues: If you suspect multiple issues with the driveline, such as worn U-joints or differential problems, a professional can address all of these concerns.
4. Time Constraints
- Busy Schedule: If you have a busy schedule and don’t have the time to perform the repair yourself, a professional mechanic can complete the job quickly and efficiently.
- Vehicle Downtime: A professional can minimize vehicle downtime, ensuring you are back on the road as soon as possible.
5. Warranty Concerns
- Warranty Coverage: If your vehicle is still under warranty, having a professional mechanic perform the repair can help ensure that the warranty remains valid.
- Proper Documentation: A professional can provide proper documentation of the repair, which may be required for warranty claims.
6. Safety Concerns
- Potential Hazards: Working under a vehicle can be hazardous if not done correctly. A professional mechanic has the experience and equipment to perform the job safely.
- Proper Lifting: Incorrectly lifting the vehicle can cause damage or injury. A professional has the proper lifting equipment and knows how to use it safely.
By recognizing when to seek professional help, you can ensure that the center support bearing replacement is performed safely and correctly. CARDIAGTECH.NET partners with a network of trusted mechanics who can provide expert service and quality workmanship. Contact us at +1 (641) 206-8880 for assistance in finding a qualified mechanic in your area.
FAQ: Center Support Bearing of the Propeller Shaft
1. What is a center support bearing?
A center support bearing, also known as a carrier bearing, supports the driveshaft in vehicles with multiple driveshaft sections, reducing vibration and preventing wear.
2. What are the symptoms of a bad center support bearing?
Symptoms include vibrations at certain speeds, unusual noises like rumbling or squealing, and shaking during acceleration.
3. How do I inspect a center support bearing?
Visually inspect for cracks or grease leaks, check for excessive play by moving the driveshaft, and listen for unusual noises while rotating it.
4. What tools are needed to replace a center support bearing?
Tools include a jack, jack stands, wrench set, socket set, torque wrench, pry bar, jaw puller, and penetrating oil.
5. How often should I inspect my center support bearing?
Inspect the bearing every 6 months or 12,000 miles, or during routine vehicle maintenance.
6. Can I drive with a bad center support bearing?
Driving with a bad center support bearing can cause further damage to the driveshaft and other components, so it should be repaired as soon as possible.
7. How much does it cost to replace a center support bearing?
The cost varies, but typically ranges from $200 to $600, including parts and labor.
8. What causes a center support bearing to fail?
Common causes include wear and tear, lack of lubrication, exposure to contaminants, and overloading the vehicle.
9. Is it difficult to replace a center support bearing myself?
Replacing it yourself can be straightforward with the right tools and experience, but professional help is recommended if you’re not experienced.
10. What maintenance can extend the life of a center support bearing?
Regular inspection, proper lubrication of U-joints, avoiding overloading, and smooth driving habits can extend its lifespan.
Navigating center support bearing issues doesn’t have to be a solo mission. At CARDIAGTECH.NET, we’re ready to equip you with top-notch tools and expert advice. Whether you’re facing tough diagnoses or seeking reliable replacement parts, our team is just a message away.
Don’t let vehicle vibrations keep you off track; reach out today, and let’s ensure your ride is smooth and steady. Connect with CARDIAGTECH.NET now via Whatsapp at +1 (641) 206-8880 and experience service that keeps you moving forward.