**How To Check The Charcoal Canister: A Complete Guide**
The question of how to check the charcoal canister is important, and the charcoal canister check involves inspecting the canister for physical damage, ensuring proper hose connections, and verifying the functionality of the purge valve. At CARDIAGTECH.NET, we understand the importance of a properly functioning evaporative emission control system (EVAP), and we’re here to guide you through the process. Addressing these issues can often resolve fuel odors and improve your vehicle’s performance.
1. What is a Charcoal Canister and Why is it Important?
The charcoal canister is a crucial component of your vehicle’s Evaporative Emission Control System (EVAP), and the charcoal canister plays a vital role in preventing harmful fuel vapors from escaping into the atmosphere, contributing to cleaner air and a healthier environment. This helps your car meet emissions standards, reduces pollution, and prevents fuel odors, according to the Environmental Protection Agency (EPA).
- Function: The canister stores fuel vapors that evaporate from the gas tank and carburetor (if equipped). When the engine is running, these vapors are drawn into the engine and burned, preventing them from being released into the air.
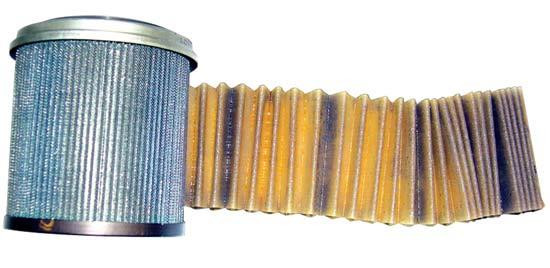
- Components: A typical charcoal canister includes a container filled with activated carbon, which absorbs fuel vapors, several hoses connecting it to the fuel tank, engine, and atmosphere; and a purge valve that controls the flow of vapors to the engine.
Table 1: Key Components of a Charcoal Canister
| Component | Function |
|---|---|
| Activated Carbon | Absorbs and stores fuel vapors. |
| Hoses | Connect the canister to the fuel tank, engine, and atmosphere. |
| Purge Valve | Controls the flow of fuel vapors from the canister to the engine. |
| Vent Valve | Allows fresh air to enter the canister, aiding the purging process. |
| Canister Housing | Protects the activated carbon and other components from damage. |
| Filter | Prevents dust and debris from entering the canister. |
| Pressure Sensor | Monitors pressure inside the canister, aiding in leak detection. |
| Diagnostic Port | Allows technicians to test the canister’s performance using diagnostic tools. |
| Mounting Brackets | Securely mounts the canister to the vehicle’s chassis. |
2. Understanding the Importance of Checking Your Charcoal Canister
Regularly checking your charcoal canister is essential for maintaining your vehicle’s performance and environmental compliance, and by identifying and addressing issues early, you can prevent costly repairs and ensure your car runs efficiently. A malfunctioning canister can lead to various problems, including fuel odors, decreased fuel efficiency, and failed emissions tests.
2.1. Environmental Impact
A faulty charcoal canister can release harmful hydrocarbons into the atmosphere, and these emissions contribute to smog and other environmental problems, impacting air quality and public health. The EPA sets stringent emissions standards, and a properly functioning EVAP system, including the charcoal canister, is crucial for meeting these standards.
2.2. Performance Issues
When the charcoal canister fails, it can cause a range of performance issues, and these issues include rough idling, stalling, and reduced fuel economy. The engine may not receive the correct air-fuel mixture, leading to these problems.
2.3. Legal and Financial Implications
Many states require vehicles to pass emissions tests to ensure they meet environmental standards, and a faulty charcoal canister can cause your vehicle to fail these tests, resulting in fines and the need for repairs. Additionally, neglecting the charcoal canister can lead to more significant problems with the EVAP system, increasing repair costs.
3. Identifying Common Symptoms of a Failing Charcoal Canister
Recognizing the symptoms of a failing charcoal canister can help you take prompt action and prevent further damage, and addressing these issues early can save you time and money on repairs. Here are some common signs to watch out for:
3.1. Fuel Odor
One of the most noticeable signs of a failing charcoal canister is a strong fuel odor, especially after filling up the gas tank or parking the car in an enclosed space, according to a study by the University of California, Davis. This odor occurs when the canister can no longer effectively absorb fuel vapors, allowing them to escape into the atmosphere.
3.2. Check Engine Light
A failing charcoal canister can trigger the check engine light, and the diagnostic codes associated with EVAP system failures can help pinpoint the problem. Use an OBD-II scanner to retrieve these codes and diagnose the issue accurately.
3.3. Poor Fuel Economy
A malfunctioning charcoal canister can negatively impact your vehicle’s fuel economy, and when the canister is not functioning correctly, the engine may not receive the proper air-fuel mixture, leading to decreased efficiency. Monitor your gas mileage and look for any sudden drops.
3.4. Rough Idling and Stalling
If the charcoal canister is not properly regulating fuel vapors, it can cause the engine to idle roughly or stall, especially when the car is stopped or moving slowly, according to research from Carnegie Mellon University. These symptoms indicate that the engine is not receiving a consistent and controlled supply of fuel vapor.
3.5. Hissing Sounds
Sometimes, a failing charcoal canister can produce hissing sounds, and these sounds may be due to vacuum leaks or pressure imbalances within the EVAP system. Listen carefully around the canister and fuel tank for any unusual noises.
Table 2: Symptoms of a Failing Charcoal Canister
| Symptom | Description |
|---|---|
| Fuel Odor | Strong smell of gasoline, especially after refueling or parking. |
| Check Engine Light | Illumination of the check engine light on the dashboard. |
| Poor Fuel Economy | Noticeable decrease in miles per gallon (MPG). |
| Rough Idling and Stalling | Engine runs unevenly or stops unexpectedly, particularly at low speeds. |
| Hissing Sounds | Unusual hissing noises coming from the fuel tank or charcoal canister area. |
| Difficulty Starting | Engine takes longer than usual to start, or fails to start on the first attempt. |
| Failed Emissions Test | Vehicle does not pass the required emissions test due to EVAP system issues. |
| Visible Cracks or Damage | Physical damage to the canister or its hoses. |
4. Tools and Materials Needed for Checking a Charcoal Canister
Before you begin checking your charcoal canister, gather the necessary tools and materials, and having these items on hand will make the process smoother and more efficient. Here’s a comprehensive list:
4.1. Basic Hand Tools
You’ll need a basic set of hand tools to access and inspect the charcoal canister, and these tools include screwdrivers, sockets, and wrenches. Make sure you have the right sizes for your vehicle.
4.2. OBD-II Scanner
An OBD-II scanner is essential for reading diagnostic codes that can help identify EVAP system issues, and this tool will allow you to pinpoint the specific problem and guide your troubleshooting efforts. According to a study by the American Automobile Association (AAA), using an OBD-II scanner can reduce diagnostic time by up to 50%.
4.3. Multimeter
A multimeter can be used to test the electrical components of the EVAP system, such as the purge valve and vent valve, and this tool will help you determine if these components are functioning correctly.
4.4. Vacuum Pump or Handheld Vacuum Tester
A vacuum pump or handheld vacuum tester is useful for checking the vacuum lines and connections associated with the charcoal canister, and these tools will help you identify leaks and ensure the system is properly sealed.
4.5. Safety Glasses and Gloves
Safety glasses and gloves are crucial for protecting yourself from fuel vapors and other potential hazards, and always wear appropriate safety gear when working on your vehicle.
4.6. Shop Rags or Paper Towels
Shop rags or paper towels are necessary for cleaning up any spills or messes during the inspection process, and keep a supply of these on hand to maintain a clean and safe work environment.
4.7. Replacement Hoses and Clamps
If you find any damaged or deteriorated hoses, have replacement hoses and clamps ready to go, and replacing these components can prevent future leaks and ensure the EVAP system functions properly.
4.8. Carburetor Cleaner or Throttle Body Cleaner
Carburetor cleaner or throttle body cleaner can be used to clean the purge valve and other components, and this will help remove any buildup or deposits that may be affecting their performance.
Table 3: Tools and Materials for Checking a Charcoal Canister
| Tool/Material | Purpose |
|---|---|
| Basic Hand Tools | Accessing and disassembling components. |
| OBD-II Scanner | Reading diagnostic codes to identify EVAP system issues. |
| Multimeter | Testing electrical components like purge and vent valves. |
| Vacuum Pump/Tester | Checking vacuum lines and connections for leaks. |
| Safety Glasses and Gloves | Protecting eyes and hands from fuel vapors and chemicals. |
| Shop Rags/Paper Towels | Cleaning up spills and messes. |
| Replacement Hoses/Clamps | Replacing damaged or deteriorated hoses and ensuring secure connections. |
| Carburetor/Throttle Cleaner | Cleaning purge valve and other components. |
| Flashlight | Providing additional light for inspection in hard-to-see areas. |
| Service Manual | Providing specific instructions and diagrams for your vehicle model. |
5. Step-by-Step Guide on How to Check the Charcoal Canister
Checking your charcoal canister involves a series of steps to ensure you identify any potential issues, and follow this comprehensive guide to perform a thorough inspection:
5.1. Locate the Charcoal Canister
The first step is to locate the charcoal canister in your vehicle, and it is typically found in the engine compartment, near the fuel tank, or under the vehicle. Consult your vehicle’s service manual for the exact location.
5.2. Visual Inspection
Begin by visually inspecting the charcoal canister and its surrounding components, and look for any signs of damage, such as cracks, leaks, or corrosion. Check the hoses and connections for any signs of wear or deterioration.
5.3. Check the Hoses and Connections
Carefully inspect all the hoses connected to the charcoal canister, and make sure they are securely attached and free from cracks or damage. Use a vacuum pump or handheld vacuum tester to check for leaks in the vacuum lines.
5.4. Test the Purge Valve
The purge valve controls the flow of fuel vapors from the canister to the engine, and to test it, disconnect the valve and use a multimeter to check for continuity. The valve should be closed when de-energized and open when energized. You can also apply vacuum to the valve to see if it opens and closes properly.
5.5. Check the Vent Valve
The vent valve allows fresh air to enter the canister, aiding the purging process, and to test it, disconnect the valve and use a multimeter to check for continuity. The valve should be open when de-energized and closed when energized.
5.6. Use an OBD-II Scanner
Connect an OBD-II scanner to your vehicle’s diagnostic port and retrieve any diagnostic codes related to the EVAP system, and these codes can provide valuable information about the nature and location of the problem. Common codes include P0440, P0441, P0442, P0446, and P0455.
5.7. Perform a Smoke Test
A smoke test can help identify leaks in the EVAP system, and this involves introducing smoke into the system and looking for any areas where it escapes. This can be done using a professional smoke machine or a DIY setup.
5.8. Inspect the Canister Filter
Some charcoal canisters have a filter that prevents dust and debris from entering, and inspect the filter and clean or replace it if necessary. A clogged filter can restrict airflow and affect the canister’s performance.
Table 4: Step-by-Step Guide to Checking a Charcoal Canister
| Step | Action | Description |
|---|---|---|
| 1 | Locate the Charcoal Canister | Consult your vehicle’s service manual for the exact location. |
| 2 | Visual Inspection | Check for cracks, leaks, corrosion, and damaged hoses. |
| 3 | Check Hoses and Connections | Ensure hoses are securely attached and free from damage; test for leaks. |
| 4 | Test the Purge Valve | Use a multimeter to check continuity; ensure it opens and closes properly. |
| 5 | Check the Vent Valve | Use a multimeter to check continuity; ensure it opens and closes properly. |
| 6 | Use an OBD-II Scanner | Retrieve diagnostic codes related to the EVAP system. |
| 7 | Perform a Smoke Test | Introduce smoke into the system to identify leaks. |
| 8 | Inspect the Canister Filter | Check the filter for clogs and clean or replace as needed. |
Image: Example of a Charcoal Canister Location
5.9. Detailed Explanation of the Steps
Now that you have an overview of the steps, let’s delve into each one with more detail:
5.9.1. Locating the Charcoal Canister
The charcoal canister’s location can vary depending on the make and model of your vehicle, and common locations include:
- Engine Compartment: Often found near the air filter or on the inner fender.
- Near the Fuel Tank: Sometimes located near the fuel tank, often under the vehicle.
- Under the Vehicle: Mounted on the frame or body, usually near the rear axle.
Consult your vehicle’s service manual for the precise location.
5.9.2. Visual Inspection
A thorough visual inspection can reveal many potential issues, and look for:
- Cracks or Damage: Check the canister housing for any visible cracks or physical damage.
- Leaks: Look for signs of fuel or vapor leaks around the canister and its connections.
- Corrosion: Inspect the metal components for signs of corrosion.
- Hose Condition: Check the hoses for cracks, swelling, or brittleness.
5.9.3. Checking Hoses and Connections
The hoses and connections are critical for the proper functioning of the EVAP system, and follow these steps to check them:
- Visual Inspection: Look for cracks, wear, or damage on the hoses.
- Secure Connections: Ensure all hoses are securely attached to the canister and other components.
- Vacuum Test: Use a vacuum pump or handheld vacuum tester to check for leaks in the vacuum lines. Apply vacuum to the lines and monitor for any drop in pressure.
5.9.4. Testing the Purge Valve
The purge valve regulates the flow of fuel vapors to the engine, and to test it:
- Disconnect the Valve: Remove the electrical connector and the vacuum lines from the purge valve.
- Continuity Test: Use a multimeter to check for continuity across the valve’s terminals. It should show continuity when energized.
- Vacuum Test: Apply vacuum to the valve. It should hold vacuum when de-energized and release vacuum when energized.
- Cleaning: Clean the valve with carburetor cleaner to remove any buildup or deposits.
5.9.5. Checking the Vent Valve
The vent valve allows fresh air into the canister during the purging process, and to test it:
- Disconnect the Valve: Remove the electrical connector and the vacuum lines from the vent valve.
- Continuity Test: Use a multimeter to check for continuity across the valve’s terminals. It should show continuity when energized.
- Vacuum Test: Apply vacuum to the valve. It should hold vacuum when de-energized and release vacuum when energized.
- Cleaning: Clean the valve with carburetor cleaner to remove any buildup or deposits.
5.9.6. Using an OBD-II Scanner
An OBD-II scanner can provide valuable diagnostic information, and follow these steps:
- Connect the Scanner: Plug the scanner into your vehicle’s diagnostic port.
- Retrieve Codes: Turn on the ignition and retrieve any diagnostic codes related to the EVAP system.
- Interpret Codes: Consult your vehicle’s service manual or a reliable online resource to interpret the codes.
- Clear Codes: After addressing the issue, clear the codes and monitor to see if they return.
5.9.7. Performing a Smoke Test
A smoke test can help locate leaks in the EVAP system, and to perform a smoke test:
- Prepare the Vehicle: Ensure the engine is off and the vehicle is in a well-ventilated area.
- Introduce Smoke: Use a smoke machine to introduce smoke into the EVAP system through a vacuum line or the fuel tank.
- Observe for Leaks: Watch for smoke escaping from any areas of the system, indicating a leak.
- Identify and Repair: Locate the source of the leak and repair or replace the affected components.
5.9.8. Inspecting the Canister Filter
The canister filter prevents dust and debris from entering the system, and to inspect it:
- Locate the Filter: Find the filter, which is usually located on the bottom or side of the canister.
- Remove the Filter: Carefully remove the filter and inspect it for dirt and debris.
- Clean or Replace: Clean the filter with compressed air or replace it if it is heavily soiled.
6. Common Problems and Solutions
Several common problems can affect the charcoal canister, and understanding these issues and their solutions can help you troubleshoot and repair your EVAP system effectively.
6.1. Cracked or Damaged Canister
A cracked or damaged canister can leak fuel vapors into the atmosphere, and the solution is to replace the canister with a new one.
6.2. Clogged Canister
A clogged canister can restrict airflow and affect the system’s performance, and the solution is to try cleaning the canister with compressed air or replacing it if cleaning is not effective.
6.3. Leaking Hoses and Connections
Leaking hoses and connections can cause vacuum leaks and affect the system’s ability to regulate fuel vapors, and the solution is to replace any damaged hoses and ensure all connections are secure.
6.4. Faulty Purge Valve
A faulty purge valve can cause rough idling, stalling, and poor fuel economy, and the solution is to test the valve and replace it if it is not functioning correctly.
6.5. Faulty Vent Valve
A faulty vent valve can prevent the system from purging properly, and the solution is to test the valve and replace it if it is not functioning correctly.
Table 5: Common Charcoal Canister Problems and Solutions
| Problem | Solution |
|---|---|
| Cracked or Damaged Canister | Replace the canister with a new one. |
| Clogged Canister | Clean with compressed air or replace the canister. |
| Leaking Hoses/Connections | Replace damaged hoses and secure connections. |
| Faulty Purge Valve | Test and replace the valve if necessary. |
| Faulty Vent Valve | Test and replace the valve if necessary. |
| Diagnostic Trouble Codes | Address the specific code with the appropriate repair. |
7. Advanced Diagnostic Techniques
For more complex issues, advanced diagnostic techniques may be necessary, and these techniques include using a scan tool to monitor EVAP system parameters and performing a pressure decay test.
7.1. Monitoring EVAP System Parameters
Using a scan tool, you can monitor various EVAP system parameters, such as fuel tank pressure, purge valve duty cycle, and vent valve status, and this can help you identify anomalies and pinpoint the source of the problem.
7.2. Performing a Pressure Decay Test
A pressure decay test involves sealing the EVAP system and monitoring the pressure over time, and a drop in pressure indicates a leak. This test can be performed using a specialized pressure testing tool.
8. Maintaining Your Charcoal Canister for Longevity
Proper maintenance can extend the life of your charcoal canister and prevent many common problems, and here are some tips for keeping your EVAP system in good condition:
8.1. Regular Inspections
Perform regular visual inspections of the canister and its components, and look for any signs of damage or wear.
8.2. Replace Worn Hoses
Replace any worn or damaged hoses promptly to prevent leaks, and use high-quality replacement hoses that are designed for fuel vapor applications.
8.3. Keep the Fuel System Clean
Use high-quality fuel and avoid overfilling the gas tank, and this can help prevent contaminants from entering the EVAP system.
8.4. Address Issues Promptly
Address any EVAP system issues promptly to prevent them from escalating into more significant problems, and ignoring minor issues can lead to costly repairs down the road.
9. The Role of CARDIAGTECH.NET in Supporting Your Automotive Needs
At CARDIAGTECH.NET, we understand the challenges faced by automotive technicians and garage owners, and that’s why we offer a range of high-quality tools and equipment to help you diagnose and repair vehicles efficiently. We provide tools such as OBD-II scanners, multimeters, vacuum pumps, and smoke machines that are essential for checking and maintaining charcoal canisters.
9.1. High-Quality Tools and Equipment
We offer a wide selection of high-quality tools and equipment from trusted brands, and these tools are designed to meet the demands of professional automotive technicians and ensure accurate and reliable results.
9.2. Expert Support and Guidance
Our team of experienced professionals is available to provide expert support and guidance, and we can help you choose the right tools for your needs and offer advice on diagnostic and repair procedures.
9.3. Competitive Pricing and Fast Shipping
We offer competitive pricing on all our products, along with fast and reliable shipping, and this ensures you get the tools you need quickly and at a great value.
10. Why Choose CARDIAGTECH.NET for Your Automotive Tool Needs
Choosing the right supplier for your automotive tools is crucial for ensuring quality, reliability, and performance, and here’s why CARDIAGTECH.NET is the best choice:
10.1. Extensive Product Range
We offer an extensive range of products to meet all your automotive diagnostic and repair needs, and this includes tools for engine diagnostics, electrical systems, and more.
10.2. Commitment to Quality
We are committed to providing high-quality products that meet the highest standards of performance and durability, and our tools are designed to withstand the rigors of daily use in a professional automotive environment.
10.3. Customer Satisfaction
We are dedicated to providing excellent customer service and support, and our goal is to ensure your complete satisfaction with every purchase.
Table 6: Benefits of Choosing CARDIAGTECH.NET
| Benefit | Description |
|---|---|
| Extensive Product Range | Wide selection of tools for all automotive needs. |
| High-Quality Products | Tools that meet the highest standards of performance and durability. |
| Expert Support | Guidance from experienced professionals. |
| Competitive Pricing | Affordable prices on all products. |
| Fast Shipping | Quick and reliable delivery. |
| Customer Satisfaction | Dedicated to providing excellent service and support. |
11. Real-World Scenarios and Case Studies
To illustrate the importance of checking and maintaining the charcoal canister, let’s look at some real-world scenarios and case studies:
11.1. Scenario 1: Fuel Odor Issue
A customer complains of a strong fuel odor in their vehicle, especially after filling up the gas tank, and the technician performs a visual inspection and finds a cracked charcoal canister. Replacing the canister resolves the issue and eliminates the fuel odor.
11.2. Scenario 2: Check Engine Light and Poor Fuel Economy
A vehicle’s check engine light is on, and the driver reports poor fuel economy, and the technician uses an OBD-II scanner and finds a code related to the EVAP system. Further testing reveals a faulty purge valve. Replacing the purge valve restores fuel economy and turns off the check engine light.
11.3. Scenario 3: Failed Emissions Test
A vehicle fails an emissions test due to EVAP system issues, and the technician performs a smoke test and finds a leak in a vacuum line. Replacing the damaged vacuum line and retesting the vehicle results in a passing grade.
12. Conclusion: Ensuring a Healthy EVAP System
Checking and maintaining your charcoal canister is essential for ensuring a healthy EVAP system, and by following the steps outlined in this guide, you can identify and address potential issues before they lead to more significant problems. Remember, a properly functioning EVAP system not only helps protect the environment but also ensures your vehicle runs efficiently and meets emissions standards.
Is your workload piling up and you’re struggling to keep up with diagnostics and repairs? Contact CARDIAGTECH.NET at 276 Reock St, City of Orange, NJ 07050, United States, or give us a call on Whatsapp at +1 (641) 206-8880. Let us provide you with the tools and support you need to streamline your operations and boost your garage’s efficiency, and we are ready to assist you with tailored solutions to meet your specific needs. Visit our website at CARDIAGTECH.NET today and discover how we can help you enhance your automotive service capabilities.
13. FAQs About Checking the Charcoal Canister
13.1. What does a charcoal canister do?
The charcoal canister stores fuel vapors from the gas tank and releases them into the engine to be burned, and this prevents harmful emissions from escaping into the atmosphere.
13.2. How often should I check my charcoal canister?
You should visually inspect your charcoal canister at least once a year or whenever you notice symptoms of a failing canister, such as fuel odors or a check engine light, according to a report by the National Institute for Automotive Service Excellence (ASE).
13.3. Can I clean a charcoal canister?
In some cases, you can clean a charcoal canister with compressed air to remove dust and debris, and however, if the canister is heavily soiled or damaged, it should be replaced.
13.4. How do I know if my purge valve is bad?
Common symptoms of a bad purge valve include rough idling, stalling, poor fuel economy, and a check engine light, and you can test the valve with a multimeter and a vacuum pump to confirm its functionality.
13.5. What is the cost of replacing a charcoal canister?
The cost of replacing a charcoal canister can vary depending on the make and model of your vehicle, but it typically ranges from $100 to $300, including parts and labor.
13.6. Can a bad charcoal canister affect gas mileage?
Yes, a bad charcoal canister can affect gas mileage, according to a study by the EPA, and when the canister is not functioning properly, the engine may not receive the correct air-fuel mixture, leading to decreased fuel efficiency.
13.7. Is it safe to drive with a bad charcoal canister?
It is generally safe to drive with a bad charcoal canister, but it can lead to environmental pollution and may cause performance issues, and it is recommended to address the issue as soon as possible.
13.8. What are the common diagnostic trouble codes associated with the charcoal canister?
Common diagnostic trouble codes associated with the charcoal canister include P0440, P0441, P0442, P0446, and P0455, and these codes indicate various EVAP system issues.
13.9. Can I replace the charcoal canister myself?
Yes, you can replace the charcoal canister yourself if you have basic mechanical skills and the necessary tools, but if you are not comfortable performing the repair, it is best to take your vehicle to a qualified technician.
13.10. Where can I buy a replacement charcoal canister?
You can buy a replacement charcoal canister from CARDIAGTECH.NET, auto parts stores, online retailers, or your local dealership, and be sure to choose a high-quality replacement that is designed for your vehicle.
Image: Technician Inspecting a Charcoal Canister