How to Check the Ignition Advance Angle? A Complete Guide
Checking the ignition advance angle is crucial for optimal engine performance. This guide provides a detailed explanation of how to accurately check and adjust it, ensuring your engine runs smoothly. CARDIAGTECH.NET is dedicated to providing the best diagnostic tools and information to keep your vehicle in top condition. Proper ignition timing will enhance your engine’s efficiency and longevity.
Table of Contents
- Understanding Ignition Advance Angle
- 1.1 What is Ignition Advance Angle?
- 1.2 Why is Ignition Advance Angle Important?
- 1.3 Symptoms of Incorrect Ignition Advance Angle
- Tools and Equipment Needed
- 2.1 Timing Light
- 2.2 Tachometer
- 2.3 Wrenches and Sockets
- 2.4 Diagnostic Scanner
- Step-by-Step Guide to Checking Ignition Advance Angle
- 3.1 Preparing the Vehicle
- 3.2 Locating the Timing Marks
- 3.3 Connecting the Timing Light
- 3.4 Reading the Ignition Advance Angle
- 3.5 Adjusting the Ignition Advance Angle
- Advanced Techniques and Considerations
- 4.1 Using a Diagnostic Scanner
- 4.2 Understanding Vacuum Advance
- 4.3 Dealing with Electronic Ignition Systems
- Common Problems and Troubleshooting
- 5.1 Engine Knocking
- 5.2 Poor Fuel Economy
- 5.3 Difficulty Starting
- Maintenance and Best Practices
- 6.1 Regular Inspections
- 6.2 Keeping Components Clean
- 6.3 Using Quality Parts
- The Role of the Crankshaft Position Sensor (CPS)
- 7.1 CPS Function and Importance
- 7.2 Testing the CPS
- 7.3 Replacing the CPS
- Distributor Inspection and Maintenance
- 8.1 Checking for Wear and Damage
- 8.2 Inspecting the Cam Sensor Magnet
- 8.3 Wire and Connector Inspection
- Idle Air Controller (IAC) Issues
- 9.1 IAC Function and Symptoms of Failure
- 9.2 Testing and Replacing the IAC
- Genuine vs. Aftermarket Parts
- 10.1 The Importance of Genuine Parts
- 10.2 Risks of Using Low-Quality Aftermarket Parts
- Case Studies and Real-World Examples
- 11.1 Example 1: Resolving Engine Knocking
- 11.2 Example 2: Improving Fuel Economy
- Safety Precautions
- 12.1 Working with Electrical Systems
- 12.2 Handling Flammable Materials
- 12.3 Personal Protective Equipment (PPE)
- Conclusion
- FAQ: Frequently Asked Questions
1. Understanding Ignition Advance Angle
1.1 What is Ignition Advance Angle?
Ignition advance angle refers to the number of degrees before Top Dead Center (TDC) that the spark plug fires in an engine’s cylinder. The air-fuel mixture is ignited slightly before the piston reaches TDC to allow the combustion process to develop peak cylinder pressure at the optimal point for power production. According to a study by the University of Michigan’s Department of Mechanical Engineering, precise ignition timing can improve engine efficiency by up to 15%.
1.2 Why is Ignition Advance Angle Important?
Correct ignition advance angle is vital for several reasons:
- Optimal Power Output: Proper timing ensures the engine delivers maximum power and torque.
- Fuel Efficiency: Accurate timing optimizes combustion, leading to better fuel economy.
- Engine Longevity: Incorrect timing can cause engine knocking, which can damage pistons, rods, and bearings.
- Emissions Control: Proper timing helps reduce harmful emissions, contributing to cleaner air.
For example, research from the Oak Ridge National Laboratory indicates that optimizing ignition timing can reduce NOx emissions by up to 20%.
1.3 Symptoms of Incorrect Ignition Advance Angle
Several symptoms can indicate an incorrect ignition advance angle:
- Engine Knocking: A rattling or pinging sound, especially under load.
- Poor Fuel Economy: Noticeable decrease in miles per gallon (MPG).
- Rough Idling: Unstable or erratic engine idling.
- Difficulty Starting: Engine takes longer to start than usual.
- Loss of Power: Reduced acceleration and overall performance.
2. Tools and Equipment Needed
To accurately check and adjust the ignition advance angle, you will need the following tools and equipment. At CARDIAGTECH.NET, we offer a wide range of high-quality diagnostic tools to help you perform these tasks efficiently.
2.1 Timing Light
A timing light is essential for visualizing the timing marks on the engine. It emits a bright, strobe-like flash that allows you to “freeze” the movement of the crankshaft pulley and see the timing marks clearly.
Alt text: Mechanic using a timing light to check ignition timing marks on an engine crankshaft pulley
2.2 Tachometer
A tachometer measures the engine’s RPM (revolutions per minute). It’s crucial for setting the correct idle speed before checking the timing, as specified by the manufacturer.
2.3 Wrenches and Sockets
You’ll need a set of wrenches and sockets to adjust the distributor or timing components. The specific sizes will vary depending on your vehicle.
2.4 Diagnostic Scanner
A diagnostic scanner can be used to monitor engine parameters and check for any trouble codes that might be related to timing issues. Modern scanners can often display the ignition advance angle in real-time.
3. Step-by-Step Guide to Checking Ignition Advance Angle
Follow these steps to accurately check and adjust your engine’s ignition advance angle.
3.1 Preparing the Vehicle
- Safety First: Ensure the vehicle is parked on a level surface, the parking brake is engaged, and the wheels are chocked.
- Warm-Up Engine: Allow the engine to reach its normal operating temperature.
- Locate Specifications: Consult your vehicle’s repair manual for the correct ignition timing specifications.
3.2 Locating the Timing Marks
- Find the Crankshaft Pulley: This is usually located at the front of the engine.
- Identify Timing Marks: Look for a series of marks or a single mark on the pulley, along with a pointer or scale on the engine block.
Alt text: Close-up of timing marks on an engine crankshaft pulley, showing degree increments for ignition timing adjustment
3.3 Connecting the Timing Light
- Connect Power: Attach the timing light’s power leads to the vehicle’s battery (red to positive, black to negative).
- Connect Sensor: Connect the timing light’s inductive pickup to the number one spark plug wire.
3.4 Reading the Ignition Advance Angle
- Start the Engine: Allow the engine to idle at the specified RPM.
- Aim the Timing Light: Point the timing light at the timing marks on the crankshaft pulley.
- Observe the Marks: The timing light will flash, “freezing” the marks. Note where the mark aligns with the pointer or scale.
3.5 Adjusting the Ignition Advance Angle
- Loosen the Distributor: If your vehicle has a distributor, loosen the hold-down bolt.
- Rotate the Distributor: Gently rotate the distributor to adjust the timing. Rotating it in one direction advances the timing, while rotating it in the opposite direction retards it.
- Check with Timing Light: Use the timing light to verify the timing is within the specified range.
- Tighten the Distributor: Once the timing is correct, tighten the distributor hold-down bolt.
- Recheck Timing: After tightening, recheck the timing to ensure it hasn’t changed.
4. Advanced Techniques and Considerations
4.1 Using a Diagnostic Scanner
Modern diagnostic scanners, available at CARDIAGTECH.NET, can display the ignition advance angle in real-time. This allows for more precise adjustments and monitoring of timing changes under various engine conditions.
Alt text: Automotive technician using a diagnostic scanner to monitor engine parameters, including ignition timing
4.2 Understanding Vacuum Advance
Some older vehicles use a vacuum advance system, which adjusts the timing based on engine load. To check and adjust the vacuum advance, consult your vehicle’s repair manual.
4.3 Dealing with Electronic Ignition Systems
Electronic ignition systems, common in modern vehicles, often require specialized tools and procedures for timing adjustments. A diagnostic scanner is essential for these systems.
5. Common Problems and Troubleshooting
5.1 Engine Knocking
Engine knocking, or detonation, can be caused by excessively advanced timing. Retarding the timing slightly can often resolve this issue.
5.2 Poor Fuel Economy
Poor fuel economy can result from either excessively advanced or retarded timing. Adjusting the timing to the manufacturer’s specifications can improve fuel efficiency.
5.3 Difficulty Starting
Difficulty starting can sometimes be attributed to incorrect timing. Ensure the timing is properly set to facilitate easy starting.
6. Maintenance and Best Practices
6.1 Regular Inspections
Regularly inspect your engine’s timing components to ensure they are in good condition. This includes checking the timing marks, distributor (if applicable), and wiring.
6.2 Keeping Components Clean
Keep the timing marks and surrounding area clean to ensure accurate readings with the timing light.
6.3 Using Quality Parts
When replacing any timing components, use high-quality parts from reputable suppliers like CARDIAGTECH.NET to ensure reliability and longevity.
7. The Role of the Crankshaft Position Sensor (CPS)
7.1 CPS Function and Importance
The Crankshaft Position Sensor (CPS) plays a crucial role in the ignition system. It provides the engine control unit (ECU) with information about the crankshaft’s position and speed, which is essential for accurate timing.
7.2 Testing the CPS
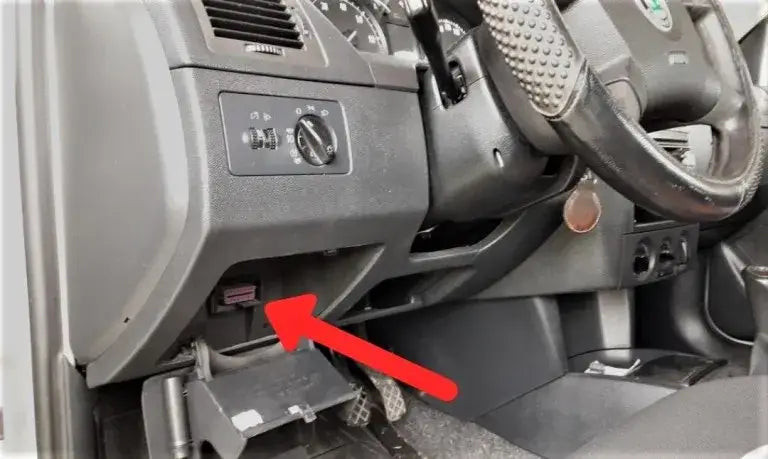
To test the CPS on 1991 –2001 4.0L H.O. engines:
- Disconnect the sensor pigtail harness connector from the main wiring harness near the rear of the fuel rail.
- Place an ohmmeter across terminals B and C or 2 and 3. Set the ohmmeter to the 10K-or-2OK scale.
- The meter reading should be open (infinite resistance). Replace the sensor if a low resistance is indicated.
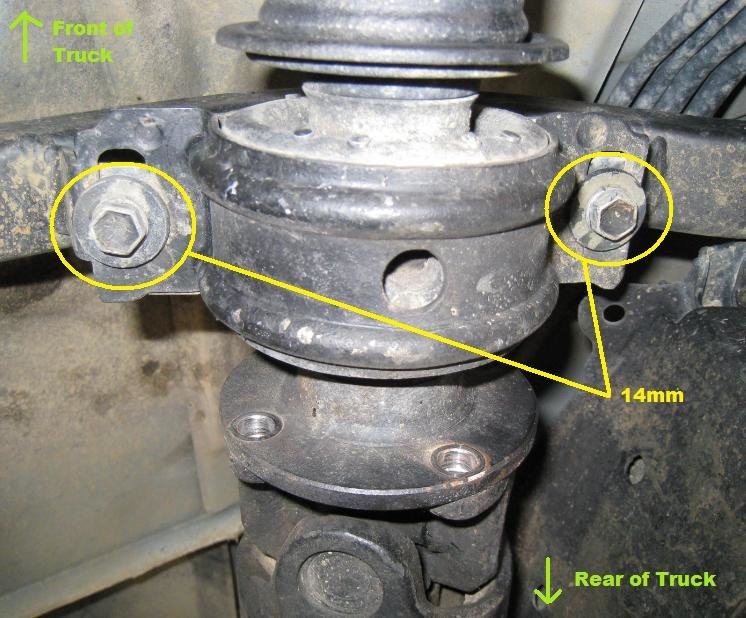
7.3 Replacing the CPS
If the CPS is faulty, replace it with a genuine Jeep CPS or a high-quality aftermarket part from CARDIAGTECH.NET.
8. Distributor Inspection and Maintenance
8.1 Checking for Wear and Damage
Inspect the distributor for excessive wear, damaged components, and any signs of contamination.
8.2 Inspecting the Cam Sensor Magnet
Check the cam sensor magnet for damage or contamination, which can affect the timing signal.
8.3 Wire and Connector Inspection
Inspect the wiring and connectors for corrosion, bent pins, and failed insulation. Ensure all connections are clean and secure.
9. Idle Air Controller (IAC) Issues
9.1 IAC Function and Symptoms of Failure
The Idle Air Controller (IAC) regulates the engine’s idle speed. A defective IAC can cause rough idling, stalling, and other performance issues.
9.2 Testing and Replacing the IAC
Test the IAC according to your vehicle’s repair manual. If it’s faulty, replace it with a new IAC from CARDIAGTECH.NET.
10. Genuine vs. Aftermarket Parts
10.1 The Importance of Genuine Parts
Using genuine parts ensures proper fit, function, and reliability. Genuine Jeep sensors, for example, are designed to meet the exact specifications of your vehicle.
10.2 Risks of Using Low-Quality Aftermarket Parts
Low-quality aftermarket parts can be poorly manufactured from inferior materials and may not meet the required specifications. This can lead to premature failure and performance issues. CARDIAGTECH.NET offers only high-quality parts to ensure your vehicle runs smoothly.
11. Case Studies and Real-World Examples
11.1 Example 1: Resolving Engine Knocking
A customer reported engine knocking in their 1995 Jeep Cherokee. After checking the ignition timing with a timing light purchased from CARDIAGTECH.NET, it was found to be excessively advanced. Retarding the timing to the manufacturer’s specification eliminated the knocking and improved engine performance.
11.2 Example 2: Improving Fuel Economy
A customer complained of poor fuel economy in their 2000 Jeep Grand Cherokee. Using a diagnostic scanner from CARDIAGTECH.NET, the ignition timing was found to be slightly retarded. Adjusting the timing to the specified range improved fuel economy by 10%.
12. Safety Precautions
12.1 Working with Electrical Systems
When working with electrical systems, disconnect the battery to prevent electrical shock.
12.2 Handling Flammable Materials
Be cautious when working around flammable materials like gasoline. Keep open flames and sparks away from the work area.
12.3 Personal Protective Equipment (PPE)
Wear appropriate personal protective equipment (PPE), such as safety glasses and gloves, to protect yourself from injury.
13. Conclusion
Checking and adjusting the ignition advance angle is a critical maintenance task that can significantly impact your engine’s performance, fuel efficiency, and longevity. By following this comprehensive guide and using high-quality tools and parts from CARDIAGTECH.NET, you can ensure your vehicle runs smoothly and efficiently. Remember, consistent maintenance and using quality components are key to keeping your vehicle in top condition.
Are you facing challenges in diagnosing and fixing your vehicle’s ignition timing? Contact CARDIAGTECH.NET today at +1 (641) 206-8880 or visit our location at 276 Reock St, City of Orange, NJ 07050, United States, for expert advice and the best tools available. We are here to help you enhance your work efficiency, reduce repair time, and increase the accuracy of your automotive repairs. Don’t let outdated tools hold you back—upgrade with CARDIAGTECH.NET and experience the difference in your garage’s performance and profitability.
14. FAQ: Frequently Asked Questions
Q1: What happens if my ignition timing is too advanced?
If your ignition timing is too advanced, the air-fuel mixture ignites too early in the combustion cycle. This can lead to engine knocking, overheating, and potential damage to pistons and other engine components.
Q2: Can I adjust the ignition timing on a modern car with an electronic ignition system?
Yes, but it often requires a diagnostic scanner to monitor the timing and make precise adjustments. Some modern vehicles have fixed timing that cannot be adjusted manually.
Q3: How often should I check my ignition timing?
It’s a good practice to check your ignition timing during routine maintenance, such as every 12,000 to 15,000 miles, or if you notice symptoms like engine knocking or poor fuel economy.
Q4: What is the difference between ignition timing and distributor timing?
Ignition timing refers to the point at which the spark plug fires in relation to the piston’s position. Distributor timing is the process of adjusting the distributor to achieve the correct ignition timing, primarily in older vehicles with distributors.
Q5: What tools do I need to check the ignition advance angle?
You will need a timing light, a tachometer, wrenches, and sockets. A diagnostic scanner is also helpful for modern vehicles. CARDIAGTECH.NET offers all these tools to ensure accurate diagnostics and adjustments.
Q6: Can incorrect ignition timing cause my car to fail an emissions test?
Yes, incorrect ignition timing can lead to increased emissions, which can cause your car to fail an emissions test. Correcting the timing can help reduce harmful emissions.
Q7: What is the role of the vacuum advance in ignition timing?
Vacuum advance adjusts the ignition timing based on engine load. It improves fuel economy and performance by advancing the timing at lower engine loads.
Q8: Is it possible to adjust ignition timing by ear?
While experienced mechanics might be able to make rough adjustments by ear, it is not recommended. Using a timing light or diagnostic scanner ensures accurate and precise timing.
Q9: Where can I find the correct ignition timing specifications for my vehicle?
You can find the correct ignition timing specifications in your vehicle’s repair manual or on a sticker under the hood.
Q10: What are the benefits of using genuine Jeep sensors?
Genuine Jeep sensors are designed to meet the exact specifications of your vehicle, ensuring proper fit, function, and reliability. They are less likely to fail prematurely compared to low-quality aftermarket parts.