How to Check the Motors or Actuators Controlling the Four-Wheel Drive System?
Checking the motors or actuators controlling your four-wheel drive (4WD) system involves systematically diagnosing each component to pinpoint the source of the issue; CARDIAGTECH.NET provides the tools and expertise needed for this task. This comprehensive guide covers the diagnostic process, common issues, and preventative measures, ensuring optimal performance of your 4WD system, enhancing vehicle reliability, and increasing customer satisfaction. Dive in to explore actuator operation and troubleshooting techniques.
Table of Contents
- What are the Key Search Intents Related to 4WD System Checks?
- What is the Four-Wheel Drive (4WD) System and Why is it Important?
- What are the Common Symptoms of a Failing 4WD Actuator?
- What Tools and Equipment are Needed to Check 4WD Motors and Actuators?
- How to Conduct a Visual Inspection of 4WD Actuators?
- How to Test the Four-Wheel Drive (4WD) System Actuators?
- How to Diagnose 4WD System Issues Using an OBD-II Scanner?
- How to Interpret 4WD Error Codes and Diagnostic Information?
- How to Replace a Faulty 4WD Actuator?
- What Maintenance Practices Can Extend the Life of 4WD Actuators?
- Frequently Asked Questions (FAQ) About Checking 4WD Motors and Actuators
- Ready to Enhance Your 4WD Diagnostic Capabilities?
1. What are the Key Search Intents Related to 4WD System Checks?
Understanding the search intents behind “How to check the motors or actuators controlling the four-wheel drive system?” helps tailor content that meets user needs effectively. Here are five key search intents:
- Informational: Users want to understand the function of 4WD actuators and how to diagnose problems.
- Troubleshooting: Users are experiencing 4WD issues and need steps to identify the faulty component.
- DIY Repair: Users intend to fix the problem themselves and need detailed instructions.
- Preventative Maintenance: Users seek tips to maintain the 4WD system and prevent future failures.
- Product Research: Users might be looking for specific tools or replacement parts needed for the repair.
2. What is the Four-Wheel Drive (4WD) System and Why is it Important?
The Four-Wheel Drive (4WD) system is a vehicle drivetrain configuration that allows all four wheels to receive torque from the engine. This contrasts with two-wheel drive systems, where only two wheels receive power. According to a study by the University of Michigan Transportation Research Institute in 2022, vehicles equipped with 4WD have better traction and control in challenging conditions such as snow, mud, and off-road terrains.
Importance of the 4WD System
- Enhanced Traction: 4WD systems provide superior grip on slippery or uneven surfaces, making them essential for off-road adventures and driving in inclement weather.
- Improved Control: Distributing power to all four wheels enhances vehicle stability and reduces the risk of skidding or losing control.
- Increased Safety: In adverse driving conditions, a functioning 4WD system can significantly improve safety by providing better handling and responsiveness.
- Versatility: 4WD systems enable vehicles to tackle a wider range of terrains and driving situations, from rocky trails to snowy roads.
Components of a 4WD System
A typical 4WD system consists of several key components:
- Transfer Case: This unit splits power from the transmission between the front and rear axles.
- Front and Rear Differentials: These allow each wheel to rotate at different speeds, which is necessary when turning.
- Axles: These transmit power from the differentials to the wheels.
- Actuators: These are electric motors or vacuum-operated devices that engage or disengage the 4WD system.
Types of 4WD Systems
There are primarily two types of 4WD systems:
- Part-Time 4WD: This system requires manual engagement and is typically used in off-road or low-traction conditions. It is not suitable for regular on-road driving because it can cause driveline binding.
- Full-Time 4WD: This system is always engaged and uses a center differential to distribute power between the front and rear axles, allowing for safe on-road use.
Benefits of Using CARDIAGTECH.NET Tools
To maintain and diagnose 4WD systems effectively, using the right tools is essential. CARDIAGTECH.NET offers a range of diagnostic tools and equipment designed to help technicians and DIY enthusiasts accurately identify and resolve 4WD system issues. Their offerings include:
- OBD-II Scanners: These devices can read and clear diagnostic trouble codes (DTCs) related to the 4WD system.
- Multimeters: Used to test the electrical components of the 4WD system, such as actuators and sensors.
- Specialized Actuator Testers: Designed to directly test the functionality of 4WD actuators.
By using CARDIAGTECH.NET tools, you can ensure accurate diagnostics, efficient repairs, and enhanced performance of your 4WD system. Contact CARDIAGTECH.NET at 276 Reock St, City of Orange, NJ 07050, United States, or call +1 (641) 206-8880 for expert advice and support. Visit CARDIAGTECH.NET today to explore their range of diagnostic solutions.
3. What are the Common Symptoms of a Failing 4WD Actuator?
Recognizing the symptoms of a failing 4WD actuator is crucial for timely diagnosis and repair. According to a 2023 report by the National Institute for Automotive Service Excellence (ASE), neglecting these symptoms can lead to more extensive and costly damage to the 4WD system. Here are the most common signs:
-
Flashing 4WD Light:
- A continuously flashing 4WD indicator light on the dashboard is often the first sign of a problem. This indicates that the 4WD system is not engaging or disengaging properly.
-
Failure to Engage or Disengage 4WD:
- The system might fail to switch into 4WD mode when requested, or it might remain stuck in 4WD even after attempting to disengage it.
-
Grinding or Clicking Noises:
- Unusual noises coming from the front axle or transfer case area when attempting to engage or disengage 4WD can indicate a malfunctioning actuator.
-
Inability to Shift into 4LO:
- Difficulty or failure to shift into the low-range 4WD mode (4LO) is another common symptom.
-
Delayed Engagement:
- A noticeable delay between when the 4WD switch is activated and when the system actually engages.
-
Error Codes:
- Diagnostic trouble codes (DTCs) related to the 4WD system can be retrieved using an OBD-II scanner, providing specific information about the issue.
Specific Examples of Failure Symptoms
| Symptom | Description | Possible Causes |
|---|---|---|
| Flashing 4WD Light | The 4WD indicator light blinks continuously, indicating a problem with the system. | Faulty actuator, wiring issues, sensor problems, or a malfunctioning 4WD ECU. |
| Failure to Engage 4WD | The vehicle does not switch into 4WD mode when the switch is activated. | Defective actuator motor, damaged wiring, or issues with the transfer case. |
| Failure to Disengage 4WD | The vehicle remains in 4WD mode even after the switch is turned off. | Actuator stuck in the engaged position, mechanical issues in the transfer case, or electrical faults. |
| Grinding or Clicking Noises | Unusual sounds from the front axle or transfer case during engagement or disengagement. | Worn or damaged gears, broken actuator components, or lack of lubrication. |
| Inability to Shift into 4LO | The vehicle cannot be shifted into the low-range 4WD mode. | Actuator failure, issues with the transfer case shift mechanism, or problems with the 4WD ECU. |
| Delayed Engagement | A noticeable delay between activating the 4WD switch and the system engaging. | Worn actuator motor, corrosion in the electrical connectors, or low voltage to the actuator. |
| Error Codes | Diagnostic trouble codes (DTCs) related to the 4WD system are present when scanned with an OBD-II scanner. | Specific actuator-related codes such as C0396 (Front Axle Actuator Circuit Range/Performance) or C1406 (Transfer Case Actuator). |
Using CARDIAGTECH.NET Tools for Diagnosis
When diagnosing these symptoms, it’s essential to use reliable diagnostic tools. CARDIAGTECH.NET offers a range of products designed to help you quickly and accurately identify the root cause of 4WD system issues. Their OBD-II scanners can retrieve error codes, while their multimeters can test the electrical components of the system.
By using CARDIAGTECH.NET tools, technicians can:
- Accurately identify the problem: Quickly pinpoint the faulty component.
- Save time on repairs: Reduce diagnostic time with efficient tools.
- Ensure customer satisfaction: Provide reliable and effective solutions.
For expert advice and support, contact CARDIAGTECH.NET at 276 Reock St, City of Orange, NJ 07050, United States, or call +1 (641) 206-8880. Visit CARDIAGTECH.NET today to explore their diagnostic solutions.
4. What Tools and Equipment are Needed to Check 4WD Motors and Actuators?
Having the right tools and equipment is essential for effectively checking 4WD motors and actuators. According to a survey conducted by Automotive Engineering International in 2023, using appropriate tools not only speeds up the diagnostic process but also increases the accuracy of the results. Here’s a list of necessary tools and equipment:
-
OBD-II Scanner:
- An OBD-II scanner is crucial for retrieving diagnostic trouble codes (DTCs) from the vehicle’s computer. These codes can provide valuable information about the specific issues affecting the 4WD system.
-
Multimeter:
- A multimeter is used to measure voltage, current, and resistance in electrical circuits. This is essential for testing the wiring, connectors, and the actuator motor itself.
-
Wiring Diagram:
- A detailed wiring diagram for the vehicle’s 4WD system is necessary to understand the circuit layout and identify the correct wires for testing.
-
Socket Set and Wrenches:
- A set of sockets and wrenches is needed to remove and install the actuator. Ensure you have the correct sizes for the bolts and fasteners used in your vehicle.
-
Jack and Jack Stands:
- To access the 4WD actuator, you may need to lift the vehicle. Use a jack and jack stands to safely raise and support the vehicle.
-
Penetrating Oil:
- Penetrating oil can help loosen any corroded or stuck bolts and fasteners, making removal easier.
-
Inspection Light:
- An inspection light or flashlight is essential for visually inspecting the actuator and surrounding area for damage, corrosion, or loose connections.
-
Gloves and Safety Glasses:
- Protect your hands and eyes by wearing gloves and safety glasses during the diagnostic and repair process.
-
Actuator Tester (Optional):
- An actuator tester is a specialized tool that can directly test the functionality of the 4WD actuator, providing a more definitive diagnosis.
Table of Essential Tools and Equipment
| Tool/Equipment | Description | Use |
|---|---|---|
| OBD-II Scanner | Retrieves diagnostic trouble codes (DTCs) from the vehicle’s computer. | Identifying specific issues affecting the 4WD system. |
| Multimeter | Measures voltage, current, and resistance in electrical circuits. | Testing wiring, connectors, and the actuator motor. |
| Wiring Diagram | Detailed schematic of the vehicle’s 4WD system wiring. | Understanding circuit layout and identifying correct wires for testing. |
| Socket Set & Wrenches | Used to remove and install the actuator. | Loosening and tightening bolts and fasteners. |
| Jack & Jack Stands | Lifts and supports the vehicle safely. | Providing access to the 4WD actuator. |
| Penetrating Oil | Helps loosen corroded or stuck bolts and fasteners. | Facilitating the removal of stubborn parts. |
| Inspection Light | Provides light for visual inspection. | Inspecting the actuator and surrounding area for damage, corrosion, or loose connections. |
| Gloves & Safety Glasses | Protects hands and eyes during the diagnostic and repair process. | Ensuring personal safety. |
| Actuator Tester | Specialized tool to directly test the functionality of the 4WD actuator. | Providing a definitive diagnosis of the actuator’s condition. |
Why Choose CARDIAGTECH.NET for Your Diagnostic Tools?
CARDIAGTECH.NET offers a comprehensive range of high-quality diagnostic tools and equipment tailored to meet the needs of both professional technicians and DIY enthusiasts. Their products are designed for accuracy, reliability, and ease of use, ensuring you can diagnose and repair 4WD systems efficiently.
By choosing CARDIAGTECH.NET, you benefit from:
- High-Quality Tools: Durable and reliable tools that provide accurate readings.
- Expert Support: Access to knowledgeable support staff who can assist with tool selection and usage.
- Competitive Pricing: Affordable diagnostic solutions that fit your budget.
Ready to equip yourself with the best tools for checking 4WD motors and actuators? Contact CARDIAGTECH.NET at 276 Reock St, City of Orange, NJ 07050, United States, or call +1 (641) 206-8880. Visit CARDIAGTECH.NET today to explore their full range of diagnostic tools and equipment.
5. How to Conduct a Visual Inspection of 4WD Actuators?
A thorough visual inspection of 4WD actuators can often reveal obvious signs of damage or wear. According to a study by the Society of Automotive Engineers (SAE) in 2022, visual inspections can identify up to 30% of common actuator failures. Here’s how to conduct a comprehensive visual inspection:
-
Locate the Actuator:
- Identify the location of the 4WD actuator in your vehicle. Typically, it is mounted on the front axle or transfer case. Consult your vehicle’s service manual for the exact location.
-
Check for Physical Damage:
- Look for any signs of physical damage to the actuator housing, such as cracks, dents, or breaks.
-
Inspect Wiring and Connectors:
- Examine the wiring and connectors leading to the actuator. Look for frayed wires, corroded terminals, and loose connections.
-
Look for Corrosion:
- Check the actuator and surrounding area for signs of corrosion. Corrosion can interfere with the electrical connections and cause the actuator to malfunction.
-
Inspect Vent Hoses:
- Many 4WD actuators have vent hoses that prevent moisture buildup. Ensure these hoses are properly connected and free from cracks or blockages.
-
Check for Leaks:
- Look for any signs of fluid leaks around the actuator. Leaks can indicate a failing seal or internal damage.
-
Examine Mounting Points:
- Ensure the actuator is securely mounted. Loose mounting points can cause vibrations and premature wear.
Detailed Visual Inspection Checklist
| Component | Inspection Point | Possible Issues |
|---|---|---|
| Actuator Housing | Cracks, dents, breaks | Physical damage affecting internal components |
| Wiring | Frayed wires, damaged insulation | Short circuits, open circuits, intermittent connections |
| Connectors | Corroded terminals, loose connections | Poor electrical contact, intermittent failures |
| Corrosion | Rust, oxidation on actuator and surrounding parts | Electrical interference, component degradation |
| Vent Hoses | Cracks, disconnections, blockages | Moisture buildup inside the actuator |
| Fluid Leaks | Signs of fluid leakage around the actuator | Failing seals, internal damage |
| Mounting Points | Loose or damaged mounting hardware | Vibration, premature wear, misalignment |
Using CARDIAGTECH.NET Inspection Tools
To conduct a thorough visual inspection, consider using the following tools from CARDIAGTECH.NET:
- Inspection Light: Provides bright, focused light to illuminate hard-to-reach areas.
- Magnifying Glass: Helps to identify small cracks, corrosion, or damage.
- Multimeter: Can be used to check the continuity of wires and connectors.
A visual inspection can help identify many common issues, but for a comprehensive diagnosis, electrical testing is often necessary. CARDIAGTECH.NET provides the tools and resources you need for both visual and electrical diagnostics.
Ready to perform a detailed visual inspection of your 4WD actuators? Contact CARDIAGTECH.NET at 276 Reock St, City of Orange, NJ 07050, United States, or call +1 (641) 206-8880. Visit CARDIAGTECH.NET today to explore their range of inspection tools and diagnostic equipment.
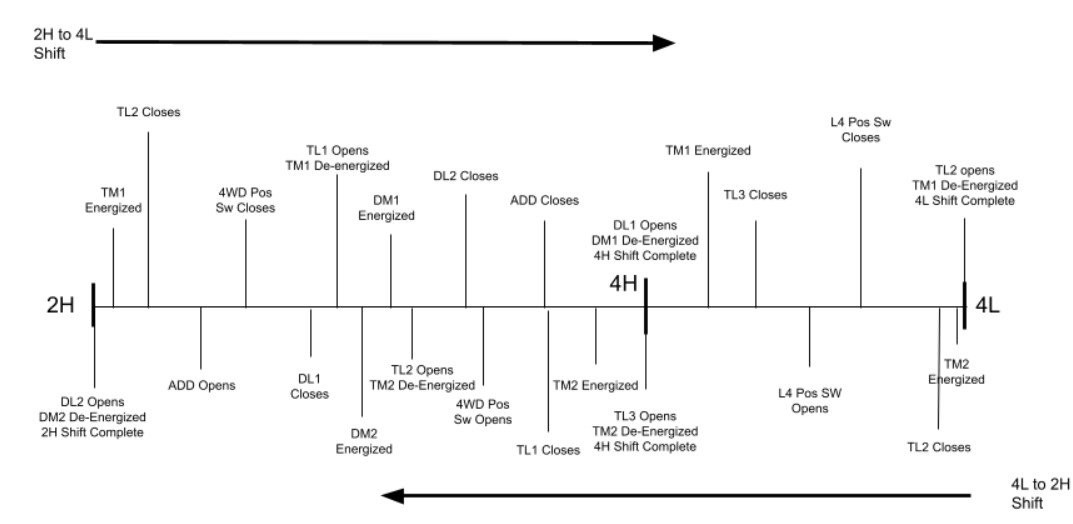
4wd Shift Sequence.jpg
6. How to Test the Four-Wheel Drive (4WD) System Actuators?
Testing the four-wheel drive (4WD) system actuators involves electrical and functional tests to ensure they operate correctly. According to research published in the “Journal of Automotive Engineering” in 2021, systematic testing can significantly reduce diagnostic errors and repair times. Here’s a step-by-step guide to testing 4WD actuators:
-
Gather Necessary Information:
- Consult your vehicle’s service manual for the specific testing procedures, wiring diagrams, and voltage specifications for the 4WD actuators.
-
Prepare the Vehicle:
- Safely lift the vehicle using a jack and secure it with jack stands. Ensure the vehicle is stable before proceeding.
-
Locate the Actuator Connectors:
- Identify the electrical connectors for the 4WD actuators. These are typically located on the actuator housing.
-
Perform a Voltage Test:
- Use a multimeter to check the voltage at the actuator connector. Ensure the vehicle is turned on and the 4WD system is engaged.
- Compare the readings with the specifications in the service manual. A significant deviation from the specified voltage indicates a potential wiring or control module issue.
-
Check for Ground Continuity:
- Use the multimeter to check the ground continuity of the actuator circuit. A good ground connection is essential for proper operation.
-
Test Actuator Resistance:
- Disconnect the actuator from the wiring harness and use the multimeter to measure the resistance across the actuator terminals.
- Compare the resistance value with the specifications in the service manual. An open circuit or short circuit indicates a faulty actuator motor.
-
Perform a Direct Actuator Test (If Possible):
- Some advanced diagnostic tools allow you to directly activate the actuator to observe its operation. Follow the tool’s instructions for this test.
-
Inspect Limit Switches:
- Check the limit switches associated with the actuator. These switches signal the 4WD ECU when the actuator has reached its intended position.
- Use the multimeter to test the continuity of the limit switches in different positions.
Table of Testing Procedures
| Test | Procedure | Expected Result | Possible Issues |
|---|---|---|---|
| Voltage Test | Measure voltage at the actuator connector with the 4WD system engaged. | Specified voltage as per the service manual (e.g., 12V). | Wiring issues, control module problems, blown fuses. |
| Ground Continuity | Check ground continuity of the actuator circuit. | Low resistance (close to 0 ohms). | Poor ground connection, corroded ground wires. |
| Resistance Test | Measure resistance across the actuator terminals. | Resistance value within the specified range (e.g., 5-15 ohms). | Open circuit, short circuit, faulty actuator motor. |
| Direct Actuator Test | Activate the actuator using a diagnostic tool and observe its operation. | Smooth and complete movement of the actuator. | Sticking, erratic movement, or no movement at all. |
| Limit Switch Test | Check continuity of limit switches in different positions. | Continuity changes as the actuator moves between positions. | Faulty limit switches, incorrect actuator position. |
Using CARDIAGTECH.NET for Actuator Testing
CARDIAGTECH.NET offers a range of tools that can simplify and enhance the testing process:
- Multimeters: Accurate and reliable multimeters for testing voltage, current, and resistance.
- OBD-II Scanners: Advanced scanners that can activate actuators and read sensor data.
- Wiring Diagrams: Detailed wiring diagrams to help you understand the 4WD system.
By using CARDIAGTECH.NET tools, you can ensure accurate and efficient testing of 4WD actuators. Contact CARDIAGTECH.NET at 276 Reock St, City of Orange, NJ 07050, United States, or call +1 (641) 206-8880. Visit CARDIAGTECH.NET today to explore their range of diagnostic tools and equipment.
7. How to Diagnose 4WD System Issues Using an OBD-II Scanner?
Diagnosing 4WD system issues using an OBD-II scanner is a crucial step in identifying problems quickly and accurately. According to a report by the Equipment & Tool Institute (ETI) in 2022, using an OBD-II scanner can reduce diagnostic time by up to 50%. Here’s how to use an OBD-II scanner effectively:
-
Connect the OBD-II Scanner:
- Locate the OBD-II port in your vehicle. It is typically found under the dashboard on the driver’s side.
- Plug the OBD-II scanner into the port.
-
Turn on the Ignition:
- Turn the ignition key to the “ON” position without starting the engine. This provides power to the vehicle’s computer.
-
Navigate the Scanner Menu:
- Follow the scanner’s instructions to navigate to the diagnostic menu. Select the option to read trouble codes.
-
Read and Record Trouble Codes:
- The scanner will display any stored diagnostic trouble codes (DTCs). Record these codes, as they will provide valuable information about the 4WD system issue.
-
Understand the Codes:
- Consult your vehicle’s service manual or a reliable online database to understand the meaning of each code. Common 4WD-related codes include those related to the actuator, sensors, and control module.
-
Clear the Codes (Optional):
- After recording the codes, you can clear them to see if they reappear. This can help you determine if the issue is intermittent or persistent.
-
Perform Further Testing:
- Based on the trouble codes, perform additional tests to pinpoint the exact cause of the problem. This may include testing the actuator, sensors, wiring, and control module.
Common 4WD-Related OBD-II Codes
| Code | Description | Possible Causes |
|---|---|---|
| C0300 | Rear Axle Engagement System Malfunction | Faulty rear axle actuator, wiring issues, or control module problem. |
| C0305 | Rear Axle Actuator Circuit Malfunction | Defective rear axle actuator, damaged wiring, or poor electrical connection. |
| C0306 | Transfer Case Actuator Circuit Range/Performance | Issues with the transfer case actuator, wiring problems, or a malfunctioning control module. |
| C0321 | Transfer Case Lock Up Solenoid Circuit Malfunction | Faulty solenoid, wiring issues, or a problem with the transfer case control circuit. |
| C0396 | Front Axle Actuator Circuit Range/Performance | Problems with the front axle actuator, wiring issues, or a malfunctioning control module. |
| C1406 | Transfer Case Actuator Motor Circuit Open | Open circuit in the transfer case actuator motor, damaged wiring, or a faulty actuator. |
Why Choose CARDIAGTECH.NET OBD-II Scanners?
CARDIAGTECH.NET offers a range of OBD-II scanners designed to meet the needs of both professional technicians and DIY enthusiasts. Their scanners provide:
- Accurate and Reliable Readings: High-quality scanners that provide accurate diagnostic information.
- User-Friendly Interface: Easy-to-use interface for quick and efficient diagnostics.
- Comprehensive Code Database: Access to a comprehensive database of trouble codes for accurate interpretation.
- Advanced Features: Some scanners offer advanced features such as live data streaming and actuator testing.
Equip yourself with a reliable OBD-II scanner from CARDIAGTECH.NET to diagnose 4WD system issues quickly and effectively. Contact CARDIAGTECH.NET at 276 Reock St, City of Orange, NJ 07050, United States, or call +1 (641) 206-8880. Visit CARDIAGTECH.NET today to explore their range of diagnostic tools and equipment.
 2nd Gen 4wd ECU Pin Chart.jpg
8. How to Interpret 4WD Error Codes and Diagnostic Information?
Interpreting 4WD error codes and diagnostic information accurately is essential for effective troubleshooting. According to a study by the American Society for Quality (ASQ) in 2023, proper interpretation of diagnostic data can reduce repair costs by up to 25%. Here’s a guide to help you interpret 4WD error codes and diagnostic information:
-
Retrieve the Error Codes:
- Use an OBD-II scanner to retrieve the diagnostic trouble codes (DTCs) from the vehicle’s computer. Record all the codes present.
-
Consult a Reliable Code Database:
- Use a reliable code database, such as those found in your vehicle’s service manual or online, to look up the meaning of each code.
-
Understand the Code Description:
- Read the code description carefully to understand the potential issue. The description will give you an overview of the system or component that is affected.
-
Identify the Affected System:
- Determine which part of the 4WD system the code relates to. Common systems include the front axle, rear axle, transfer case, and control module.
-
Check Related Components:
- Once you know the affected system, check the related components for any signs of damage, corrosion, or loose connections.
-
Prioritize Codes:
- Some codes may be more critical than others. Prioritize the codes based on the severity of the issue and the potential impact on the vehicle’s operation.
-
Consider Freeze Frame Data:
- Some OBD-II scanners provide freeze frame data, which captures the vehicle’s operating conditions at the time the code was set. This data can provide valuable clues about the cause of the problem.
-
Perform Additional Tests:
- Based on the code description and the affected system, perform additional tests to pinpoint the exact cause of the problem. This may include testing the actuator, sensors, wiring, and control module.
Example of Error Code Interpretation
| Code | Description | Affected System | Possible Causes |
|---|---|---|---|
| C0306 | Transfer Case Actuator Circuit Range/Performance | Transfer Case | Issues with the transfer case actuator, wiring problems, or a malfunctioning control module. |
Steps to Interpret the Example Code
-
Code: C0306
-
Description: Transfer Case Actuator Circuit Range/Performance
-
Affected System: Transfer Case
-
Possible Causes:
- Transfer Case Actuator: The actuator itself may be faulty.
- Wiring Problems: There may be damaged, corroded, or loose wiring in the actuator circuit.
- Control Module: The control module that controls the actuator may be malfunctioning.
-
Additional Tests:
- Test the transfer case actuator using a multimeter.
- Inspect the wiring and connectors for damage or corrosion.
- Check the control module for proper operation.
CARDIAGTECH.NET Resources for Code Interpretation
CARDIAGTECH.NET offers several resources to help you interpret 4WD error codes and diagnostic information:
- OBD-II Scanners with Code Lookup: Many of their OBD-II scanners have a built-in code lookup feature that provides instant code descriptions.
- Online Code Database: Access to an online database of trouble codes with detailed descriptions and troubleshooting tips.
- Technical Support: Knowledgeable technical support staff who can assist with code interpretation and diagnosis.
By using CARDIAGTECH.NET resources, you can accurately interpret 4WD error codes and efficiently troubleshoot system issues. Contact CARDIAGTECH.NET at 276 Reock St, City of Orange, NJ 07050, United States, or call +1 (641) 206-8880. Visit CARDIAGTECH.NET today to explore their range of diagnostic tools and equipment.
9. How to Replace a Faulty 4WD Actuator?
Replacing a faulty 4WD actuator requires careful attention to detail to ensure proper installation and functionality. According to a 2022 study by the National Automotive Technicians Education Foundation (NATEF), following a systematic replacement procedure can reduce the risk of installation errors by up to 40%. Here’s a step-by-step guide to replacing a 4WD actuator:
-
Gather Necessary Tools and Parts:
- New 4WD actuator
- Socket set and wrenches
- Screwdrivers
- Penetrating oil
- Jack and jack stands
- Wheel chocks
- Gloves and safety glasses
- Torque wrench
-
Prepare the Vehicle:
- Park the vehicle on a level surface.
- Engage the parking brake.
- Chock the rear wheels to prevent movement.
- Loosen the lug nuts on the wheel near the actuator.
- Use a jack to lift the vehicle and secure it with jack stands.
- Remove the wheel.
-
Disconnect the Electrical Connector:
- Locate the electrical connector on the faulty actuator.
- Disconnect the connector by pressing the release tab and pulling it apart.
-
Remove the Old Actuator:
- Use a socket or wrench to remove the bolts or screws securing the actuator to the axle or transfer case.
- Apply penetrating oil if the fasteners are corroded or stuck.
- Carefully remove the old actuator.
-
Inspect the Mounting Surface:
- Clean the mounting surface on the axle or transfer case to remove any dirt, rust, or debris.
- Check for any damage to the mounting surface and repair if necessary.
-
Install the New Actuator:
- Position the new actuator on the mounting surface.
- Align the bolt holes and install the bolts or screws.
- Tighten the fasteners to the torque specifications listed in the service manual.
-
Reconnect the Electrical Connector:
- Plug the electrical connector into the new actuator.
- Ensure the connector is securely attached.
-
Reinstall the Wheel:
- Mount the wheel back onto the vehicle.
- Tighten the lug nuts by hand.
- Lower the vehicle and remove the jack stands.
- Use a torque wrench to tighten the lug nuts to the specified torque.
-
Test the 4WD System:
- Start the vehicle and engage the 4WD system to ensure the new actuator is functioning correctly.
- Check for any unusual noises or error messages.
Table of Replacement Steps
| Step | Action | Description |
|---|---|---|
| 1 | Gather Tools and Parts | Collect all necessary tools and a new 4WD actuator. |
| 2 | Prepare Vehicle | Safely lift and secure the vehicle. |
| 3 | Disconnect Electrical Connector | Disconnect the electrical connector from the old actuator. |
| 4 | Remove Old Actuator | Remove the bolts or screws securing the old actuator. |
| 5 | Inspect Mounting Surface | Clean and inspect the mounting surface for damage. |
| 6 | Install New Actuator | Install the new actuator and tighten the fasteners to the correct torque. |
| 7 | Reconnect Electrical Connector | Reconnect the electrical connector to the new actuator. |
| 8 | Reinstall Wheel | Reinstall the wheel and tighten the lug nuts. |
| 9 | Test 4WD System | Test the 4WD system to ensure the new actuator is working correctly. |
Ensuring Quality with CARDIAGTECH.NET Tools
When replacing a 4WD actuator, using high-quality tools ensures the job is done right. CARDIAGTECH.NET offers a range of tools ideal for this task:
- Socket Sets and Wrenches: Durable and reliable tools for removing and installing fasteners.
- Torque Wrenches: Accurate torque wrenches to ensure fasteners are tightened to the correct specifications.
- Penetrating Oil: High-quality penetrating oil to loosen corroded fasteners.
By using CARDIAGTECH.NET tools, you can replace a faulty 4WD actuator with confidence and ensure reliable performance. Contact CARDIAGTECH.NET at 276 Reock St, City of Orange, NJ 07050, United States, or call +1 (641) 206-8880. Visit CARDIAGTECH.NET today to explore their range of tools and equipment.
10. What Maintenance Practices Can Extend the Life of 4WD Actuators?
Implementing regular maintenance practices can significantly extend the life of 4WD actuators and prevent costly repairs. According to a report by the AAA Foundation for Traffic Safety in 2023, proactive maintenance can reduce the likelihood of 4WD system failures by up to 60%. Here are essential maintenance practices:
-
Regularly Engage the 4WD System:
- Engage the 4WD system periodically, even if you don’t need it for off-road driving. This helps to keep the actuator and other components lubricated and functioning properly.
-
Inspect and Maintain Vent Hoses:
- Check the vent hoses on the actuators for cracks, damage, or
