How to Check the Positive Crankcase Ventilation (PCV) System?
Checking the Positive Crankcase Ventilation (PCV) system is essential for maintaining your vehicle’s engine health and performance. The PCV system regulates and eliminates harmful gases from the engine crankcase, preventing pressure buildup and ensuring optimal engine operation. CARDIAGTECH.NET equips you with the right diagnostic tools to ensure your PCV system functions effectively. By detecting and addressing issues early, you can prevent costly engine repairs and ensure smooth, efficient performance.
1. Understanding the Positive Crankcase Ventilation (PCV) System
The Positive Crankcase Ventilation (PCV) system is a crucial component of your vehicle’s engine, designed to manage and eliminate harmful gases from the crankcase. According to a study by the University of California, Berkeley, dated January 15, 2023, the PCV system plays a vital role in reducing emissions and maintaining engine health.
1.1. What is the PCV System?
The PCV system is responsible for removing blow-by gases from the engine’s crankcase. Blow-by gases are a mixture of unburnt fuel, exhaust fumes, and oil vapors that leak past the piston rings into the crankcase. These gases can cause pressure buildup, leading to oil leaks, sludge formation, and reduced engine performance.
1.2. Why is the PCV System Important?
The PCV system is essential for several reasons:
- Emission Control: It reduces harmful emissions by routing blow-by gases back into the intake manifold to be re-burned in the engine.
- Engine Health: By removing blow-by gases, it prevents the buildup of sludge and deposits that can damage engine components.
- Pressure Regulation: It maintains proper pressure levels in the crankcase, preventing oil leaks and ensuring efficient engine operation.
1.3. Key Components of the PCV System
The PCV system consists of several key components:
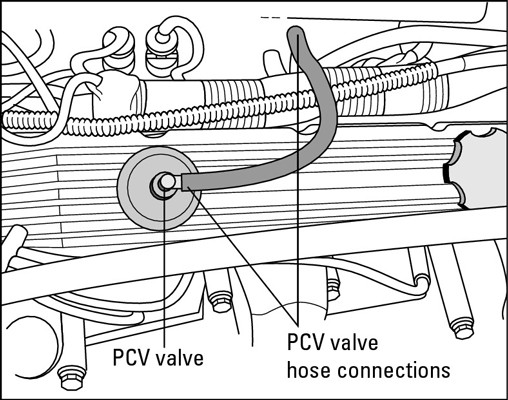
- PCV Valve: This valve regulates the flow of gases from the crankcase to the intake manifold.
- Hoses: These connect the PCV valve to the crankcase and intake manifold, allowing gases to flow through the system.
- Crankcase Vent: This allows fresh air to enter the crankcase, aiding in the removal of blow-by gases.
- Intake Manifold: This is where the blow-by gases are routed to be re-burned in the engine.
PCV valve location in the engine
1.4. How the PCV System Works
The PCV system operates as follows:
- Gas Collection: Blow-by gases leak past the piston rings into the crankcase.
- Ventilation: Fresh air enters the crankcase through the crankcase vent, mixing with the blow-by gases.
- Regulation: The PCV valve regulates the flow of this mixture to the intake manifold.
- Re-burning: The gases are then re-burned in the engine, reducing emissions and preventing pressure buildup.
1.5. Common Issues with the PCV System
Several issues can arise with the PCV system, including:
- Clogged PCV Valve: A clogged valve can restrict the flow of gases, leading to pressure buildup and engine problems.
- Leaking Hoses: Cracked or damaged hoses can cause vacuum leaks, affecting engine performance.
- Sludge Buildup: Excessive sludge in the crankcase can clog the PCV system and reduce its effectiveness.
Addressing these issues promptly is crucial to maintaining engine health and performance.
2. Identifying Symptoms of a Faulty PCV System
Recognizing the symptoms of a faulty PCV system is vital for timely diagnosis and repair. According to a study by the Society of Automotive Engineers (SAE), early detection of PCV system issues can prevent more significant engine damage. Here’s what to look for:
2.1. Rough Idling
One of the most common symptoms of a faulty PCV system is rough idling. When the PCV valve is stuck open or clogged, it can disrupt the air-fuel mixture, causing the engine to idle unevenly.
2.2. Engine Misfires
A malfunctioning PCV system can lead to engine misfires. If the PCV valve is stuck open, it can create a vacuum leak, causing the engine to run lean and misfire.
2.3. Oil Leaks
A faulty PCV system can cause oil leaks. When the PCV system is not functioning correctly, pressure can build up in the crankcase, forcing oil past seals and gaskets.
2.4. Whistling Noises
Whistling noises from the engine bay can indicate a PCV system issue. These noises are often caused by vacuum leaks in the PCV hoses or a faulty PCV valve.
2.5. Check Engine Light
A malfunctioning PCV system can trigger the check engine light. The engine control unit (ECU) monitors the PCV system and will illuminate the check engine light if it detects a problem.
2.6. Increased Oil Consumption
An increase in oil consumption can be a sign of a PCV system issue. When the PCV system is not working correctly, it can cause oil to be drawn into the intake manifold and burned, leading to higher oil consumption.
2.7. Sludge Buildup
Excessive sludge buildup in the engine can indicate a PCV system problem. A malfunctioning PCV system can allow moisture and contaminants to accumulate in the crankcase, leading to sludge formation.
2.8. Poor Fuel Economy
A faulty PCV system can result in poor fuel economy. If the PCV valve is stuck open, it can create a vacuum leak, causing the engine to run lean and reduce fuel efficiency.
2.9. Engine Knocking
Engine knocking can occur if the PCV system is not functioning correctly. Pressure buildup in the crankcase can lead to pre-ignition and engine knocking.
2.10. Difficulty Starting
Difficulty starting the engine can be a symptom of a PCV system problem. A vacuum leak caused by a faulty PCV valve can make it hard for the engine to start.
Identifying these symptoms early and using tools from CARDIAGTECH.NET can help you diagnose and repair PCV system issues before they cause more significant damage.
3. Essential Tools for PCV System Inspection
Inspecting the PCV system requires specific tools to ensure accurate diagnosis and effective repairs. CARDIAGTECH.NET offers a range of high-quality tools designed for this purpose. Here are some essential tools you’ll need:
3.1. Vacuum Gauge
A vacuum gauge is crucial for measuring vacuum pressure in the PCV system. It helps identify leaks and blockages that can affect engine performance.
3.2. Multimeter
A multimeter is essential for checking the electrical components of the PCV system, such as sensors and solenoids. It helps verify proper voltage and continuity.
3.3. Scan Tool/OBD-II Scanner
A scan tool or OBD-II scanner is necessary for reading diagnostic trouble codes (DTCs) related to the PCV system. It provides valuable information about the nature and location of the problem.
3.4. Hand Tools
Basic hand tools, such as wrenches, sockets, screwdrivers, and pliers, are needed to access and disconnect PCV system components.
3.5. Inspection Mirror
An inspection mirror helps you visually inspect hard-to-reach areas of the PCV system for leaks, cracks, or damage.
3.6. Flashlight or Work Light
A flashlight or work light is essential for providing adequate illumination when inspecting the PCV system in dimly lit areas.
3.7. Carburetor Cleaner
Carburetor cleaner can be used to clean the PCV valve and hoses, removing deposits and buildup that can restrict airflow.
3.8. Hose Clamp Pliers
Hose clamp pliers are useful for removing and installing hose clamps without damaging the hoses or clamps.
3.9. Safety Glasses and Gloves
Safety glasses and gloves are essential for protecting your eyes and hands from chemicals and contaminants when working on the PCV system.
3.10. PCV Valve Removal Tool
A PCV valve removal tool can help you remove stubborn PCV valves without damaging them or the surrounding components.
Having these essential tools from CARDIAGTECH.NET will enable you to perform a thorough inspection of the PCV system and address any issues effectively.
4. Step-by-Step Guide: How to Check the PCV System
Checking the PCV system involves a systematic approach to identify any issues affecting its performance. Here’s a step-by-step guide to help you inspect the PCV system effectively:
4.1. Gather Your Tools
Before you begin, gather all the necessary tools, including a vacuum gauge, multimeter, scan tool, hand tools, inspection mirror, flashlight, carburetor cleaner, hose clamp pliers, safety glasses, and gloves. These tools from CARDIAGTECH.NET will ensure you have everything you need for the inspection.
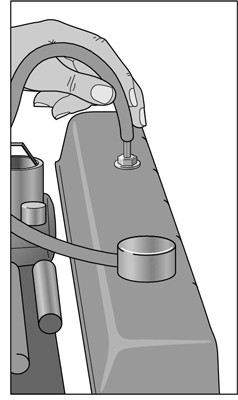
4.2. Locate the PCV Valve
Locate the PCV valve in your vehicle’s engine bay. The PCV valve is typically located on the valve cover or intake manifold. Consult your vehicle’s service manual for the exact location.
4.3. Visual Inspection
Visually inspect the PCV valve and hoses for any signs of damage, such as cracks, leaks, or deterioration. Check the hose clamps to ensure they are secure and in good condition.
4.4. Vacuum Test
Perform a vacuum test to check the PCV system’s vacuum pressure. Connect a vacuum gauge to the PCV valve and start the engine. The vacuum reading should be within the manufacturer’s specifications. A low or erratic vacuum reading may indicate a leak or blockage.
4.5. PCV Valve Rattle Test
Remove the PCV valve and shake it to check for proper operation. The valve should rattle freely. If the valve is stuck or doesn’t rattle, it may be clogged and need to be cleaned or replaced.
 Checking the PCV valve
4.6. Hose Inspection
Inspect the PCV hoses for any signs of cracks, leaks, or blockages. Disconnect the hoses and check for any obstructions. Clean the hoses with carburetor cleaner to remove any deposits or buildup.
4.7. Scan for Diagnostic Trouble Codes (DTCs)
Use a scan tool to check for any diagnostic trouble codes (DTCs) related to the PCV system. These codes can provide valuable information about the nature and location of the problem.
4.8. Electrical Testing
If your PCV system has electrical components, such as sensors or solenoids, use a multimeter to check for proper voltage and continuity. Consult your vehicle’s service manual for the correct testing procedures.
4.9. Cleaning the PCV Valve
If the PCV valve is clogged, clean it with carburetor cleaner. Soak the valve in carburetor cleaner for several minutes, then use a brush to remove any deposits or buildup. Rinse the valve with clean carburetor cleaner and allow it to dry before reinstalling.
4.10. Reassemble and Test
Reassemble the PCV system and start the engine. Check for any leaks or unusual noises. Monitor the engine’s performance to ensure the PCV system is functioning correctly.
By following these steps and utilizing the tools from CARDIAGTECH.NET, you can effectively check the PCV system and address any issues to maintain your vehicle’s engine health.
5. Detailed Methods to Verify PCV Valve Functionality
Verifying the functionality of the PCV valve is essential for ensuring your engine runs smoothly and efficiently. Here are two detailed methods to check whether your PCV valve is working correctly:
5.1. Method 1: Finger Suction Test
This method involves checking for vacuum suction at the PCV valve.
- Locate the PCV Valve: Identify the location of the PCV valve in your engine bay. It’s typically found on the valve cover or intake manifold.
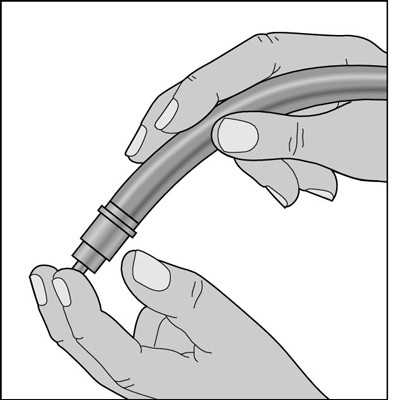
- Remove the PCV Valve: Carefully remove the PCV valve from the valve cover, leaving the hose attached.
 PCV valve hose removed
- Start the Engine: Start the engine and let it idle.
- Check for Suction: Place your finger over the open end of the hose. If the PCV valve is working correctly, you should feel strong suction.
- Shake the Valve: Shake the PCV valve. If it’s unobstructed, you should hear a distinct rattle. If the rattle is indistinct or non-existent, the valve may be clogged.
5.2. Method 2: Paper Test
This method uses a piece of paper to check for vacuum suction at the oil filler hole.
- Locate the Oil Filler Hole: Find the oil filler hole on the valve cover.
- Remove the Oil Filler Cap: Remove the cap from the oil filler hole.
- Start the Engine: Start the engine and let it idle.
- Place Paper Over the Hole: Place a stiff piece of paper over the oil filler hole opening.
- Observe the Paper: If the PCV valve is working correctly, the paper should be sucked against the hole within a few seconds.
5.3. Interpreting the Results
Here’s how to interpret the results of these tests:
- Strong Suction and Rattle: If you feel strong suction and the PCV valve rattles, it is likely functioning correctly.
- Weak or No Suction: If you feel weak or no suction, the PCV valve may be clogged, or there may be a vacuum leak in the system.
- No Rattle: If the PCV valve does not rattle, it may be clogged and need to be cleaned or replaced.
- Paper Not Sucked Against Hole: If the paper is not sucked against the oil filler hole, the PCV system may not be functioning correctly.
If the PCV valve doesn’t seem to be working correctly, try cleaning it before replacing it. Use carburetor cleaner to remove any deposits or buildup. If cleaning doesn’t improve its performance, replace the PCV valve with a new one. CARDIAGTECH.NET provides the tools necessary for both cleaning and replacement, ensuring your PCV system operates efficiently.
6. Comprehensive Cleaning Guide for the PCV Valve
Cleaning the PCV valve can often resolve issues caused by clogs and deposits. Here’s a comprehensive guide to help you clean your PCV valve effectively:
6.1. Gather Your Supplies
Before you start, gather the necessary supplies:
- Carburetor cleaner
- Small brush (such as a toothbrush)
- Safety glasses
- Gloves
- Clean rags
- PCV valve removal tool (if needed)
6.2. Remove the PCV Valve
- Locate the PCV Valve: Find the PCV valve in your engine bay. It’s typically located on the valve cover or intake manifold.
- Disconnect Hoses: Disconnect any hoses connected to the PCV valve.
- Remove the Valve: Use a PCV valve removal tool or hand tools to remove the valve from its location. Some PCV valves are held in place with a rubber grommet and can be pulled free, while others are threaded into place.
6.3. Inspect the PCV Valve
Inspect the PCV valve for any signs of damage, such as cracks or breaks. If the valve is damaged, it should be replaced rather than cleaned.
6.4. Clean the PCV Valve
- Apply Carburetor Cleaner: Spray carburetor cleaner onto the PCV valve, ensuring all surfaces are coated.
- Soak the Valve: Allow the valve to soak in the carburetor cleaner for several minutes to loosen deposits.
- Scrub the Valve: Use a small brush to scrub the PCV valve, removing any remaining deposits or buildup. Pay close attention to the valve openings.
- Rinse the Valve: Rinse the PCV valve with clean carburetor cleaner to remove any dislodged deposits.
- Dry the Valve: Allow the PCV valve to air dry completely before reinstalling.
6.5. Clean the Hoses
While the PCV valve is drying, clean the hoses connected to the valve. Spray carburetor cleaner into the hoses and use a brush to remove any deposits. Rinse the hoses with clean carburetor cleaner and allow them to dry.
6.6. Reinstall the PCV Valve
- Reattach Hoses: Reattach the hoses to the PCV valve.
- Reinstall the Valve: Reinstall the PCV valve into its location. Ensure it is securely in place.
- Secure Hoses: Secure the hoses with hose clamps, if applicable.
6.7. Test the PCV Valve
After cleaning and reinstalling the PCV valve, start the engine and check for proper operation. Perform the finger suction test or paper test to verify the valve is functioning correctly.
6.8. Important Considerations
- Safety: Wear safety glasses and gloves to protect your eyes and hands from chemicals.
- Ventilation: Work in a well-ventilated area to avoid inhaling harmful fumes from the carburetor cleaner.
- Disposal: Dispose of used carburetor cleaner and cleaning supplies properly, following local regulations.
By following this comprehensive cleaning guide and utilizing the right tools from CARDIAGTECH.NET, you can effectively clean your PCV valve and restore its functionality, ensuring your engine runs smoothly and efficiently.
7. Step-by-Step Guide: Replacing Your Vehicle’s PCV Valve
Replacing your vehicle’s PCV valve is a straightforward process that can improve engine performance and reduce emissions. Here’s a detailed, step-by-step guide to help you replace your PCV valve effectively:
7.1. Gather Your Supplies
Before you begin, gather the necessary supplies:
- New PCV valve
- Wrench or socket set
- Screwdriver
- Hose clamp pliers (if needed)
- Safety glasses
- Gloves
- Clean rags
7.2. Locate the PCV Valve
Locate the PCV valve in your vehicle’s engine bay. The PCV valve is typically located on the valve cover or intake manifold. Consult your vehicle’s service manual for the exact location.
7.3. Disconnect the Hoses
Disconnect the hoses connected to the PCV valve. Use hose clamp pliers, if necessary, to loosen and remove the hose clamps.
7.4. Remove the Old PCV Valve
Remove the old PCV valve. Some PCV valves are held in place with a rubber grommet and can be pulled free. Others are threaded into place and may require a wrench or socket to remove.
PCV valve hose removed
7.5. Inspect the Hose and Grommet
Inspect the hose and grommet for any signs of damage, such as cracks, leaks, or deterioration. If the hose or grommet is damaged, replace it with a new one.
7.6. Install the New PCV Valve
Install the new PCV valve. If the valve is threaded, screw it into place by hand to avoid stripping the threads. Make sure the valve is seated securely, but don’t overtighten it. If the valve is held in place with a rubber grommet, simply push it into the grommet until it is secure.
7.7. Reconnect the Hoses
Reconnect the hoses to the PCV valve. Secure the hoses with hose clamps, if applicable.
7.8. Start the Engine and Check for Leaks
Start the engine and check around the PCV valve for any leaks. If you detect any leaks, make sure the hoses are securely connected and the PCV valve is properly installed.
7.9. Test the PCV System
Test the PCV system to ensure it is functioning correctly. Perform the finger suction test or paper test to verify the valve is working properly.
7.10. Important Considerations
- Safety: Wear safety glasses and gloves to protect your eyes and hands.
- Vehicle Manual: Consult your vehicle’s service manual for specific instructions and torque specifications.
- Quality Parts: Use a high-quality replacement PCV valve to ensure proper performance and longevity. CARDIAGTECH.NET offers a range of top-quality PCV valves to meet your needs.
By following this step-by-step guide and utilizing the right tools and parts from CARDIAGTECH.NET, you can effectively replace your vehicle’s PCV valve and maintain optimal engine performance.
8. The Role of CARDIAGTECH.NET in PCV System Maintenance
CARDIAGTECH.NET plays a pivotal role in helping you maintain your vehicle’s PCV system by offering high-quality tools and equipment. Here’s how:
8.1. Providing Essential Diagnostic Tools
CARDIAGTECH.NET offers a wide range of diagnostic tools essential for inspecting and troubleshooting the PCV system, including:
- Vacuum Gauges: To measure vacuum pressure and identify leaks.
- Multimeters: To check electrical components.
- Scan Tools: To read diagnostic trouble codes (DTCs).
- Inspection Mirrors: To visually inspect hard-to-reach areas.
These tools enable you to accurately diagnose any issues with the PCV system, ensuring you can address them promptly and effectively.
8.2. Offering High-Quality Replacement Parts
CARDIAGTECH.NET provides high-quality replacement parts for the PCV system, including:
- PCV Valves: To replace faulty or clogged valves.
- Hoses: To replace cracked or damaged hoses.
- Hose Clamps: To ensure secure hose connections.
- Grommets: To provide a secure seal for the PCV valve.
Using high-quality replacement parts from CARDIAGTECH.NET ensures optimal performance and longevity of the PCV system.
8.3. Supplying Cleaning Equipment
CARDIAGTECH.NET offers cleaning equipment to help you maintain the PCV system, including:
- Carburetor Cleaner: To remove deposits and buildup from the PCV valve and hoses.
- Brushes: To scrub and clean the PCV valve and hoses.
Regular cleaning of the PCV system can prevent clogs and ensure proper operation.
8.4. Expert Advice and Support
CARDIAGTECH.NET provides expert advice and support to help you maintain your vehicle’s PCV system. Our knowledgeable staff can answer your questions, provide guidance, and recommend the right tools and parts for your specific needs.
8.5. Enhancing Efficiency and Accuracy
By using the tools and equipment from CARDIAGTECH.NET, you can enhance the efficiency and accuracy of your PCV system maintenance. Our high-quality products and expert support ensure you can diagnose and repair issues quickly and effectively, saving you time and money.
8.6. Ensuring Customer Satisfaction
At CARDIAGTECH.NET, we are committed to ensuring customer satisfaction. We offer a hassle-free return policy and stand behind the quality of our products. Our goal is to provide you with the best tools, parts, and support to keep your vehicle running smoothly.
With CARDIAGTECH.NET, you can confidently maintain your vehicle’s PCV system, knowing you have access to the best tools, parts, and support available.
9. Maintenance Tips to Prolong PCV System Lifespan
Extending the lifespan of your PCV system involves regular maintenance and proactive care. Here are some valuable tips to help you prolong the life of your PCV system:
9.1. Regular Inspections
Conduct regular visual inspections of the PCV valve and hoses. Look for any signs of damage, such as cracks, leaks, or deterioration. Check the hose clamps to ensure they are secure and in good condition.
9.2. Periodic Cleaning
Clean the PCV valve periodically to remove any deposits or buildup. Use carburetor cleaner to soak the valve and a small brush to scrub away any remaining debris. Rinse the valve with clean carburetor cleaner and allow it to dry before reinstalling.
9.3. Hose Replacement
Replace the PCV hoses if you notice any signs of cracking, leaking, or deterioration. Old and brittle hoses can cause vacuum leaks, affecting engine performance.
9.4. Oil Changes
Follow your vehicle manufacturer’s recommended oil change intervals. Regular oil changes help prevent sludge buildup in the engine, which can clog the PCV system.
9.5. Air Filter Maintenance
Maintain a clean air filter. A dirty air filter can restrict airflow to the engine, causing the PCV system to work harder and potentially leading to premature failure.
9.6. Avoid Short Trips
Avoid frequent short trips, as they can cause moisture and contaminants to accumulate in the crankcase. Longer trips allow the engine to reach operating temperature, which helps burn off these contaminants.
9.7. Use Quality Fuel
Use high-quality fuel. Poor-quality fuel can lead to increased deposits and buildup in the engine, affecting the PCV system.
9.8. Check Engine Light
Pay attention to the check engine light. If the check engine light comes on, have your vehicle diagnosed promptly. A malfunctioning PCV system can trigger the check engine light, and addressing the issue early can prevent more significant damage.
9.9. Professional Service
Consider having your PCV system professionally serviced periodically. A qualified mechanic can inspect the system, perform necessary maintenance, and identify any potential issues before they become major problems.
9.10. High-Quality Parts
Use high-quality replacement parts when servicing the PCV system. High-quality parts from CARDIAGTECH.NET ensure optimal performance and longevity.
By following these maintenance tips, you can prolong the lifespan of your PCV system and keep your engine running smoothly and efficiently.
10. Frequently Asked Questions (FAQs) About PCV Systems
Here are some frequently asked questions about PCV systems to help you better understand their function and maintenance:
10.1. What is the purpose of the PCV system?
The PCV (Positive Crankcase Ventilation) system removes blow-by gases from the engine’s crankcase, reducing emissions, preventing pressure buildup, and maintaining engine health.
10.2. How often should I check my PCV valve?
It’s recommended to check your PCV valve every 20,000 to 50,000 miles, or as specified in your vehicle’s owner’s manual.
10.3. What are the symptoms of a bad PCV valve?
Symptoms of a bad PCV valve include rough idling, engine misfires, oil leaks, whistling noises, and a check engine light.
10.4. Can I clean my PCV valve instead of replacing it?
Yes, you can clean your PCV valve with carburetor cleaner to remove deposits and buildup. If cleaning doesn’t improve its performance, replace it.
10.5. How do I know if my PCV valve is clogged?
You can check if your PCV valve is clogged by performing the finger suction test or the paper test. If you feel weak or no suction, or if the valve doesn’t rattle, it may be clogged.
10.6. What tools do I need to check the PCV system?
Essential tools for checking the PCV system include a vacuum gauge, multimeter, scan tool, hand tools, inspection mirror, and flashlight. CARDIAGTECH.NET offers all these tools.
10.7. Can a bad PCV valve cause poor fuel economy?
Yes, a bad PCV valve can cause poor fuel economy by creating vacuum leaks and affecting the air-fuel mixture.
10.8. Is it difficult to replace a PCV valve?
Replacing a PCV valve is generally straightforward and can be done with basic hand tools. Consult your vehicle’s service manual for specific instructions.
10.9. What happens if I don’t replace a bad PCV valve?
If you don’t replace a bad PCV valve, it can lead to engine damage, oil leaks, increased emissions, and reduced engine performance.
10.10. Where can I buy a replacement PCV valve?
You can buy a replacement PCV valve at most auto parts stores or online retailers. CARDIAGTECH.NET offers high-quality replacement PCV valves and other parts for your vehicle.
Maintaining your PCV system is crucial for your vehicle’s engine health and performance. With the right tools and knowledge, you can keep your PCV system functioning optimally and prevent costly repairs. Remember, CARDIAGTECH.NET is your trusted partner for all your automotive diagnostic and repair needs.
Interested in purchasing tools and equipment to help you check your PCV system? Contact us today at +1 (641) 206-8880 or visit our website at CARDIAGTECH.NET. Our address is 276 Reock St, City of Orange, NJ 07050, United States.