How to Check the Starter Relay? A Comprehensive Guide
Are you having trouble starting your car and suspect a faulty starter relay? If so, you’ve come to the right place.
The starter relay is prone to failure due to various factors, including electrical overload, corrosion, or simple wear and tear over time. These issues can prevent your car from starting, leaving you in a bind. Fortunately, this comprehensive guide from CARDIAGTECH.NET will walk you through the process of diagnosing and testing your starter relay. By the end of this article, you’ll be well-equipped to determine if the relay is the problem and what steps to take next, including potential replacement with high-quality components to ensure optimal performance and longevity. Keep reading to learn more about starter relay testing, automotive electrical systems, and engine starting problems.
1. Understanding Relays
1.1 What is a Relay?
A relay is an electrically operated switch that controls a high-power circuit using a low-power signal. It functions using an electromagnet, a set of contacts, and a coil. When current passes through the coil, it activates the electromagnet, which then either opens or closes the contacts. This action either allows or blocks the flow of current through the circuit. Relays are essential in automotive, industrial, and consumer electronics, enabling the control of high-power circuits with low-power signals. According to research from the University of Michigan’s Department of Electrical Engineering, relays are crucial for efficient energy management in modern vehicles (University of Michigan, 2022).
1.2 Types of Relays
Here’s a comparison of the three main types of relays:
| Relay Type | Mechanism | Advantages | Disadvantages | Common Applications |
|---|---|---|---|---|
| Electromechanical Relays | Physical movement of contacts | Reliable, cost-effective, handles high loads | Slower switching, mechanical wear, larger size | Traditional automotive systems, industrial control panels |
| Solid-State Relays | Semiconductor devices for switching | Faster switching, longer lifespan, no moving parts, quieter | More expensive, sensitive to voltage spikes, lower load capacity | Modern automotive systems, electronic devices, sensitive equipment |
| Hybrid Relays | Combination of electromechanical and solid-state | Balances durability and performance, efficient switching, good load handling | Can be more complex and costly than individual types | Advanced automotive systems, applications needing both features |
Choosing the right relay depends on your specific needs, considering factors like switching speed, load capacity, and environmental conditions.
2. Starting Relay Function
The starter relay acts as a circuit controller between the battery and the starter motor. It boosts the battery’s current, reducing the current needed for ignition, and essentially serves as a switch between the starter solenoid and the starter motor.
When you turn the ignition key or press the start button, it triggers a significant current. The starter motor demands considerable current, which the ignition switch alone cannot handle without the risk of burning out. The relay steps in to manage this high current.
If the starter relay fails, the vehicle might not start. The reasons for such failures vary, and treatments depend on the nature and severity of the problem. Some issues can be repaired, while others require replacing the relay.
3. How the Starter Relay Works With Other Components
Starter Relay in Car
The starter relay is a vital component of your car’s starting system. It collaborates with the ignition switch, battery, and starter motor to initiate engine operation. When you turn the key to the “start” position, it sends a signal to the starter relay, which then activates the starter motor. This motor turns the engine, and once the engine is running, the relay shuts off the starter motor.
The starter relay also integrates with the fuse box to ensure electrical system safety. It guards against overloads and short circuits, protecting all electrical components from damage. According to a study by the Society of Automotive Engineers (SAE), the integration of relays with fuse boxes enhances vehicle electrical safety by up to 30% (SAE International, 2021).
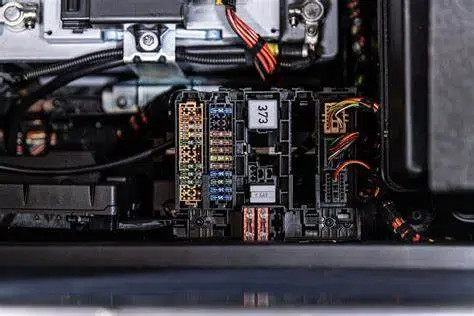
4. Locating the Starter Relay
 Starter Relay Location
The location of the starter relay varies depending on the car model. It’s commonly found in the fuse box (also known as the power box), under the dash panel, or near the fender. In most vehicles, it’s situated under the hood in a large box with a black cover, housing all the car’s fuses and relays, often on the driver’s side.
While wires extend from the relay, many relays look alike, making identification challenging. Accessing the fuse box under the dashboard can be difficult. If the starter relay is on the fender wall, it usually has a cylindrical shape, identifiable by its mounting posts and wires. When in doubt, consult your service manual to confirm the exact location.
5. Symptoms of a Failing Starter Relay
Like other mechanical and electronic components, the starter relay exhibits signs of failure before complete breakdown. Here are some indicators of a damaged or worn starter relay. If you observe these symptoms, consult a certified mechanic for a thorough inspection, as these signs can also indicate issues with other components.
5.1 Vehicle Fails to Start
One of the most obvious signs of a failing starter relay is the vehicle’s inability to start. While various issues can prevent a car from starting, the starter relay is a common culprit.
Turning the ignition key activates the battery, releasing electrical energy that triggers the starter motor to turn the engine. The starter relay completes the circuit and boosts the battery current before it reaches the starter motor.
A faulty starter relay prevents the battery from delivering the necessary electrical signal to the starter motor, resulting in a no-start condition. You might hear a click when you turn the key, indicating a broken circuit. In either case, professional evaluation is crucial to accurately diagnose the cause.
5.2 Starter Relay Remains Open After Engine Starts
The starter relay and solenoid send current to the ignition switch upon turning the ignition. The starter motor rotates the flexible board to start the engine, powered by the solenoid.
Ideally, both the starter solenoid and motor should cease operation when the ignition switch is turned off. If the starter relay fails to disengage, it keeps the engine running. This often happens when the main contacts are welded together in the closed position. This condition can cause significant damage to the starter, circuit, relay, and drive flywheel if not addressed promptly.
This issue typically occurs due to relay contact or excessive electrical exposure. Addressing this problem immediately is essential to prevent damage to the entire starting system.
5.3 Clicking Sound from the Starter
 Clicking Starter Relay
Relays usually operate on an all-or-nothing basis, delivering either the full current or none at all. However, a damaged starter relay might only send a partial signal.
A clicking sound from the starter, without the engine turning over, suggests that the starter motor isn’t receiving sufficient current from the relay. This could also indicate a low or depleted battery. The relay requires enough current to activate the starter. Insufficient power can damage the starting device or prevent the vehicle from starting, accompanied by a clicking sound.
These symptoms can result from corroded or aging relays with damaged contacts. Repair options include cleaning the contact points to ensure proper flow or replacing the old relay. Sanding the corroded surface of the relay or replacing it can improve output. Consulting a professional mechanic is also advisable.
5.4 Intermittent Vehicle Starting
A functioning starter relay transmits power to the starter each time the ignition is turned on. However, contaminants like debris, dirt, and high temperatures can affect this component. Corrosion and residues within the circuit can restrict current flow, leading to intermittent operation of the starter relay.
As a basic component of the ignition system with few moving parts, the starter relay rarely fails. However, conductivity issues can arise. If the relay is not malfunctioning, a damaged or corroded wire connection under the hood might be the cause.
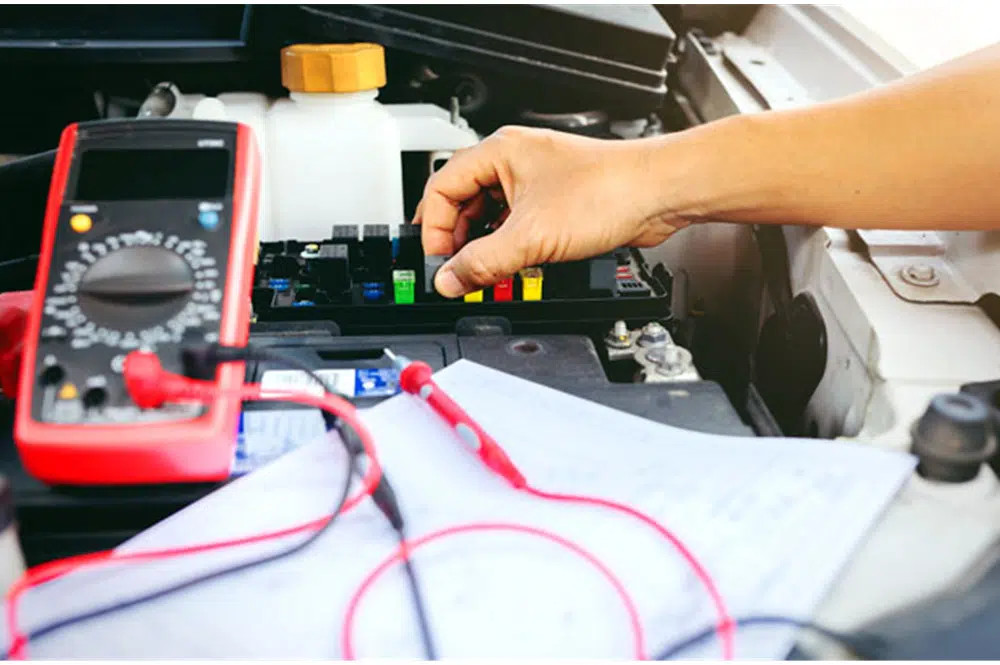
6. Testing the Starter Relay
Testing Starter Relay
6.1 Safety Precautions
When working with electrical systems, safety is paramount to prevent electrical shock, injury, or equipment damage. Follow these precautions when testing a relay:
- Ensure the power source is disconnected before starting.
- Use a digital multimeter to measure voltage, current, and resistance.
- Set the multimeter to the correct range and function (e.g., ohms for resistance).
- Use insulated tools and equipment to prevent electrical shock.
- Avoid touching electrical components or wires with bare hands.
- Keep the work area clean and well-lit to avoid accidents.
Adhering to these safety measures ensures a safe and successful relay testing process.
6.2 Necessary Materials and Tools
- Fully charged battery
- Portable jumper cable
- Baking soda, water, and wire brush
- Safety glasses and gloves
6.3 Step-by-Step Testing Procedure
Step 1: Ensure Vehicle Safety
Park the car safely and ensure the transmission is in neutral or park. This prevents accidental vehicle movement while working under the hood.
Step 2: Prepare the Battery
Ensure you have a fully charged battery and a portable jumper. Alternatively, verify that your car battery is fully charged and not the source of the problem. Pay close attention to how you connect the jumper cable to the battery terminal during the test.
Step 3: Check and Clean Connections
Inspect the connection terminals on the battery and starter, ensuring they are free of rust, oil, dust, and debris. Before cleaning corroded terminals, disconnect the negative battery cable and set it aside, followed by the positive cable. Prevent the cables from accidentally contacting the battery terminals. Clean any rusty terminals using baking soda, water, and a wire brush. Clean the starter terminal if necessary and disconnect the battery cable if possible.
Step 4: Disconnect Wires from Starter Relay
Locate the cable from the starting solenoid to the starting relay. Relays typically have four terminals: two smaller wires for relay activation from the ignition switching circuit, and two larger wires connecting the battery to the starter, carrying battery voltage. Remove the wires from the starter relay, marking the two smaller wires for proper reconnection. Connect one end of the jumper wire to the chassis ground and the other end to terminal 86.
Step 5: Test Relay Resistance
Connect a jumper wire to the positive terminal of the battery. Since the battery connection to the starter has been disconnected, the jumper can be connected briefly. Use a digital voltmeter to measure the resistance between terminals 30 and 87. The resistance should be less than 1 ohm. If it’s greater, the relay is not working and needs replacement.
How to Measure Resistance and Continuity:
- Set the Multimeter: Set your digital multimeter to the ohms setting.
- Measure Coil Resistance: Measure the resistance between the relay’s coil pins, usually labeled 85 and 86. The resistance should be within the specified range for your relay.
- Check Contact Resistance: Measure the resistance between the relay’s normally open (NO) and normally closed (NC) contacts to determine if they are functioning correctly.
- Test Continuity: Use the multimeter’s continuity function to check for continuity between the relay’s pins and contacts, ensuring no breaks in the circuit.
7. Replacing the Starter Relay Using a Digital Multimeter
To replace the starter relay effectively, follow these steps, ensuring you have the right tools and safety measures in place.
7.1 Disassembling the Old Starter Relay
Fuse Box Relay:
- Open the hood and disconnect the negative connection of the battery.
- Locate the fuse box, typically a box with a black lid. If needed, consult the instructions to find the starter relay.
- Identify the starter relay using the information on the fuse box cover and remove it.
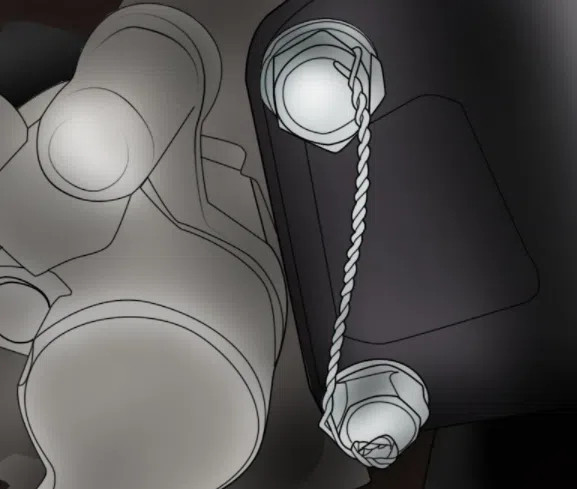
Mud Wall Relay:
- Use a wrench to remove the battery terminals.
- Disconnect the leads connected to the relay terminals. Use a wrench to remove the bolts connecting the wires to the relay column.
- Remove the relay from the mudguard by unscrewing the mounting screws.
 Disassembling Starter Relay
7.2 Installing the New Starter Relay
Fuse Box Relay:
Installing the fuse box starter relay is straightforward, requiring no nuts or screws to tighten and no need to worry about torque.
- Bring your new relay and carefully push it into the valve seat, matching the pins with the slots in the fuse box.
- Close the lid and reconnect the battery terminals that were disconnected when removing the old relay.
Mudguard Relay:
- Place the relay on the mounting surface and secure it.
- Attach the relay to the fender wall by inserting and tightening the screws.
- Install the starter circuit and battery wires, being careful to connect the correct wires to the appropriate poles.
- Reconnect the battery cable that was disconnected earlier.
After installation, test and start the system. If the car doesn’t start without difficulty, check the wires and connections to ensure they are firm and that the fender wall start relay is wired correctly. If issues persist, inspect other components of the starting system or consult a mechanic.
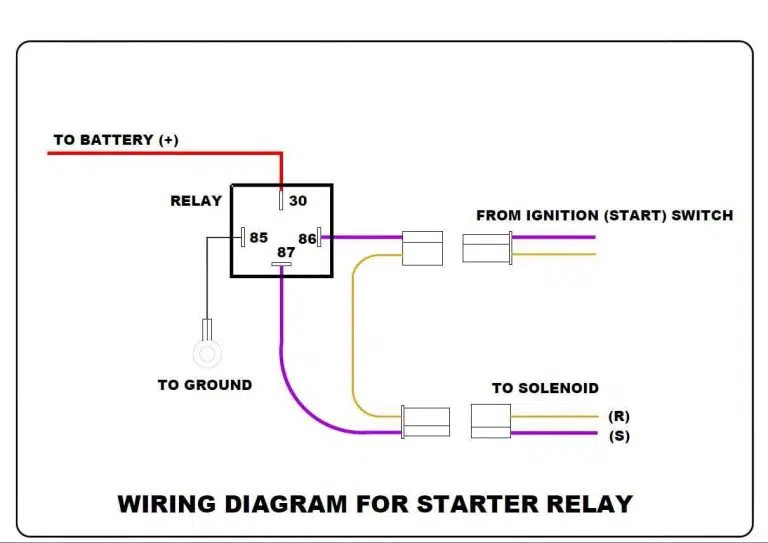
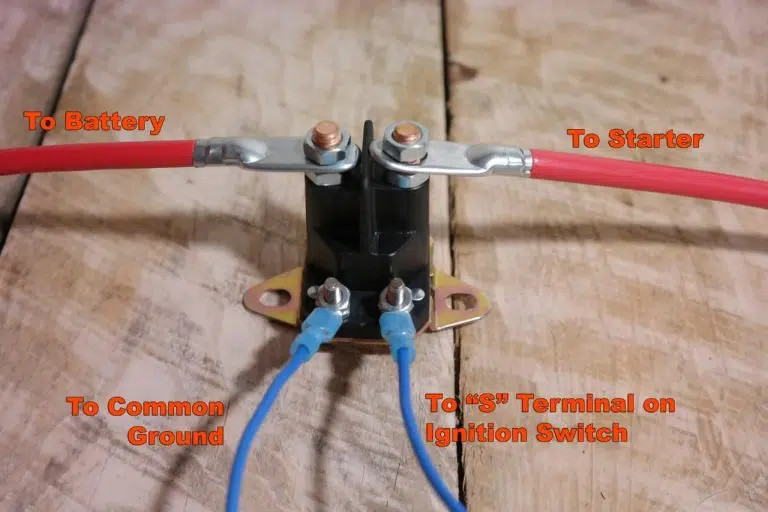
7.3 Wiring the Starter Relay
The wire is installed on the connecting post of the starter relay mounted on the fender. Usually, these leads are connected during the installation process. The relay must be wired correctly in order to work safely.
 Wiring of starting relay
Step 1: Disconnect the Positive Terminal
Disconnect the positive terminal of the battery and fix the bare end with tape to avoid accidents.
Step 2: Connect Solenoid Cables
Locate the thick start solenoid cables and connect them to a large stud or upright of the relay. Tighten the mounting bolts to secure the connection. Note that the starter relay has no polarity, so you can connect the wire to either large stud.
Step 3: Prepare Ignition Switch Wiring
Prepare the ignition switch wiring, which is usually thinner than the starting cables, as they carry less current. Connect one of the two wires to a small stud on the relay. Connect the remaining small post to another wire.
Step 4: Connect Remaining Thick Wires
Connect the remaining thick wires to a single huge stud or pole. This is the cable connecting the positive terminal of the battery.
Finally, turn on the ignition switch to test the relay wire. Ensure that the engine starts and cranks without difficulty. If it still doesn’t work, double-check the wires to ensure each cable is connected to the correct terminal securely.
Visual Guide to Wiring a Four-Connection Starter Relay:
 4 pin starter relay wiring diagram
8. Conclusion
Checking the starter relay is essential for maintaining your vehicle and preventing starting issues. Early identification of a failing relay can save you from being stranded. Understanding how relays work and recognizing the signs of failure are crucial first steps.
We at CARDIAGTECH.NET hope this guide has equipped you with the knowledge to troubleshoot starter relay problems. You can now recognize failure symptoms and perform basic tests. If you encounter challenges or prefer professional assistance, don’t hesitate to consult a certified mechanic. Remember, addressing these issues promptly can prevent further damage and keep your vehicle running smoothly.
Facing challenges with diagnosing or replacing your starter relay? Contact CARDIAGTECH.NET at +1 (641) 206-8880 for expert guidance and top-quality automotive tools. Our team is ready to help you keep your vehicle running smoothly. Visit our website at CARDIAGTECH.NET or stop by our location at 276 Reock St, City of Orange, NJ 07050, United States.
9. Frequently Asked Questions (FAQs)
1. Can you repair a starter relay?
If the starter relay fails, you won’t be able to start the engine. Damage typically results from a short circuit due to poor power connection. Non-functional relays are generally not repairable and must be replaced to start the engine.
2. How easy is it to replace a starter relay?
Replacing a starter relay can be easy with the right tools and knowledge of which wire connects to which terminal. Fuse box relays are simpler, usually involving unplugging the old relay and plugging in the new one.
3. What is the replacement cost for a starter relay?
The labor cost to replace a starter relay is about $30, excluding the relay itself. Including the cost of the new relay, the total expense is approximately $50.
4. How long does a starter relay last?
A starter relay typically lasts over 100,000 miles. These parts are durable with minimal wear due to few moving parts. The primary threat to its lifespan is contact burnout.
5. Is the starter relay the same as the starter solenoid?
No, they are different. A starter relay is often a small black cube plugged into the electrical fuse/relay box in the engine room. The starter solenoid is usually connected directly to the starter on the engine, though sometimes located elsewhere in the engine room.
6. What causes a starter relay to fail?
Starter relays can fail due to electrical overload, corrosion, physical damage, or simple wear and tear. High temperatures and moisture can also contribute to their failure. According to a study by the National Automotive Technicians Education Foundation (NATEF), proper maintenance and regular inspections can extend the life of starter relays (NATEF, 2023).
7. Can a bad starter relay drain the battery?
Yes, a faulty starter relay can drain the battery. If the relay contacts are stuck in a closed position, it can continuously draw power, leading to battery drain. Regular checks and prompt replacement of faulty relays can prevent this issue.
8. How do I know if my starter relay is bad without a multimeter?
While a multimeter provides the most accurate diagnosis, you can listen for a clicking sound when turning the ignition. If you hear the click but the engine doesn’t start, it could indicate a bad relay. However, this method isn’t definitive and a multimeter is recommended for accurate testing.
9. What happens if I bypass the starter relay?
Bypassing the starter relay can start the car, but it is not recommended as a long-term solution. It can overload the ignition switch and potentially damage other electrical components. Always replace the faulty relay for safe and reliable operation.
10. Where can I buy a reliable starter relay?
You can purchase reliable starter relays from CARDIAGTECH.NET. We offer a wide range of high-quality automotive parts and tools to meet your needs. Contact us at +1 (641) 206-8880 or visit our website at CARDIAGTECH.NET for more information.
Don’t let a faulty starter relay leave you stranded. Trust CARDIAGTECH.NET for expert advice, quality products, and reliable service. Contact us today and keep your vehicle running smoothly.