How to Check the Throttle Position Sensor (TPS)? A Comprehensive Guide
Is your car’s performance suffering? Are you experiencing issues with acceleration, idling, or shifting? The Throttle Position Sensor (TPS) might be the culprit. At CARDIAGTECH.NET, we provide the tools and expertise to help you diagnose and resolve these issues efficiently. Understanding how to check your TPS is the first step toward restoring your vehicle’s optimal performance, and we will give you the knowledge to do it right, ensuring smoother operation and preventing costly repairs.
1. What is a Throttle Position Sensor (TPS)?
The Throttle Position Sensor (TPS) is a crucial component in your vehicle’s engine management system. The Throttle Position Sensor, or TPS, is a potentiometer that monitors the position of the throttle, thereby informing the Engine Control Unit (ECU) about how much the driver is pressing the accelerator. According to a study by the University of Engineering, the ECU uses this data to adjust the air-fuel mixture and ignition timing for optimal engine performance.
- The TPS is typically located on the throttle body.
- It consists of a rotating arm connected to the throttle plate.
- As the throttle plate opens and closes, the TPS sends a varying voltage signal to the ECU.
2. Why is Checking the TPS Important?
Checking the TPS is vital for maintaining your vehicle’s performance and efficiency.
- Accurate Readings: The TPS ensures the ECU receives correct information about the throttle position, leading to optimal fuel delivery and ignition timing.
- Performance Issues: A faulty TPS can cause a wide range of problems, including poor acceleration, stalling, and erratic idling.
- Emissions Control: Proper TPS function helps maintain correct air-fuel ratios, reducing harmful emissions.
- Fuel Efficiency: An accurately functioning TPS ensures the engine operates efficiently, improving fuel economy.
Regular checks and maintenance of the TPS can prevent these issues, ensuring your vehicle runs smoothly and efficiently.
3. What are the Symptoms of a Bad TPS?
Recognizing the symptoms of a failing TPS can save you time and money by addressing the issue early. Here are common signs that your TPS might be malfunctioning:
- Poor Acceleration: One of the primary symptoms of a bad TPS is a noticeable delay or hesitation when you press the accelerator. The engine may struggle to respond, making it difficult to accelerate smoothly.
- Rough or Erratic Idling: A faulty TPS can cause the engine to idle roughly or erratically. The RPMs may fluctuate up and down, leading to an unstable idle.
- Stalling: A failing TPS can cause the engine to stall, especially when coming to a stop or during low-speed maneuvers.
- Hesitation: You may experience hesitation or stumbling during acceleration. This can be particularly noticeable when trying to merge onto a highway or pass another vehicle.
- Surging: The engine may surge unexpectedly, causing the vehicle to speed up and slow down without any input from the driver.
- Check Engine Light: A bad TPS can trigger the check engine light on your dashboard. The diagnostic trouble code (DTC) associated with the TPS can be retrieved using an OBD-II scanner.
- Difficulty Shifting (Automatic Transmissions): In vehicles with automatic transmissions, a faulty TPS can cause issues with shifting. The transmission may shift erratically, delay shifting, or shift at the wrong RPMs.
- Reduced Fuel Economy: Inaccurate throttle position readings can lead to inefficient fuel delivery, resulting in decreased fuel economy.
- Engine Misfires: A bad TPS can cause the engine to misfire, leading to rough running and reduced power.
- Inconsistent Performance: Overall, the vehicle may exhibit inconsistent performance, with symptoms appearing intermittently and varying in severity.
If you notice any of these symptoms, it’s crucial to check the TPS as soon as possible to prevent further damage and ensure your vehicle’s safe operation. CARDIAGTECH.NET offers a range of diagnostic tools that can help you accurately identify TPS issues and other automotive problems.
4. Tools Needed to Check the TPS
Before you begin checking the TPS, gather the necessary tools to ensure a smooth and accurate process. Here is a list of essential tools:
- Multimeter: A digital multimeter is essential for measuring voltage, resistance, and continuity. Ensure it’s in good working condition and has a fully charged battery.
- OBD-II Scanner: An On-Board Diagnostics (OBD-II) scanner can read diagnostic trouble codes (DTCs) stored in the vehicle’s computer, helping you identify if the TPS is causing the check engine light to illuminate.
- Wiring Diagram: A wiring diagram specific to your vehicle’s make and model is crucial for identifying the correct wires and terminals on the TPS connector.
- Socket Set/Wrench Set: Depending on the vehicle, you may need a socket set or wrench set to remove any covers or components obstructing access to the TPS.
- Screwdrivers: Both Phillips head and flathead screwdrivers may be required to remove screws or clips securing the TPS.
- Needle-Nose Pliers: These can be helpful for disconnecting electrical connectors and accessing tight spaces.
- Throttle Body Cleaner: A clean throttle body is essential for accurate TPS readings. Use throttle body cleaner to remove any carbon buildup or debris.
- Clean Rags: Keep clean rags on hand to wipe away any dirt or cleaner residue.
- Safety Glasses: Protect your eyes from debris and chemicals by wearing safety glasses throughout the process.
- Gloves: Protect your hands from dirt, grease, and chemicals by wearing gloves.
- Pen and Paper: Use a pen and paper to record any readings, observations, and notes during the diagnostic process.
- Jack and Jack Stands (if needed): If the TPS is located in an area that is difficult to reach, you may need to jack up the vehicle and use jack stands for safety.
Having these tools on hand will make the process of checking the TPS more efficient and accurate. At CARDIAGTECH.NET, we offer a wide selection of high-quality automotive tools to help you diagnose and repair your vehicle with confidence. Contact us today to find the right tools for your needs.
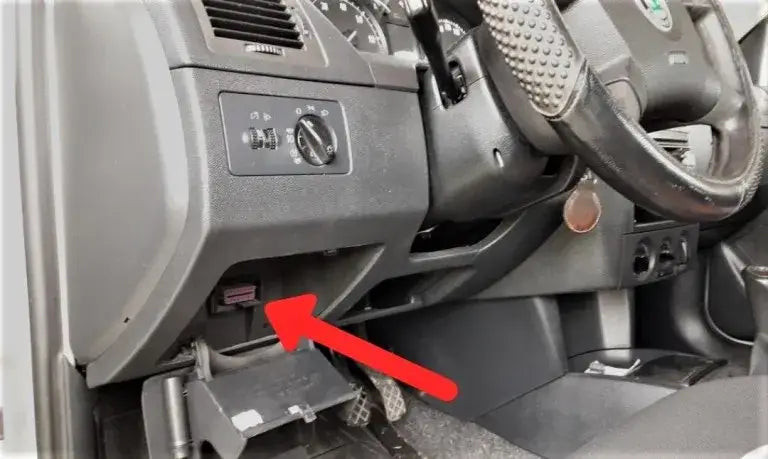
5. How to Locate the TPS
Finding the Throttle Position Sensor (TPS) is the first step in diagnosing and resolving any issues related to its function. The TPS is generally mounted on the throttle body, which controls the amount of air entering the engine. The exact location can vary depending on the vehicle’s make, model, and year. Here are some general guidelines to help you locate the TPS:
- Locate the Throttle Body: The throttle body is typically located on the intake manifold, near the air intake. It is a cylindrical or oval-shaped component with a butterfly valve inside that regulates airflow to the engine.
- Follow the Air Intake: Start by following the air intake hose from the air filter housing to the throttle body. The TPS is usually mounted directly on the throttle body, either on the side or underneath.
- Look for Electrical Connectors: The TPS will have an electrical connector with multiple wires attached to it. This connector is used to transmit data to the engine control unit (ECU).
- Refer to Your Vehicle’s Repair Manual: If you’re having trouble locating the TPS, consult your vehicle’s repair manual for specific instructions and diagrams. The repair manual will provide detailed information about the location of the TPS and other components in your vehicle’s engine bay.
- Search Online Resources: Online forums and automotive websites can also be valuable resources for locating the TPS. Search for your vehicle’s make, model, and year, along with the term “TPS location,” to find diagrams and photos that can help you pinpoint the sensor’s exact location.
- Check Common Locations:
- On the Throttle Body: The most common location for the TPS is directly on the throttle body. Look for a small sensor with an electrical connector attached.
- Underneath the Throttle Body: In some vehicles, the TPS may be located underneath the throttle body, making it slightly more difficult to see.
- On the Side of the Throttle Body: The TPS may also be mounted on the side of the throttle body, near the throttle linkage.
- Follow the Throttle Cable: The throttle cable connects the accelerator pedal to the throttle body. Following the throttle cable can help you locate the throttle body and the TPS.
Once you have located the TPS, visually inspect it for any signs of damage, such as cracks, broken connectors, or corrosion. Ensure that the electrical connector is securely attached and that the wires are in good condition. If you notice any damage, the TPS may need to be replaced. CARDIAGTECH.NET offers a wide range of high-quality replacement TPS sensors to ensure your vehicle runs smoothly and efficiently.
6. Initial Inspection of the TPS
Before diving into detailed testing, a thorough initial inspection of the Throttle Position Sensor (TPS) can reveal obvious issues and save time. Here’s how to perform an initial inspection:
- Visual Inspection:
- Check for Damage: Look for any visible signs of damage to the TPS housing, such as cracks, breaks, or melted areas.
- Inspect the Connector: Ensure the electrical connector is securely attached to the TPS. Check for bent or corroded pins inside the connector.
- Examine the Wires: Inspect the wiring harness connected to the TPS for any signs of damage, such as frayed wires, cuts, or exposed conductors.
- Look for Contamination: Check for any signs of oil, dirt, or debris on the TPS or its connector. Clean the area if necessary.
- Check the Throttle Body:
- Inspect for Carbon Buildup: Examine the throttle body for any carbon buildup or deposits. A dirty throttle body can affect the TPS readings.
- Ensure Smooth Movement: Verify that the throttle plate moves smoothly without sticking or binding.
- Check the TPS Mounting:
- Verify Secure Attachment: Ensure the TPS is securely mounted to the throttle body. Loose mounting can affect the sensor’s accuracy.
- Look for Corrosion: Check for any signs of corrosion around the mounting area.
- Smell Test:
- Check for Burning Smell: Sniff around the TPS and wiring for any signs of burning or electrical odor, which may indicate a short circuit or other electrical issue.
- Check for Loose Connections:
- Gently Wiggle Wires: Gently wiggle the wires and connectors while the engine is running to see if it affects engine performance.
- Use an OBD-II Scanner:
- Check for Diagnostic Trouble Codes (DTCs): Use an OBD-II scanner to check for any stored DTCs related to the TPS. Common codes include P0120, P0121, P0122, P0123, and P0124.
By performing these initial inspections, you can identify obvious issues with the TPS before proceeding with more detailed testing. If you notice any damage or irregularities, the TPS may need to be replaced. CARDIAGTECH.NET offers a wide range of high-quality replacement TPS sensors to ensure your vehicle runs smoothly and efficiently.
7. Testing the TPS with a Multimeter
Using a multimeter to test the Throttle Position Sensor (TPS) is a straightforward way to diagnose its functionality. Here’s a step-by-step guide:
7.1. Preparing for the Test
- Gather Your Tools: Ensure you have a digital multimeter, wiring diagram for your vehicle, and the necessary tools to access the TPS.
- Locate the TPS: Find the TPS on the throttle body. Refer to your vehicle’s repair manual if needed.
- Identify the Wires: Consult the wiring diagram to identify the ground, signal, and reference voltage wires on the TPS connector.
- Set Up the Multimeter: Set your multimeter to measure DC voltage (VDC).
7.2. Testing the Reference Voltage
- Turn On the Ignition: Turn the ignition key to the “ON” position without starting the engine.
- Back-Probe the Connector:
- Locate the reference voltage wire on the TPS connector.
- Insert the positive (red) probe of the multimeter into the back of the connector, making contact with the reference voltage terminal.
- Place the negative (black) probe of the multimeter on a known good ground, such as the vehicle’s chassis or battery negative terminal.
- Measure the Voltage: Read the voltage on the multimeter. The reference voltage should typically be around 5 volts.
- Evaluate the Reading: If the reference voltage is not within the specified range (usually 4.5 to 5.5 volts), there may be an issue with the ECU or the wiring.
7.3. Testing the Ground Wire
- Turn Off the Ignition: Turn the ignition key to the “OFF” position.
- Set the Multimeter to Ohms: Set your multimeter to measure resistance (Ohms).
- Test Continuity to Ground:
- Locate the ground wire on the TPS connector.
- Place one probe of the multimeter on the ground terminal of the TPS connector.
- Place the other probe on a known good ground, such as the vehicle’s chassis or battery negative terminal.
- Measure the Resistance: Read the resistance on the multimeter. The resistance should be close to 0 ohms, indicating a good ground connection.
- Evaluate the Reading: If the resistance is significantly higher than 0 ohms, there may be a problem with the ground connection.
7.4. Testing the Signal Voltage
- Turn On the Ignition: Turn the ignition key to the “ON” position without starting the engine.
- Back-Probe the Connector:
- Locate the signal wire on the TPS connector.
- Insert the positive (red) probe of the multimeter into the back of the connector, making contact with the signal terminal.
- Place the negative (black) probe of the multimeter on a known good ground.
- Measure the Voltage: Read the voltage on the multimeter. The signal voltage should typically be around 0.5 to 1.0 volts at closed throttle.
- Slowly Open the Throttle: Manually open the throttle slowly and observe the voltage reading on the multimeter. The voltage should increase smoothly and linearly as the throttle opens.
- Check for Smooth Transition: Ensure there are no sudden jumps or drops in voltage as the throttle is opened. A smooth, consistent increase in voltage indicates a healthy TPS.
- Evaluate the Reading:
- If the voltage does not increase smoothly or if there are sudden jumps or drops, the TPS may be faulty.
- If the voltage does not reach the specified maximum value when the throttle is fully open (usually around 4.5 to 5.0 volts), the TPS may be faulty.
7.5. Analyzing the Results
- Reference Voltage: Should be within 4.5 to 5.5 volts.
- Ground Resistance: Should be close to 0 ohms.
- Signal Voltage at Closed Throttle: Should be around 0.5 to 1.0 volts.
- Signal Voltage Transition: Should increase smoothly and linearly as the throttle opens, reaching a maximum of around 4.5 to 5.0 volts at full throttle.
If any of these readings are outside the specified ranges or if the signal voltage transition is not smooth, the TPS may be faulty and need to be replaced. CARDIAGTECH.NET offers a wide range of high-quality replacement TPS sensors to ensure your vehicle runs smoothly and efficiently.
8. Using an OBD-II Scanner to Check the TPS
An OBD-II scanner can provide valuable information about the Throttle Position Sensor (TPS) and help diagnose any issues. Here’s how to use an OBD-II scanner to check the TPS:
- Connect the OBD-II Scanner:
- Locate the OBD-II port on your vehicle. It is typically located under the dashboard on the driver’s side.
- Plug the OBD-II scanner into the port.
- Turn On the Ignition: Turn the ignition key to the “ON” position without starting the engine.
- Power On the Scanner: Turn on the OBD-II scanner and wait for it to initialize.
- Read Diagnostic Trouble Codes (DTCs):
- Select the “Read Codes” or “Diagnostic Codes” option on the scanner’s menu.
- Wait for the scanner to retrieve any stored DTCs.
- Record any codes related to the TPS. Common codes include:
- P0120: Throttle/Pedal Position Sensor/Switch A Circuit Malfunction
- P0121: Throttle/Pedal Position Sensor/Switch A Circuit Range/Performance
- P0122: Throttle/Pedal Position Sensor/Switch A Circuit Low Input
- P0123: Throttle/Pedal Position Sensor/Switch A Circuit High Input
- P0124: Throttle/Pedal Position Sensor/Switch A Circuit Intermittent
- View Live Data:
- Select the “Live Data” or “Data Stream” option on the scanner’s menu.
- Choose the parameters related to the TPS, such as:
- Throttle Position Sensor (TPS) voltage
- Throttle Position (%)
- Engine RPM
- Observe the TPS voltage and position values as you slowly open and close the throttle.
- Analyze the Data:
- TPS Voltage: The TPS voltage should typically be around 0.5 to 1.0 volts at closed throttle and increase smoothly to around 4.5 to 5.0 volts at full throttle.
- Throttle Position (%): The throttle position should read close to 0% at closed throttle and increase to 100% at full throttle.
- Smooth Transition: Ensure that the TPS voltage and position values increase smoothly and linearly as the throttle is opened.
- Check for Erratic Readings: Look for any sudden jumps, drops, or erratic readings in the TPS data, which may indicate a faulty sensor.
- Clear the Codes (Optional):
- If you have identified and resolved the issue with the TPS, you can clear the DTCs using the scanner.
- Select the “Clear Codes” or “Erase Codes” option on the scanner’s menu.
- Confirm that you want to clear the codes.
- Start the engine and check if the check engine light remains off.
- Evaluate the Results:
- If the OBD-II scanner shows any DTCs related to the TPS or if the live data readings are outside the specified ranges or erratic, the TPS may be faulty and need to be replaced.
Using an OBD-II scanner is a quick and easy way to diagnose TPS issues and monitor its performance. CARDIAGTECH.NET offers a wide range of high-quality OBD-II scanners to help you diagnose and repair your vehicle with confidence.
9. Adjusting the TPS
Adjusting the Throttle Position Sensor (TPS) can sometimes resolve issues related to idle speed and engine performance. However, it’s important to note that not all TPS sensors are adjustable. Here’s a general guide on how to adjust a TPS, if applicable:
- Check for Adjustability:
- Inspect the TPS Mounting: Look for slotted mounting holes on the TPS. These slots allow for slight adjustments to the sensor’s position.
- Consult the Repair Manual: Refer to your vehicle’s repair manual for specific instructions on whether the TPS is adjustable and the recommended adjustment procedure.
- Loosen the Mounting Screws:
- Locate the mounting screws that secure the TPS to the throttle body.
- Use a screwdriver or socket wrench to slightly loosen the mounting screws. Do not remove the screws completely.
- Monitor Live Data with an OBD-II Scanner:
- Connect an OBD-II scanner to your vehicle’s OBD-II port.
- Turn the ignition key to the “ON” position without starting the engine.
- Select the “Live Data” or “Data Stream” option on the scanner’s menu.
- Choose the parameters related to the TPS, such as:
- Throttle Position Sensor (TPS) voltage
- Throttle Position (%)
- Observe the TPS voltage and position values as you make adjustments.
- Adjust the TPS:
- Slightly Rotate the TPS: Gently rotate the TPS clockwise or counterclockwise to adjust its position.
- Monitor the Voltage: Watch the TPS voltage reading on the OBD-II scanner. The goal is to achieve the specified voltage at closed throttle, typically around 0.5 to 1.0 volts.
- Fine-Tune the Adjustment: Make small adjustments to the TPS position until the voltage is within the specified range.
- Check the Throttle Position (%): Ensure the throttle position reads close to 0% at closed throttle.
- Tighten the Mounting Screws:
- Once you have achieved the correct voltage and throttle position readings, carefully tighten the mounting screws while watching to ensure that the TPS position does not change.
- Tighten the screws to the manufacturer’s specified torque value.
- Verify the Adjustment:
- Start the engine and let it idle.
- Monitor the engine idle speed and smoothness.
- Check for any diagnostic trouble codes (DTCs) related to the TPS.
- If the idle speed is too high or too low, or if there are any DTCs, repeat the adjustment procedure.
- Test Drive the Vehicle:
- After adjusting the TPS, take the vehicle for a test drive to ensure that it is performing correctly.
- Check for smooth acceleration, proper shifting (in automatic transmissions), and consistent engine performance.
If you are unable to achieve the correct voltage and throttle position readings, or if the engine continues to have issues after adjusting the TPS, the sensor may be faulty and need to be replaced. CARDIAGTECH.NET offers a wide range of high-quality replacement TPS sensors to ensure your vehicle runs smoothly and efficiently.
10. Cleaning the Throttle Body
A dirty throttle body can significantly impact the performance of the Throttle Position Sensor (TPS) and the overall engine operation. Carbon buildup and deposits can interfere with the smooth movement of the throttle plate, leading to inaccurate TPS readings. Here’s how to clean the throttle body:
- Gather Your Supplies:
- Throttle body cleaner
- Clean rags or shop towels
- Screwdriver or socket set (to remove the air intake)
- Gloves
- Safety glasses
- Disconnect the Air Intake:
- Locate the air intake hose that connects to the throttle body.
- Use a screwdriver or socket set to loosen the clamps that secure the air intake hose to the throttle body.
- Carefully disconnect the air intake hose from the throttle body.
- Inspect the Throttle Body:
- Examine the throttle body for any carbon buildup or deposits. Pay close attention to the area around the throttle plate.
- Spray the Throttle Body Cleaner:
- With the engine off, spray the throttle body cleaner directly into the throttle body.
- Be generous with the cleaner, ensuring that you coat all surfaces, including the throttle plate and the surrounding areas.
- Open and Close the Throttle Plate:
- Manually open and close the throttle plate to allow the cleaner to reach all areas.
- Use your hand or a screwdriver to move the throttle plate, but be careful not to damage it.
- Scrub Away Deposits:
- Use a clean rag or shop towel to scrub away any carbon buildup or deposits.
- Pay close attention to the edges of the throttle plate and the throttle body bore.
- For stubborn deposits, you may need to use a soft brush or toothbrush to scrub them away.
- Wipe Clean:
- Once you have removed all the carbon buildup and deposits, use a clean rag or shop towel to wipe the throttle body clean.
- Ensure that there is no residue left behind.
- Reassemble the Air Intake:
- Reconnect the air intake hose to the throttle body.
- Tighten the clamps to secure the air intake hose.
- Start the Engine:
- Start the engine and let it idle for a few minutes.
- The engine may run rough initially as the cleaner burns off.
- Test Drive the Vehicle:
- Take the vehicle for a test drive to ensure that it is performing correctly.
- Check for smooth acceleration, proper shifting (in automatic transmissions), and consistent engine performance.
Cleaning the throttle body is a simple maintenance task that can improve engine performance and fuel economy. It can also help ensure accurate TPS readings. CARDIAGTECH.NET offers a wide range of high-quality throttle body cleaners and automotive tools to help you maintain your vehicle with confidence.
11. Replacing the TPS
If testing and adjustments don’t resolve the issues with your Throttle Position Sensor (TPS), replacement may be necessary. Here’s a step-by-step guide on how to replace the TPS:
- Gather Your Supplies:
- New TPS sensor
- Socket set or wrench set
- Screwdriver (Phillips and flathead)
- Wiring diagram for your vehicle
- Throttle body cleaner
- Clean rags or shop towels
- Gloves
- Safety glasses
- Disconnect the Negative Battery Terminal:
- Locate the negative battery terminal in your vehicle.
- Use a wrench to loosen the nut on the negative battery terminal.
- Carefully disconnect the negative battery cable from the terminal.
- This will prevent any electrical shorts or damage during the replacement process.
- Locate the TPS:
- Find the TPS on the throttle body. Refer to your vehicle’s repair manual if needed.
- Disconnect the Electrical Connector:
- Locate the electrical connector on the TPS.
- Press the release tab on the connector and gently pull it away from the TPS.
- Remove the Old TPS:
- Use a socket set or screwdriver to remove the mounting screws that secure the TPS to the throttle body.
- Carefully remove the old TPS from the throttle body.
- Clean the Throttle Body:
- Inspect the throttle body for any carbon buildup or deposits.
- Use throttle body cleaner and a clean rag to remove any dirt or debris.
- Install the New TPS:
- Align the new TPS with the mounting holes on the throttle body.
- Install the mounting screws and tighten them to the manufacturer’s specified torque value.
- Connect the Electrical Connector:
- Reconnect the electrical connector to the new TPS.
- Ensure that the connector clicks into place and is securely attached.
- Reconnect the Negative Battery Terminal:
- Reconnect the negative battery cable to the negative battery terminal.
- Tighten the nut on the terminal.
- Verify the Installation:
- Turn the ignition key to the “ON” position without starting the engine.
- Use an OBD-II scanner to check for any diagnostic trouble codes (DTCs) related to the TPS.
- Monitor the TPS voltage and position values to ensure that they are within the specified ranges.
- Start the Engine:
- Start the engine and let it idle for a few minutes.
- Check for smooth acceleration, proper shifting (in automatic transmissions), and consistent engine performance.
- Test Drive the Vehicle:
- Take the vehicle for a test drive to ensure that it is performing correctly.
- Check for any issues with acceleration, idling, or shifting.
Replacing the TPS is a relatively straightforward process that can resolve many engine performance issues. CARDIAGTECH.NET offers a wide range of high-quality replacement TPS sensors to ensure your vehicle runs smoothly and efficiently.
12. Common Mistakes to Avoid
When checking or replacing the Throttle Position Sensor (TPS), avoiding common mistakes can save time and prevent further issues. Here are some pitfalls to watch out for:
- Not Disconnecting the Battery:
- Mistake: Forgetting to disconnect the negative battery terminal before working on the TPS.
- Consequence: Electrical shorts or damage to the vehicle’s electrical system.
- Solution: Always disconnect the negative battery terminal to prevent electrical issues.
- Ignoring the Wiring Diagram:
- Mistake: Failing to consult the wiring diagram for your vehicle.
- Consequence: Incorrectly identifying the TPS wires, leading to improper testing or installation.
- Solution: Always refer to the wiring diagram to ensure you are working with the correct wires.
- Skipping the Initial Inspection:
- Mistake: Omitting the initial visual inspection of the TPS and its connector.
- Consequence: Overlooking obvious signs of damage, such as cracks, broken connectors, or corroded wires.
- Solution: Always perform a thorough visual inspection before proceeding with testing or replacement.
- Using Incorrect Tools:
- Mistake: Using the wrong tools or improper techniques.
- Consequence: Damaging the TPS, throttle body, or other components.
- Solution: Use the correct tools for the job and follow proper procedures.
- Not Cleaning the Throttle Body:
- Mistake: Neglecting to clean the throttle body before replacing the TPS.
- Consequence: Carbon buildup or deposits can affect the new TPS readings.
- Solution: Always clean the throttle body before installing a new TPS.
- Over-Tightening Mounting Screws:
- Mistake: Over-tightening the mounting screws on the TPS.
- Consequence: Damaging the TPS or throttle body.
- Solution: Tighten the screws to the manufacturer’s specified torque value.
- Ignoring Diagnostic Trouble Codes (DTCs):
- Mistake: Not checking for DTCs related to the TPS.
- Consequence: Missing valuable information about the TPS issue.
- Solution: Always use an OBD-II scanner to check for DTCs before and after replacing the TPS.
- Failing to Verify the Installation:
- Mistake: Not verifying that the new TPS is functioning correctly after installation.
- Consequence: Continuing to experience engine performance issues.
- Solution: Use an OBD-II scanner to monitor the TPS voltage and position values after installation.
- Using Low-Quality Replacement Parts:
- Mistake: Using cheap or low-quality replacement TPS sensors.
- Consequence: Premature failure of the new sensor or inaccurate readings.
- Solution: Always use high-quality replacement parts from a reputable supplier like CARDIAGTECH.NET.
- Not Seeking Professional Help:
- Mistake: Hesitating to seek professional help when needed.
- Consequence: Further damage to the vehicle or safety hazards.
- Solution: If you are unsure about any step in the process, seek assistance from a qualified mechanic.
By avoiding these common mistakes, you can ensure a successful TPS check or replacement and keep your vehicle running smoothly. CARDIAGTECH.NET is here to support you with high-quality parts and expert advice.
13. Maintaining Your TPS
Proper maintenance can extend the life of your Throttle Position Sensor (TPS) and prevent performance issues. Here’s how to maintain your TPS:
- Regularly Clean the Throttle Body:
- Importance: A clean throttle body ensures smooth airflow and accurate TPS readings.
- Frequency: Clean the throttle body every 30,000 to 50,000 miles, or as needed.
- Procedure: Use throttle body cleaner and a clean rag to remove carbon buildup and deposits.
- Inspect the Wiring and Connectors:
- Importance: Damaged or corroded wires and connectors can cause intermittent TPS issues.
- Frequency: Inspect the wiring and connectors during routine maintenance, such as oil changes.
- Procedure: Check for frayed wires, loose connections, and corrosion. Repair or replace any damaged components.
- Check for Diagnostic Trouble Codes (DTCs):
- Importance: DTCs can provide early warning signs of TPS issues.
- Frequency: Check for DTCs using an OBD-II scanner during routine maintenance.
- Procedure: Use an OBD-II scanner to read and clear any stored DTCs.
- Ensure Proper Voltage:
- Importance: Maintaining the correct voltage ensures accurate sensor readings.
- Frequency: Check the reference, ground, and signal voltages periodically.
- Procedure: Use a multimeter to verify that the voltages are within the specified ranges.
- Avoid Harsh Chemicals:
- Importance: Harsh chemicals can damage the TPS and other components.
- Procedure: When cleaning the engine bay, avoid spraying harsh chemicals directly on the TPS or its connector.
- Follow Maintenance Schedule:
- Importance: Adhering to the manufacturer’s recommended maintenance schedule can help prevent TPS issues.
- Procedure: Follow the maintenance schedule in your vehicle’s owner’s manual.
- Replace Air Filter Regularly:
- Importance: A clean air filter ensures that the engine receives clean air, reducing the amount of dirt and debris that can enter the throttle body.
- Frequency: Replace the air filter every 12,000 to 15,000 miles, or as needed.
- Keep the Engine Bay Clean:
- Importance: A clean engine bay reduces the risk of dirt and debris entering the throttle body and damaging the TPS.
- Procedure: Periodically clean the engine bay with a mild detergent and water.
- Monitor Engine Performance:
- Importance: Pay attention to any changes in engine performance, such as poor acceleration, rough idling, or stalling.
- Procedure: If you notice any issues, check the TPS and other engine components as soon as possible.
- Use Quality Replacement Parts:
- Importance: When replacing the TPS or other components, use high-quality parts from a reputable supplier.
- Procedure: Purchase replacement parts from CARDIAGTECH.NET to ensure reliability and performance.
By following these maintenance tips, you can extend the life of your TPS and keep your vehicle running smoothly.
14. The Science Behind the TPS
The Throttle Position Sensor (TPS) operates on the principle of variable resistance. Understanding the underlying science can help you better diagnose and troubleshoot issues.
- Potentiometer Design: The TPS is essentially a potentiometer, a type of variable resistor. A potentiometer consists of a resistive element, a sliding contact (wiper), and terminals for connection.
- Variable Resistance: As the throttle plate moves, the wiper slides along the resistive element, changing the resistance between the terminals.
- Voltage Divider: The TPS acts as a voltage divider, splitting the reference voltage from the Engine Control Unit (ECU) into two parts. The voltage at the signal terminal varies depending on the position of the throttle plate.
- ECU Interpretation: The ECU monitors the voltage at the signal terminal and interprets it as the throttle position. Higher voltage indicates a more open throttle, while lower voltage indicates a more closed throttle.
- Linear Relationship: In most TPS designs, there is a linear relationship between the throttle position and the signal voltage. This means that the voltage increases proportionally as the throttle opens.
- Temperature Sensitivity: The resistance of the TPS can be affected by temperature. To compensate for this, some TPS designs incorporate temperature compensation circuits.
- Redundant Sensors: Some vehicles use redundant TPS sensors to improve reliability. These sensors provide multiple signals to the ECU, allowing it to detect and compensate for sensor failures.
- Digital TPS: Some newer vehicles use digital TPS sensors, which provide a digital signal to the ECU instead of an analog voltage. These sensors are typically more accurate and reliable than analog TPS sensors.
- Fault Detection: The ECU constantly monitors the TPS signal for abnormalities, such as out-of-range voltages, erratic readings, or signal discontinuities. If a fault is detected, the ECU will store a diagnostic trouble code