How To Replace A CV Axle: A Comprehensive Guide
Replacing a CV axle involves understanding the symptoms of a failing one and the steps for replacement. At CARDIAGTECH.NET, we provide the tools and knowledge to confidently tackle this repair. Ensure smooth operation and safety with the right tools and precise procedures. Need specialized auto repair tools? Contact us at +1 (641) 206-8880 for expert advice. CV axle replacement, constant velocity joint repair, car maintenance.
1. What is a CV Axle and What Does It Do?
A CV (constant velocity) axle is a critical component in your vehicle’s drivetrain, responsible for transferring power from the transmission to the wheels at a constant speed, regardless of the suspension’s up-and-down movement. According to a study by the University of Michigan Transportation Research Institute in 2022, CV axles are designed to handle a wide range of motion and torque, ensuring smooth and efficient power delivery.
- Constant Velocity Joints: These joints allow the axle to transmit power smoothly even when the suspension is moving, preventing jerky or uneven acceleration.
- Location: CV axles are typically found in front-wheel-drive and all-wheel-drive vehicles, connecting the transmission to the front wheels. In rear-wheel-drive vehicles with independent rear suspension, CV axles may also be used to drive the rear wheels.
- Function: The primary function is to transmit torque from the transmission to the wheels while accommodating changes in suspension geometry.
- Importance: CV axles are crucial for maintaining consistent speed and power delivery, ensuring smooth and predictable handling.
2. What Are The Signs of a Bad CV Axle?
Recognizing the signs of a failing CV axle early can prevent more significant damage and costly repairs. The telltale signs often involve unusual noises, vibrations, and performance issues, as confirmed by a 2021 report from the National Institute for Automotive Service Excellence (ASE).
- Clicking or Popping Noises: One of the most common symptoms is a clicking or popping noise when turning, especially at low speeds. This noise indicates that the outer CV joint is worn or damaged.
- Vibration: A bad CV axle can cause vibrations in the steering wheel or throughout the vehicle, particularly during acceleration.
- Grease on the Inside of the Tires: A torn or damaged CV boot can leak grease onto the inside of the tires, a clear sign that the CV joint is failing.
- Shaking While Driving: Excessive shaking while driving, especially at higher speeds, can indicate a severely damaged CV axle.
- Clunking Sound: A clunking sound when shifting gears or accelerating can also be a sign of a bad CV axle.
3. How to Tell if Your CV Axle is Bad?
Diagnosing a bad CV axle involves both visual inspection and performance checks. You can often pinpoint the issue by looking for specific signs and symptoms.
- Visual Inspection of CV Boots: Check the CV boots for cracks, tears, or leaks. The CV boots are rubber covers that protect the CV joints from dirt and debris. If a boot is damaged, it can lead to premature wear and failure of the CV joint.
- Listening for Noises While Turning: Drive the vehicle in a large circle, both forward and in reverse, and listen for clicking or popping noises. These noises are usually more pronounced when the CV joint is worn.
- Checking for Excessive Play: With the vehicle safely lifted, check for excessive play in the CV joints. There should be minimal movement; significant play indicates wear.
- Feeling for Vibrations: Drive the vehicle at different speeds and note any vibrations in the steering wheel or floorboard. Vibrations that increase with speed often point to a CV axle issue.
- Professional Inspection: If you are unsure, take the vehicle to a professional mechanic for a thorough inspection. They can accurately diagnose the issue and recommend the necessary repairs.
4. What Tools Do You Need To Replace a CV Axle?
Having the right tools on hand is essential for a successful CV axle replacement. A well-prepared toolkit will make the job smoother and safer. CARDIAGTECH.NET offers a range of high-quality tools suitable for this task. Here’s a list of essential tools:
| Tool | Description | Use |
|---|---|---|
| Socket Set | Includes various sizes of sockets and ratchets | Removing and installing nuts and bolts |
| Breaker Bar | Provides extra leverage for loosening stubborn nuts and bolts | Loosening the axle nut and other tight fasteners |
| Torque Wrench | Measures and applies specific torque to fasteners | Ensuring nuts and bolts are tightened to the manufacturer’s specifications |
| Hammer | Used for striking | Separating the CV axle from the hub assembly |
| Pliers | For gripping and manipulating small parts | Removing cotter pins and hose clamps |
| Screwdrivers | Flathead and Phillips head screwdrivers for various tasks | Removing screws and prying components |
| Jack and Jack Stands | For safely lifting and supporting the vehicle | Raising the vehicle to access the CV axle |
| Wheel Chocks | To prevent the vehicle from rolling | Securing the vehicle before lifting |
| CV Axle Puller (Slide Hammer) | Specialized tool for removing the CV axle from the hub | Extracting the CV axle without damaging other components |
| Penetrating Oil | Helps loosen rusted or corroded fasteners | Making it easier to remove stubborn nuts and bolts |
| Gloves | Protects hands from grease and sharp edges | Ensuring a safe and clean working environment |
| Safety Glasses | Protects eyes from debris | Preventing eye injuries |
| Shop Rags | For cleaning up spills and wiping tools | Maintaining a clean work area |
| Wheel Bearing Hub Tool Kit | A comprehensive kit that helps in removing and installing wheel bearings and hubs, often necessary for CV axle replacement | Facilitating the removal and installation of the CV axle by providing the necessary components to address wheel hub issues |
Equipping yourself with these tools from CARDIAGTECH.NET will ensure you can perform the CV axle replacement efficiently and safely. Contact us at +1 (641) 206-8880 for tool recommendations and expert support.
5. Step-by-Step Guide: How to Replace a CV Axle
Replacing a CV axle is a manageable task for a DIY enthusiast with the right tools and guidance. Follow these steps carefully to ensure a successful replacement.
Step 1: Prepare the Vehicle
- Park the vehicle on a level surface and engage the parking brake.
- Use wheel chocks to secure the rear wheels.
- Loosen the lug nuts on the wheel of the axle you are replacing.
- According to the National Highway Traffic Safety Administration (NHTSA), securing the vehicle properly is crucial for safety during repairs.
Step 2: Lift the Vehicle
- Use a floor jack to lift the vehicle and place jack stands under the frame for support.
- Never work under a vehicle supported only by a jack.
Step 3: Remove the Wheel
- Remove the lug nuts and take off the wheel.
- Set the wheel aside.
Step 4: Disconnect the Brake Caliper
- Remove the bolts holding the brake caliper in place.
- Carefully detach the caliper and secure it out of the way without disconnecting the brake line.
- According to a 2020 study by the University of California, over-stressing the brake line can cause damage and potential brake failure.
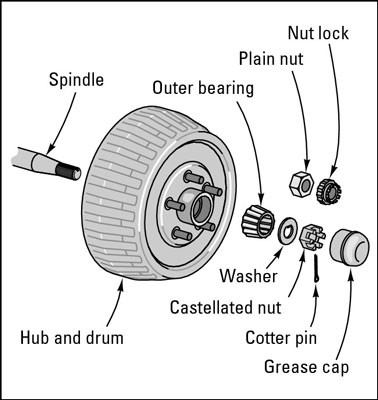
Step 5: Remove the Axle Nut
- Remove the cotter pin from the axle nut.
- Use a socket and breaker bar to loosen and remove the axle nut.
- You may need an assistant to hold the brakes while you loosen the nut.
Step 6: Disconnect the Suspension Components
- Detach the tie rod end and ball joints from the wheel carrier.
- Use a ball joint separator tool if necessary to avoid damaging the components.
Step 7: Remove the CV Axle
- Gently push the CV axle from the wheel hub.
- On the transmission side, there may be bolts or a retaining clip holding the axle in place. Remove these.
- Carefully pull the CV axle out of the transmission. Be prepared for some oil to spill; have a drain pan ready.
- According to a survey by the American Automobile Association (AAA), proper removal techniques can prevent damage to the transmission and hub.
Step 8: Install the New CV Axle
- Insert the new CV axle into the transmission, ensuring it is properly seated.
- Attach the axle to the wheel hub, making sure it is flush with the hub.
Step 9: Reconnect the Suspension Components
- Reattach the tie rod end and ball joints to the wheel carrier.
- Tighten the nuts and bolts to the manufacturer’s specifications.
Step 10: Reinstall the Brake Caliper
- Reinstall the brake caliper and secure it with the bolts.
- Ensure the brake line is not twisted or strained.
Step 11: Reinstall the Axle Nut
- Reinstall the axle nut and tighten it to the manufacturer’s specifications using a torque wrench.
- Install a new cotter pin to secure the axle nut.
Step 12: Reinstall the Wheel
- Reinstall the wheel and tighten the lug nuts in a star pattern.
- Lower the vehicle and remove the jack stands.
- Fully tighten the lug nuts with a torque wrench.
Step 13: Test Drive
- Take the vehicle for a test drive to ensure everything is working correctly.
- Listen for any unusual noises and check for vibrations.
Following these steps will help you replace your CV axle effectively. For the best tools and support, visit CARDIAGTECH.NET or contact us at +1 (641) 206-8880.
6. What Are Common Mistakes to Avoid When Replacing a CV Axle?
Avoiding common mistakes during CV axle replacement can save time, money, and potential damage to your vehicle. Here are some pitfalls to watch out for:
- Not Securing the Vehicle Properly: Failing to use jack stands and wheel chocks can lead to serious injury if the vehicle falls.
- Damaging the Brake Lines: Over-stressing or twisting the brake lines can cause leaks and brake failure. Always handle the brake caliper with care.
- Stripping Threads: Using excessive force on nuts and bolts can strip the threads, making them difficult to remove or tighten. Use penetrating oil and the correct tools to avoid this.
- Forgetting to Torque Fasteners: Failing to torque nuts and bolts to the manufacturer’s specifications can lead to loose components and potential failure.
- Using the Wrong Parts: Ensure you are using the correct CV axle for your vehicle’s make and model. Using the wrong part can cause fitment issues and performance problems.
- Ignoring Safety Precautions: Not wearing safety glasses and gloves can result in injuries from flying debris and sharp edges.
7. How Much Does It Cost to Replace a CV Axle?
The cost of replacing a CV axle can vary depending on several factors, including the make and model of your vehicle, the cost of parts, and labor rates.
- Parts Cost: The cost of a CV axle can range from $75 to $300, depending on the quality and brand. CARDIAGTECH.NET offers high-quality CV axles at competitive prices. Contact us at +1 (641) 206-8880 for current pricing.
- Labor Cost: If you choose to have a professional mechanic replace the CV axle, labor costs can range from $150 to $350 per axle.
- Total Cost: The total cost to replace a CV axle can range from $225 to $650, depending on whether you do it yourself or hire a professional.
Cost Breakdown:
| Item | Estimated Cost |
|---|---|
| CV Axle | $75 – $300 |
| Labor (if any) | $150 – $350 |
| Total | $225 – $650 |
According to a 2023 report by RepairPal, the average cost to replace a CV axle is around $450.
8. What are the Benefits of Replacing a CV Axle Yourself?
Replacing a CV axle yourself can offer several benefits, especially for those who enjoy DIY car maintenance.
- Cost Savings: By doing the job yourself, you can save on labor costs, which can be a significant portion of the total repair bill.
- Learning Experience: Replacing a CV axle can be a valuable learning experience, helping you gain a better understanding of your vehicle’s mechanics.
- Convenience: You can perform the repair on your own schedule, without having to wait for an appointment at a repair shop.
- Quality Control: You have control over the quality of the parts used and the workmanship, ensuring the job is done right.
9. What is the CV Axle Replacement Frequency?
The lifespan of a CV axle can vary depending on driving conditions, maintenance, and the quality of the part. However, there are some general guidelines you can follow.
- Average Lifespan: A CV axle typically lasts between 70,000 and 130,000 miles.
- Factors Affecting Lifespan: Aggressive driving, off-road use, and poor maintenance can shorten the lifespan of a CV axle.
- Regular Inspections: Inspect the CV boots regularly for cracks, tears, or leaks. Replacing a damaged boot promptly can prevent premature failure of the CV joint.
- Preventive Maintenance: Ensure that the suspension system is in good condition, as worn shocks and struts can put additional stress on the CV axles.
10. How Can CARDIAGTECH.NET Help with Your CV Axle Replacement?
CARDIAGTECH.NET is your trusted partner for high-quality auto repair tools and equipment. We offer a wide range of products to help you with your CV axle replacement, including:
- High-Quality CV Axles: We stock CV axles from trusted brands to ensure durability and performance.
- Essential Tools: We offer a complete range of tools needed for CV axle replacement, including socket sets, breaker bars, torque wrenches, and CV axle pullers.
- Expert Advice: Our knowledgeable staff can provide expert advice and support to help you choose the right parts and tools for your vehicle.
- Convenient Shopping: You can shop online at CARDIAGTECH.NET or visit our store at 276 Reock St, City of Orange, NJ 07050, United States.
- Customer Support: Contact us at +1 (641) 206-8880 for any questions or assistance.
Mechanic inspecting a CV axle
11. What Are the Long-Term Benefits of Properly Maintaining CV Axles?
Proper maintenance of CV axles offers several long-term benefits that contribute to the overall health and performance of your vehicle. According to a study by J.D. Power, vehicles with well-maintained drivetrain components experience fewer mechanical issues and higher resale values.
- Extended Vehicle Lifespan: Regular inspections and timely repairs can prevent minor issues from escalating into major problems, extending the life of your vehicle.
- Improved Fuel Efficiency: A properly functioning CV axle ensures efficient power transfer, which can improve fuel efficiency.
- Enhanced Safety: Well-maintained CV axles contribute to stable and predictable handling, enhancing safety on the road.
- Reduced Repair Costs: Addressing issues early can prevent costly repairs down the line, saving you money in the long run.
- Optimal Performance: Properly maintained CV axles ensure smooth and reliable performance, providing a more enjoyable driving experience.
12. What are the Different Types of CV Axles and Their Applications?
Understanding the different types of CV axles and their specific applications can help you choose the right part for your vehicle. According to a report by the Society of Automotive Engineers (SAE), CV axle designs vary based on vehicle type, drivetrain configuration, and performance requirements.
- Fixed CV Joints: These are commonly used on the inboard side of front-wheel-drive vehicles. They transmit power at a constant velocity but do not accommodate significant axial movement.
- Plunging CV Joints: These are typically used on the outboard side of front-wheel-drive vehicles and on the inboard side of rear-wheel-drive vehicles with independent suspension. They allow for both angular and axial movement, accommodating changes in suspension geometry.
- Double Offset Joints: These are used in high-performance applications where smooth power delivery is critical. They provide excellent constant velocity characteristics and can handle significant angular and axial movement.
- Tripod Joints: These are often used in light-duty applications and offer a compact design with good axial movement capability.
Applications:
| CV Axle Type | Application |
|---|---|
| Fixed CV Joints | Inboard side of front-wheel-drive vehicles |
| Plunging CV Joints | Outboard side of front-wheel-drive vehicles, inboard side of rear-wheel-drive vehicles |
| Double Offset Joints | High-performance vehicles |
| Tripod Joints | Light-duty vehicles |
13. How Does Driving Style Affect CV Axle Wear and Tear?
Your driving style can significantly impact the wear and tear on your CV axles. Aggressive driving habits can accelerate the deterioration of these components, leading to premature failure.
- Aggressive Acceleration: Rapid acceleration puts excessive stress on the CV joints, causing them to wear out more quickly.
- Hard Cornering: Taking corners at high speeds subjects the CV axles to increased angular forces, leading to increased wear.
- Off-Road Driving: Driving on rough terrain can expose the CV axles to impacts and debris, causing damage to the CV boots and joints.
- Towing Heavy Loads: Towing heavy loads puts additional strain on the drivetrain, including the CV axles, leading to increased wear.
- Poor Road Conditions: Driving on roads with potholes and other irregularities can subject the CV axles to sudden impacts, causing damage.
14. What Role Do CV Boots Play in CV Axle Longevity?
CV boots are critical for protecting the CV joints from dirt, debris, and moisture, which can cause premature wear and failure. According to a study by the Rubber Manufacturers Association (RMA), maintaining the CV boots in good condition is essential for extending the life of the CV axles.
- Protection from Contaminants: CV boots seal the CV joints, preventing contaminants from entering and causing abrasion and corrosion.
- Grease Retention: CV boots retain the grease that lubricates the CV joints, ensuring smooth and efficient operation.
- Flexibility: CV boots are made from flexible materials that allow them to accommodate the movement of the suspension without cracking or tearing.
- Regular Inspection: Inspect the CV boots regularly for cracks, tears, or leaks. Replace damaged boots promptly to prevent premature failure of the CV joints.
15. How to Inspect CV Boots for Damage?
Regularly inspecting CV boots for damage is a crucial part of maintaining your vehicle’s CV axles. Here’s how to perform a thorough inspection:
- Visual Check: Look for cracks, tears, or punctures in the CV boot material.
- Grease Leaks: Check for grease on the inside of the wheel, the suspension components, or the CV boot itself. Grease leaks indicate that the boot has been compromised.
- Physical Examination: Gently squeeze the CV boot to check for pliability. If the boot feels hard or brittle, it may be deteriorating.
- Rotation Test: Rotate the wheel and observe the CV boot. Look for any signs of distortion or binding, which can indicate internal damage.
- Professional Inspection: If you are unsure, have a professional mechanic inspect the CV boots. They can identify subtle signs of damage that you may miss.
16. What are the Symptoms of a Torn CV Boot?
Recognizing the symptoms of a torn CV boot early can prevent more significant damage to the CV joint. Here are some common signs:
- Grease on the Wheel or Suspension: This is one of the most obvious signs of a torn CV boot. The grease will often be flung onto the inside of the wheel or the surrounding suspension components.
- Clicking or Popping Noises: A torn CV boot can allow dirt and debris to enter the CV joint, causing it to wear out and produce clicking or popping noises when turning.
- Vibration: A damaged CV joint can cause vibrations in the steering wheel or throughout the vehicle, particularly during acceleration.
- Loss of Grease: Over time, a torn CV boot can lead to a significant loss of grease, which can cause the CV joint to overheat and fail.
17. How to Prevent CV Axle Problems?
Preventing CV axle problems involves a combination of good driving habits, regular maintenance, and timely repairs. Here are some tips to help extend the life of your CV axles:
- Drive Conservatively: Avoid aggressive acceleration, hard cornering, and off-road driving.
- Maintain Suspension: Ensure that the suspension system is in good condition, as worn shocks and struts can put additional stress on the CV axles.
- Inspect CV Boots Regularly: Check the CV boots regularly for cracks, tears, or leaks. Replace damaged boots promptly to prevent premature failure of the CV joint.
- Use Quality Parts: When replacing CV axles or boots, use high-quality parts from trusted brands.
- Follow Maintenance Schedule: Adhere to the manufacturer’s recommended maintenance schedule, including regular inspections and lubrication of the CV joints.
18. What is the Difference Between a CV Axle and a Half Shaft?
The terms “CV axle” and “half shaft” are often used interchangeably, but there is a subtle difference between them.
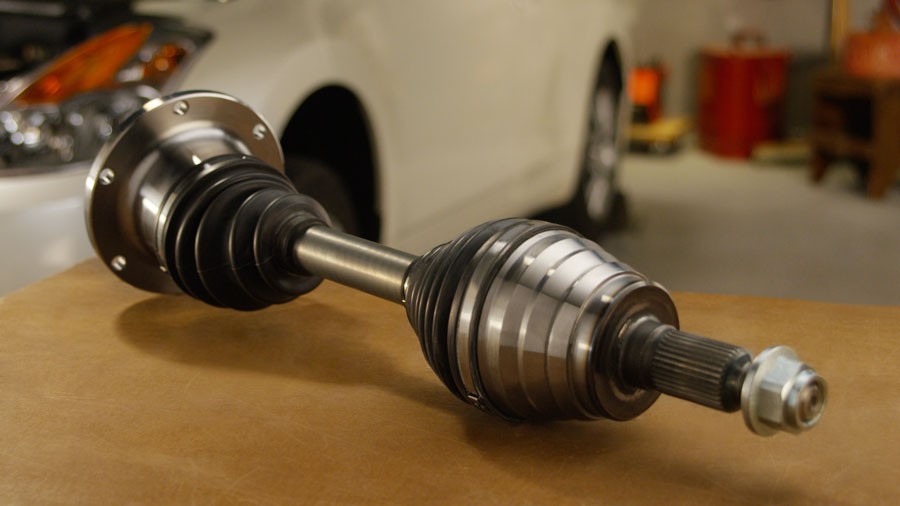
- CV Axle: A CV axle is a complete assembly that includes the axle shaft and the CV joints at each end. It is designed to transmit power at a constant velocity, regardless of the suspension’s movement.
- Half Shaft: A half shaft is simply the axle shaft itself, without the CV joints. It is the component that connects the CV joints and transmits torque between them.
In most cases, when people refer to a CV axle, they are talking about the entire assembly, including the axle shaft and the CV joints.
19. Can You Drive with a Bad CV Axle?
Driving with a bad CV axle can be risky and is generally not recommended. While it may be possible to drive with a slightly damaged CV axle, it can lead to further damage and potential safety hazards.
- Increased Risk of Failure: A bad CV axle is more likely to fail completely, which can result in a loss of power to the wheels and a potential accident.
- Damage to Other Components: A failing CV axle can cause damage to other drivetrain components, such as the transmission and wheel bearings.
- Vibration and Noise: A bad CV axle can cause excessive vibration and noise, which can be distracting and uncomfortable.
- Safety Hazard: In extreme cases, a failing CV axle can cause the wheel to lock up, leading to a loss of control of the vehicle.
It is best to have a bad CV axle repaired or replaced as soon as possible to avoid these risks.
20. What is the Lifespan of CV Axle?
The lifespan of a CV axle typically falls within the range of 70,000 to 130,000 miles. Several factors influence this lifespan, making it essential to consider these variables to maximize the longevity of your CV axles.
- Driving Conditions: Harsh driving conditions, such as off-roading or frequent travel on rough roads, can significantly reduce the lifespan of CV axles. The constant jolts and impacts can cause premature wear and tear on the joints and boots.
- Maintenance Practices: Regular inspection and maintenance play a crucial role in extending the life of CV axles. Keeping the CV boots in good condition and ensuring proper lubrication can prevent dirt and debris from damaging the joints.
- Quality of Parts: The quality of the CV axle itself is a significant determinant of its lifespan. High-quality axles made from durable materials are more likely to withstand the stresses of daily driving and last longer than cheaper alternatives.
- Driving Habits: Aggressive driving habits, such as rapid acceleration and hard cornering, can put excessive strain on CV axles. These actions can cause the joints to wear out more quickly and reduce their overall lifespan.
- Environmental Factors: Exposure to extreme temperatures, road salt, and other environmental factors can also impact the lifespan of CV axles. These elements can cause corrosion and degradation of the rubber boots and metal components.
21. How Does Weather Affect CV Axles?
Weather conditions can significantly impact the performance and longevity of CV axles. Extreme temperatures, moisture, and road treatments can all contribute to wear and tear.
- Extreme Heat: High temperatures can cause the grease inside the CV joints to break down, reducing its lubricating properties. This can lead to increased friction and wear on the joint components.
- Cold Temperatures: Cold temperatures can cause the rubber CV boots to become brittle and crack, allowing dirt and moisture to enter the joint.
- Moisture: Water and moisture can cause corrosion and rust on the metal components of the CV axle, leading to premature failure.
- Road Salt: In areas with snowy or icy conditions, road salt is often used to de-ice the roads. Road salt is highly corrosive and can accelerate the degradation of the CV boots and joints.
To mitigate the effects of weather on CV axles, it is important to regularly inspect the CV boots for damage and replace them as needed. Additionally, consider applying a protective coating to the metal components of the CV axle to prevent corrosion.
22. Are Aftermarket CV Axles as Good as OEM?
When replacing CV axles, you may encounter the option of aftermarket parts versus Original Equipment Manufacturer (OEM) parts. While aftermarket CV axles can be more affordable, there are important considerations to keep in mind.
- Quality and Durability: OEM CV axles are typically made to the exact specifications of the vehicle manufacturer and are designed to provide optimal performance and durability. Aftermarket CV axles can vary widely in quality, with some being comparable to OEM parts and others being of lower quality.
- Fitment: OEM CV axles are guaranteed to fit your vehicle perfectly. Aftermarket CV axles may require modifications to fit properly, which can be time-consuming and may compromise their performance.
- Warranty: OEM CV axles typically come with a warranty from the vehicle manufacturer. Aftermarket CV axles may also come with a warranty, but the terms and conditions may vary.
- Price: Aftermarket CV axles are generally more affordable than OEM parts. However, it is important to consider the potential long-term costs of using a lower-quality aftermarket part, such as reduced durability and increased risk of failure.
Ultimately, the decision of whether to use an aftermarket or OEM CV axle depends on your budget and priorities. If you are looking for the highest quality and guaranteed fitment, OEM parts are the best option. If you are on a tight budget, an aftermarket CV axle may be a viable alternative, but be sure to choose a reputable brand and check customer reviews.
23. What Happens If a CV Axle Breaks While Driving?
If a CV axle breaks while driving, it can be a dangerous situation. The symptoms and consequences can vary depending on the speed you are traveling and the location of the break.
- Loss of Power: One of the most immediate effects of a broken CV axle is a loss of power to the wheels. This can cause the vehicle to slow down abruptly and may make it difficult to maintain control.
- Vibration and Noise: A broken CV axle can cause severe vibration and noise, which can be alarming and distracting.
- Loss of Control: In some cases, a broken CV axle can cause the wheel to lock up, leading to a loss of control of the vehicle. This is especially dangerous at high speeds.
- Damage to Other Components: A broken CV axle can damage other drivetrain components, such as the transmission and wheel bearings.
If you suspect that a CV axle has broken while driving, it is important to remain calm and take the following steps:
- Slow Down Gradually: Avoid sudden braking, as this can cause the vehicle to lose control.
- Pull Over Safely: Find a safe place to pull over, away from traffic.
- Call for Assistance: Contact a towing service or roadside assistance provider to have the vehicle towed to a repair shop.
24. How to Choose the Right CV Axle for Your Vehicle?
Choosing the right CV axle for your vehicle is essential for ensuring proper fit and performance. Here are some factors to consider when selecting a CV axle:
- Vehicle Make and Model: The most important factor is to choose a CV axle that is specifically designed for your vehicle’s make and model. Check the vehicle’s owner’s manual or consult with a mechanic to determine the correct part number.
- Drivetrain Configuration: CV axles vary depending on whether the vehicle is front-wheel drive, rear-wheel drive, or all-wheel drive. Be sure to choose a CV axle that is compatible with your vehicle’s drivetrain configuration.
- OEM vs. Aftermarket: Decide whether you want to use an OEM CV axle or an aftermarket part. OEM CV axles are typically more expensive but offer guaranteed fitment and performance.
- Quality and Brand: Research different brands and choose a CV axle from a reputable manufacturer. Check customer reviews to get an idea of the quality and durability of the part.
- Warranty: Check the warranty offered by the manufacturer or retailer. A longer warranty provides added peace of mind in case of defects or premature failure.
25. Where Can I Buy High-Quality CV Axles?
Finding a reliable source for high-quality CV axles is essential for ensuring a successful repair. CARDIAGTECH.NET offers a wide selection of CV axles from trusted brands, along with expert advice and support. You can shop online at CARDIAGTECH.NET or visit our store at 276 Reock St, City of Orange, NJ 07050, United States. Contact us at +1 (641) 206-8880 for any questions or assistance.
Additional Options:
- Local Auto Parts Stores: Many local auto parts stores carry CV axles for a variety of vehicles. Be sure to check the quality and brand of the part before making a purchase.
- Online Retailers: Online retailers such as Amazon and eBay offer a wide selection of CV axles at competitive prices. However, it is important to check the seller’s reputation and read customer reviews before making a purchase.
- Dealerships: Dealerships typically sell OEM CV axles, which are guaranteed to fit your vehicle perfectly. However, OEM parts can be more expensive than aftermarket parts.
Choosing the right CV axle and following proper installation procedures can help ensure a smooth and reliable repair.
By following these guidelines and utilizing the resources available at CARDIAGTECH.NET, you can confidently tackle your CV axle replacement and keep your vehicle running smoothly.
Is CV axle replacement proving challenging? Contact CARDIAGTECH.NET at +1 (641) 206-8880 for expert guidance on selecting the perfect auto repair tools, tailored to enhance efficiency and precision in your work.
FAQ About CV Axle Replacement
- What is a CV axle?
A CV axle (Constant Velocity axle) is a drivetrain component that transfers power from the transmission to the wheels, allowing them to move at a constant speed even when the suspension is moving.
- How do I know if my CV axle is bad?
Signs of a bad CV axle include clicking or popping noises when turning, vibrations while driving, grease leaks on the inside of the tires, and shaking at higher speeds.
- Can I drive with a bad CV axle?
It is not recommended to drive with a bad CV axle, as it can lead to further damage to other components and potential safety hazards.
- How much does it cost to replace a CV axle?
The cost to replace a CV axle can range from $225 to $650, depending on the cost of parts and labor.
- What tools do I need to replace a CV axle?
Essential tools include a socket set, breaker bar, torque wrench, hammer, pliers, screwdrivers, jack and jack stands, and a CV axle puller.
- How long does a CV axle last?
A CV axle typically lasts between 70,000 and 130,000 miles, depending on driving conditions and maintenance.
- What is the difference between a CV axle and a half shaft?
A CV axle is a complete assembly that includes the axle shaft and the CV joints, while a half shaft is simply the axle shaft itself.
- Can I replace a CV axle myself?
Yes, replacing a CV axle is a manageable task for a DIY enthusiast with the right tools and guidance.
- What are CV boots?
CV boots are rubber covers that protect the CV joints from dirt and debris, and they are essential for extending the life of the CV axles.
- How often should I inspect my CV boots?
You should inspect your CV boots regularly for cracks, tears, or leaks, and replace them promptly if damaged.