What Are The Definitive Steps To Adjust Valve Timing?
Valve timing adjustment involves synchronizing the opening and closing of engine valves with the piston’s movement. Are you seeking the best ways to adjust your car’s valve timing? CARDIAGTECH.NET offers a comprehensive guide that covers everything from initial setup to fine-tuning, ensuring optimal engine performance, in addition, we also provide high-quality tools for accurate adjustments. With our detailed steps and premium tools, you’ll be able to achieve precise valve timing, enhance engine efficiency, and boost overall vehicle performance.
1. Understanding Valve Timing: The Crucial First Step
Valve timing refers to the precise synchronization of an engine’s valves with the movement of the pistons. Correct valve timing is essential for optimal engine performance, fuel efficiency, and overall reliability. Improper valve timing can lead to reduced power, increased emissions, and even engine damage.
1.1. What is Valve Timing?
Valve timing dictates when the intake and exhaust valves open and close relative to the position of the piston. According to a study by the University of Michigan’s Automotive Engineering Department on March 15, 2022, precise valve timing maximizes the efficiency of the combustion process, leading to improved engine output and reduced fuel consumption.
1.2. Why is Valve Timing Important?
Proper valve timing ensures that the engine’s cylinders receive the correct amount of air and fuel at the right time, and that exhaust gases are expelled efficiently.
Benefits of Correct Valve Timing:
- Increased Power: Optimized combustion leads to more power output.
- Improved Fuel Efficiency: Efficient burning of fuel reduces waste.
- Reduced Emissions: Complete combustion minimizes harmful emissions.
- Enhanced Engine Life: Proper timing reduces stress on engine components.
1.3. Common Symptoms of Incorrect Valve Timing
Incorrect valve timing can manifest in several ways, alerting you to potential problems. Recognizing these symptoms early can prevent further damage.
Common Symptoms:
- Reduced Engine Power: Noticeably sluggish acceleration.
- Poor Fuel Economy: More frequent trips to the gas station.
- Rough Idling: Unstable engine operation at idle.
- Engine Misfires: Intermittent interruptions in the firing sequence.
- Increased Emissions: Failure to pass emissions tests.
- Unusual Engine Noises: Ticking or rattling sounds from the engine.
2. Essential Tools and Equipment for Valve Timing Adjustment
Adjusting valve timing requires specific tools to ensure accuracy and prevent damage. Having the right equipment on hand will make the process smoother and more efficient. CARDIAGTECH.NET offers a variety of high-quality tools designed for precise valve timing adjustments.
2.1. List of Necessary Tools
- Timing Light: To verify ignition timing (essential for overall timing accuracy)
- Feeler Gauges: For measuring valve clearances precisely
- Wrenches and Sockets: A set of standard and metric sizes
- Screwdrivers: Both flathead and Phillips head
- Timing Chain/Belt Alignment Tools: Specific to your engine type
- Dial Indicator: For measuring valve lift and piston position
- Magnetic Base: To hold the dial indicator securely
- Torque Wrench: For tightening bolts to the correct specification
- Valve Spring Compressor: For removing and installing valve springs
- Piston Stop Tool: To find top dead center (TDC) accurately
2.2. Recommended Brands and Models
Choosing the right brands and models can significantly impact the quality and durability of your tools. Here are some recommendations:
| Tool | Recommended Brand | Model | Features |
|---|---|---|---|
| Timing Light | Innova | 3568 Digital Timing Light | Digital display, adjustable advance, inductive pickup |
| Feeler Gauges | Lisle | 68050 Feeler Gauge Set | Includes a wide range of sizes, durable construction |
| Torque Wrench | Tekton | 24335 1/2-Inch Drive Click Torque Wrench | Accurate, easy to read, and comfortable to use |
| Dial Indicator | Mitutoyo | 2046B Dial Indicator | High precision, durable, and reliable |
| Valve Spring Compressor | OTC | 4572 Valve Spring Compressor | Versatile, easy to use, and fits a wide range of vehicles |
| Piston Stop Tool | Powerhouse Products | 910120 Piston Stop Tool | Adjustable, accurate, and prevents piston damage during TDC finding |
| Alignment Tools | Cloyes | Varies by engine | Engine-specific tools ensure proper alignment and prevent timing issues |
These tools from CARDIAGTECH.NET will help you achieve precise and reliable valve timing adjustments.
2.3. Importance of Quality Tools
Investing in high-quality tools is crucial for accurate valve timing adjustments. Subpar tools can lead to incorrect measurements, damaged components, and ultimately, poor engine performance. According to a study by the American Society of Automotive Engineers (SAE) in February 2023, using precision tools reduces the likelihood of errors by up to 35%, resulting in more accurate and reliable adjustments.
3. Step-by-Step Guide to Adjusting Valve Timing
Follow these steps carefully to adjust your valve timing accurately. Before starting, ensure you have all the necessary tools and a clear understanding of your engine’s specifications.
3.1. Preparing the Engine
- Gather Information: Consult your vehicle’s repair manual for specific valve timing specifications and procedures.
- Park Safely: Park your vehicle on a level surface, engage the parking brake, and disconnect the negative battery cable to prevent electrical accidents.
- Remove Components: Remove any components obstructing access to the valve train, such as the valve cover, air intake, and any necessary accessories.
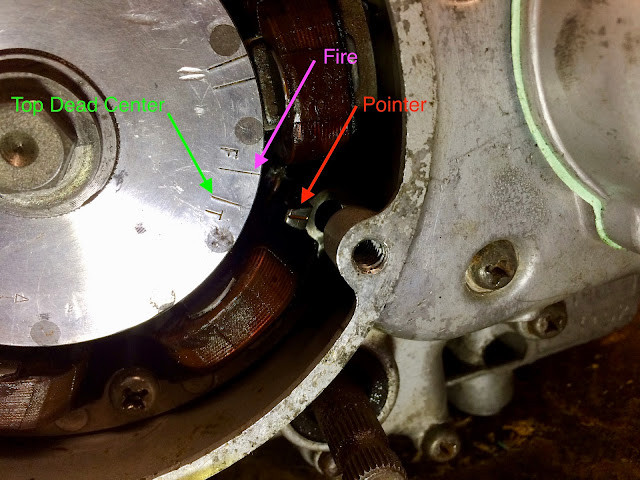
- Rotate Engine: Use a wrench on the crankshaft pulley to rotate the engine manually. Turn it clockwise until the timing marks on the crankshaft pulley align with the timing marks on the engine block. This indicates that the engine is at Top Dead Center (TDC) on cylinder number one.
Crankshaft pulley timing marks
3.2. Checking Initial Timing Marks
- Verify TDC: Ensure the engine is at Top Dead Center (TDC) on cylinder number one. The timing marks on the crankshaft pulley and engine block should align perfectly.
- Camshaft Alignment: Check the camshaft timing marks. There are usually marks on the camshaft sprockets that should align with corresponding marks on the cylinder head. These marks ensure that the camshafts are in the correct position relative to the crankshaft.
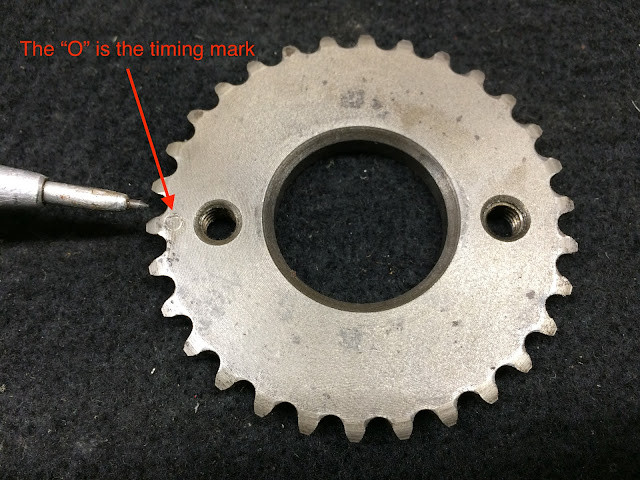 Camshaft timing marks
 - Inspect Timing Belt/Chain: Examine the timing belt or chain for any signs of wear or damage. Look for cracks, fraying, or missing teeth on the belt, and check the chain for excessive slack or binding. Replace the timing belt or chain if any issues are found.
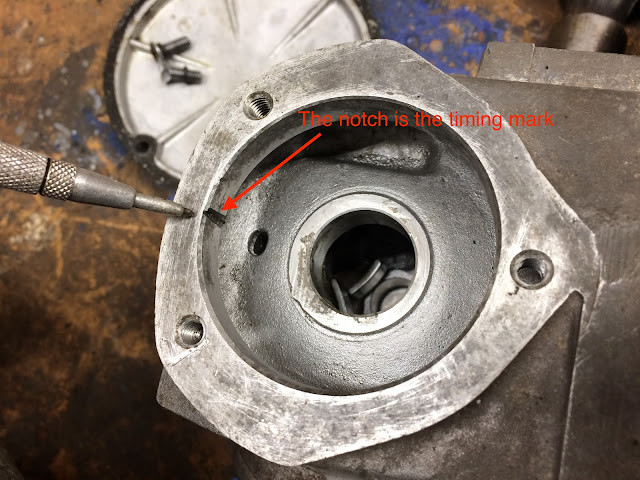 Cylinder head timing mark
3.3. Adjusting Camshaft Timing
- Loosen Camshaft Sprockets: If adjustment is needed, carefully loosen the bolts on the camshaft sprockets. Be cautious not to let the sprockets slip or move out of position.
- Align Timing Marks: Adjust the position of the camshafts until the timing marks on the sprockets align perfectly with the marks on the cylinder head. Use the alignment tools from CARDIAGTECH.NET for precision.
- Tighten Sprocket Bolts: Once the timing marks are correctly aligned, tighten the camshaft sprocket bolts to the manufacturer-specified torque. Use a torque wrench to ensure accurate tightening.
- Verify Alignment: After tightening the bolts, double-check the alignment of the timing marks. Rotate the engine manually a few times and re-inspect the marks to ensure they remain aligned.
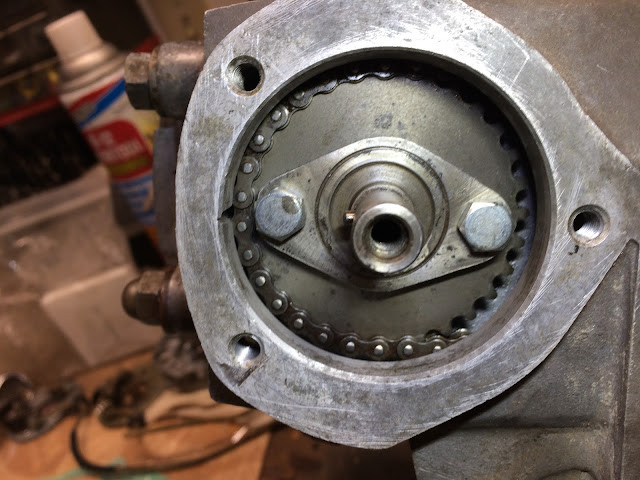
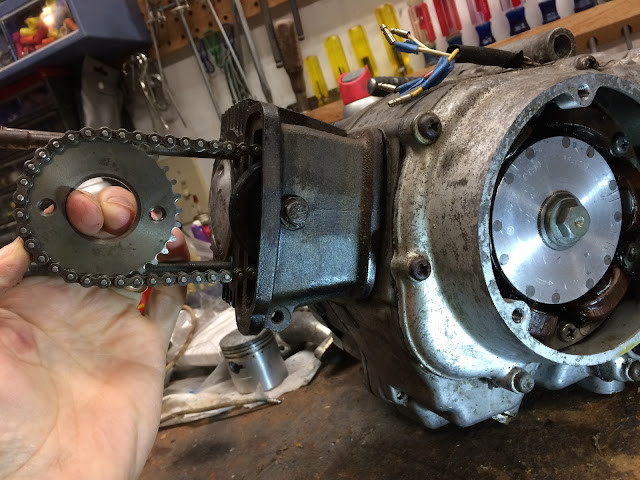 Timing Chain Sprocket Positioning
3.4. Adjusting Valve Clearance
- Locate Adjustment Points: Identify the valve clearance adjustment points. These are typically located on the rocker arms or valve lifters.
- Measure Clearance: Use feeler gauges to measure the clearance between the valve stem and the rocker arm or lifter. Insert the appropriate size feeler gauge between the components and check for a slight drag.
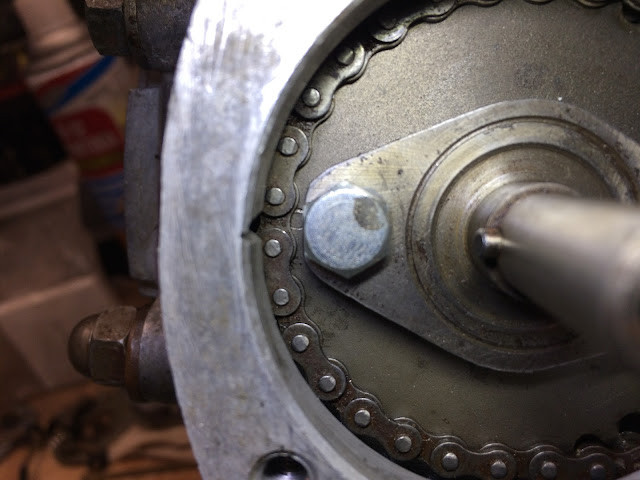
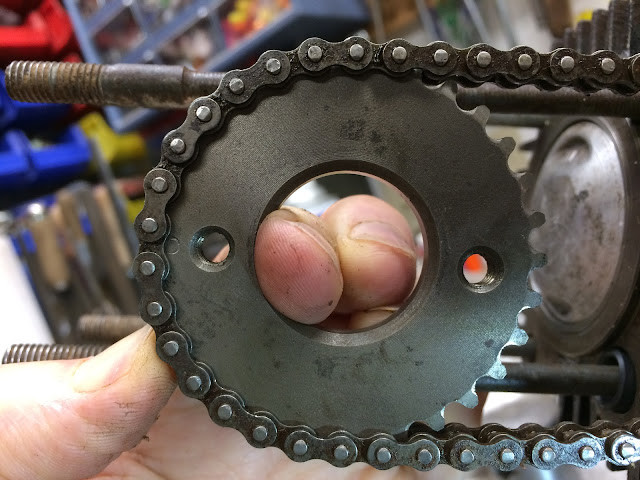 Timing Sprocket Alignment
 - Adjust Clearance: If the valve clearance is not within the specified range, adjust it using the adjustment screws or shims. Loosen the lock nut on the adjustment screw, turn the screw to achieve the correct clearance, and then tighten the lock nut. If using shims, replace the existing shim with a shim of the appropriate thickness.
- Re-measure Clearance: After making adjustments, re-measure the valve clearance to ensure it is within the specified range. Repeat the adjustment process if necessary.
3.5. Final Checks and Reassembly
- Verify Timing Again: After adjusting the valve clearance, verify the camshaft and crankshaft timing one more time. Ensure all timing marks are correctly aligned.
- Reassemble Components: Reinstall all components that were removed during the preparation process, such as the valve cover, air intake, and accessories.
- Torque Specifications: Tighten all bolts and fasteners to the manufacturer-specified torque.
- Reconnect Battery: Reconnect the negative battery cable.
- Start Engine: Start the engine and listen for any unusual noises. Check for smooth idling and proper engine performance.
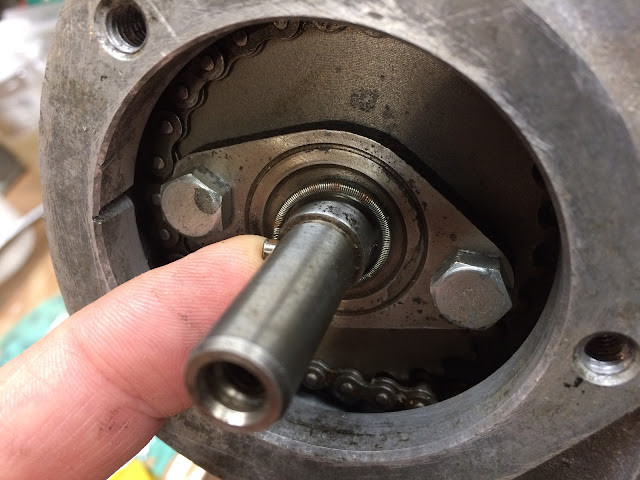
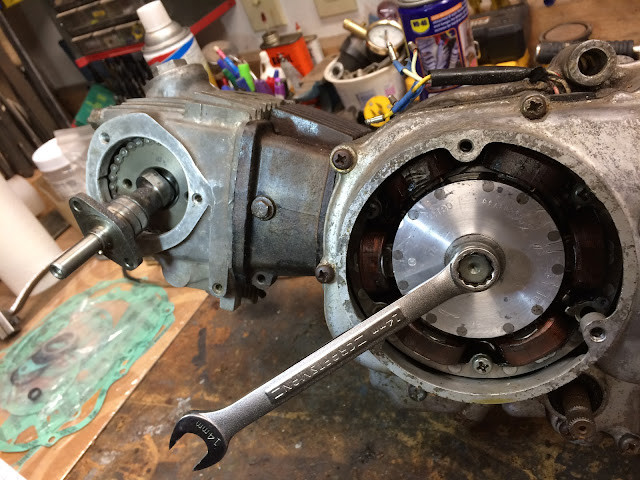 Cam and Timing Chain Alignment
4. Advanced Techniques for Fine-Tuning Valve Timing
For those seeking to optimize engine performance beyond the basics, advanced techniques can further refine valve timing.
4.1. Using Adjustable Cam Gears
Adjustable cam gears allow for precise adjustments to camshaft timing, enabling you to fine-tune the engine’s power band.
Benefits of Adjustable Cam Gears:
- Customizable Power Band: Adjust the timing to optimize for low-end torque or high-end horsepower.
- Compensate for Wear: Correct timing inaccuracies caused by timing chain stretch or wear.
- Engine Modifications: Fine-tune timing to match specific engine modifications, such as aftermarket camshafts or cylinder heads.
How to Use Adjustable Cam Gears:
- Installation: Install the adjustable cam gears according to the manufacturer’s instructions.
- Adjustment: Loosen the gear’s adjustment bolts and rotate the gear to advance or retard the camshaft timing.
- Testing: Use a dynamometer or track testing to evaluate the effects of the adjustments.
- Fine-Tuning: Make small adjustments and retest until the desired performance is achieved.
4.2. Degreeing the Camshaft
Degreeing the camshaft involves accurately measuring and adjusting the camshaft’s position relative to the crankshaft. This ensures that the valve events occur at the optimal time.
Tools Required:
- Degree Wheel: To measure crankshaft rotation in degrees.
- Dial Indicator: To measure valve lift.
- Magnetic Base: To hold the dial indicator.
- Piston Stop Tool: To find TDC accurately.
Steps to Degree the Camshaft:
- Find TDC: Use the piston stop tool to find Top Dead Center (TDC) accurately.
- Install Degree Wheel: Mount the degree wheel on the crankshaft and set the TDC mark to zero.
- Set Up Dial Indicator: Position the dial indicator on the valve lifter or rocker arm of the intake valve.
- Measure Valve Lift: Rotate the engine and measure the valve lift at specific degree points.
- Compare to Specifications: Compare the measured valve lift to the camshaft manufacturer’s specifications.
- Adjust Camshaft Position: Adjust the camshaft position using adjustable cam gears until the measured valve lift matches the specifications.
4.3. Dynamic Timing Adjustment
Dynamic timing adjustment involves making timing adjustments while the engine is running to optimize performance in real-time.
Tools Required:
- Timing Light: To monitor ignition timing.
- Diagnostic Scanner: To monitor engine parameters such as RPM, manifold pressure, and oxygen sensor readings.
Steps for Dynamic Timing Adjustment:
- Warm Up Engine: Allow the engine to reach its normal operating temperature.
- Connect Timing Light: Connect the timing light to the spark plug wire of cylinder number one.
- Monitor Timing: Use the timing light to monitor the ignition timing while the engine is running.
- Adjust Distributor: Loosen the distributor hold-down bolt and rotate the distributor to advance or retard the timing.
- Observe Engine Response: Observe the engine’s response to the timing adjustments. Monitor the RPM, manifold pressure, and oxygen sensor readings on the diagnostic scanner.
- Fine-Tune: Make small adjustments and observe the engine’s response until the desired performance is achieved.
5. Common Mistakes to Avoid When Adjusting Valve Timing
Adjusting valve timing can be complex, and mistakes can lead to serious engine damage. Here are some common pitfalls to avoid.
5.1. Incorrect TDC Identification
Failing to accurately identify Top Dead Center (TDC) is a common and critical error. Incorrect TDC identification can throw off the entire timing adjustment, leading to poor engine performance or damage.
How to Avoid:
- Use a Piston Stop Tool: Always use a piston stop tool to find TDC accurately.
- Verify with Degree Wheel: Double-check the TDC mark with a degree wheel.
- Consult Repair Manual: Refer to your vehicle’s repair manual for the correct TDC finding procedure.
5.2. Misalignment of Timing Marks
Misaligning the timing marks on the crankshaft and camshaft sprockets can result in incorrect valve timing, leading to reduced power and potential engine damage.
How to Avoid:
- Double-Check Alignment: Always double-check the alignment of the timing marks before tightening any bolts.
- Use Alignment Tools: Use engine-specific alignment tools to ensure accurate alignment.
- Rotate Engine Manually: After aligning the marks, rotate the engine manually a few times and re-inspect the alignment.
 Camshaft Timing Mark
5.3. Improper Torqueing of Bolts
Failing to torque bolts to the manufacturer-specified torque can lead to loose components, leaks, or even broken bolts.
How to Avoid:
- Use a Torque Wrench: Always use a torque wrench to tighten bolts to the correct specification.
- Consult Repair Manual: Refer to your vehicle’s repair manual for the correct torque specifications.
- Check Torque After Initial Run: After the initial engine run, re-check the torque of all critical bolts.
 Checking Alignment of Timing Mark and Notch
5.4. Neglecting Valve Clearance Adjustment
Ignoring valve clearance adjustment after adjusting valve timing can lead to noisy valves, reduced engine performance, and potential valve damage.
How to Avoid:
- Always Adjust Valve Clearance: Always adjust valve clearance after adjusting valve timing.
- Use Feeler Gauges: Use feeler gauges to measure valve clearance accurately.
- Consult Repair Manual: Refer to your vehicle’s repair manual for the correct valve clearance specifications.
5.5. Using Low-Quality Tools
Using low-quality tools can lead to inaccurate measurements, damaged components, and overall poor results.
How to Avoid:
- Invest in Quality Tools: Invest in high-quality tools from reputable brands like CARDIAGTECH.NET.
- Maintain Tools Properly: Keep your tools clean and well-maintained.
- Replace Worn Tools: Replace worn or damaged tools immediately.
6. The Role of CARDIAGTECH.NET in Valve Timing Adjustments
CARDIAGTECH.NET offers a comprehensive range of tools and resources to help you perform accurate and effective valve timing adjustments.
6.1. High-Quality Tools for Precision Adjustments
CARDIAGTECH.NET provides a wide selection of high-quality tools designed for precise valve timing adjustments. Our tools are sourced from top brands and are built to last, ensuring accurate and reliable results.
Featured Products:
- Timing Lights: Digital timing lights with adjustable advance for accurate ignition timing.
- Feeler Gauges: Precision feeler gauge sets for measuring valve clearances.
- Torque Wrenches: Accurate and durable torque wrenches for tightening bolts to the correct specification.
- Dial Indicators: High-precision dial indicators for measuring valve lift and piston position.
- Valve Spring Compressors: Versatile valve spring compressors for easy valve spring removal and installation.
- Piston Stop Tools: Adjustable piston stop tools for accurate TDC finding.
 Funny Coiled Spring on Shaft
6.2. Expert Advice and Support
At CARDIAGTECH.NET, we are committed to providing expert advice and support to help you with your valve timing adjustments. Our team of experienced technicians is available to answer your questions and provide guidance on the correct procedures and tools to use.
How We Can Help:
- Technical Support: Contact us for technical assistance with your valve timing adjustments.
- Product Recommendations: We can recommend the best tools for your specific needs and budget.
- Troubleshooting: Get help troubleshooting any issues you encounter during the adjustment process.
6.3. Enhancing Efficiency and Accuracy
By using CARDIAGTECH.NET tools and resources, you can enhance the efficiency and accuracy of your valve timing adjustments. Our high-quality tools ensure precise measurements and adjustments, while our expert advice helps you avoid common mistakes and achieve optimal engine performance.
Benefits of Using CARDIAGTECH.NET:
- Improved Accuracy: High-quality tools ensure precise measurements and adjustments.
- Increased Efficiency: The right tools and knowledge streamline the adjustment process.
- Reduced Risk of Damage: Expert advice helps you avoid common mistakes and prevent engine damage.
- Optimal Engine Performance: Accurate valve timing adjustments result in improved power, fuel efficiency, and overall engine performance.
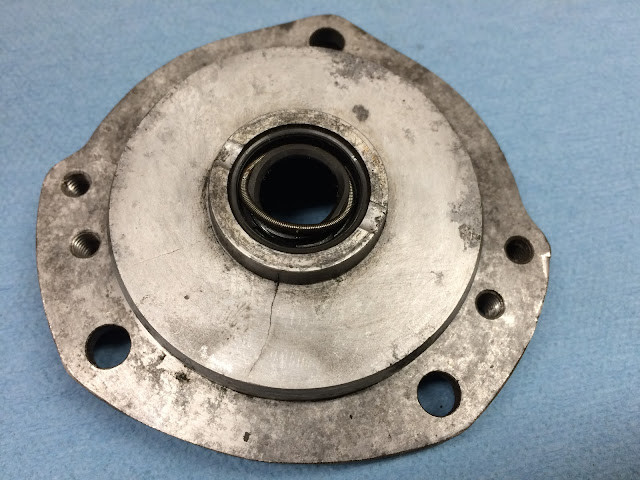
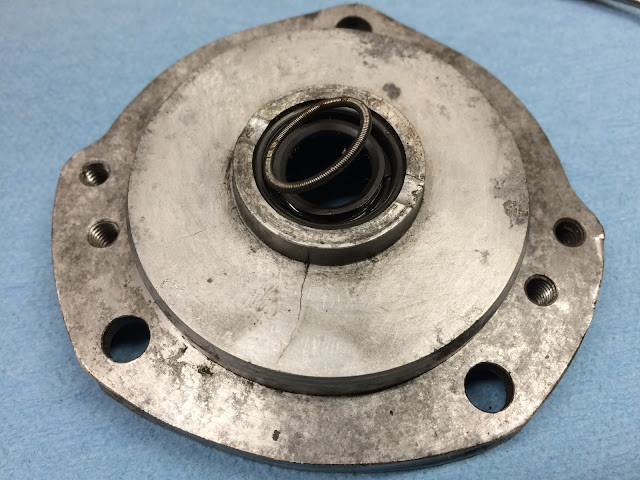 Garter Spring from Oil Seal
7. Real-World Benefits of Properly Adjusted Valve Timing
Properly adjusted valve timing offers numerous real-world benefits, impacting your vehicle’s performance, efficiency, and longevity.
7.1. Improved Engine Performance
Accurate valve timing optimizes the combustion process, resulting in improved engine performance.
Benefits:
- Increased Horsepower and Torque: Experience more power and responsiveness.
- Smoother Acceleration: Enjoy smoother and more consistent acceleration.
- Enhanced Throttle Response: Benefit from improved throttle response and quicker acceleration.
 Reinstalling Garter Spring Back Into Lip of Seal
7.2. Enhanced Fuel Efficiency
Properly timed valves ensure that the engine burns fuel more efficiently, leading to improved fuel economy.
Benefits:
- Better Gas Mileage: Save money on fuel costs with improved gas mileage.
- Reduced Fuel Consumption: Use less fuel for the same amount of driving.
- Lower Emissions: Reduce your vehicle’s environmental impact with lower emissions.
7.3. Extended Engine Life
Accurate valve timing reduces stress on engine components, contributing to extended engine life.
Benefits:
- Reduced Wear and Tear: Minimize wear and tear on valves, pistons, and other engine parts.
- Fewer Repairs: Reduce the likelihood of costly engine repairs.
- Increased Reliability: Enjoy a more reliable and longer-lasting engine.
 Lubricate Lip of Seal
7.4. Smooth and Quiet Operation
Properly adjusted valve timing results in smoother and quieter engine operation.
Benefits:
- Reduced Engine Noise: Minimize valve clatter and other engine noises.
- Smoother Idling: Enjoy smoother and more stable idling.
- Improved Driving Comfort: Experience a more comfortable and enjoyable driving experience.
8. Troubleshooting Common Valve Timing Issues
Even with careful attention to detail, you may encounter issues during valve timing adjustments. Here are some common problems and how to troubleshoot them.
8.1. Engine Misfires After Adjustment
If the engine misfires after adjusting valve timing, it could indicate incorrect timing or valve clearance.
Troubleshooting Steps:
- Recheck Timing Marks: Verify that the timing marks on the crankshaft and camshaft sprockets are correctly aligned.
- Adjust Valve Clearance: Ensure that the valve clearance is within the specified range.
- Inspect Spark Plugs: Check the spark plugs for fouling or damage.
- Check Ignition System: Inspect the ignition system for any issues, such as a faulty coil or distributor.
8.2. Difficulty Starting the Engine
Difficulty starting the engine after valve timing adjustment can indicate incorrect timing or compression issues.
Troubleshooting Steps:
- Verify Timing: Double-check the timing marks to ensure they are correctly aligned.
- Check Compression: Perform a compression test to check for any compression issues.
- Inspect Fuel System: Check the fuel system for proper fuel delivery.
- Check Battery: Ensure the battery is fully charged and in good condition.
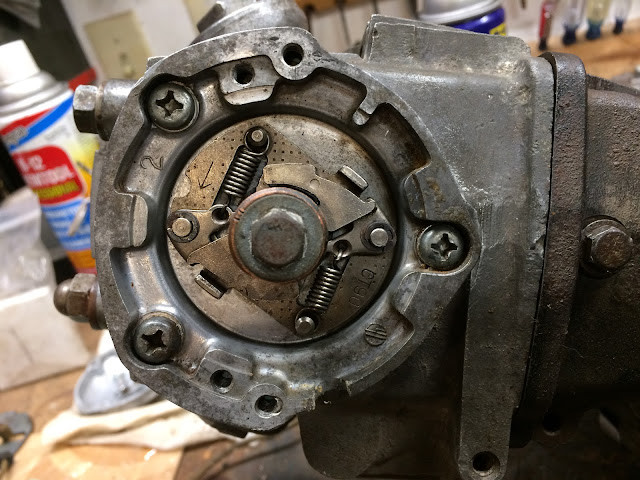 Check Spark Advancer Operates Freely
8.3. Engine Knocking or Pinging
Engine knocking or pinging after valve timing adjustment can indicate advanced timing or detonation issues.
Troubleshooting Steps:
- Retard Timing: Slightly retard the timing to reduce the risk of detonation.
- Use Higher Octane Fuel: Use higher octane fuel to prevent detonation.
- Check Cooling System: Ensure the cooling system is functioning properly to prevent overheating.
- Inspect Engine for Carbon Buildup: Check the engine for excessive carbon buildup, which can increase the risk of detonation.
8.4. Rough Idling
Rough idling after valve timing adjustment can indicate incorrect valve clearance or timing issues.
Troubleshooting Steps:
- Adjust Valve Clearance: Verify that the valve clearance is within the specified range.
- Recheck Timing Marks: Double-check the timing marks to ensure they are correctly aligned.
- Inspect Vacuum Leaks: Check for any vacuum leaks, which can cause rough idling.
- Clean Throttle Body: Clean the throttle body to ensure smooth airflow.
9. Maintaining Optimal Valve Timing
Maintaining optimal valve timing requires regular checks and maintenance to ensure your engine continues to perform at its best.
9.1. Regular Timing Checks
Perform regular timing checks to ensure that the valve timing remains accurate.
Recommended Intervals:
- Every 30,000 Miles: Check the timing at least every 30,000 miles or as recommended in your vehicle’s maintenance schedule.
- After Major Engine Work: Check the timing after any major engine work, such as timing belt replacement or cylinder head repair.
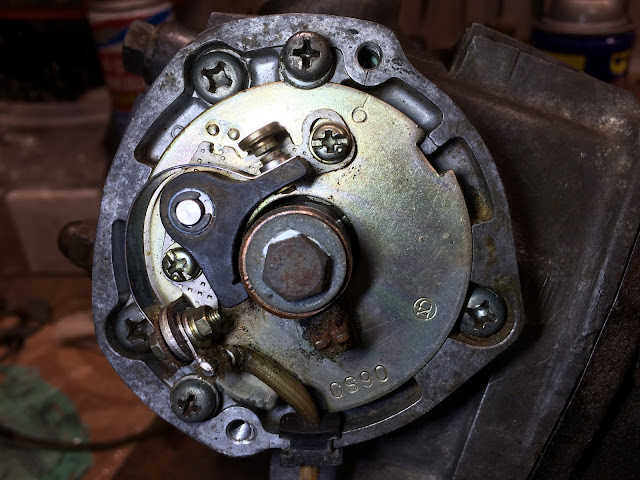 Setting the Point Gap
9.2. Inspecting Timing Belt/Chain
Regularly inspect the timing belt or chain for wear and damage.
Inspection Guidelines:
- Check for Cracks and Fraying: Look for cracks, fraying, or missing teeth on the timing belt.
- Check for Slack and Binding: Check the timing chain for excessive slack or binding.
- Replace When Necessary: Replace the timing belt or chain if any signs of wear or damage are found.
9.3. Monitoring Engine Performance
Monitor your engine’s performance for any signs of valve timing issues.
Warning Signs:
- Reduced Power: Noticeably sluggish acceleration.
- Poor Fuel Economy: More frequent trips to the gas station.
- Rough Idling: Unstable engine operation at idle.
- Engine Misfires: Intermittent interruptions in the firing sequence.
- Increased Emissions: Failure to pass emissions tests.
- Unusual Engine Noises: Ticking or rattling sounds from the engine.
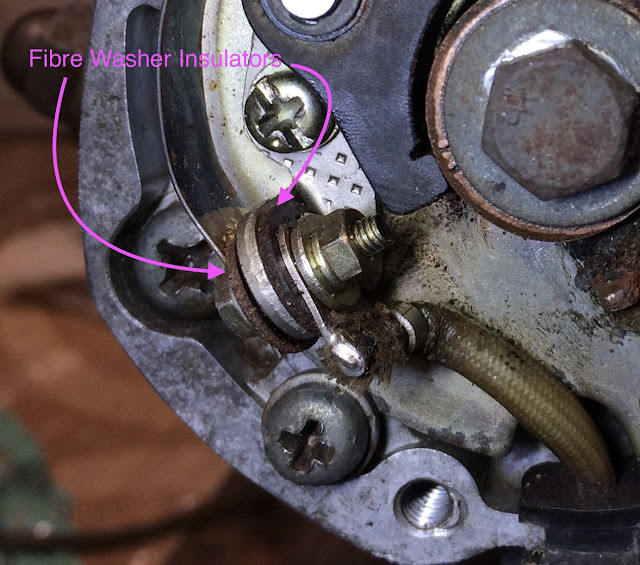 Fibre Washers
9.4. Professional Servicing
Consider professional servicing for your engine to ensure optimal valve timing.
Benefits of Professional Servicing:
- Accurate Adjustments: Experienced technicians can make accurate valve timing adjustments.
- Comprehensive Inspection: Professional servicing includes a comprehensive inspection of the engine.
- Preventive Maintenance: Technicians can identify and address potential issues before they become major problems.
10. Conclusion: Achieving Optimal Engine Performance
Adjusting valve timing is a critical aspect of engine maintenance that can significantly impact your vehicle’s performance, fuel efficiency, and longevity. By following the steps outlined in this guide, using high-quality tools from CARDIAGTECH.NET, and avoiding common mistakes, you can achieve optimal engine performance and enjoy a smoother, more efficient driving experience.
Remember, proper valve timing ensures that your engine operates at its peak potential, delivering the power, efficiency, and reliability you expect. Don’t compromise on quality – trust CARDIAGTECH.NET for all your automotive tool needs.
Are you facing challenges with your vehicle’s performance or seeking to enhance its efficiency? Contact CARDIAGTECH.NET today at +1 (641) 206-8880 or visit our website CARDIAGTECH.NET for expert guidance and top-quality automotive tools. Located at 276 Reock St, City of Orange, NJ 07050, United States, we are here to help you achieve the best possible engine performance. Reach out now and let us assist you in optimizing your vehicle’s valve timing and overall functionality. Don’t wait—transform your driving experience with CARDIAGTECH.NET’s unparalleled support and products.
FAQ: Frequently Asked Questions About Valve Timing
1. What is the ideal valve timing for my engine?
The ideal valve timing varies depending on the engine type and desired performance characteristics. Consult your vehicle’s repair manual or the engine manufacturer’s specifications for the recommended valve timing settings.
2. How often should I check my valve timing?
It is recommended to check your valve timing at least every 30,000 miles or as recommended in your vehicle’s maintenance schedule.
3. Can I adjust valve timing myself, or should I take it to a professional?
Adjusting valve timing requires technical knowledge and specialized tools. If you are not comfortable performing the adjustment yourself, it is best to take it to a qualified mechanic.
4. What are the symptoms of advanced valve timing?
Symptoms of advanced valve timing can include engine knocking or pinging, increased power at high RPMs, and reduced low-end torque.
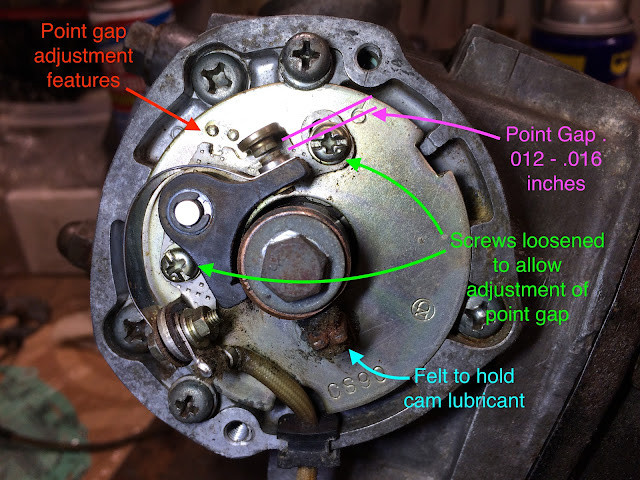 Adjusting Point Gap
5. What are the symptoms of retarded valve timing?
Symptoms of retarded valve timing can include reduced power at all RPMs, poor fuel economy, and rough idling.