Discovery Sport Radio Frequency Adjustment For USA Vehicles
Discovery Sport Radio frequency adjustment unlocks your vehicle’s full radio potential for USA models. CARDIAGTECH.NET offers a seamless solution to enable even FM radio frequencies, expanding your listening options and enhancing your driving experience; consider our advanced radio unlocking services. This article explores the benefits, process, and tools needed for optimizing your Discovery Sport’s radio functionality, including frequency calibration and radio signal enhancement.
1. Understanding Discovery Sport Radio Frequency Adjustment
Radio frequency adjustment for USA vehicles, specifically Discovery Sport models, involves modifying the vehicle’s radio system to receive a broader range of FM frequencies. Typically, vehicles manufactured for the US market are configured to receive only odd-numbered FM frequencies. This limitation can restrict the number of radio stations accessible to the driver. The radio frequency adjustment process unlocks the ability to receive even-numbered frequencies as well, effectively doubling the potential number of available stations.
1.1. Why is Radio Frequency Adjustment Necessary?
The necessity for radio frequency adjustment stems from regional differences in radio frequency allocation and vehicle manufacturing standards. In the United States, FM radio channels are assigned in 200 kHz increments, ranging from 88.1 MHz to 107.9 MHz. However, due to various factors, including historical regulations and manufacturing choices, many vehicles sold in the US are pre-set to only receive odd-numbered frequencies.
This restriction means that if a radio station broadcasts on an even frequency, such as 98.6 MHz, a driver in a US-market vehicle without frequency adjustment will not be able to tune into it. This limitation is particularly noticeable in metropolitan areas where the radio spectrum is densely populated, and many stations operate on even frequencies.
Alternative text: A detailed radio frequency spectrum allocation chart showing frequency bands and their respective uses, highlighting broadcast radio.
1.2. Identifying the Need for Adjustment
To determine if your Discovery Sport requires radio frequency adjustment, consider the following indicators:
- Limited Station Availability: You may notice that you can only tune into certain FM stations, even though you know others are broadcasting in your area.
- Difficulty Tuning to Specific Frequencies: If you manually try to tune to an even-numbered frequency, the radio skips over it or fails to lock onto the station.
- Regional Variations: If you recently moved to the US from a region where even frequencies are standard, your vehicle may not be fully compatible with the local radio landscape.
1.3. Benefits of Radio Frequency Adjustment
Performing a radio frequency adjustment on your Discovery Sport offers several compelling benefits:
- Expanded Listening Options: Access to both odd and even FM frequencies significantly increases the number of radio stations you can tune into, providing a wider variety of music, news, and talk programs.
- Improved Reception: In areas with congested radio airwaves, having access to more frequencies can improve your chances of finding a clear, strong signal.
- Enhanced Entertainment Experience: By unlocking the full potential of your vehicle’s radio, you can enjoy a more diverse and satisfying in-car entertainment experience.
- Increased Vehicle Value: While not a major factor, having a fully functional radio system can subtly increase the overall appeal and value of your vehicle.
1.4. Models Supported
CARDIAGTECH.NET generally offers radio frequency adjustment services for Discovery Sport models manufactured for the US market. The specific years and trim levels supported may vary, so it is recommended to check with CARDIAGTECH.NET directly to confirm compatibility with your vehicle. Typically, models from 2015 onwards are eligible for this type of modification.
2. The Radio Frequency Adjustment Process: A Step-by-Step Guide
The radio frequency adjustment process typically involves reprogramming the vehicle’s radio system using specialized software and diagnostic tools. While it is technically possible for a knowledgeable individual to perform this adjustment themselves, it is generally recommended to seek the services of a qualified technician or specialist, such as CARDIAGTECH.NET, to ensure the process is performed correctly and without causing unintended issues.
2.1. Gathering Necessary Tools and Software
Before beginning the adjustment process, it is essential to have the correct tools and software. These typically include:
- Diagnostic Interface: A compatible diagnostic interface, such as an ENET cable or a specialized JLR (Jaguar Land Rover) interface, is required to connect to the vehicle’s electronic control units (ECUs). CARDIAGTECH.NET offers a JLR ENET/WIFI adapter suitable for this purpose.
- Reprogramming Software: Specific software designed for reprogramming JLR vehicles is needed. This software may be proprietary to CARDIAGTECH.NET or available through authorized channels.
- Laptop or Computer: A laptop or computer running a compatible operating system (usually Windows) is required to run the reprogramming software and interface with the diagnostic tool.
- Stable Power Supply: It is crucial to maintain a stable power supply to the vehicle throughout the reprogramming process to prevent data corruption or damage to the ECUs. A battery support unit or a charger with a stable power output is recommended.
2.2. Connecting to the Vehicle’s ECU
The first step in the adjustment process is to establish a connection between the diagnostic interface and the vehicle’s ECU. This typically involves the following steps:
- Locate the OBD-II Port: The OBD-II (On-Board Diagnostics II) port is usually located under the dashboard on the driver’s side of the vehicle. Consult your vehicle’s owner’s manual if you have trouble locating it.
- Connect the Diagnostic Interface: Plug the diagnostic interface into the OBD-II port.
- Connect to the Computer: Connect the diagnostic interface to your laptop or computer via USB or Ethernet cable, depending on the type of interface.
- Establish Communication: Turn on the vehicle’s ignition (without starting the engine) and launch the reprogramming software on your computer. Follow the software’s instructions to establish communication with the vehicle’s ECU.
2.3. Identifying the Radio Module
Once a connection has been established, the next step is to identify the radio module within the vehicle’s ECU network. This process may vary depending on the specific software and diagnostic tool being used, but it generally involves scanning the ECU network for available modules and identifying the one responsible for radio functions.
The radio module may be referred to by different names depending on the vehicle and software version, such as:
- Infotainment Control Module
- Audio Amplifier Module
- Radio Receiver Module
Refer to the software’s documentation or consult with CARDIAGTECH.NET’s support team if you have difficulty identifying the correct module.
2.4. Modifying the Radio Frequency Settings
After identifying the radio module, the next step is to modify the frequency settings to enable even-numbered frequencies. This typically involves accessing specific parameters or configuration settings within the radio module’s software.
The exact procedure for modifying the frequency settings will vary depending on the software being used. However, it generally involves the following steps:
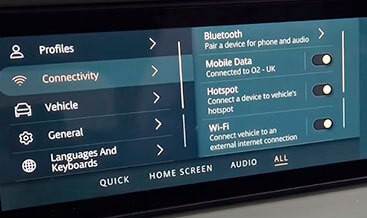
- Access Configuration Menu: Navigate to the configuration or settings menu for the radio module within the reprogramming software.
- Locate Frequency Settings: Look for settings related to frequency range, frequency step, or regional settings.
- Modify Settings: Change the settings to enable even-numbered frequencies. This may involve selecting a different region code, changing a frequency step value, or enabling a specific feature.
- Save Changes: Save the changes to the radio module’s configuration.
Alternative text: A view of the configuration settings of the vehicle radio module, illustrating the various adjustable parameters.
2.5. Verifying the Adjustment
After modifying the frequency settings, it is crucial to verify that the adjustment has been successful. This can be done by:
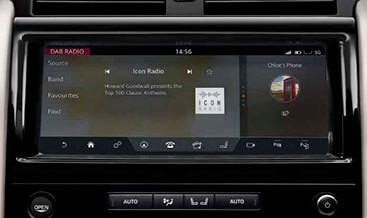
- Scanning for Radio Stations: Use the vehicle’s radio to scan for available FM stations. Check if you can now tune into stations broadcasting on even-numbered frequencies that were previously inaccessible.
- Manual Tuning: Manually tune to specific even-numbered frequencies to confirm that the radio can lock onto and play those stations.
- Audio Quality Check: Listen to the audio quality of the newly accessible stations to ensure that the adjustment has not introduced any distortion or interference.
2.6. Potential Risks and Considerations
While radio frequency adjustment is generally a safe and straightforward process, there are some potential risks and considerations to be aware of:
- Incorrect Settings: Modifying the wrong settings within the radio module can cause unintended issues or malfunctions. It is crucial to follow the software’s instructions carefully and consult with CARDIAGTECH.NET’s support team if you are unsure about any step.
- Software Compatibility: Using incompatible or outdated software can lead to errors or damage to the vehicle’s ECU. Ensure that you are using the correct software version and that it is compatible with your vehicle’s model and year.
- Power Interruption: Interrupting the power supply to the vehicle during the reprogramming process can cause data corruption or damage to the ECUs. It is essential to maintain a stable power supply throughout the process.
- Warranty Implications: Modifying the vehicle’s radio system may void the warranty on that system or other related components. Check with your vehicle’s manufacturer or warranty provider to understand the potential implications before proceeding with the adjustment.
3. Tools and Equipment Recommended by CARDIAGTECH.NET
CARDIAGTECH.NET recommends using specific tools and equipment to ensure a smooth and successful radio frequency adjustment process. These recommendations are based on their expertise and experience working with JLR vehicles.
3.1. JLR ENET/WIFI Adapter
CARDIAGTECH.NET offers a JLR ENET/WIFI adapter specifically designed for coding, flashing, and diagnostic procedures on Jaguar Land Rover vehicles. This adapter provides a reliable and high-speed connection to the vehicle’s ECU, ensuring stable data transfer during the reprogramming process.
Key Features of the JLR ENET/WIFI Adapter:
| Feature | Description |
|---|---|
| Connectivity | Supports both ENET (Ethernet) and WIFI connections for flexible usage |
| Compatibility | Designed specifically for Jaguar Land Rover vehicles |
| Speed | High-speed data transfer for efficient coding and flashing |
| Stability | Ensures a stable connection to prevent data corruption during reprogramming |
| Wireless Access | WIFI connectivity allows for wireless diagnostics and coding |
3.2. Reprogramming Software
CARDIAGTECH.NET may provide or recommend specific reprogramming software compatible with their JLR ENET/WIFI adapter. This software is designed to simplify the radio frequency adjustment process and minimize the risk of errors.
Recommended Software Features:
- User-Friendly Interface: An intuitive interface that guides users through the adjustment process step-by-step.
- Vehicle Identification: Automatic vehicle identification to ensure compatibility and prevent incorrect settings.
- Backup and Restore: Ability to back up the original radio module configuration before making changes, allowing for easy restoration if needed.
- Error Detection: Built-in error detection and correction mechanisms to prevent data corruption.
- Online Support: Access to online support and documentation to assist with any questions or issues.
3.3. Battery Support Unit
A battery support unit is crucial to maintain a stable power supply to the vehicle during the reprogramming process. CARDIAGTECH.NET recommends using a high-quality battery support unit that can provide a constant voltage and amperage output.
Key Features of a Battery Support Unit:
| Feature | Description |
|---|---|
| Voltage Output | Provides a stable voltage output (typically 13.5V to 14.5V) to the vehicle’s battery |
| Amperage Output | Delivers sufficient amperage to meet the vehicle’s power demands during reprogramming |
| Overload Protection | Protects the vehicle’s electrical system from overload or short circuits |
| Voltage Regulation | Regulates the voltage output to prevent fluctuations that can damage ECUs |
| Digital Display | Displays the voltage and amperage output for monitoring purposes |
3.4. Other Useful Tools
In addition to the above-mentioned tools, CARDIAGTECH.NET may also recommend the following:
- OBD-II Extension Cable: An OBD-II extension cable can provide more flexibility when connecting the diagnostic interface to the vehicle’s OBD-II port, especially in tight spaces.
- Laptop with Windows OS: A laptop running a compatible version of Windows operating system is required to run the reprogramming software.
- Internet Connection: A stable internet connection is needed to download software updates, access online support, and activate licenses.
4. Troubleshooting Common Issues
Even with the right tools and guidance, you may encounter some issues during the radio frequency adjustment process. Here are some common problems and troubleshooting tips:
4.1. Communication Errors
If you are unable to establish communication between the diagnostic interface and the vehicle’s ECU, try the following:
- Check Connections: Ensure that all cables are securely connected to the OBD-II port, the diagnostic interface, and the computer.
- Verify Ignition: Make sure the vehicle’s ignition is turned on (without starting the engine).
- Software Compatibility: Confirm that the reprogramming software is compatible with your vehicle’s model and year.
- Driver Installation: Verify that the correct drivers for the diagnostic interface are installed on your computer.
- Firewall Settings: Check your computer’s firewall settings to ensure that they are not blocking communication between the software and the interface.
4.2. Software Errors
If you encounter errors within the reprogramming software, try the following:
- Restart Software: Close and restart the reprogramming software.
- Update Software: Check for software updates and install the latest version.
- Check System Requirements: Ensure that your computer meets the minimum system requirements for the software.
- Reinstall Software: Try uninstalling and reinstalling the software.
- Contact Support: Contact CARDIAGTECH.NET’s support team for assistance.
4.3. Radio Not Tuning to Even Frequencies
If the radio is still unable to tune to even frequencies after the adjustment, try the following:
- Verify Settings: Double-check the frequency settings in the radio module to ensure that they have been correctly modified.
- Reset Radio: Try resetting the radio module to its default settings and then re-apply the adjustment.
- Check Antenna: Ensure that the vehicle’s antenna is properly connected and functioning correctly.
- Interference: Check for potential sources of interference that may be affecting radio reception.
4.4. ECU Malfunction
In rare cases, incorrect programming or power interruptions can cause an ECU malfunction. If you suspect that an ECU has been damaged, contact a qualified technician or CARDIAGTECH.NET’s support team immediately.
Alternative text: A diagnostic interface tool connected to a car’s OBD-II port, ready for vehicle diagnostics and reprogramming.
5. Alternatives to Radio Frequency Adjustment
While radio frequency adjustment is a direct solution to the problem of limited station availability, there are some alternative approaches that can provide similar benefits:
5.1. Using Online Radio and Streaming Services
Online radio and music streaming services offer a vast library of content that can be accessed through your smartphone or other mobile devices. By connecting your device to your vehicle’s audio system via Bluetooth or USB, you can enjoy a wide variety of music, news, and talk programs without being limited by the available FM radio frequencies.
Popular Online Radio and Streaming Services:
| Service | Description |
|---|---|
| Spotify | Offers a vast library of music, podcasts, and audiobooks |
| Apple Music | Provides access to millions of songs, curated playlists, and live radio stations |
| Pandora | Creates personalized radio stations based on your favorite artists and songs |
| iHeartRadio | Offers access to live radio stations, podcasts, and custom music playlists |
| TuneIn Radio | Provides access to thousands of radio stations from around the world |
5.2. Installing a Satellite Radio Receiver
Satellite radio services, such as SiriusXM, broadcast audio content via satellite, providing a wide range of channels with commercial-free music, news, sports, and talk programs. Installing a satellite radio receiver in your vehicle can provide access to this content, regardless of the available FM radio frequencies in your area.
Benefits of Satellite Radio:
- Wide Range of Channels: Access to hundreds of channels with diverse content.
- Commercial-Free Music: Enjoy uninterrupted music without commercials.
- Nationwide Coverage: Access to the same channels throughout the United States.
- Specialized Content: Dedicated channels for news, sports, talk, and entertainment.
5.3. Upgrading to a Modern Infotainment System
If your Discovery Sport has an older infotainment system, upgrading to a newer system can provide access to a wider range of audio sources and features. Modern infotainment systems typically include:
- Apple CarPlay and Android Auto: Seamless integration with your smartphone for accessing music, podcasts, and other audio content.
- HD Radio: Improved FM radio reception with higher audio quality and additional channels.
- USB and Bluetooth Connectivity: Easy connection to external audio devices.
- Navigation: Built-in navigation system with real-time traffic updates.
CARDIAGTECH.NET also offers activation of Apple CarPlay and Android Auto for Discovery 5 models.
5.4. FM Transmitter
An FM transmitter allows you to play audio from your smartphone or MP3 player through your car’s radio by broadcasting it over a specific FM frequency. While the audio quality may not be as high as direct connections, it provides a convenient way to listen to your preferred content in older vehicles.
Advantages of Using an FM Transmitter:
- Affordable: FM transmitters are relatively inexpensive.
- Easy to Use: Simply plug the transmitter into your device and tune your car radio to the specified frequency.
- Universal Compatibility: Works with almost any car radio and audio device.
6. Cost and Time Involved
The cost and time involved in radio frequency adjustment can vary depending on several factors, including:
- Service Provider: The rates charged by different service providers, such as CARDIAGTECH.NET, can vary.
- Vehicle Model: The specific model and year of your Discovery Sport can affect the complexity of the adjustment process.
- Software and Tools: The cost of the necessary software and diagnostic tools can add to the overall expense.
6.1. Estimated Cost
As of today, CARDIAGTECH.NET offers Discovery 5 Radio frequency adjustment for USA vehicles for US$99.00. However, prices may change, so it’s best to confirm directly with them.
Other Potential Costs:
- Diagnostic Interface: If you don’t already own a compatible diagnostic interface, you may need to purchase one. CARDIAGTECH.NET offers a JLR ENET/WIFI adapter.
- Software License: Some reprogramming software may require a license fee.
- Labor Costs: If you choose to have a technician perform the adjustment, you will need to factor in labor costs.
6.2. Estimated Time
The radio frequency adjustment process typically takes between 30 minutes to 1 hour to complete, depending on the complexity of the vehicle’s system and the efficiency of the technician.
Factors Affecting Time:
- Experience of Technician: An experienced technician can typically complete the adjustment more quickly.
- Software Efficiency: The efficiency of the reprogramming software can affect the overall time.
- Troubleshooting: If any issues arise during the adjustment process, it may take longer to resolve them.
7. Why Choose CARDIAGTECH.NET?
CARDIAGTECH.NET offers a range of compelling reasons to choose them for your Discovery Sport radio frequency adjustment needs:
7.1. Expertise and Experience
CARDIAGTECH.NET specializes in coding, flashing, and diagnostic services for Jaguar Land Rover vehicles. Their technicians have extensive experience working with these vehicles and are knowledgeable about the intricacies of their electronic systems.
7.2. Reliable Tools and Software
CARDIAGTECH.NET uses reliable and high-quality diagnostic tools and software to ensure a smooth and successful adjustment process. They offer a JLR ENET/WIFI adapter specifically designed for JLR vehicles.
7.3. Remote Activation Service
CARDIAGTECH.NET offers a convenient remote activation service that allows you to have your vehicle’s radio frequency adjusted without having to visit a physical location. This service saves you time and money and can be performed from the comfort of your own home or garage.
7.4. Competitive Pricing
CARDIAGTECH.NET offers competitive pricing for their radio frequency adjustment service, making it an affordable option for Discovery Sport owners.
7.5. Excellent Customer Support
CARDIAGTECH.NET provides excellent customer support to assist you with any questions or issues you may have. Their support team is knowledgeable and responsive and can guide you through the adjustment process step-by-step.
CARDIAGTECH.NET Logo
Alternative text: The CARDIAGTECH.NET logo symbolizing expertise in automotive diagnostic solutions.
8. Ensuring Compliance and Regulations
When performing any modifications to your vehicle’s radio system, it is important to ensure compliance with applicable laws and regulations.
8.1. FCC Regulations
In the United States, the Federal Communications Commission (FCC) regulates the use of radio frequencies. Modifying your vehicle’s radio system to operate outside of the authorized frequency bands or in violation of other FCC regulations can result in fines or penalties.
8.2. Vehicle Safety Standards
Modifying your vehicle’s radio system should not compromise its safety or performance. Ensure that the adjustment is performed correctly and does not interfere with other vehicle systems, such as the anti-lock braking system (ABS) or the airbag system.
8.3. Warranty Considerations
As mentioned earlier, modifying your vehicle’s radio system may void the warranty on that system or other related components. Check with your vehicle’s manufacturer or warranty provider to understand the potential implications before proceeding with the adjustment.
9. Call to Action: Get Your Radio Adjusted Today
Are you tired of being limited to only odd-numbered FM radio frequencies in your Discovery Sport? Do you want to unlock the full potential of your vehicle’s radio and enjoy a wider variety of music, news, and talk programs?
CARDIAGTECH.NET can help. Their expert technicians can perform a radio frequency adjustment on your Discovery Sport, enabling you to access both odd and even FM frequencies. With their reliable tools, software, and remote activation service, the process is quick, easy, and affordable.
Benefits of Choosing CARDIAGTECH.NET:
- Expanded Listening Options: Access to more radio stations.
- Improved Reception: Better signal quality in congested areas.
- Enhanced Entertainment: A more diverse and satisfying in-car experience.
- Convenient Service: Remote activation from the comfort of your own home or garage.
Don’t miss out on the opportunity to enhance your driving experience. Contact CARDIAGTECH.NET today to schedule your Discovery Sport radio frequency adjustment.
Contact Information:
- Address: 276 Reock St, City of Orange, NJ 07050, United States
- WhatsApp: +1 (641) 206-8880
- Website: CARDIAGTECH.NET
Let CARDIAGTECH.NET help you unlock the full potential of your Discovery Sport’s radio system! Contact them now to learn more and schedule your adjustment.
10. Frequently Asked Questions (FAQ)
Here are some frequently asked questions about Discovery Sport radio frequency adjustment:
1. What is radio frequency adjustment?
Radio frequency adjustment is the process of modifying a vehicle’s radio system to receive a broader range of FM frequencies, including both odd and even numbers.
2. Why do USA vehicles only receive odd FM frequencies?
Vehicles manufactured for the US market are often pre-set to only receive odd-numbered frequencies due to historical regulations and manufacturing choices.
3. What are the benefits of radio frequency adjustment?
The benefits include expanded listening options, improved reception, and an enhanced entertainment experience.
4. Which Discovery Sport models are supported?
CARDIAGTECH.NET generally supports Discovery Sport models from 2015 onwards, but it’s best to confirm compatibility with your specific model and year.
5. What tools are needed for radio frequency adjustment?
The tools typically include a diagnostic interface (like the JLR ENET/WIFI adapter), reprogramming software, a laptop, and a stable power supply.
6. Can I perform the adjustment myself?
While technically possible, it’s recommended to seek the services of a qualified technician or specialist like CARDIAGTECH.NET to ensure the process is performed correctly.
7. How long does the adjustment process take?
The process usually takes between 30 minutes to 1 hour.
8. How much does radio frequency adjustment cost?
CARDIAGTECH.NET offers Discovery 5 Radio frequency adjustment for USA vehicles for US$99.00, but prices may vary.
9. What is the remote activation service?
The remote activation service allows CARDIAGTECH.NET to perform the adjustment remotely, saving you time and money.
10. Will radio frequency adjustment void my vehicle’s warranty?
Modifying your vehicle’s radio system may void the warranty on that system or related components, so check with your vehicle’s manufacturer or warranty provider beforehand.