Ducati/Piaggio/Vespa Marelli ECUs 3 Pin Connector: Your Ultimate Guide

Unlock the full potential of your Ducati, Piaggio, or Vespa with in-depth diagnostics using the Marelli ECU and its 3-pin connector. At CARDIAGTECH.NET, we provide the tools and expertise needed to keep your ride running smoothly. Explore cutting-edge diagnostic techniques, gain insights into ECU functionalities, and discover the advantages of having a reliable diagnostic setup.
1. Understanding the Ducati/Piaggio/Vespa Marelli ECU
The Magneti Marelli ECU (Engine Control Unit) is the brain of many modern Ducati, Piaggio, and Vespa motorcycles and scooters. This sophisticated piece of technology manages various engine functions, including fuel injection, ignition timing, and emissions control. Understanding the ECU and its components, such as the 3-pin connector, is crucial for effective diagnostics and maintenance.
- What is an ECU?
- The ECU is a small computer that controls the engine’s performance by analyzing data from various sensors.
- It adjusts fuel delivery, ignition timing, and other parameters to optimize performance, fuel efficiency, and emissions.
- Importance of the Marelli ECU:
- The Marelli ECU is known for its reliability and precision in managing engine functions.
- It ensures that your Ducati, Piaggio, or Vespa runs smoothly and efficiently.
- Role of the 3-Pin Connector:
- The 3-pin connector serves as a crucial interface for diagnostic tools to communicate with the ECU.
- It allows technicians to read diagnostic codes, monitor engine parameters, and perform necessary adjustments.
2. Identifying Compatible Models
Knowing whether your Ducati, Piaggio, or Vespa model is compatible with diagnostic tools designed for the Marelli ECU and its 3-pin connector is essential. Here’s how to check:
- Check the ECU Type:
- Locate the ECU on your motorcycle or scooter. It’s usually found under the seat or in the engine compartment.
- Look for a sticker on the ECU that indicates the type and serial number. For example, you might see “IAWMIU3G ECU” on a Vespa GTS300.
- Compatibility List:
- Refer to the list of compatible ECUs in diagnostic software like IAWdiag. If your ECU is listed, the software should work.
- Software Verification:
- IAWdiag: Widely used for diagnosing Marelli ECUs in various Italian bikes.
- JPDiag: Another reliable option for connecting to and diagnosing your ECU.
ECU Type
ECU Identification Label
3. Essential Tools for ECU Diagnostics
To effectively diagnose issues with your Ducati, Piaggio, or Vespa’s Marelli ECU, you’ll need specific tools. Here’s a comprehensive list:
- PC/Laptop with Windows:
- A laptop or PC running Windows XP or higher is required to run diagnostic software. Older laptops with low specifications are often sufficient.
- VAG KKL Cable:
- This cable connects your computer to the motorcycle’s diagnostic port.
- Preferred Type: Choose a VAG KKL cable with an FTDI chip for reliable communication. Cables with cheaper Chinese CH340 chipsets may not work correctly.
- Fiat OBD Cable:
- This cable adapts the VAG KKL cable to fit the 3-pin connector on your Ducati, Piaggio, or Vespa.
- It usually comes with crocodile clamps for connecting to the battery.
- Multimeter:
- A multimeter is essential for checking the wiring and voltage levels of the cables and connectors.
- Diagnostic Software:
- IAWdiag: A popular freeware program for diagnosing Marelli ECUs.
- JPDiag: Another excellent option with a user-friendly interface.
4. Step-by-Step Guide to Building Your Diagnostic Tool
Constructing your diagnostic tool involves several steps to ensure proper connection and functionality.
4.1. Setting Up Your PC/Laptop
- Install Diagnostic Software:
- Download and install IAWdiag or JPDiag from their respective websites.
- Install FTDI Drivers:
- Before connecting the VAG KKL cable, install the FTDI drivers. Avoid using the drivers that come with the cable, as they may be outdated.
- Windows XP/Vista (Version 2.08.24): https://ftdichip.com/drivers/d2xx-drivers/
- Windows 7 and higher (Version 2.12.28): https://ftdichip.com/drivers/d2xx-drivers/
- Before connecting the VAG KKL cable, install the FTDI drivers. Avoid using the drivers that come with the cable, as they may be outdated.
- Connect VAG KKL Cable:
- Connect the VAG KKL cable to your PC/laptop. Windows should recognize the new hardware and install the drivers automatically.
- Determine COM Port:
- Use the Reassign COMNo Utility to check which COM port is assigned to the VAG KKL cable.
- Reassign COMNo Utility: http://www.ftdichip.com/Support/Utilities/Reassign%20COMNo%20Utility.zip
- You may need to change the COM port in the Device Manager if necessary.
- Use the Reassign COMNo Utility to check which COM port is assigned to the VAG KKL cable.
4.2. Verifying Cable Connections
- Inspect the Fiat OBD Cable:
- Ensure the Fiat OBD cable is correctly wired according to the following scheme:
- OBD plug (female):
- Pin 5 – GND
- Pin 7 – K-line
- Pin 16 – 12V+
- FIAT plug (male):
- Pin 2 – GND
- Pin 3 – K-line
- OBD plug (female):
- Use a multimeter to verify these connections. Incorrect wiring can damage your ECU.
- Ensure the Fiat OBD cable is correctly wired according to the following scheme:
- Additional Checks:
- Some cables may have OBD pin 15 connected to the L-line (FIAT pin 1) and OBD pins 4 and 5 bridged (GND). Ensure these connections are also correct.
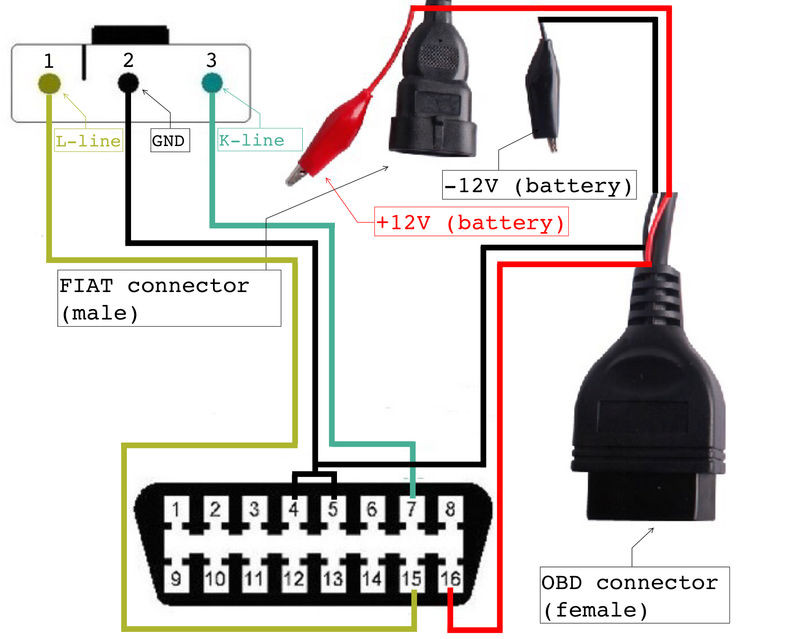 Wiring Diagram
Fiat OBD Cable Wiring Diagram
4.3. Testing the Cables
- Adapter Test Program:
- Download and run the AdapterTest program to test the VAG KKL cable:
- Connect to Battery (Without ECU):
- Connect the crocodile clamps of the Fiat OBD cable to the battery. Connect the red clamp first, then the black.
- Important: Do not connect the diagnostic plug to the ECU at this stage.
- Run the Test:
- Start the AdapterTest program, enter the COM port number, and press “connect.”
- If tests 1 and 2 are successful, press “disconnect.”
- Alternative Test Program:
- Use another simple test program:
- Alternative test program: http://www.von-der-salierburg.de/download/GuzziDiag/AdapterTest_V1.01.zip
- Use another simple test program:
- Troubleshooting:
- If any test fails, there might be an issue with one of the cables. Do not connect the cable to the ECU to prevent damage.
- Recheck the wiring of the Fiat OBD cable and inspect the VAG KKL cable for a fake FTDI chip.
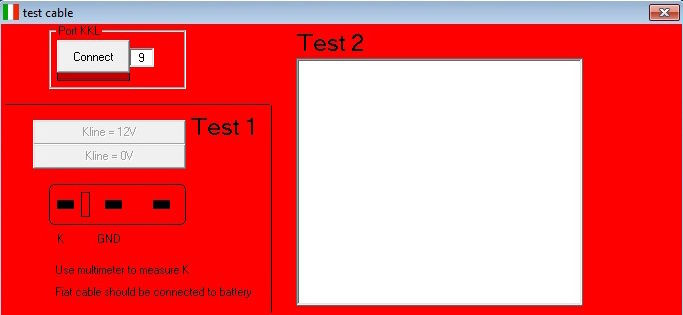 Adapter Test
Adapter Test Interface
4.4. Connecting to the ECU
- Connect the Diagnostic Plug:
- If the cable tests are successful, connect the diagnostic plug to the ECU.
- Start IAWdiag:
- Launch IAWdiag, select your language, COM port, and ECU type.
- Establish Connection:
- Go to “file” and select “connect.” Follow the on-screen instructions.
- If the ECU is properly connected, you will see the ECU data at the bottom left of your screen.
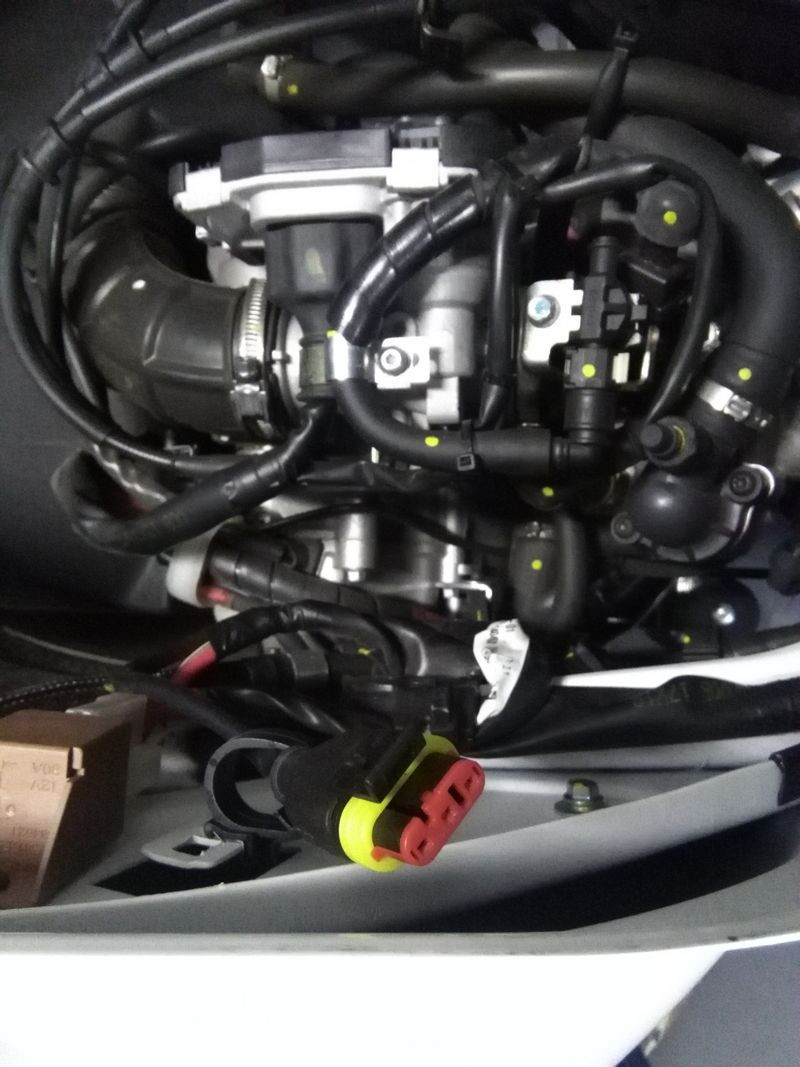 Diagnostic Connector
Diagnostic Connector Location
5. Using Diagnostic Software: IAWdiag and JPDiag
Both IAWdiag and JPDiag offer similar functionalities for diagnosing Marelli ECUs.
5.1. IAWdiag
- Monitoring Parameters:
- Select the parameters you want to monitor, such as engine temperature, RPM, and throttle position.
- Reading Fault Messages:
- Check for any fault codes stored in the ECU. These codes can help identify issues with the engine or related systems.
- Static Tests:
- Perform static tests to check the functionality of various components.
- Engine Start:
- Start the engine to read more parameters in real-time.
- TPS Reset Caution:
- Avoid performing a TPS (Throttle Position Sensor) reset, as these ECUs are pre-calibrated at the factory.
 IAWdiag Setup
IAWdiag Setup Interface
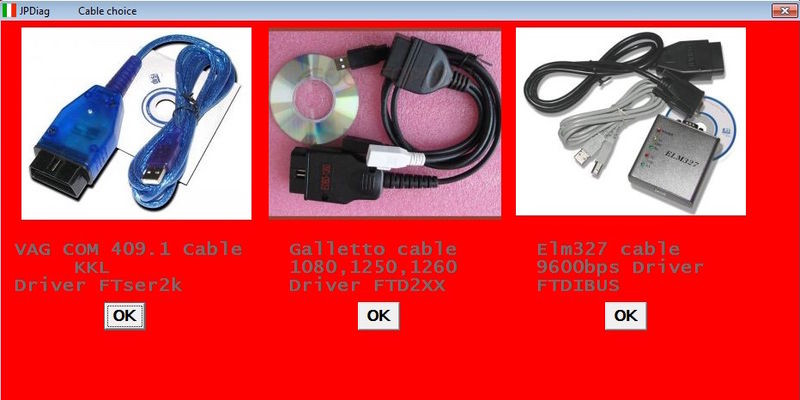
5.2. JPDiag
- Installation:
- Install JPDiag and follow the installation instructions.
- Cable Selection:
- Start JPDiag and select your preferred language. Choose “Galletto Cable” if you are using the FTDI cable.
- Establish Connection:
- Press the lower radio button on the right side of the “connect” option and then press “connect.”
- The ECU information will be displayed once connected.
- License Activation:
- To get a free license, press the blue “copy” button. This will open your browser and direct you to the JPDiag webpage.
- Fill in your scooter type and email address to receive a license file.
- Copy the
cle.licfile (without renaming it) into the JPDiag directory, usually located inc:program_filesjpdiag. - Restart JPDiag to use all features.
 JPDiag Cable Selection
JPDiag Cable Selection Interface
6. Advanced ECU Functions
Beyond basic diagnostics, advanced users can explore additional ECU functions:
- Reading and Writing ECU Maps:
- Use programs like IAWMIU3GReader, IAWMIU3GWriter, and IAWMIU3GEEPROMTool to read and write to your MIU ECU.
- These tools can be downloaded from: http://www.von-der-salierburg.de/download/GuzziDiag/
- Backup ECU Data:
- Create backups of your ECU map (.bin file) and EEPROM (.eep file) for safety.
- Mapping Programs:
- Import the ECU file into a mapping program like TunerPro (http://www.tunerpro.net/downloadApp.htm).
- Use the .xdf file from http://www.von-der-salierburg.de/download/GuzziDiag/xdf/MIUG3_Piaggio_GTS300_V1.02.zip for compatibility.
7. Common Issues and Troubleshooting
Diagnosing ECU issues can be complex. Here are some common problems and troubleshooting tips:
- Communication Problems:
- Issue: Cannot connect to the ECU.
- Troubleshooting:
- Ensure the VAG KKL cable is properly connected and the FTDI drivers are installed correctly.
- Verify the COM port setting in the diagnostic software.
- Check the wiring of the Fiat OBD cable.
- Test the VAG KKL cable using the AdapterTest program.
- Fault Codes:
- Issue: ECU is reporting fault codes.
- Troubleshooting:
- Research the specific fault codes to understand the potential issues.
- Check the related components and sensors.
- Clear the fault codes after addressing the problem and monitor if they reappear.
- Engine Performance Issues:
- Issue: Poor engine performance, such as rough idling or misfires.
- Troubleshooting:
- Monitor engine parameters using the diagnostic software to identify any anomalies.
- Check fuel injection, ignition timing, and sensor readings.
- Consider a professional diagnostic if the issue persists.
- Damaged ECU:
- Issue: ECU is not functioning at all.
- Troubleshooting:
- Check the ECU’s power supply and ground connections.
- If the ECU is damaged, it may need to be replaced.
8. Advantages of Using CARDIAGTECH.NET Tools
At CARDIAGTECH.NET, we understand the challenges faced by automotive technicians. Our tools are designed to enhance your efficiency, accuracy, and profitability.
- Enhanced Efficiency:
- Our diagnostic tools are engineered to reduce repair times, allowing you to service more vehicles and increase throughput.
- With quick and accurate diagnostics, you can identify and address issues promptly.
- Increased Accuracy:
- Our advanced tools provide precise data and insights, minimizing the risk of misdiagnosis and ensuring accurate repairs.
- This leads to higher customer satisfaction and fewer comebacks.
- Cost Savings:
- By accurately diagnosing problems, you can avoid unnecessary parts replacements and reduce overall repair costs.
- Our tools help you make informed decisions, saving time and money.
- Revenue Growth:
- Efficient and accurate diagnostics enable you to offer higher-quality services, attracting more customers and boosting revenue.
- Happy customers are more likely to return and recommend your services.
- Customer Satisfaction:
- Our reliable tools and expert support help you provide top-notch service, ensuring customer satisfaction and loyalty.
- Positive reviews and referrals contribute to long-term business growth.
9. Why Choose CARDIAGTECH.NET for Your Diagnostic Needs?
Choosing CARDIAGTECH.NET means investing in tools that deliver real results. Our products are designed to meet the demands of modern automotive repair, providing you with the technology needed to excel.
- Expert Support:
- Our team of experienced technicians is available to provide support and guidance, helping you get the most out of your diagnostic tools.
- We offer training resources and troubleshooting assistance to ensure you’re always equipped to handle any situation.
- Comprehensive Solutions:
- We offer a wide range of diagnostic tools and equipment, catering to various makes and models.
- Our comprehensive solutions ensure you have everything you need for efficient and accurate automotive diagnostics.
- Latest Technology:
- We stay ahead of the curve by incorporating the latest advancements in automotive diagnostic technology.
- Our tools are continuously updated to support new models and features, ensuring you’re always at the forefront of the industry.
10. Real-World Applications and Case Studies
Understanding how diagnostic tools are used in real-world scenarios can highlight their value. Here are a few case studies:
- Case Study 1: Vespa GTS300 Rough Idling
- Problem: A Vespa GTS300 is experiencing rough idling and occasional stalling.
- Diagnosis: Using IAWdiag, the technician connects to the ECU and reads a fault code indicating a problem with the throttle position sensor (TPS).
- Solution: The technician inspects the TPS wiring and finds a loose connection. After securing the connection, the fault code is cleared, and the Vespa runs smoothly.
- Case Study 2: Ducati Misfire
- Problem: A Ducati motorcycle is misfiring at high RPMs.
- Diagnosis: The technician uses JPDiag to monitor engine parameters and identifies a drop in voltage to one of the ignition coils.
- Solution: The technician replaces the faulty ignition coil, and the misfire is resolved. The motorcycle’s performance is restored.
- Case Study 3: Piaggio Scooter Fuel Efficiency
- Problem: A Piaggio scooter’s fuel efficiency has decreased significantly.
- Diagnosis: The technician uses IAWdiag to check the fuel injection system and discovers that one of the injectors is clogged.
- Solution: The technician cleans the fuel injector, restoring proper fuel flow. The scooter’s fuel efficiency returns to normal.
11. Maintaining Your Diagnostic Tools
Proper maintenance of your diagnostic tools ensures their longevity and accuracy. Here are some tips:
- Keep Software Updated:
- Regularly update your diagnostic software to ensure compatibility with the latest ECU versions and access to new features.
- Handle Cables with Care:
- Avoid bending or pulling the cables excessively to prevent damage.
- Store cables properly when not in use.
- Protect Your Laptop:
- Use a sturdy laptop case to protect it from physical damage.
- Keep the laptop clean and free from dust.
- Regular Checks:
- Periodically check the connections and wiring of your cables and connectors.
- Use a multimeter to verify voltage levels and continuity.
12. Future Trends in ECU Diagnostics
The field of ECU diagnostics is constantly evolving. Here are some future trends to watch out for:
- Wireless Diagnostics:
- The use of wireless diagnostic tools is increasing, allowing technicians to diagnose vehicles remotely.
- Cloud-Based Solutions:
- Cloud-based diagnostic platforms provide access to a vast database of information and diagnostic procedures.
- AI-Powered Diagnostics:
- Artificial intelligence is being used to analyze diagnostic data and provide more accurate and efficient troubleshooting.
- Integration with Mobile Devices:
- Diagnostic tools are increasingly integrating with smartphones and tablets, making them more portable and user-friendly.
13. Ensuring Safety During Diagnostics
Safety should always be a priority when performing ECU diagnostics. Here are some safety precautions:
- Disconnect Battery:
- Before connecting or disconnecting any diagnostic equipment, disconnect the vehicle’s battery to prevent electrical damage.
- Proper Ventilation:
- Ensure the work area is well-ventilated to avoid inhaling harmful fumes.
- Wear Protective Gear:
- Wear safety glasses and gloves to protect yourself from potential hazards.
- Follow Instructions:
- Always follow the manufacturer’s instructions for using diagnostic tools and equipment.
- Avoid Water:
- Keep diagnostic equipment away from water and moisture to prevent electrical shock.
14. Frequently Asked Questions (FAQs)
- What is a Marelli ECU?
- The Marelli ECU (Engine Control Unit) is a type of electronic control unit used in many Ducati, Piaggio, and Vespa vehicles to manage engine functions.
- What is the 3-pin connector used for?
- The 3-pin connector serves as an interface for connecting diagnostic tools to the ECU, allowing technicians to read data, monitor parameters, and perform tests.
- Which diagnostic software is compatible with Marelli ECUs?
- IAWdiag and JPDiag are two popular software options that are compatible with Marelli ECUs.
- What tools are needed for ECU diagnostics?
- You’ll need a PC/laptop with Windows, a VAG KKL cable, a Fiat OBD cable, a multimeter, and diagnostic software.
- How do I install FTDI drivers?
- Download the correct drivers from the FTDI website (https://ftdichip.com/drivers/d2xx-drivers/) and follow the installation instructions.
- How can I test the VAG KKL cable?
- Use the AdapterTest program (available at https://www.dropbox.com/scl/fi/677ur0f66llxrmoohahod/cable_testc.exe?rlkey=iaa0401sb5n1o3zrnz94b7yq8&st=z9h75k15&dl=0) to check the cable’s functionality.
- What should I do if I cannot connect to the ECU?
- Check the cable connections, COM port settings, and FTDI drivers. Ensure the Fiat OBD cable is wired correctly.
- Is it safe to perform a TPS reset on Marelli ECUs?
- No, it is generally not recommended to perform a TPS reset on these ECUs, as they are pre-calibrated at the factory.
- Can I read and write ECU maps with these tools?
- Yes, with programs like IAWMIU3GReader and IAWMIU3GWriter, you can read and write to your MIU ECU, but proceed with caution.
- Where can I find more information about Magneti Marelli MIU G3 ECUs?
- Refer to the Magneti Marelli MIU G3 Information PDF for detailed specifications and functionality.
15. Conclusion
Mastering the Ducati/Piaggio/Vespa Marelli ECU with its 3-pin connector opens up a world of diagnostic possibilities. By understanding the ECU’s functions, using the right tools, and following proper procedures, you can ensure your motorcycle or scooter runs at its best. CARDIAGTECH.NET is dedicated to providing you with the tools and knowledge you need to succeed.
Ready to take your diagnostic capabilities to the next level? Contact CARDIAGTECH.NET today for expert advice and top-quality diagnostic tools. Our team is here to help you find the perfect solutions for your needs.
Contact Information:
- Address: 276 Reock St, City of Orange, NJ 07050, United States
- WhatsApp: +1 (641) 206-8880
- Website: CARDIAGTECH.NET
Unlock the full potential of your Ducati, Piaggio, or Vespa with CARDIAGTECH.NET. Let us help you diagnose, maintain, and optimize your ride for peak performance. Connect with us today and experience the difference expert tools and support can make!