How Do You Fix A Car Horn: Expert Troubleshooting Guide

Fixing a car horn involves diagnosing and resolving issues related to the horn’s electrical circuit or the horn itself; CARDIAGTECH.NET offers tools and equipment that can make the troubleshooting process easier and more efficient. This guide provides a step-by-step approach to diagnosing and repairing common car horn problems, ensuring your vehicle can effectively signal when necessary, and we’ll also highlight how high-quality tools from CARDIAGTECH.NET can assist in this process, which involves electrical testing, circuit analysis, and component replacement. Whether it’s a blown fuse, a faulty relay, or a corroded connection, understanding the process is crucial for vehicle maintenance, and proper repair can prevent dangerous situations on the road.
1. Understanding The Car Horn System
Before diving into the repair process, it’s important to understand how a car horn system works. The horn circuit typically includes the following components:
- Horn Button/Switch: Located on the steering wheel, this activates the horn circuit when pressed.
- Relay: An electrical switch that controls the power supply to the horn.
- Fuse: Protects the circuit from overloads.
- Wiring: Connects all the components.
- Horn: The sound-producing device itself.
Understanding these components will make diagnosing the problem much easier. According to a study by the National Highway Traffic Safety Administration (NHTSA), a malfunctioning horn can significantly impair a driver’s ability to prevent accidents.
2. Identifying The Search Intent
Before troubleshooting, understand the various reasons someone might search for information on fixing a car horn. This can help tailor the approach and provide comprehensive information. Here are five key search intents:
- DIY Repair: Individuals looking for step-by-step instructions to fix the horn themselves.
- Troubleshooting: Car owners trying to diagnose why their horn isn’t working.
- Component Check: People wanting to know how to check individual parts like fuses, relays, and the horn itself.
- Cost Estimate: Those looking for an idea of the potential costs for repair or replacement.
- Professional Advice: Users seeking advice on when to consult a professional mechanic.
3. Gathering Necessary Tools And Materials From CARDIAGTECH.NET
Having the right tools on hand is crucial for efficient troubleshooting and repair. CARDIAGTECH.NET offers a range of high-quality tools perfect for this task. Consider gathering the following:
- Multimeter: For testing voltage and continuity.
- Test Light: To check for power in the circuit.
- Socket Set: For removing and installing components.
- Wire Strippers/Crimpers: For repairing wiring.
- Replacement Fuses and Relays: To have on hand for testing.
- Contact Cleaner: To clean electrical connections.
Equipping yourself with these tools from CARDIAGTECH.NET will ensure you’re prepared for any issues you might encounter.
4. Initial Inspection: Visual Check And Basic Troubleshooting
4.1. Checking The Horn Itself
Begin with a visual inspection of the horn. Look for any signs of physical damage, such as cracks, dents, or corrosion. Horns are typically located behind the front grille or in the engine compartment, exposing them to the elements.
4.2. Inspecting Wire Connections
Check the wiring connected to the horn. Ensure the connections are secure and free from corrosion. Disconnect the wires, clean the terminals with contact cleaner from CARDIAGTECH.NET, and reconnect them tightly.
4.3. Testing The Horn Directly
To test the horn directly, disconnect it from the vehicle’s wiring and use jumper cables connected to a 12V battery. If the horn works when connected directly, the problem lies elsewhere in the circuit.
{width=1200 height=1200}
The image displays a corroded car horn connection, which is a common cause of horn failure. Cleaning these connections is a crucial first step in troubleshooting.5. Checking The Fuse: A Simple But Critical Step
5.1. Locating The Fuse Box
The fuse box is typically located under the dashboard, in the engine compartment, or sometimes in the trunk. Consult your vehicle’s owner’s manual to find its exact location and the fuse diagram.
5.2. Identifying The Horn Fuse
Refer to the fuse diagram to identify the fuse for the horn. It’s usually labeled clearly.
5.3. Inspecting The Fuse
Visually inspect the fuse for any signs of damage. A blown fuse will have a broken filament inside.
5.4. Replacing The Fuse
If the fuse is blown, replace it with a new fuse of the same amperage. After replacement, test the horn to see if it now works. If the new fuse blows immediately, there is likely a short circuit in the system.
According to a survey by AAA, electrical issues, including blown fuses, are a common cause of vehicle breakdowns.
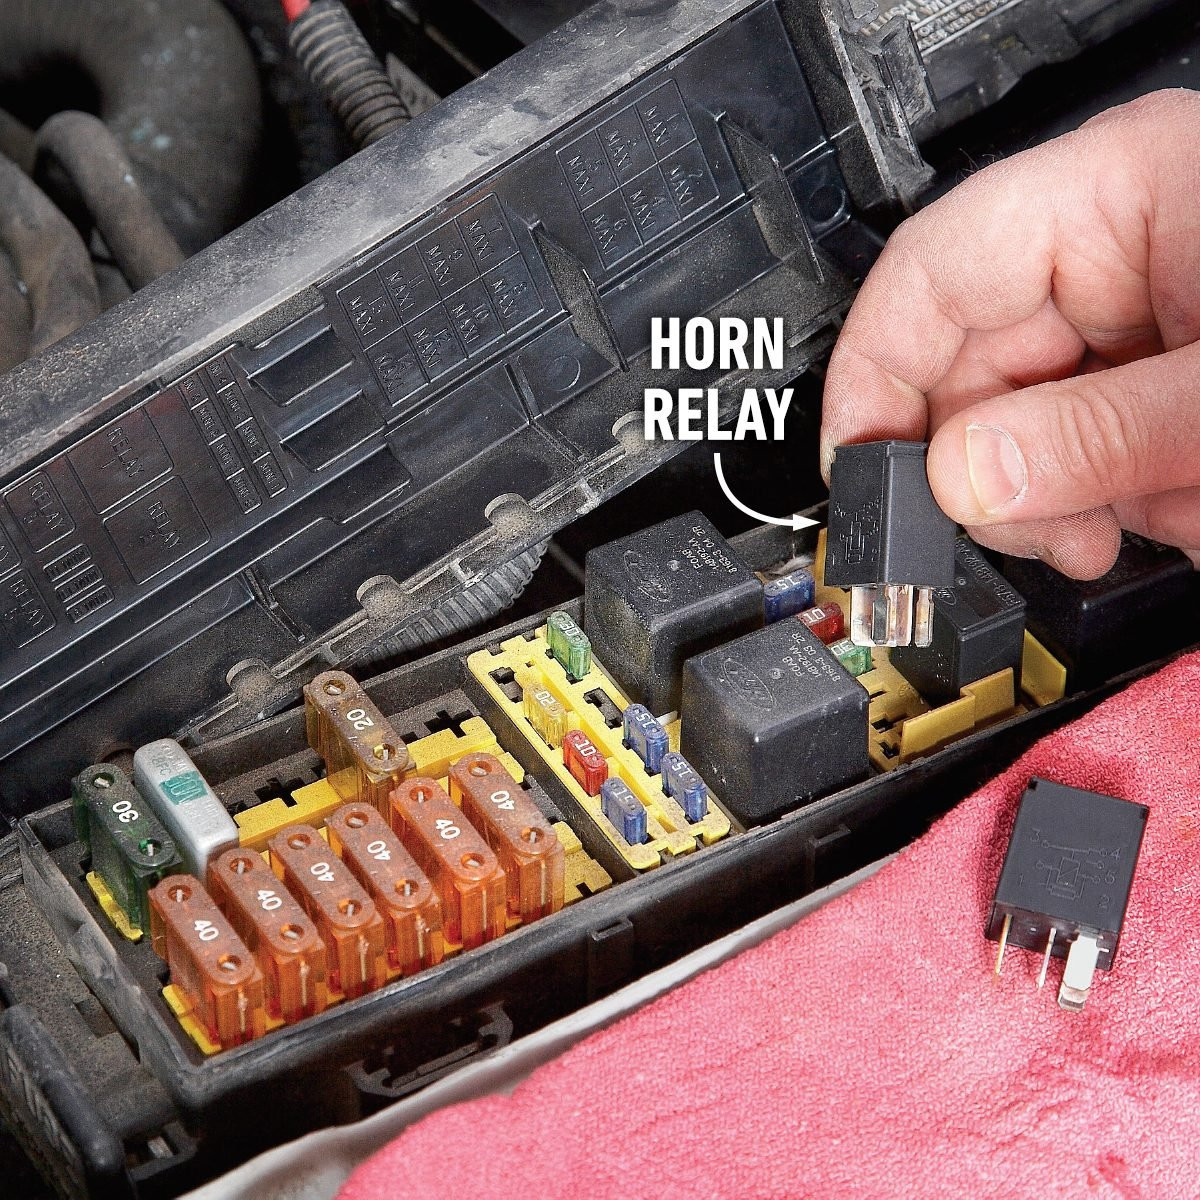
6. Testing The Relay: Ensuring Proper Power Delivery
6.1. Locating The Horn Relay
The horn relay is usually found in the fuse box along with other relays. Again, consult your vehicle’s owner’s manual for the exact location.
6.2. Identifying The Relay
The relay is typically a small, cube-shaped component. The owner’s manual or the relay itself will indicate its function.
6.3. Testing The Relay
There are a couple of ways to test the relay:
- Relay Tester: CARDIAGTECH.NET offers relay testers that can quickly and accurately determine if the relay is functioning correctly.
- Swapping Method: Swap the horn relay with another relay of the same type in the fuse box (e.g., the relay for the headlights). If the horn works after swapping, the original relay is faulty and needs replacement.
6.4. Checking The Relay Socket
Use a multimeter to check the relay socket for power. With the ignition on and the horn button pressed, there should be voltage at the appropriate terminals.
7. Diagnosing Wiring Issues: Tracing The Circuit
7.1. Visual Inspection
Inspect the wiring harness for any signs of damage, such as cuts, abrasions, or melted insulation. Pay close attention to areas where the wiring passes through metal parts of the vehicle, as these are common spots for shorts.
7.2. Continuity Testing
Use a multimeter to perform a continuity test on the wiring. Disconnect the battery before performing this test to avoid electrical shock. Check the continuity between the horn button and the relay, and between the relay and the horn.
7.3. Voltage Testing
Use a multimeter to check for voltage at the horn connector when the horn button is pressed. If there is no voltage, the problem lies upstream in the circuit.
7.4. Ground Connection
Ensure the horn has a good ground connection. Clean the grounding point and make sure the connection is tight. A poor ground can cause the horn to function intermittently or not at all.
8. Checking The Horn Button And Clock Spring
8.1. Accessing The Horn Button
The horn button is located on the steering wheel. Accessing it may require removing the airbag, which should be done with extreme caution. Disconnect the battery and wait at least 30 minutes before attempting to remove the airbag to prevent accidental deployment.
8.2. Testing The Horn Button
Use a multimeter to check the continuity of the horn button. When the button is pressed, there should be continuity between the terminals.
8.3. Inspecting The Clock Spring
The clock spring is a coiled ribbon cable that allows the steering wheel to turn while maintaining electrical connections to the airbag, horn, and other components. A broken clock spring is a common cause of horn failure. Look for any signs of damage to the clock spring.
8.4. Replacing The Clock Spring
Replacing the clock spring is a delicate procedure that requires careful attention. Follow the vehicle manufacturer’s instructions and ensure the new clock spring is properly aligned.
{width=1200 height=1200}
The image illustrates a car horn fuse box, emphasizing the importance of checking and replacing fuses as a diagnostic step. Correct fuse identification is crucial for effective troubleshooting.9. Component Replacement: Choosing Quality Parts From CARDIAGTECH.NET
9.1. Selecting Replacement Parts
When replacing any component in the horn circuit, it’s crucial to use high-quality parts. CARDIAGTECH.NET offers a wide selection of reliable replacement parts, including horns, relays, fuses, and wiring.
9.2. Horn Replacement
To replace the horn, disconnect the wiring and remove the mounting bolts. Install the new horn, ensuring it is securely mounted and the wiring is properly connected.
9.3. Relay Replacement
Replacing the relay is straightforward. Simply remove the old relay from the fuse box and plug in the new one.
9.4. Fuse Replacement
Ensure you use the correct amperage fuse for the horn circuit. Using a fuse with a higher amperage can damage the wiring and other components.
10. Advanced Troubleshooting Techniques
10.1. Using A Scan Tool
A scan tool can be helpful in diagnosing horn problems, especially in newer vehicles with complex electrical systems. The scan tool can read diagnostic trouble codes (DTCs) related to the horn circuit, providing valuable clues.
10.2. Circuit Tracing
If the problem is not immediately apparent, use a circuit tester to trace the horn circuit from the battery to the horn. This can help identify any breaks or shorts in the wiring.
10.3. Consult A Wiring Diagram
A wiring diagram for your vehicle can be an invaluable tool for troubleshooting electrical problems. The diagram shows the exact routing of the wiring and the location of all components in the circuit.
11. Step-By-Step Guide To Fixing A Car Horn
Here is a concise, step-by-step guide to fixing a car horn:
- Gather Tools: Multimeter, test light, socket set, wire strippers/crimpers, replacement fuses and relays, contact cleaner from CARDIAGTECH.NET.
- Visual Inspection: Check the horn and wiring for physical damage and corrosion.
- Fuse Check: Locate and inspect the horn fuse in the fuse box. Replace if blown.
- Relay Test: Test the horn relay using a relay tester or the swapping method.
- Direct Horn Test: Connect the horn directly to a 12V battery to see if it works.
- Wiring Inspection: Check the wiring for continuity and voltage using a multimeter.
- Horn Button/Clock Spring: Inspect the horn button and clock spring for damage.
- Component Replacement: Replace any faulty components with quality parts from CARDIAGTECH.NET.
- Final Test: After making repairs, test the horn to ensure it is working properly.
- Professional Help: If you’re unsure, consult a professional mechanic.
12. Maintaining Your Car Horn System
12.1. Regular Inspections
Perform regular visual inspections of the horn and wiring to catch any potential problems early.
12.2. Cleaning Connections
Keep the electrical connections clean and free from corrosion. Use contact cleaner from CARDIAGTECH.NET to clean the terminals periodically.
12.3. Protecting The Horn
Consider installing a protective cover over the horn to shield it from the elements.
13. Addressing Common Car Horn Problems
| Problem | Possible Cause | Solution |
|---|---|---|
| Horn Doesn’t Work At All | Blown fuse, faulty relay, broken wiring | Check fuse, test relay, inspect wiring |
| Horn Works Intermittently | Loose connections, faulty horn button | Tighten connections, replace horn button |
| Horn Sounds Weak Or Muffled | Corroded horn, poor ground connection | Clean horn, improve ground connection |
| Horn Stuck On | Faulty relay, shorted wiring | Replace relay, repair wiring |
| New Fuse Blows Immediately | Short circuit in wiring | Inspect wiring for shorts |
14. Ensuring Road Safety Through Functional Horns
A functioning car horn is essential for road safety. It allows drivers to alert others to potential hazards, preventing accidents. Regular maintenance and prompt repair of the horn system are crucial for ensuring the safety of yourself and others on the road.
15. Common Mistakes To Avoid When Fixing A Car Horn
- Skipping The Basics: Always start with the simple checks, like the fuse and connections.
- Using The Wrong Fuse: Make sure to use the correct amperage fuse.
- Ignoring The Ground Connection: A poor ground can cause many problems.
- Neglecting The Wiring: Inspect the wiring thoroughly for damage.
- Forgetting The Clock Spring: This is a common cause of horn failure.
16. Why Choose CARDIAGTECH.NET For Your Automotive Tool Needs?
CARDIAGTECH.NET offers a wide range of high-quality automotive tools and equipment, perfect for diagnosing and repairing car horn problems. Here’s why you should choose CARDIAGTECH.NET:
- Quality Products: We offer only the best tools and equipment from trusted brands.
- Wide Selection: From multimeters to relay testers, we have everything you need.
- Expert Advice: Our knowledgeable staff can help you choose the right tools for your needs.
- Competitive Prices: We offer competitive prices on all our products.
- Customer Satisfaction: We are committed to providing excellent customer service.
17. Leveraging Technology In Car Horn Repair
Modern technology has made car horn repair more efficient and accurate. Digital multimeters, scan tools, and circuit testers provide precise measurements and diagnostic information. CARDIAGTECH.NET stays up-to-date with the latest technology to offer you the best tools for the job.
18. Environmental Considerations In Car Repair
When repairing a car horn, be mindful of environmental considerations. Dispose of old parts properly and recycle whenever possible. Use environmentally friendly cleaning products and avoid spilling fluids.
19. The Importance Of Professional Training And Certification
While many car horn repairs can be done by DIY enthusiasts, some problems require professional training and certification. If you’re not comfortable working with electrical systems or removing airbags, it’s best to consult a qualified mechanic.
20. Understanding Legal Requirements
Ensure that your horn meets all legal requirements. Many jurisdictions have specific regulations regarding the loudness and type of horn that can be used on a vehicle. Check your local laws to ensure compliance. According to the National Conference of State Legislatures (NCSL), adhering to these regulations ensures road safety and prevents legal issues.
21. Cost Analysis of DIY vs. Professional Repair
- DIY Repair:
- Pros: Lower cost (parts only), convenience of doing it yourself.
- Cons: Time investment, potential for mistakes, risk of injury if not done correctly.
- Costs:
- Fuse: $1 – $5
- Relay: $10 – $30
- Horn: $20 – $100
- Tools (if needed): $50 – $200
- Professional Repair:
- Pros: Expertise, guaranteed work, time-saving.
- Cons: Higher cost, scheduling required.
- Costs:
- Labor: $75 – $150 per hour
- Parts: Similar to DIY costs but with markup
22. Impact of Weather Conditions on Car Horn Function
Extreme weather conditions can significantly impact the function of a car horn. High humidity and road salt can accelerate corrosion of electrical connections, leading to horn failure. In colder climates, ice and snow can block the horn, reducing its effectiveness. Regularly inspect and maintain your horn, especially after exposure to harsh weather.
23. Safety Measures During Car Horn Repair
- Disconnect the Battery: Always disconnect the negative battery terminal before starting any electrical work.
- Wear Safety Glasses: Protect your eyes from debris and chemicals.
- Use Gloves: Protect your hands from dirt, grease, and chemicals.
- Work in a Well-Ventilated Area: Avoid breathing in fumes from cleaning products.
- Follow Instructions: Always follow the vehicle manufacturer’s instructions.
24. The Role of Aftermarket Car Horns
Aftermarket car horns can provide enhanced functionality and sound. These horns come in various styles and loudness levels, allowing drivers to customize their vehicle’s sound. When installing an aftermarket horn, ensure it meets legal requirements and is compatible with your vehicle’s electrical system.
25. How to Improve Car Horn Loudness
If your car horn is not loud enough, there are several ways to improve its loudness:
- Replace with a Louder Horn: Choose an aftermarket horn with a higher decibel rating.
- Check Wiring and Connections: Ensure all connections are clean and tight.
- Add a Relay: A relay can provide more power to the horn, increasing its loudness.
- Upgrade the Wiring: Use thicker gauge wiring to reduce voltage drop.
26. Innovations in Car Horn Technology
Recent innovations in car horn technology include:
- Digital Horns: These horns use digital signal processing to produce a variety of sounds.
- Smart Horns: These horns can adjust their loudness based on ambient noise levels.
- Wireless Horns: These horns use wireless technology to communicate with the vehicle’s electrical system.
27. Future Trends in Car Horn Systems
Future trends in car horn systems include integration with advanced driver-assistance systems (ADAS) and autonomous driving technologies. Horns may be used to communicate with pedestrians and other vehicles, enhancing safety in complex traffic scenarios.
28. The Added Value of Using Professional Diagnostic Tools
Professional diagnostic tools, such as those available at CARDIAGTECH.NET, offer significant advantages in car horn repair:
- Accuracy: Precise measurements and diagnostic information.
- Efficiency: Faster troubleshooting and repair.
- Comprehensive Analysis: Detailed circuit analysis and component testing.
- Cost Savings: Reduced risk of misdiagnosis and unnecessary repairs.
- Professional Results: High-quality repairs that ensure long-term reliability.
This image showcases a variety of car horn repair tools, including a multimeter, wire strippers, and fuse pullers, all essential for diagnosing and fixing horn issues.29. How To Choose The Right Car Horn For Your Vehicle
Selecting the appropriate car horn involves considering several key factors to ensure compatibility, performance, and safety. First, verify the horn’s voltage matches your vehicle’s electrical system (typically 12V for cars). Next, assess the sound level (measured in decibels) to comply with local regulations while ensuring it’s audible enough for safety. Also, consider the horn’s tone; single-tone horns are basic, while dual-tone horns offer a more distinctive sound. Finally, check the horn’s physical dimensions to ensure it fits properly in the designated mounting location within your vehicle. Consulting with CARDIAGTECH.NET experts can provide valuable insights and guidance in making the best choice.
30. Ensuring Compliance With Local Regulations
Adhering to local regulations is crucial when modifying or repairing your car horn system. Many jurisdictions have specific laws regarding the loudness (decibel levels) and types of sounds permitted for car horns. For instance, some areas prohibit the use of excessively loud or unconventional sounds to prevent noise pollution and avoid startling other drivers or pedestrians. Always research and comply with your local motor vehicle laws to prevent fines or legal issues. CARDIAGTECH.NET can offer advice on products that meet regional regulatory standards.
31. Step-by-Step Guide To Replacing A Car Horn
Replacing a car horn can be a straightforward process if you follow these steps:
- Gather Tools: Socket set, wrench, new horn, and safety glasses.
- Disconnect Battery: Disconnect the negative terminal to prevent electrical shock.
- Locate Horn: Typically behind the grille or in the engine compartment.
- Remove Old Horn: Disconnect wiring and mounting bolts.
- Connect New Horn: Attach wires and secure the new horn.
- Test Horn: Reconnect the battery and test the horn.
32. Understanding The Role Of Car Horns In Preventing Accidents
Car horns play a vital role in preventing accidents by allowing drivers to alert others to potential hazards. A functional horn can warn pedestrians, cyclists, and other drivers of your presence, especially in situations where visibility is limited or attention is divided. According to the National Highway Traffic Safety Administration (NHTSA), a properly functioning horn can significantly reduce the risk of collisions.
33. The Advantages of Using a Multimeter in Car Horn Repair
A multimeter is an indispensable tool for diagnosing and repairing car horn issues. It allows you to:
- Check Voltage: Verify that the horn is receiving the correct voltage.
- Test Continuity: Ensure that the wiring is intact and free from breaks.
- Measure Resistance: Identify shorts or open circuits in the system.
- Diagnose Components: Test the functionality of the relay and horn button.
34. Troubleshooting a Car Horn That Works Intermittently
An intermittent car horn can be frustrating and dangerous. Here’s how to troubleshoot it:
- Check Connections: Loose or corroded connections are a common cause.
- Inspect Wiring: Look for damaged or frayed wires.
- Test Relay: A faulty relay may work sometimes but not others.
- Examine Horn Button: The button itself may be worn or damaged.
35. How to Protect Your Car Horn from Weather Damage
Protecting your car horn from weather damage can extend its lifespan and ensure reliable performance. Consider these tips:
- Install a Shield: A plastic or metal shield can protect the horn from direct exposure to rain and snow.
- Use Corrosion Inhibitor: Apply a corrosion inhibitor to the electrical connections.
- Regular Cleaning: Clean the horn and connections regularly to remove dirt and debris.
- Park Under Cover: When possible, park your car in a garage or under a carport.
36. The Relationship Between Car Horns and Vehicle Safety Inspections
Many states require car horns to be functional as part of their vehicle safety inspections. A non-functioning horn can result in a failed inspection, preventing you from legally operating your vehicle. Regular maintenance and timely repairs are essential to ensure your horn meets inspection requirements.
37. How To Diagnose A Faulty Car Horn Relay
Diagnosing a faulty car horn relay is crucial for fixing horn issues. Here’s how to do it:
- Locate the Relay: Consult your vehicle’s manual for its location.
- Listen for Click: Have someone press the horn button while you listen for a click from the relay.
- Swap with Known Good Relay: Replace the horn relay with a known working relay to see if the horn functions.
- Use a Multimeter: Check for voltage at the relay terminals when the horn button is pressed.
38. The Significance Of Grounding In Car Horn Systems
Proper grounding is essential for the correct operation of a car horn. A poor ground connection can cause the horn to function weakly, intermittently, or not at all. Ensure that the horn is securely grounded to a clean, rust-free metal surface on the vehicle’s chassis.
39. How To Test A Car Horn With A Multimeter
Testing a car horn with a multimeter is a straightforward process:
- Set Multimeter: Set the multimeter to DC voltage mode.
- Disconnect Horn: Disconnect the horn’s electrical connector.
- Connect Probes: Connect the multimeter probes to the terminals on the connector.
- Press Horn Button: Have someone press the horn button while you observe the multimeter reading.
- Check Voltage: You should see a voltage reading close to your vehicle’s battery voltage (approximately 12V).
40. Call To Action:
Experiencing issues with your car horn? Don’t compromise on safety! Contact CARDIAGTECH.NET today for expert advice and high-quality tools to diagnose and repair your car horn effectively. Whether you’re a seasoned mechanic or a DIY enthusiast, we have the right solutions for you. Call us at +1 (641) 206-8880, visit our website at CARDIAGTECH.NET, or stop by our location at 276 Reock St, City of Orange, NJ 07050, United States. Let CARDIAGTECH.NET help you stay safe on the road! Take advantage of our exclusive deals on essential automotive tools and ensure your vehicle is always in top condition. Contact us now and experience the CARDIAGTECH.NET difference!