How To Fix A Leather Car Seat Like A Pro
Fixing a leather car seat can restore your car’s interior and increase its value. At CARDIAGTECH.NET, we provide tools and techniques to repair damage and maintain the luxurious feel of your vehicle’s seats. Discover how to repair rips, cracks, and fading, ensuring your car’s interior looks as good as new with professional-grade leather repair. Revitalize your car’s interior with leather conditioning and upholstery repair solutions.
1. Understanding Leather Car Seat Damage
Leather car seats, while luxurious, are prone to damage from daily use, environmental factors, and accidents. Recognizing the type and extent of damage is crucial for effective repair. Here’s a breakdown of common issues:
- Cracks: Often appear on the seat’s surface due to drying out or repeated stress.
- Rips: Can range from small tears to large gashes, usually caused by sharp objects or excessive wear.
- Fading: Occurs when the leather loses its color due to sun exposure.
- Stains: Result from spills, dirt, or dyes transferring onto the leather.
- Scratches: Typically superficial, caused by keys, pets, or abrasive clothing.
- Wear and Tear: General signs of aging, including discoloration and loss of texture.
Understanding these damages helps in choosing the right repair methods and products, ensuring a lasting restoration. Addressing these issues promptly prevents further degradation, maintaining both the appearance and value of your vehicle.
1.1 Identifying the Type of Leather
Different types of leather require specific care and repair techniques. Identifying the leather in your car seat is essential for choosing the right approach.
| Leather Type | Characteristics | Common Uses | Care Considerations |
|---|---|---|---|
| Aniline Leather | Natural, soft, and porous; shows natural markings | High-end car seats, furniture | Requires gentle cleaning and conditioning to avoid staining and drying |
| Semi-Aniline | Similar to aniline but with a light protective coating | Mid- to high-end car seats | More resistant to stains than aniline but still needs regular care |
| Pigmented | Durable with a uniform color; heavily coated for protection | Most standard car seats | Easiest to clean and maintain; resistant to stains and fading |
| Suede/Alcantara | Soft, velvety texture; actually a microfiber fabric that mimics suede | Seat inserts, steering wheels | Requires special cleaners and protectants to prevent matting and staining; vacuum regularly |
| Bonded Leather | Made from leather scraps and fibers; not as durable as other types of leather | Less expensive car seats, trim | More prone to cracking and peeling; avoid harsh chemicals |
| Faux Leather | Artificial leather made from synthetic materials (e.g., vinyl, PU) | Entry-level car seats | Easy to clean with mild soap and water; avoid extreme temperatures and harsh chemicals |
Identifying your leather type ensures you use appropriate cleaning, conditioning, and repair products. This prevents damage and prolongs the life of your car seats.
2. Essential Tools and Materials for Leather Car Seat Repair
Having the right tools and materials is crucial for successfully fixing a leather car seat. Here’s a comprehensive list of what you’ll need:
- Leather Cleaner: Removes dirt and grime without damaging the leather.
- Leather Conditioner: Keeps the leather soft and prevents cracking.
- Leather Repair Kit: Includes fillers, dyes, and adhesives for fixing rips and tears.
- Colorant Kit: Necessary for matching the original color of the leather.
- Leather Glue: For bonding patches and securing edges.
- Heavy Filler: Used to fill in holes and deep cracks.
- Sub-Patch: Provides a backing for the repair area.
- Spatula or Palette Knife: For applying fillers smoothly.
- Tweezers: Helps in positioning the sub-patch.
- Scalpel or Scissors: For trimming frayed edges.
- Abrasive Pad: Prepares the leather surface for repair.
- Alcohol Cleaner: Removes residue and prepares the surface for dyeing.
- Airbrush: Applies colorant evenly for a seamless finish.
- Sponges: For applying cleaner and colorant.
- Sandpaper: Smooths out the filler after it dries.
- Heat Gun or Hair Dryer: Speeds up the drying process.
- Protective Gloves: Keeps your hands clean and protected.
- Masking Tape: Protects surrounding areas from accidental spills or color transfer.
- Soft Cloths: For wiping and buffing.
2.1 Where to Source Quality Repair Tools
Sourcing high-quality repair tools and materials is essential for achieving professional results. Here are some trusted sources:
- CARDIAGTECH.NET: Offers a curated selection of leather repair kits, colorants, and tools specifically designed for automotive leather. CARDIAGTECH.NET provides expert advice and high-quality products for all your leather repair needs.
- Address: 276 Reock St, City of Orange, NJ 07050, United States
- WhatsApp: +1 (641) 206-8880
- Website: CARDIAGTECH.NET
- Automotive Supply Stores: Stores like AutoZone, Advance Auto Parts, and Pep Boys provide a range of leather care and repair products.
- Online Marketplaces: Amazon and eBay offer a vast selection of leather repair kits and individual tools from various brands.
- Specialty Leather Shops: Local leather supply stores often carry specialized products and can offer expert advice.
- Furniture Repair Stores: These stores may also carry leather repair products suitable for car seats.
Choosing the right supplier ensures you get quality products that deliver effective and lasting repairs, giving your leather car seats a renewed and refreshed look.
3. Step-by-Step Guide to Fixing a Leather Car Seat
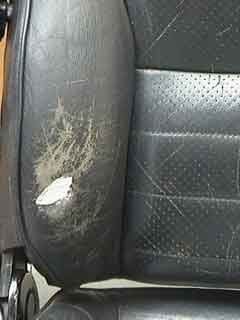
3.1 Preparing the Leather Surface
- Clean the Area:
- Use a leather cleaner to remove dirt, grime, and oils from the damaged area.
- Apply the cleaner with a soft cloth, gently rubbing the surface in a circular motion.
- Wipe away any excess cleaner with a clean, damp cloth.
- Allow the area to dry completely before proceeding.
- Prepare with Leather Prep:
- Using the Leather Prep & abrasive pad, gently rub the surface of the leather to remove any grease and oils that have accumulated. This step will also remove any loose fibers and remove the manufactured finish allowing the colorant to adhere to the leather properly.
- Tidy the Area
- Using the scalpel or a pair of scissors, carefully remove the lip by cutting it away at the base, taking care not to damage the surrounding leather.
- Alcohol Cleaning:
- Wipe the leather down with the Alcohol Cleaner, this will remove any dirt or dust from the area before moving on to the next step.
Preparing Leather Car Seat
Alt: Preparing a car seat for leather repair involves cleaning the surface to remove dirt and oils, ensuring a clean base.
3.2 Repairing Small Cracks and Scratches
- Apply Leather Filler:
- Use a small amount of leather filler to fill in the cracks or scratches.
- Apply the filler with a palette knife, spreading it evenly over the damaged area.
- Ensure the filler is level with the surrounding leather.
- Dry the Filler:
- Allow the filler to dry completely. This may take 20-30 minutes, depending on the product.
- Use a heat gun or hair dryer to speed up the drying process, if desired.
- Sand the Area:
- Once the filler is dry, use fine-grit sandpaper (320-400 grit) to smooth the surface.
- Gently sand the area until it is flush with the surrounding leather.
- Wipe away any dust with a soft cloth.
- Apply Colorant:
- Match the colorant to the original color of the leather.
- Apply the colorant with a sponge or airbrush, using thin, even coats.
- Allow each coat to dry before applying the next.
- Apply 2-3 coats until the repaired area blends seamlessly with the surrounding leather.
- Apply Leather Finish:
- Apply a leather finish to seal the colorant and protect the repaired area.
- Use a spray gun to apply thin, even coats of the finish.
- Allow the finish to dry completely before using the seat.
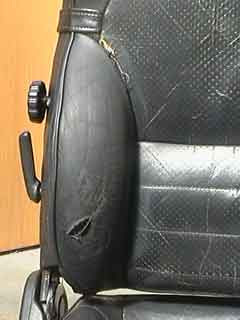
3.3 Fixing Rips and Tears
- Apply the backing patch:
- In order to provide a firm backing for the repair, the leather repair sub-patch should be applied. Take the patch supplied in the kit and cut it to size, it should be enough to completely cover the repair with an additional 1cm of material surrounding the hole.
- Once this is done use the tweezers to insert one side of the patch underneath the leather so that the 1cm excess is completely under the leather. Apply pressure to hold this in place and gently feed the patch under the remaining edges of the hole. When done the patch should lie flat under the repair, and the 1cm surrounding material we left should be underneath the leather on all sides.
- When this is done, put a small amount of Leather Glue onto the spatula supplied and feed this underneath the edges of the hole to coat the underside of the leather surrounding it, taking care not to move the canvas patch. When all edges have been glued, apply pressure to bond the leather to the patch and allow to dry.
 Applying Backing Patch
Alt: Using a sub-patch to provide support beneath a leather tear, ensuring a stable base for repair.
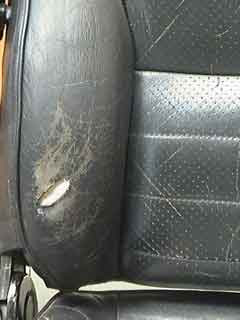
- Fill the hole:
- Now that the backing patch is firmly in place, the hole in the leather must be filled. In order to do this; take a small amount of the Heavy Filler using the end of the palette knife and place a thin layer into the hole over the backing patch. Make sure all the layer is very thin, just covering the sub-patch and allow 20 minutes to dry, this can be speeded up by using a hair dryer.
- Keep applying the heavy filler in thin layers, it is crucial to use thin layers as the filler shrinks as it dries and may not cure properly if the layers applied are too thick. As a general rule, at least 5-6 thin layers should be used to build up the filler until the filler level is built up to just below the top of the hole.
- To remove excess, with the application of each layer, smooth the area over with the sharper edge of the palette knife before drying the layer applied.
 Filling Hole With Filler
Alt: Applying heavy filler in thin layers to repair a hole in a leather car seat, building up to the surface level.
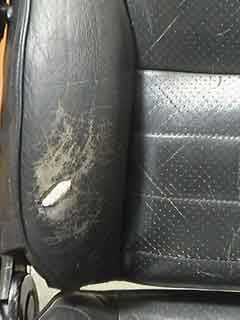
- More Layers of Filler:
- This is an illustration of what the hole will look like after 5 or 6 layers of filler have been used.It will not be smooth but it will have nearly filled the hole completely.
 Hole After Layers of Filler
Alt: An illustration of what the hole will look like after 5 or 6 layers of filler have been used.It will not be smooth but it will have nearly filled the hole completely.
- Add the final layer of filler:
- Apply the final layer of filler to the hole, completely filling it so that it is on an even level with the surrounding leather on the seat. Take care to let this final layer cure properly as when cured the filler can shrink, reducing it to below the desired level.
- Add more repair filler if necessary.If you rub over the hole and filler gets onto the leather, remove it with the palette knife.
- Your aim is to fill the hole so that it is level with the leather and not over filled. If you do over fill it, you can reduce it with sandpaper.
- When you are happy with the level of the filler, and you can no longer feel any ‘ridge’ between the level of the filler and the surrounding leather, clean the area with the Alcohol cleaner again to remove any unwanted filler and dust from the surrounding area.
 Adding the final layer of filler
Alt: Applying the final layer of filler to completely fill a hole in the leather car seat so that it is on an even level with the surrounding leather on the seat.
- Apply an initial coat of colorant:
- The colorant supplied with the kit should have been matched to the colour of the leather item being repaired, unless you are completely re-colouring it.
- Take one of the sponges supplied in the kit and apply a small amount of colorant to it, then rub this into the area of the repair thoroughly. This allows the colorant to penetrate into the creases of the leather and valleys of the grain, giving a better overall finish.
- When this is done, move onto the next step, where the colorant is sprayed on.
Hole After Layers of Filler
Alt: Applying an initial coat of colorant ensures proper penetration into the leather’s creases for an even finish.
- Finish the job:
- Using an airbrush spray as many thin coats of colour over the leather car seat to thoroughly blend in the repair. For the best result, ensure that each coat is very thin and is given sufficient time to cure before applying the next. This will enable an even finish to be built up and will avoid problems with uncured colourant. It is not uncommon for the best repairs to apply 10-15 thin coats of colourant, depending on the extent of the damage and the colour used.
- Once you are happy that the repair is concealed, the colourant is cured properly and it is well blended with the surrounding leather, the finish can be applied. Using the spray gun apply 4 or 5 thin coats of the finish, again allowing time for it to dry between each coat. The finish seals the colourant in the leather preventing it from wearing and prolongs the leathers life.When complete, allow 24 hours before using the item, to ensure the filler, colourant and finish have cured sufficiently.
 Finishing the Job
Alt: Spraying thin coats of colorant to seamlessly blend a leather car seat repair, followed by a protective finish.
3.4 Addressing Stains and Discoloration
- Identify the Stain:
- Determine the type of stain (e.g., ink, grease, dye transfer) to select the appropriate cleaning method.
- Apply Leather Cleaner:
- Use a leather cleaner specifically designed for stain removal.
- Apply the cleaner to a soft cloth and gently blot the stain. Avoid rubbing vigorously, as this can spread the stain or damage the leather.
- Work from the outside of the stain inward to prevent it from spreading.
- Blot the area with a clean, damp cloth to remove any residue.
- Use Specialized Stain Removers:
- For stubborn stains like ink or dye transfer, use a specialized leather stain remover.
- Follow the product instructions carefully, testing it on an inconspicuous area first.
- Apply the stain remover with a cotton swab, gently dabbing the affected area.
- Blot the area with a clean, damp cloth to remove any residue.
- Address Discoloration:
- For minor discoloration, a leather conditioner can help restore the leather’s natural color.
- Apply the conditioner to a soft cloth and rub it into the discolored area in a circular motion.
- Allow the conditioner to penetrate the leather for 10-15 minutes.
- Buff the area with a clean, dry cloth to remove any excess conditioner.
- For significant fading, use a leather color restorer or dye to re-color the leather. Follow the product instructions carefully, ensuring the color matches the original leather.
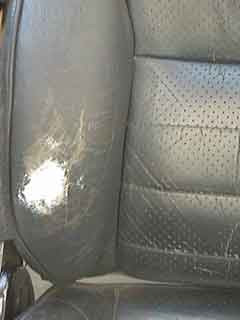
3.5 Restoring Color to Faded Leather
- Clean the Leather:
- Thoroughly clean the leather surface with a leather cleaner to remove any dirt, grime, or oils.
- Allow the leather to dry completely.
- Prepare the Surface:
- Lightly sand the faded area with fine-grit sandpaper (400-600 grit) to create a smooth surface for the dye to adhere to.
- Wipe away any dust with a soft cloth.
- Apply Leather Dye:
- Choose a leather dye that matches the original color of the car seat.
- Test the dye on an inconspicuous area first to ensure the color is a good match.
- Apply the dye with a sponge, brush, or airbrush, using thin, even coats.
- Allow each coat to dry completely before applying the next.
- Apply 2-3 coats until the faded area blends seamlessly with the surrounding leather.
- Seal the Dye:
- Apply a leather sealant or finish to protect the dyed area and prevent the color from fading again.
- Use a spray gun to apply thin, even coats of the sealant.
- Allow the sealant to dry completely before using the seat.
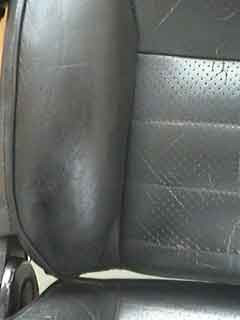
3.6 Final Touches and Protection
- Apply Leather Conditioner:
- Once the repairs are complete and the color is restored, apply a high-quality leather conditioner to the entire seat.
- This will keep the leather soft, supple, and protected from future damage.
- Apply the conditioner with a soft cloth, rubbing it into the leather in a circular motion.
- Allow the conditioner to penetrate the leather for 10-15 minutes.
- Buff the area with a clean, dry cloth to remove any excess conditioner.
- Protect with Leather Protector:
- Apply a leather protector to create a barrier against stains, spills, and UV damage.
- This will help prolong the life of the leather and keep it looking its best.
- Spray the protector evenly over the surface of the seat, following the product instructions.
- Allow the protector to dry completely before using the seat.
- Regular Maintenance:
- Clean and condition your leather car seats regularly (every 1-3 months) to prevent damage and keep them looking their best.
- Use a leather cleaner and conditioner specifically designed for automotive leather.
- Avoid using harsh chemicals or abrasive cleaners, as these can damage the leather.
- Park in shaded areas or use a sunshade to protect the leather from UV damage.
- Address any spills or stains immediately to prevent them from setting in.
Following these steps will help you repair and maintain your leather car seats, keeping them looking luxurious and comfortable for years to come.
4. DIY vs. Professional Leather Repair
Deciding between DIY and professional leather repair depends on the extent of the damage, your skill level, and budget.
4.1 When to DIY
- Minor Damage: Small cracks, scratches, or stains can often be handled with a DIY repair kit.
- Basic Skills: If you have some experience with DIY projects and are comfortable following instructions, DIY can be a good option.
- Cost Savings: DIY repairs are generally more affordable than professional services.
4.2 When to Hire a Professional
- Extensive Damage: Large rips, tears, or significant fading may require professional attention.
- Complex Repairs: If the damage is in a hard-to-reach area or requires specialized techniques, a professional is recommended.
- Color Matching: Professionals have the expertise to perfectly match the color of the leather, ensuring a seamless repair.
- Guaranteed Results: Professional repairs often come with a warranty, providing peace of mind.
4.3 Cost Comparison
| Repair Type | DIY Cost | Professional Cost |
|---|---|---|
| Small Crack/Scratch | $20 – $50 | $50 – $150 |
| Stain Removal | $10 – $30 | $40 – $100 |
| Rip/Tear Repair | $30 – $80 | $100 – $300 |
| Color Restoration | $40 – $100 | $150 – $400 |
| Full Seat Restoration | $100 – $200 | $300 – $800+ |
4.4 Finding a Reputable Professional
- Check Online Reviews: Look for local leather repair shops with positive reviews and testimonials.
- Ask for Referrals: Ask friends, family, or your local car dealership for recommendations.
- Verify Credentials: Ensure the professional is experienced and certified in leather repair.
- Get a Quote: Obtain a detailed quote before proceeding with the repair, including the cost of materials and labor.
- Ask About Warranty: Inquire about the warranty offered on the repair work.
5. Advanced Techniques for Leather Car Seat Restoration
5.1 Leather Reconditioning
Leather reconditioning is a comprehensive process that restores the leather’s natural oils and suppleness.
- Deep Cleaning:
- Use a specialized leather cleaner to remove deep-seated dirt and grime.
- Apply the cleaner with a soft brush, working it into the leather’s grain.
- Wipe away any excess cleaner with a clean, damp cloth.
- Oil Replenishment:
- Apply a leather oil or conditioner to replenish the leather’s natural oils.
- Use a high-quality product that contains natural oils like neatsfoot oil or mink oil.
- Apply the oil with a soft cloth, rubbing it into the leather in a circular motion.
- Allow the oil to penetrate the leather for 24-48 hours.
- Buffing:
- Buff the leather with a clean, dry cloth to remove any excess oil and restore its shine.
- Use a horsehair brush for a more thorough buffing.
- Sealing:
- Apply a leather sealant to protect the reconditioned leather from future damage.
- Use a spray sealant for even coverage.
- Allow the sealant to dry completely before using the seat.
5.2 Custom Color Matching
Achieving a perfect color match is crucial for seamless leather repair.
- Identify the Original Color:
- Use a leather color chart or a professional color matching system to identify the original color of the leather.
- Take a sample of the leather to a paint or dye supplier for a custom color match.
- Mix the Dye:
- Use high-quality leather dyes to mix a custom color that matches the original.
- Start with a base color and gradually add small amounts of other colors until you achieve the desired shade.
- Test the color on an inconspicuous area of the leather before applying it to the entire seat.
- Apply the Dye:
- Apply the custom-mixed dye with a sponge, brush, or airbrush, using thin, even coats.
- Allow each coat to dry completely before applying the next.
- Apply 2-3 coats until the color is uniform and blends seamlessly with the surrounding leather.
- Seal the Dye:
- Apply a leather sealant to protect the dyed area and prevent the color from fading.
- Use a spray sealant for even coverage.
- Allow the sealant to dry completely before using the seat.
5.3 Replacing Leather Panels
For severely damaged leather, replacing entire panels may be necessary.
- Remove the Old Panel:
- Carefully remove the damaged leather panel from the seat, using a seam ripper or sharp knife.
- Take note of how the panel is attached and any clips or fasteners that need to be removed.
- Create a Template:
- Use the old leather panel as a template to cut a new panel from a sheet of matching leather.
- Ensure the new panel is the same size and shape as the old one.
- Attach the New Panel:
- Attach the new leather panel to the seat, using the same method as the original panel.
- Use a sewing machine to sew the panel in place, or use leather adhesive to glue it down.
- Ensure the panel is securely attached and that the seams are straight and even.
- Finishing Touches:
- Trim any excess leather from the edges of the panel.
- Apply a leather conditioner to the new panel to keep it soft and supple.
- Apply a leather protector to protect the new panel from future damage.
6. Maintaining Leather Car Seats to Prevent Future Damage
Regular maintenance is key to preventing damage and keeping your leather car seats looking their best.
6.1 Regular Cleaning
- Vacuum Regularly:
- Vacuum your leather car seats regularly (at least once a month) to remove dirt, dust, and debris.
- Use a soft brush attachment to avoid scratching the leather.
- Wipe Down Spills Immediately:
- Wipe down any spills or stains immediately with a clean, damp cloth.
- Avoid rubbing vigorously, as this can spread the stain or damage the leather.
- Use Leather Cleaner:
- Use a leather cleaner specifically designed for automotive leather.
- Apply the cleaner with a soft cloth, gently rubbing the surface in a circular motion.
- Wipe away any excess cleaner with a clean, damp cloth.
6.2 Conditioning and Protection
- Apply Leather Conditioner:
- Apply a high-quality leather conditioner every 1-3 months to keep the leather soft and supple.
- Apply the conditioner with a soft cloth, rubbing it into the leather in a circular motion.
- Allow the conditioner to penetrate the leather for 10-15 minutes.
- Buff the area with a clean, dry cloth to remove any excess conditioner.
- Use Leather Protector:
- Apply a leather protector to create a barrier against stains, spills, and UV damage.
- Spray the protector evenly over the surface of the seat, following the product instructions.
- Allow the protector to dry completely before using the seat.
6.3 Preventing UV Damage
- Park in Shaded Areas:
- Park your car in shaded areas whenever possible to protect the leather from UV damage.
- Use a Sunshade:
- Use a sunshade to block out sunlight when parking in direct sun.
- Tint Your Windows:
- Tint your car windows to reduce the amount of UV radiation that enters the vehicle.
6.4 Avoiding Common Mistakes
- Don’t Use Harsh Chemicals:
- Avoid using harsh chemicals or abrasive cleaners on your leather car seats, as these can damage the leather.
- Don’t Over-Condition:
- Avoid over-conditioning the leather, as this can make it greasy and attract dirt.
- Don’t Ignore Small Issues:
- Address any small cracks, scratches, or stains immediately to prevent them from becoming larger problems.
7. Innovations in Leather Car Seat Repair
7.1 Self-Healing Leather
Researchers are developing self-healing leather that can repair minor scratches and abrasions on its own.
- Microcapsule Technology: Incorporates microcapsules containing healing agents that are released when the leather is damaged.
- Polymer Networks: Uses polymer networks that can rearrange themselves to fill in cracks and scratches.
7.2 Nanotechnology Coatings
Nanotechnology coatings provide enhanced protection against stains, UV damage, and wear.
- Hydrophobic Coatings: Repel water and oil-based stains, making the leather easier to clean.
- UV-Resistant Coatings: Protect the leather from fading and cracking due to sun exposure.
- Scratch-Resistant Coatings: Provide a durable barrier against scratches and abrasions.
7.3 3D-Printed Leather
3D printing technology is being used to create custom leather panels for car seat repair.
- Customization: Allows for the creation of panels with unique shapes and textures.
- Sustainability: Uses sustainable materials and reduces waste.
- Precision: Ensures a perfect fit and seamless integration with the existing leather.
8. Why Choose CARDIAGTECH.NET for Your Automotive Repair Needs
CARDIAGTECH.NET is your trusted partner for high-quality automotive repair tools and solutions. We understand the challenges faced by auto repair professionals and enthusiasts, and we are committed to providing products that enhance efficiency, accuracy, and safety.
8.1 Comprehensive Product Range
At CARDIAGTECH.NET, we offer a wide range of tools and equipment to meet all your automotive repair needs. Our selection includes:
- Diagnostic Tools: Advanced scanners, code readers, and diagnostic software for accurate troubleshooting.
- Hand Tools: High-quality wrenches, sockets, pliers, and screwdrivers designed for durability and performance.
- Power Tools: Impact wrenches, drills, and grinders for efficient and effective repairs.
- Specialty Tools: Unique tools for specific tasks, such as brake service, engine repair, and electrical diagnostics.
- Leather Repair Kits: Complete kits for repairing cracks, tears, and stains in leather car seats.
- Colorant Kits: Kits for matching and restoring the color of leather car seats.
- Accessories: A wide range of accessories, including abrasives, adhesives, and cleaning supplies.
8.2 Superior Quality and Durability
We source our products from leading manufacturers known for their commitment to quality and innovation. Our tools are made from high-grade materials and undergo rigorous testing to ensure they meet the highest standards of performance and durability.
8.3 Expert Support and Guidance
Our team of experienced professionals is dedicated to providing expert support and guidance to our customers. Whether you need help selecting the right tool or troubleshooting a repair issue, we are here to assist you.
- Technical Support: Our technical support team is available to answer your questions and provide guidance on using our products.
- Training Resources: We offer a variety of training resources, including videos, tutorials, and online courses, to help you improve your skills and knowledge.
- Community Forum: Our online community forum allows you to connect with other auto repair professionals and share tips, advice, and best practices.
8.4 Competitive Pricing and Value
We are committed to offering our products at competitive prices, without compromising on quality. We also offer a variety of value-added services, such as free shipping on orders over $100 and a satisfaction guarantee.
8.5 Customer Satisfaction Guarantee
Your satisfaction is our top priority. If you are not completely satisfied with your purchase, simply return it for a full refund or exchange.
8.6 Contact Information
- Address: 276 Reock St, City of Orange, NJ 07050, United States
- WhatsApp: +1 (641) 206-8880
- Website: CARDIAGTECH.NET
9. Call to Action
Ready to restore your leather car seats to their former glory? Contact CARDIAGTECH.NET today! Our expert team is here to help you find the perfect tools and solutions for all your automotive repair needs. Whether you’re dealing with minor scratches or major damage, we have the products and expertise to get the job done right. Don’t let worn-out leather detract from your car’s value and appearance. Reach out to us now for personalized advice and top-quality tools that will transform your car’s interior.
- Nâng cao hiệu quả công việc, giảm thời gian sửa chữa: With CARDIAGTECH.NET tools, you can streamline your repair process and get back on the road faster.
- Tăng độ chính xác và an toàn trong quá trình làm việc: Our precision tools ensure accurate repairs and minimize the risk of errors.
- Tiết kiệm chi phí sửa chữa và bảo dưỡng xe cho khách hàng: By using our durable tools, you can reduce the need for frequent replacements and save money in the long run.
- Tăng doanh thu và lợi nhuận cho gara: Our high-quality tools help you provide top-notch service, attracting more customers and boosting your bottom line.
- Nâng cao uy tín và chất lượng dịch vụ của gara: Using CARDIAGTECH.NET tools demonstrates your commitment to excellence and customer satisfaction.
Contact us today and experience the CARDIAGTECH.NET difference!
- Address: 276 Reock St, City of Orange, NJ 07050, United States
- WhatsApp: +1 (641) 206-8880
- Website: CARDIAGTECH.NET
10. Frequently Asked Questions (FAQ)
-
What is the best way to clean leather car seats?
Use a specialized leather cleaner and a soft cloth to gently wipe the seats. Avoid harsh chemicals and abrasive cleaners.
-
How often should I condition my leather car seats?
Condition your leather car seats every 1-3 months to keep them soft and supple.
-
Can I use regular household cleaners on leather car seats?
No, regular household cleaners can damage leather. Always use a cleaner specifically designed for leather.
-
How do I repair a small crack in a leather car seat?
Use a leather filler to fill the crack, then sand it smooth and apply a colorant to match the original color.
-
What causes leather car seats to fade?
Sun exposure is the primary cause of fading in leather car seats. Park in shaded areas or use a sunshade to prevent fading.
-
How do I remove a stain from a leather car seat?
Blot the stain with a clean, damp cloth and a leather cleaner. For stubborn stains, use a specialized leather stain remover.
-
Is it better to DIY or hire a professional for leather car seat repair?
DIY is suitable for minor damage, while professional repair is recommended for extensive damage or complex repairs.
-
How much does it cost to repair a rip in a leather car seat?
DIY repair kits can cost $30-$80, while professional repairs can range from $100-$300.
-
What are the benefits of using a leather protector on car seats?
Leather protector creates a barrier against stains, spills, and UV damage, prolonging the life of the leather.
-
Where can I buy high-quality leather repair products?
CARDIAGTECH.NET offers a wide range of high-quality leather repair kits, colorants, and tools for automotive leather.