How To Fix A Cracked Plastic Car Bumper: Your Ultimate Guide
How to fix a cracked plastic car bumper? Fixing a cracked plastic car bumper involves a detailed process that can restore its appearance and structural integrity, and CARDIAGTECH.BIZ offers the tools and equipment you need to do the job right. This guide provides a step-by-step approach to repairing your bumper, ensuring a professional finish. With proper techniques and the right materials, you can save money and maintain your vehicle’s aesthetics.
1. Understanding the Need for Plastic Bumper Repair
Why is it important to address a cracked plastic car bumper? A cracked bumper isn’t just an eyesore; it can compromise your vehicle’s structural integrity. Ignoring it can lead to further damage and higher repair costs down the line. According to a study by the Highway Loss Data Institute (HLDI), vehicles with damaged bumpers can experience increased damage in subsequent collisions. Early repair prevents further deterioration and maintains the vehicle’s safety features. CARDIAGTECH.BIZ provides the tools to ensure these repairs are done effectively and efficiently.
1.1. Identifying the Severity of the Damage
How do you know if a cracked bumper can be repaired versus replaced? Assessing the damage is crucial. Minor cracks and scratches can often be repaired, while severe damage, such as large cracks or missing pieces, may require a full replacement. Consider the extent of the damage:
- Minor Cracks: Small, superficial cracks that don’t affect the bumper’s structural integrity.
- Medium Cracks: More noticeable cracks that may penetrate deeper into the plastic.
- Severe Damage: Large cracks, holes, or missing pieces that significantly compromise the bumper’s structure.
According to research from the National Body Repair Association (NBRA), proper assessment is essential to determine the best course of action.
1.2. Benefits of Repairing a Cracked Bumper
What are the advantages of choosing repair over replacement? Repairing a cracked bumper offers several benefits. According to a 2022 report by the Automotive Body Repair Association (ABRA), repairing bumpers can be more cost-effective than replacing them, saving you money on parts and labor. It also helps maintain the original factory finish, which can preserve the vehicle’s value. Additionally, repairing is more environmentally friendly as it reduces plastic waste. Here’s a quick look at the advantages:
- Cost Savings: Repairing is generally cheaper than replacing.
- Maintains Original Finish: Keeps the factory paint and appearance.
- Environmentally Friendly: Reduces plastic waste.
- Faster Turnaround: Repairs are often quicker than replacements.
1.3. Factors to Consider Before Repairing
What factors should influence your decision to repair or replace a bumper? Before starting any repairs, consider the following:
- Cost: Get estimates for both repair and replacement to compare expenses.
- Time: Assess how long each option will take.
- Vehicle Value: Consider the vehicle’s age and condition.
- Safety: Ensure the repair will restore the bumper’s structural integrity.
According to a survey by the Insurance Institute for Highway Safety (IIHS), bumpers play a crucial role in low-speed collisions. Ensure your repair will maintain this protection.
2. Essential Tools and Materials for Bumper Repair
What tools and materials do you need to fix a cracked plastic car bumper effectively? To tackle a cracked bumper repair, having the right tools and materials is essential. Here’s a comprehensive list:
- Safety Gear: Safety glasses, gloves, and a respirator to protect yourself.
- Cleaning Supplies: Soap, water, and a degreaser to clean the bumper.
- Sanding Tools: Sandpaper (various grits), a sanding block, and a power sander (optional).
- Grinding Tools: A rotary tool or grinder to create a V-groove along the crack.
- Plastic Welder: A plastic welder to melt and fuse the plastic together.
- Filler: Automotive body filler to smooth out imperfections.
- Epoxy: Two-part epoxy adhesive for strong bonding.
- Masking Tape: To protect surrounding areas from sanding and painting.
- Primer: Automotive primer to prepare the surface for paint.
- Paint: Automotive paint that matches your vehicle’s color code.
- Clear Coat: To protect the paint and add a glossy finish.
- Spreader: To evenly apply the epoxy and filler.
- Drill: To drill holes at the end of the crack to prevent further damage.
- Adhesion Promoter: To ensure the paint properly sticks to the bumper surface.
- JTAPE Premium Cloth Protection Tape: To protect adjacent panels from drilling, sanding, and painting.
- JTAPE Foam Masking Tapes: For masking off surrounding panels to achieve a soft-edge finish.
Having these tools ensures you can perform a professional-quality repair. CARDIAGTECH.BIZ offers a wide range of these products, ensuring you have everything you need for the job.
2.1. Safety Equipment
Why is safety equipment crucial for auto repairs? Safety should always be your top priority when working on automotive repairs. Safety glasses protect your eyes from debris, gloves protect your hands from chemicals and sharp edges, and a respirator prevents you from inhaling harmful fumes. The Occupational Safety and Health Administration (OSHA) provides guidelines on personal protective equipment (PPE) to ensure a safe working environment. Always wear appropriate safety gear to prevent injuries.
2.2. Sanding and Grinding Tools
What types of sanding and grinding tools are best for bumper repair? Sanding and grinding tools are essential for preparing the bumper surface for repair. Use various grits of sandpaper to smooth out imperfections and create a surface that will properly adhere to fillers and paint. A power sander can speed up the process, but be careful not to remove too much material. A rotary tool or grinder is useful for creating a V-groove along the crack, which provides a larger surface area for bonding.
2.3. Plastic Welding Equipment
How does plastic welding help in repairing bumpers? A plastic welder is a specialized tool that melts and fuses plastic together, creating a strong and durable bond. According to the Society of Automotive Engineers (SAE), plastic welding is an effective method for repairing thermoplastic parts like bumpers. The plastic welder heats the plastic to a melting point, allowing you to fuse the edges of the crack together. This creates a seamless repair that restores the bumper’s structural integrity.
2.4. Fillers and Adhesives
What types of fillers and adhesives are recommended for bumper repair? Automotive body filler is used to smooth out imperfections and create a uniform surface. Choose a high-quality filler that is specifically designed for plastic repairs. Two-part epoxy adhesive is used for strong bonding, particularly on the backside of the bumper. According to research by the American Chemistry Council, epoxy adhesives offer excellent adhesion and durability for automotive applications. Make sure to follow the manufacturer’s instructions for mixing and applying the filler and adhesive.
2.5. Painting and Finishing Supplies
What painting supplies are needed for a professional bumper repair? Achieving a professional finish requires the right painting supplies. Automotive primer prepares the surface for paint, ensuring proper adhesion. Use automotive paint that matches your vehicle’s color code for a seamless repair. Apply several thin coats of paint, allowing each coat to dry before applying the next. Finish with a clear coat to protect the paint and add a glossy finish. High-quality masking tape is essential for protecting surrounding areas from overspray.
3. Step-by-Step Guide to Fixing a Cracked Plastic Car Bumper
Ready to get started? Here’s a detailed, step-by-step guide on how to fix a cracked plastic car bumper.
3.1. Preparing the Bumper
How do you properly prepare the bumper for repair? Preparation is key to a successful repair. Start by thoroughly cleaning the bumper with soap, water, and a degreaser to remove any dirt, grease, or wax. Rinse the bumper and allow it to dry completely. Next, use masking tape to protect any surrounding areas that you don’t want to be sanded or painted.
3.2. Drilling the Crack
Why is drilling important in the repair process? Drilling two small holes, about 6mm in diameter, one at each end of the crack can prevent the crack from spreading further. This is a crucial step in ensuring the longevity of the repair.
3.3. Creating a V-Groove
What is the purpose of creating a V-groove along the crack? Use a rotary tool or grinder to create a V-groove along the crack. This involves carving out a V-shaped channel that provides a larger surface area for the plastic welder or epoxy to bond to. The V-groove should be wide and deep enough to allow for a strong and seamless repair.
3.4. Sanding the Area
How does sanding contribute to a successful repair? Sanding is essential for smoothing out the area and creating a surface that will properly adhere to fillers and paint. Start with a medium-grit sandpaper to remove any rough edges or imperfections. Then, switch to a fine-grit sandpaper to smooth out the surface. Sand the area thoroughly, feathering the edges of the repair to blend it seamlessly with the surrounding area.
3.5. Plastic Welding (Optional)
When is plastic welding necessary for bumper repair? If you have a plastic welder, use it to fuse the edges of the crack together. Heat the plastic slowly and evenly, pressing the edges together until they melt and fuse. Allow the plastic to cool completely before proceeding to the next step. According to the American Welding Society (AWS), proper plastic welding techniques can create a bond that is as strong as the original material.
3.6. Applying Epoxy
How do you apply epoxy for maximum strength? Apply a two-part epoxy adhesive to the backside of the bumper to reinforce the repair. Mix the epoxy according to the manufacturer’s instructions and apply it to the backside of the crack, overlapping the edges of the V-groove. Use a spreader to smooth out the epoxy and ensure it is evenly distributed. Allow the epoxy to cure completely before proceeding to the next step.
3.7. Applying Body Filler
What is the best way to apply body filler for a smooth finish? Apply automotive body filler to the V-groove, filling in any gaps or imperfections. Mix the body filler according to the manufacturer’s instructions and apply it to the area with a spreader. Smooth out the filler, following the contours of the bumper. Allow the filler to dry completely before proceeding to the next step.
3.8. Sanding the Filler
How do you sand the body filler to achieve a smooth surface? Once the body filler is dry, sand it down to create a smooth and uniform surface. Start with a medium-grit sandpaper to remove any excess filler and shape the repair. Then, switch to a fine-grit sandpaper to smooth out the surface and blend it seamlessly with the surrounding area. Sand the area thoroughly, feathering the edges of the repair to create a smooth transition.
3.9. Priming the Area
Why is priming necessary before painting? Apply automotive primer to the repair area to prepare it for paint. Primer helps the paint adhere properly and provides a uniform surface for the color coat. Apply several thin coats of primer, allowing each coat to dry before applying the next.
3.10. Painting the Bumper
How do you paint the bumper for a factory-like finish? Apply automotive paint that matches your vehicle’s color code to the repair area. Use several thin coats of paint, allowing each coat to dry before applying the next. This helps to avoid runs and ensures an even finish. According to automotive painting experts, proper paint application is crucial for achieving a factory-like finish.
3.11. Applying Clear Coat
What are the benefits of using clear coat? Finish the repair with a clear coat to protect the paint and add a glossy finish. Apply several thin coats of clear coat, allowing each coat to dry before applying the next. This will help to protect the paint from scratches and fading and will give the bumper a professional, showroom-quality finish.
3.12. Polishing and Buffing
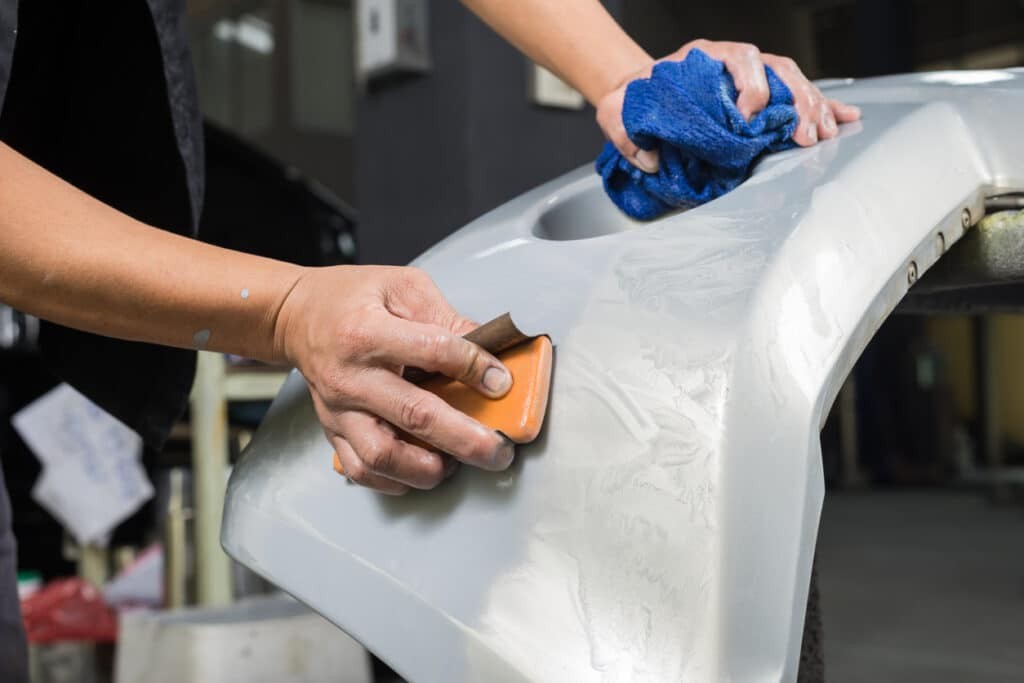
How do you polish and buff the bumper for a showroom finish? Once the clear coat is dry, polish and buff the repair area to remove any imperfections and create a smooth, glossy finish. Use a polishing compound and a buffing pad to polish the area, then switch to a finishing compound and a clean buffing pad to buff the area. This will help to blend the repair seamlessly with the surrounding area and give the bumper a showroom-quality finish.
Technician sanding a car bumper
4. Advanced Techniques for Bumper Repair
Want to take your repair skills to the next level? Here are some advanced techniques for repairing cracked plastic car bumpers.
4.1. Heat Gun Techniques
How can a heat gun improve the repair process? A heat gun can be used to reshape and mold plastic, making it useful for repairing dents and distortions. Heat the plastic slowly and evenly, using your hands to reshape it as it softens. Be careful not to overheat the plastic, as this can cause it to melt or burn.
4.2. Reinforcement Methods
What are some ways to reinforce a repaired bumper? For added strength, consider using reinforcement methods such as fiberglass mesh or metal strips. These can be embedded in the epoxy or body filler to provide extra support. According to materials scientists at MIT, composite materials like fiberglass offer excellent strength-to-weight ratios, making them ideal for reinforcing automotive repairs.
4.3. Color Matching Techniques
How can you ensure a perfect color match when painting? Achieving a perfect color match can be challenging, but there are several techniques you can use to improve your chances of success. Start by obtaining the vehicle’s color code from the manufacturer. Use a paint mixing system to create a custom color match. Spray a test panel to ensure the color matches before painting the entire bumper.
4.4. Working with Textured Bumpers
How do you repair textured bumpers? Textured bumpers require special techniques to maintain the original texture. Use a texture coating to replicate the original finish. Apply the texture coating evenly and allow it to dry completely before painting.
5. Cost Analysis: Repair vs. Replacement
How much does it cost to repair a cracked bumper compared to replacing it? Understanding the costs associated with repairing versus replacing a cracked bumper is essential for making an informed decision.
5.1. Factors Affecting Repair Costs
What factors influence the cost of bumper repair? Several factors can affect the cost of repairing a cracked bumper:
- Severity of the Damage: Minor cracks are cheaper to repair than severe damage.
- Materials Used: The cost of fillers, adhesives, and paint can vary.
- Labor Costs: Professional repair shops charge hourly rates for labor.
- DIY vs. Professional Repair: DIY repairs can save money on labor costs.
According to a survey by AAA, the average cost of repairing a bumper ranges from $300 to $800, depending on the extent of the damage and the repair method used.
5.2. Factors Affecting Replacement Costs
What factors influence the cost of bumper replacement? The cost of replacing a bumper can also vary depending on several factors:
- Vehicle Make and Model: Some bumpers are more expensive than others.
- Bumper Type: Aftermarket bumpers may be cheaper than OEM bumpers.
- Labor Costs: Professional installation can add to the overall cost.
- Painting Costs: Painting a new bumper to match the vehicle’s color can be expensive.
According to data from the National Automobile Dealers Association (NADA), the average cost of replacing a bumper ranges from $800 to $2,000, depending on the vehicle and the type of bumper used.
5.3. Case Studies
Can you provide real-world examples of repair vs. replacement costs?
Case Study 1: Minor Crack Repair
- DIY Repair: $100 (materials only)
- Professional Repair: $350
Case Study 2: Severe Damage Replacement
- Aftermarket Bumper Replacement: $900
- OEM Bumper Replacement: $1,800
5.4. Making an Informed Decision
How do you decide whether to repair or replace the bumper based on cost? To make an informed decision, get estimates for both repair and replacement. Consider the factors mentioned above and weigh the costs against the benefits of each option. If the repair cost is significantly lower and the repair will restore the bumper’s structural integrity, repair may be the best option. However, if the damage is severe and the repair cost is close to the replacement cost, replacement may be the more practical choice.
6. Maintaining Your Repaired Bumper
How can you ensure the longevity of your bumper repair? Proper maintenance is crucial for ensuring the longevity of your repaired bumper.
6.1. Regular Cleaning
Why is regular cleaning important? Regularly clean your bumper with soap and water to remove dirt, grime, and road salt. This will help to protect the paint and prevent corrosion. According to detailing experts at Meguiar’s, regular cleaning can extend the life of your vehicle’s paint and finish.
6.2. Protective Coatings
What types of protective coatings are recommended? Apply a protective coating such as wax or sealant to protect the paint from UV rays, scratches, and other environmental damage. Reapply the coating every few months to maintain its protective properties.
6.3. Avoiding Impact
How can you prevent future bumper damage? Be mindful of parking and driving conditions to avoid impact with other objects. Install parking sensors or a rearview camera to help you avoid collisions. According to the National Safety Council (NSC), defensive driving techniques can help to prevent accidents and reduce the risk of bumper damage.
6.4. Inspecting Regularly
Why is it important to inspect your bumper regularly? Regularly inspect your bumper for any signs of damage, such as cracks, scratches, or dents. Address any issues promptly to prevent them from worsening. Early detection and repair can save you money and prevent more extensive damage in the future.
7. Common Mistakes to Avoid
What are some common mistakes people make when repairing bumpers? Avoiding common mistakes can help you achieve a professional-quality repair and prevent further damage.
7.1. Improper Preparation
Why is proper preparation crucial for a successful repair? Failing to properly prepare the bumper surface is a common mistake. Always clean the bumper thoroughly and sand it properly to ensure that fillers and paint adhere correctly.
7.2. Using the Wrong Materials
Why is it important to use the right materials for bumper repair? Using the wrong materials, such as low-quality fillers or paints, can result in a subpar repair. Always use high-quality materials that are specifically designed for automotive repairs.
7.3. Rushing the Process
Why is it important to take your time when repairing a bumper? Rushing the repair process can lead to mistakes and a poor finish. Take your time and follow each step carefully to ensure a professional-quality repair.
7.4. Neglecting Safety
Why is safety important when repairing a bumper? Neglecting safety precautions, such as wearing safety glasses and gloves, can result in injuries. Always wear appropriate safety gear to protect yourself from hazards.
8. When to Seek Professional Help
When is it best to consult a professional for bumper repair? While DIY repairs can save money, there are times when it’s best to seek professional help.
8.1. Severe Damage
When is professional help necessary for severe bumper damage? If the bumper has severe damage, such as large cracks, holes, or missing pieces, it’s best to consult a professional repair shop. They have the expertise and equipment to handle complex repairs and ensure that the bumper is restored to its original condition.
8.2. Structural Damage
When is professional help necessary for structural damage? If the bumper has structural damage, such as a bent frame or damaged mounting points, it’s important to seek professional help. Structural damage can compromise the safety of the vehicle, and a professional repair shop can ensure that the bumper is properly repaired and aligned.
8.3. Lack of Experience
When is professional help necessary due to lack of experience? If you lack experience in automotive repairs, it’s best to consult a professional. Repairing a bumper can be a complex process, and mistakes can be costly. A professional repair shop can ensure that the job is done right the first time.
8.4. Specialized Tools
When is professional help necessary due to specialized tools? If the repair requires specialized tools, such as a plastic welder or a paint mixing system, it’s best to consult a professional. These tools can be expensive, and a professional repair shop will already have them on hand.
9. CARDIAGTECH.BIZ: Your Partner in Auto Repair
Why should you choose CARDIAGTECH.BIZ for your auto repair needs? At CARDIAGTECH.BIZ, we understand the challenges faced by auto repair professionals and DIY enthusiasts alike. We offer a wide range of high-quality tools and equipment to help you tackle any repair job with confidence.
9.1. High-Quality Tools and Equipment
Why is high-quality equipment important for bumper repair? We offer a comprehensive selection of tools and equipment for bumper repair, including:
- Sanding and Grinding Tools
- Plastic Welders
- Fillers and Adhesives
- Painting and Finishing Supplies
- Safety Gear
- Drills
- Adhesion Promoters
- JTAPE Premium Cloth Protection Tape
- JTAPE Foam Masking Tapes
Our products are sourced from trusted manufacturers and are designed to meet the demands of professional repair shops and DIY enthusiasts.
9.2. Expert Advice and Support
Why is expert advice valuable for auto repair projects? Our team of experienced professionals is here to provide expert advice and support. Whether you need help choosing the right tools or guidance on a specific repair technique, we are here to assist you every step of the way.
9.3. Convenient Online Shopping
How does CARDIAGTECH.BIZ make it easy to shop for auto repair tools? Our user-friendly website makes it easy to find the tools and equipment you need. Browse our extensive catalog, read product reviews, and place your order online. We offer fast and reliable shipping to get your tools to you quickly.
9.4. Commitment to Customer Satisfaction
Why is customer satisfaction a priority for CARDIAGTECH.BIZ? We are committed to providing exceptional customer service and ensuring your satisfaction. If you have any questions or concerns, our customer support team is here to help.
10. Frequently Asked Questions (FAQs)
10.1. Can I repair a cracked bumper myself?
Yes, minor cracks can often be repaired at home with the right tools and materials. However, severe damage may require professional repair.
10.2. What is the best way to clean a plastic bumper before repair?
Use soap, water, and a degreaser to remove any dirt, grease, or wax.
10.3. How do I prevent a crack from spreading?
Drill small holes at the ends of the crack to prevent it from spreading further.
10.4. What type of filler should I use for plastic bumper repair?
Use an automotive body filler specifically designed for plastic repairs.
10.5. How do I match the paint color to my vehicle?
Obtain the vehicle’s color code from the manufacturer and use a paint mixing system to create a custom color match.
10.6. Is plastic welding necessary for bumper repair?
Plastic welding can provide a strong and durable bond, but it is not always necessary for minor cracks.
10.7. How much does it cost to repair a cracked bumper?
The cost can range from $300 to $800, depending on the severity of the damage and the repair method used.
10.8. How much does it cost to replace a bumper?
The cost can range from $800 to $2,000, depending on the vehicle and the type of bumper used.
10.9. What safety precautions should I take when repairing a bumper?
Wear safety glasses, gloves, and a respirator to protect yourself from hazards.
10.10. Where can I buy high-quality tools and equipment for bumper repair?
CARDIAGTECH.BIZ offers a wide range of high-quality tools and equipment for bumper repair.
Repairing a cracked plastic car bumper is a manageable task with the right tools, materials, and techniques. Whether you’re a seasoned auto repair professional or a DIY enthusiast, CARDIAGTECH.BIZ is here to support you with top-quality products and expert advice. By following this comprehensive guide, you can restore your bumper to its original condition, save money, and maintain the value of your vehicle.
Ready to get started on your bumper repair project? Contact CARDIAGTECH.BIZ today for expert advice and the best tools and equipment:
- Address: 276 Reock St, City of Orange, NJ 07050, United States
- WhatsApp: +1 (641) 206-8880
- Website: CARDIAGTECH.BIZ
Let us help you achieve a professional-quality repair with ease and confidence.