**Can You Fix a Ripped Leather Car Seat: A Comprehensive Guide**

The question, “Can you fix a ripped leather car seat?” is commonly asked, and the answer is a resounding yes. At CARDIAGTECH.NET, we’ll explore practical methods and expert tips to restore your car’s interior. The information presented aims to provide you with the knowledge and confidence to tackle leather repair, offering solutions that blend seamlessly with your vehicle’s aesthetic. Whether you’re dealing with minor tears, or significant damage, this guide ensures a professional-quality restoration. Learn to repair, restore, and protect your car seats, enhancing both their appearance and longevity.
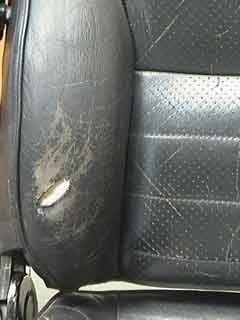
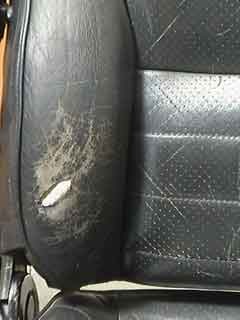
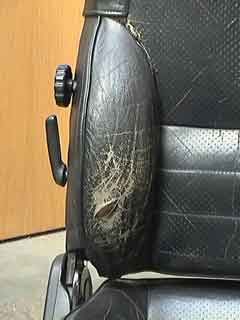
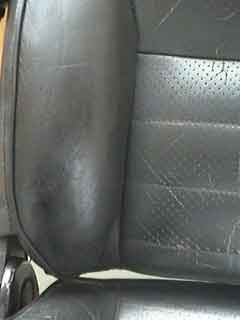
1. Identifying the Damage to Your Leather Car Seat
Before you start any repair work, it’s important to understand the type and extent of the damage. Accurate diagnosis is the first step in choosing the right repair strategy.
1.1. Types of Leather Damage
Leather car seats can suffer from various types of damage. Knowing the specific issue helps determine the best course of action.
- Small Tears: These are minor rips that typically occur due to sharp objects or stress on the leather.
- Large Rips: Larger tears can result from accidents, heavy use, or significant wear and tear.
- Scratches: Often caused by keys, pets, or other abrasive objects.
- Fading: Sunlight and age can cause the leather to lose its color and vibrancy.
- Cracking: Leather can crack over time, especially if it’s not properly conditioned.
- Stains: Spills, dirt, and other contaminants can leave unsightly stains on the leather.
- Wear and Tear: General wear and tear can lead to the leather becoming thin and worn in high-use areas.
1.2. Assessing the Extent of the Damage
A careful inspection will help you understand how much work is needed.
- Size of the Tear: Measure the length and width of the tear to estimate the amount of repair material needed.
- Location: Tears in high-stress areas may require more reinforcement.
- Leather Condition: Check if the surrounding leather is dry, cracked, or otherwise damaged.
- Color Matching: Determine if the color of the repair material will match the original leather.
- Structural Integrity: Assess if the underlying foam or structure is damaged.
1.3. Tools for Assessment
Having the right tools can make the assessment process easier.
- Magnifying Glass: Helps to see small details and assess the condition of the leather fibers.
- Measuring Tape: Use to measure the size of the tear or damage area accurately.
- Bright Light Source: Ensures you can see the damage clearly, especially in darker areas of the car.
- Camera: Take photos of the damage before and after cleaning to document the repair process.
2. Essential Tools and Materials for Leather Car Seat Repair
To effectively repair a ripped leather car seat, you’ll need specific tools and materials. Choosing the right supplies ensures a professional and lasting repair.
2.1. Cleaning Supplies
Proper cleaning prepares the leather for repair and ensures better adhesion of repair materials.
- Leather Cleaner: Removes dirt, oils, and other contaminants from the leather surface.
- Soft Brushes: Helps to gently scrub the leather without causing damage.
- Microfiber Cloths: Ideal for wiping and buffing the leather surface.
- Isopropyl Alcohol: Used to clean the area before applying adhesive or filler.
2.2. Repair Materials
These materials are crucial for filling the tear and restoring the leather’s surface.
- Leather Repair Kit: Contains essential items like leather filler, adhesive, and colorant.
- Leather Filler: Used to fill the tear and create a smooth, even surface.
- Leather Adhesive: Bonds the leather edges and the backing material.
- Backing Material: Provides support behind the tear to reinforce the repair. Options include:
- Canvas Patch: Strong and durable, suitable for larger repairs.
- Leather Patch: Blends seamlessly with the original leather.
- Colorant or Leather Dye: Matches the color of the original leather to blend the repair.
- Leather Finish: Seals and protects the repaired area, providing a consistent sheen.
2.3. Application Tools
These tools help apply the repair materials accurately and achieve a professional finish.
- Palette Knife or Spreader: Used to apply and smooth leather filler.
- Small Brushes: Apply colorant and finish to the repaired area.
- Airbrush: Provides an even and consistent application of colorant and finish (optional).
- Heat Gun or Hair Dryer: Speeds up the drying process of fillers and adhesives (use with caution to avoid overheating).
- Sandpaper (Various Grits): Smooths the filled area and blends it with the surrounding leather.
2.4. Safety Equipment
Protect yourself during the repair process with appropriate safety gear.
- Gloves: Protect your hands from chemicals and adhesives.
- Mask: Prevents inhalation of fumes from cleaners, colorants, and finishes.
- Eye Protection: Safety glasses or goggles protect your eyes from splashes and debris.
2.5. Where to Buy Supplies
You can find these supplies at various retailers:
Note: Prices and availability may vary.
| Item | Where to Buy | Estimated Price |
|---|---|---|
| Leather Repair Kit | CARDIAGTECH.NET, Auto Stores, Online Retailers | $20 – $50 |
| Leather Cleaner | CARDIAGTECH.NET, Auto Stores, Online Retailers | $10 – $20 |
| Leather Filler | CARDIAGTECH.NET, Auto Stores, Online Retailers | $15 – $30 |
| Leather Adhesive | CARDIAGTECH.NET, Hardware Stores, Online Retailers | $5 – $15 |
| Canvas/Leather Patch | CARDIAGTECH.NET, Fabric Stores, Online Retailers | $5 – $10 |
| Colorant/Leather Dye | CARDIAGTECH.NET, Leather Supply Stores, Online Retailers | $15 – $35 |
| Leather Finish | CARDIAGTECH.NET, Leather Supply Stores, Online Retailers | $15 – $30 |
| Application Tools | CARDIAGTECH.NET, Art Supply Stores, Online Retailers | $10 – $25 |
| Safety Equipment | CARDIAGTECH.NET, Hardware Stores, Online Retailers | $10 – $20 |
3. Step-by-Step Guide to Repairing a Ripped Leather Car Seat
Here’s a comprehensive, step-by-step guide to fixing a ripped leather car seat, ensuring a professional and durable repair.
3.1. Preparing the Area
Proper preparation is crucial for a successful repair.
- Clean the Leather:
- Use a leather cleaner and a soft brush to remove dirt and grime from the damaged area and its surroundings.
- Wipe the area with a microfiber cloth to remove any residue.
- Dry the Area:
- Allow the leather to air dry completely. You can use a clean, dry cloth to speed up the process.
- Trim Loose Fibers:
- Use a pair of scissors or a sharp knife to carefully trim any loose fibers or frayed edges around the tear.
- Be careful not to cut the surrounding leather.
Preparing leather car seat for repair with leather prep and abrasive pad
3.2. Applying a Backing Patch
A backing patch provides support and reinforcement for the repair.
- Cut the Patch:
- Cut a piece of canvas or leather patch slightly larger than the tear. Ensure it extends about 1 cm beyond the edges of the tear.
- Insert the Patch:
- Use tweezers or a spatula to carefully insert the patch under the edges of the tear.
- The patch should lie flat and cover the entire tear with the excess material tucked beneath the leather.
- Adhere the Patch:
- Apply leather adhesive to the underside of the leather around the tear.
- Press the edges of the leather onto the patch, ensuring a secure bond.
- Allow the adhesive to dry completely according to the manufacturer’s instructions.
 Applying backing patch to leather car seat repair
3.3. Filling the Tear
Leather filler helps to create a smooth, even surface.
- Apply the First Layer of Filler:
- Use a palette knife to apply a thin layer of leather filler over the backing patch and into the tear.
- Ensure the filler covers the entire area and is level with the surrounding leather.
- Dry the Filler:
- Allow the filler to dry completely. You can use a heat gun or hair dryer on a low setting to speed up the drying process. Be cautious not to overheat the leather.
- Apply Additional Layers:
- Apply additional thin layers of filler, allowing each layer to dry before applying the next.
- Typically, 3-5 layers are needed to fill the tear completely.
- Smooth the Surface:
- After the final layer has dried, use fine-grit sandpaper (e.g., 400-grit) to gently smooth the surface.
- Be careful not to remove too much filler. The goal is to create a smooth, even surface that blends with the surrounding leather.
 Filling hole in leather car seat with heavy filler
3.4. Coloring and Finishing
Coloring and finishing help to blend the repair seamlessly with the original leather.
- Apply Colorant:
- Apply a small amount of leather colorant to a sponge or cloth.
- Gently rub the colorant onto the filled area, blending it with the surrounding leather.
- If using an airbrush, apply thin, even coats of colorant, allowing each coat to dry before applying the next.
- Dry the Colorant:
- Allow the colorant to dry completely. Use a heat gun or hair dryer on a low setting to speed up the drying process if needed.
- Apply Leather Finish:
- Apply a thin layer of leather finish to the repaired area.
- This helps to seal the colorant and protect the repair.
- Allow the finish to dry completely.
- Buff the Surface:
- Use a soft, clean cloth to gently buff the repaired area.
- This helps to blend the finish with the surrounding leather and create a uniform sheen.
 Applying colorant to leather car seat repair
3.5. Final Inspection and Maintenance
- Inspect the Repair:
- Check the repaired area for any imperfections. If needed, apply additional colorant or finish to achieve a seamless blend.
- Allow to Cure:
- Allow the repaired area to cure for 24-48 hours before using the seat. This ensures the filler, colorant, and finish have fully set.
- Regular Maintenance:
- Clean and condition the leather car seats regularly to prevent future damage.
- Use a high-quality leather conditioner to keep the leather soft and supple.
- Avoid exposing the seats to direct sunlight for extended periods.
 Before and after leather car seat repair
 Finished leather car seat repair
4. Advanced Techniques for Complex Leather Repairs
For more severe damage, such as large rips or extensive wear, advanced techniques are necessary.
4.1. Replacing Leather Panels
When a large section of leather is severely damaged, replacing the entire panel may be the best option.
- Remove the Damaged Panel:
- Carefully remove the damaged leather panel from the car seat. This may involve removing stitching, clips, or fasteners.
- Create a Template:
- Use the old panel as a template to cut a new panel from a matching piece of leather.
- Stitch the New Panel:
- Sew the new panel onto the car seat, using the same stitching pattern as the original.
- Ensure the stitching is tight and secure.
- Reattach the Panel:
- Reattach the panel to the car seat frame, using clips, fasteners, or adhesive as needed.
4.2. Dealing with Deep Cracks
Deep cracks can be challenging to repair, but with the right techniques, you can restore the leather’s appearance.
- Clean the Cracks:
- Use a leather cleaner and a small brush to thoroughly clean the cracks.
- Remove any dirt or debris.
- Apply Leather Conditioner:
- Apply a generous amount of leather conditioner to the cracked area.
- Allow the conditioner to soak into the leather for several hours.
- Fill the Cracks:
- Use a flexible leather filler to fill the cracks.
- Apply thin layers, allowing each layer to dry before applying the next.
- Smooth the Surface:
- Use fine-grit sandpaper to smooth the filled area and blend it with the surrounding leather.
- Color and Finish:
- Apply colorant and leather finish to match the original leather and protect the repair.
4.3. Restoring Faded Leather
Faded leather can be brought back to life with the right products and techniques.
- Clean the Leather:
- Use a leather cleaner to remove any dirt or grime from the faded area.
- Apply Leather Dye:
- Choose a leather dye that matches the original color of the leather.
- Apply the dye evenly to the faded area, using a sponge or cloth.
- Allow the dye to dry completely.
- Apply Leather Finish:
- Apply a thin layer of leather finish to seal the dye and protect the leather.
- Allow the finish to dry completely.
- Condition the Leather:
- Apply a high-quality leather conditioner to keep the leather soft and supple.
5. Preventing Future Damage to Leather Car Seats
Prevention is key to maintaining the condition of your leather car seats.
5.1. Regular Cleaning and Conditioning
Regular maintenance can prevent many types of damage.
- Clean Regularly:
- Clean your leather car seats every 1-2 months to remove dirt, oils, and grime.
- Use a mild leather cleaner and a soft cloth.
- Condition Regularly:
- Apply a leather conditioner every 3-6 months to keep the leather soft and supple.
- Conditioner helps to prevent cracking and fading.
5.2. Protecting from Sunlight
Sunlight can cause fading and cracking.
- Park in the Shade:
- Whenever possible, park your car in the shade to protect the leather from direct sunlight.
- Use a Sunshade:
- Use a sunshade to block sunlight from entering the car when parked.
- Apply UV Protectant:
- Use a leather conditioner with UV protectant to help prevent fading.
5.3. Avoiding Sharp Objects
Sharp objects can easily tear or scratch leather.
- Be Careful with Keys:
- Avoid placing keys or other sharp objects on the leather seats.
- Protect from Pets:
- Use a seat cover to protect the leather from pet claws and hair.
- Avoid Abrasive Materials:
- Be careful when placing items on the seats that could potentially scratch or damage the leather.
5.4. Using Seat Covers
Seat covers can provide an extra layer of protection.
- Choose the Right Cover:
- Select seat covers that are designed for leather seats.
- Ensure they are made from a soft, non-abrasive material.
- Install Properly:
- Install the seat covers properly to ensure they stay in place and provide adequate protection.
- Clean Regularly:
- Clean the seat covers regularly to prevent dirt and grime from accumulating on the leather.
6. Cost Analysis: DIY vs. Professional Repair
Deciding whether to repair your leather car seat yourself or hire a professional depends on several factors.
6.1. DIY Repair Costs
The cost of DIY repair depends on the materials and tools you need.
- Basic Repair Kit: $20 – $50
- Leather Cleaner and Conditioner: $20 – $40
- Additional Tools (if needed): $10 – $30
- Total Estimated Cost: $50 – $120
6.2. Professional Repair Costs
Professional repair costs vary depending on the extent of the damage and the location.
- Small Tear Repair: $100 – $200
- Large Rip Repair: $200 – $400
- Panel Replacement: $300 – $600
- Total Estimated Cost: $100 – $600+
6.3. Factors to Consider
- Skill Level: If you have experience with leather repair, DIY may be a good option.
- Complexity of Damage: For complex damage, professional repair may be necessary.
- Time Commitment: DIY repair can take several hours, while professional repair may take a few days.
- Quality of Results: Professional repair typically provides a higher quality and more durable result.
6.4. When to Choose DIY
- Minor Damage: Small tears, scratches, or fading can often be repaired with a DIY kit.
- Budget Constraints: DIY repair is more affordable than professional repair.
- Personal Satisfaction: Some people enjoy the process of DIY repair and take pride in their work.
6.5. When to Choose Professional Repair
- Extensive Damage: Large rips, deep cracks, or panel replacement may require professional expertise.
- Lack of Experience: If you are not comfortable working with leather, professional repair is a safer option.
- Desire for Quality: Professional repair can provide a higher quality and more durable result.
- Time Constraints: If you don’t have the time to do the repair yourself, professional repair is a convenient option.
7. Common Mistakes to Avoid When Repairing Leather Car Seats
Avoiding common mistakes can ensure a successful and long-lasting repair.
7.1. Using the Wrong Products
- Avoid Harsh Chemicals: Do not use harsh chemicals or household cleaners on leather.
- Use Leather-Specific Products: Always use products that are specifically designed for leather.
- Match Colors Carefully: Ensure that the colorant or dye matches the original color of the leather.
7.2. Skipping Preparation
- Always Clean the Leather: Cleaning removes dirt and grime, allowing repair materials to adhere properly.
- Trim Loose Fibers: Trimming loose fibers creates a smoother surface for repair.
- Apply Backing Patch: A backing patch provides support and reinforcement for the repair.
7.3. Applying Too Much Filler
- Apply Thin Layers: Apply filler in thin layers, allowing each layer to dry before applying the next.
- Avoid Overfilling: Overfilling can create a bulge that is difficult to smooth.
- Smooth the Surface: Use fine-grit sandpaper to smooth the surface and blend it with the surrounding leather.
7.4. Rushing the Process
- Allow Sufficient Drying Time: Allow repair materials to dry completely before proceeding to the next step.
- Avoid Heat Damage: Use heat guns or hair dryers with caution to avoid overheating the leather.
- Take Your Time: Rushing the process can lead to mistakes and a less durable repair.
7.5. Neglecting Maintenance
- Clean Regularly: Clean your leather car seats every 1-2 months to remove dirt and grime.
- Condition Regularly: Apply a leather conditioner every 3-6 months to keep the leather soft and supple.
- Protect from Sunlight: Park in the shade or use a sunshade to protect the leather from direct sunlight.
8. Choosing the Right Leather Repair Kit
Selecting the appropriate leather repair kit is essential for achieving the best results. Here’s what to consider:
8.1. Types of Leather Repair Kits
- Basic Kits: Ideal for minor repairs like small tears and scratches. They typically include leather filler, adhesive, colorant, and application tools.
- Comprehensive Kits: Suitable for more extensive damage, including large rips and cracks. These kits often include additional materials like backing fabric, heavy-duty filler, and a wider range of colorants.
- Color-Matching Kits: Designed for precise color matching, ensuring seamless blending with the original leather. These kits may include a color chart or a color-matching service.
8.2. Key Components to Look For
- High-Quality Filler: The filler should be flexible, durable, and easy to sand. Look for fillers that are specifically designed for leather repair.
- Strong Adhesive: The adhesive should create a strong and lasting bond between the leather and the backing material.
- Colorant or Dye: The colorant or dye should match the original color of the leather and provide good coverage.
- Leather Finish: The finish should protect the repaired area and provide a consistent sheen.
- Application Tools: The kit should include the necessary application tools, such as a palette knife, small brushes, and sandpaper.
8.3. Top Recommended Leather Repair Kits
Note: Prices and availability may vary.
| Kit Name | Features | Price |
|---|---|---|
| CARDIAGTECH Leather Repair Kit | Comprehensive, includes color-matching service, high-quality filler | $49.99 |
| Furniture Clinic Leather Repair Kit | Includes a wide range of materials and tools, suitable for various types of damage | $54.99 |
| Coconix Leather and Vinyl Repair Kit | Easy to use, suitable for minor repairs, includes multiple colors for blending | $29.99 |
| Fortivo Leather Repair Kit | Includes backing fabric, strong adhesive, and a variety of color options | $39.99 |
8.4. Customer Reviews and Ratings
- Read Reviews: Before purchasing a leather repair kit, read customer reviews and ratings to get an idea of its quality and effectiveness.
- Check for Common Issues: Look for common issues, such as poor color matching, weak adhesive, or low-quality filler.
- Consider Recommendations: Consider recommendations from experts and other users who have experience with leather repair.
9. Understanding Leather Types and Their Repair Needs
Different types of leather require different repair approaches. Knowing your leather type helps tailor your repair strategy.
9.1. Common Leather Types in Car Seats
- Aniline Leather:
- Characteristics: Soft, natural, and luxurious, with visible pores and grain.
- Repair Needs: Requires gentle cleaning and conditioning to maintain its natural appearance. Color matching can be challenging.
- Semi-Aniline Leather:
- Characteristics: Similar to aniline leather but with a light protective coating.
- Repair Needs: More resistant to stains and wear than aniline leather. Repair is easier due to the protective coating.
- Pigmented Leather:
- Characteristics: Durable and uniform in appearance, with a thick protective coating.
- Repair Needs: Easiest to clean and repair due to its robust coating. Color matching is straightforward.
- Nappa Leather:
- Characteristics: Soft and supple, made from full-grain leather.
- Repair Needs: Requires careful handling and gentle products to avoid damage. Similar to aniline leather in repair complexity.
- Suede/Alcantara:
- Characteristics: Soft, velvety texture.
- Repair Needs: Requires specialized cleaning and repair techniques. Difficult to repair without professional help.
9.2. Identifying Your Leather Type
- Visual Inspection: Examine the leather’s surface. Aniline leather has visible pores, while pigmented leather has a uniform appearance.
- Water Test: Place a drop of water on the leather. Aniline leather will absorb it quickly, while pigmented leather will resist absorption.
- Manufacturer Information: Check your car’s manual or the manufacturer’s website for information about the leather type used in your car seats.
9.3. Tailoring Your Repair Approach
- Aniline Leather:
- Use gentle cleaners and conditioners.
- Consider professional repair for significant damage.
- Semi-Aniline Leather:
- Use cleaners and conditioners designed for coated leather.
- Repair minor damage with a basic leather repair kit.
- Pigmented Leather:
- Use a standard leather repair kit.
- Color matching is typically straightforward.
- Nappa Leather:
- Use gentle, high-quality products.
- Handle with care to avoid damage.
- Suede/Alcantara:
- Use specialized suede cleaners and protectors.
- Consider professional repair for any damage.
9.4. Product Recommendations by Leather Type
Note: Prices and availability may vary.
| Leather Type | Recommended Cleaner | Recommended Conditioner | Repair Kit Recommendation |
|---|---|---|---|
| Aniline | Chemical Guys Leather Cleaner | Leather Honey Leather Conditioner | Professional Repair Recommended |
| Semi-Aniline | Meguiar’s Leather Cleaner | Lexol Leather Conditioner | CARDIAGTECH Leather Repair Kit |
| Pigmented | Armor All Leather Cleaner | Mothers Leather Conditioner | Coconix Leather and Vinyl Repair Kit |
| Nappa | Connolly Hide Care | Gliptone Liquid Leather | Professional Repair Recommended |
| Suede/Alcantara | Sonax Alcantara Cleaner | 303 Fabric Guard | Professional Cleaning and Repair Recommended |
10. Ensuring a Perfect Color Match for Leather Repairs
Achieving a perfect color match is crucial for a seamless repair. Here’s how to ensure your repaired area blends flawlessly with the rest of the seat.
10.1. Understanding Color Matching Challenges
- Fading: Leather color fades over time due to sunlight exposure and wear.
- Variations: Even within the same dye lot, leather color can vary slightly.
- Texture: The texture of the leather can affect how the color appears.
10.2. Methods for Color Matching
- Using a Color Chart:
- Most leather repair kits include a color chart.
- Compare the chart to your leather in natural light to find the closest match.
- Mixing Colors:
- Some kits allow you to mix colors to create a custom match.
- Start with a small amount of colorant and gradually add more until you achieve the desired shade.
- Professional Color Matching:
- Some companies offer professional color-matching services.
- Send a sample of your leather to the company, and they will create a custom colorant for you.
10.3. Tools for Color Matching
- Colorimeter: A device that measures color accurately and provides a precise color code.
- Spectrophotometer: Similar to a colorimeter but more advanced, providing detailed color analysis.
- Natural Light: Essential for accurate color assessment. Avoid artificial light, which can distort colors.
10.4. Step-by-Step Color Matching Guide
- Clean the Area: Clean the leather surface to remove any dirt or grime that could affect the color.
- Select Base Color: Choose the color on the chart that is closest to your leather.
- Test the Color: Apply a small amount of colorant to an inconspicuous area and let it dry to see how it looks.
- Adjust the Color: If the color is too light or too dark, add small amounts of other colors to adjust the shade.
- Re-Test the Color: Apply the adjusted color to another inconspicuous area and let it dry.
- Repeat as Necessary: Continue adjusting the color until you achieve a perfect match.
10.5. Tips for Perfect Color Matching
- Work in Natural Light: Natural light provides the most accurate color representation.
- Test on a Hidden Area: Always test the color on a hidden area before applying it to the entire repair.
- Apply Thin Coats: Apply thin coats of colorant, allowing each coat to dry before applying the next.
- Blend the Edges: Blend the edges of the repaired area with the surrounding leather to create a seamless transition.
- Take Your Time: Color matching can be time-consuming, so be patient and take your time.
FAQ: Addressing Your Leather Car Seat Repair Questions
Here are some frequently asked questions about repairing leather car seats, providing quick and helpful answers.
- Can I use regular glue for leather repair?
- No, use leather-specific adhesive to ensure a strong and flexible bond that won’t damage the leather. Leather adhesives are designed to maintain flexibility and prevent cracking.
- How long does it take for leather filler to dry?
- Leather filler typically takes 20-30 minutes to dry, but it’s best to allow it to dry completely (about 1-2 hours) before sanding. Drying times can vary based on the product and environmental conditions.
- What grit sandpaper should I use for smoothing leather filler?
- Use fine-grit sandpaper (400-600 grit) for smoothing leather filler to avoid scratching the leather. Sand lightly and evenly for best results.
- How do I prevent the color from fading after repair?
- Apply a leather finish with UV protection to seal the color and prevent fading. Regular conditioning also helps maintain the leather’s color and suppleness.
- Is it necessary to use a backing patch for small tears?
- Yes, a backing patch provides support and reinforcement, preventing the tear from re-opening. It’s essential for a durable repair, even on small tears.
- Can I repair a tear on a perforated leather seat?
- Yes, but it requires extra care to maintain the perforated pattern. Use a small applicator to fill the tear without clogging the perforations.
- What’s the best way to clean leather car seats before repair?
- Use a mild leather cleaner and a soft brush to gently remove dirt and grime. Avoid harsh chemicals that can damage the leather. CARDIAGTECH.NET offers a range of suitable cleaning products.
- How often should I condition my leather car seats?
- Condition your leather car seats every 3-6 months to keep them soft and supple, preventing cracks and wear. Regular conditioning extends the life of your leather.
- What should I do if the colorant doesn’t match my leather?
- Mix different colorants to achieve a custom match. Test the mixture on an inconspicuous area first to ensure it blends seamlessly.
- Can I use a hair dryer to speed up the drying process?
- Yes, but use it on a low setting and keep it moving to avoid overheating the leather. High heat can cause the leather to shrink or crack.
Conclusion: Restore Your Leather Car Seats with Confidence
Repairing a ripped leather car seat is achievable with the right tools, materials, and techniques. By following this comprehensive guide from CARDIAGTECH.NET, you can restore your car’s interior to its former glory and preserve its value. Whether you choose to tackle the repair yourself or seek professional help, the knowledge you’ve gained here will ensure a successful outcome. With proper care and maintenance, your leather car seats will continue to provide comfort and style for years to come.
Ready to get started? Contact CARDIAGTECH.NET today for expert advice and high-quality leather repair products. Our team is here to help you every step of the way, ensuring you have the best tools and knowledge for a flawless repair. Reach us at 276 Reock St, City of Orange, NJ 07050, United States, or call us on WhatsApp at +1 (641) 206-8880. Visit CARDIAGTECH.NET to explore our range of car care solutions. Let’s restore your ride together!