How Can I Fix The Headliner In My Car: A Detailed Guide

Is your car’s headliner sagging? Discover effective methods on how can i fix the headliner in my car without the hassle of removal, ensuring a fresh interior look. At CARDIAGTECH.NET, we’ll guide you through practical solutions and essential tools to restore your vehicle’s headliner, offering budget-friendly and long-lasting results. Explore options like headliner adhesives and innovative twist pins to tackle this common automotive issue. Diagnostic Scanner BMW
1. Understanding the Car Headliner
The headliner, often called headlining, is the interior fabric attached to your car’s roof framing. This material provides a smooth, finished look to the vehicle’s interior and contributes significantly to noise reduction and temperature regulation. Typically made of multiple layers, including a foam backing (usually polyurethane) adhered to a headliner board, it acts as an insulator against both heat and cold.
Beyond aesthetics, a functional headliner insulates the car, keeping it cooler in sunny conditions and reducing wind noise, especially at higher speeds. Furthermore, it improves the acoustics inside your car, enhancing the performance of your audio system.
car headliner fabric secured to the roof framing
Alt text: A close-up of a car’s interior showing the headliner, a fabric secured to the roof framing, highlighting its texture and finish.
2. Common Causes of Headliner Sagging
Headliners can begin to sag over time due to several factors, particularly harsh environmental conditions. As the fabric loosens and separates from the backing board, it creates an unsightly and often inconvenient problem.
Here are the primary reasons why car headliners start sagging:
- Heat and Sunlight: Exposure to extreme heat causes the adhesive to break down, leading the fabric to detach from the headliner board.
- Moisture: Humidity and leaks can penetrate the headliner, causing the foam backing to absorb moisture and lose its structural integrity.
- Poor Installation: Inadequate adhesive or improper installation techniques can cause premature sagging.
- Physical Strain: Children or pets can pull, scratch, or otherwise damage the headliner, accelerating its deterioration.
Addressing these issues early can prevent more extensive and costly repairs.
3. Step-by-Step Guide: Fixing a Sagging Headliner Without Removal
Replacing the entire headliner can be expensive, particularly in older vehicles. Fortunately, there are several methods for fixing a sagging headliner without removing it, providing a cost-effective solution. Here are detailed instructions for each approach:
3.1. Using Headliner Adhesive
This method is most effective for partial sagging, such as around the edges or corners.
Materials Needed:
- Headliner adhesive spray
- Drop cloth or plastic sheeting
- Masking tape
- Clean cloth
- Ladder or step stool
Steps:
- Preparation: Park your car in a well-ventilated area and cover the seats and interior surfaces with a drop cloth or plastic sheeting to protect them from overspray.
- Clean the Area: Wipe down the sagging area with a clean cloth to remove any dust or debris. This ensures better adhesion.
- Apply Adhesive: Shake the headliner adhesive spray can thoroughly. Hold the can about 6-8 inches away from the headliner and apply an even coat to both the sagging fabric and the exposed headliner board.
- Bonding: Allow the adhesive to become tacky for about 1-2 minutes, as per the manufacturer’s instructions.
- Reattach Fabric: Gently press the fabric back onto the headliner board, starting from the center and working outwards. Use a clean cloth to smooth out any wrinkles or bubbles.
- Secure the Edges: Use masking tape to secure the edges of the fabric while the adhesive dries. Leave the tape in place for at least 2-4 hours.
- Final Check: Once the adhesive is fully cured, remove the masking tape and inspect the repaired area. Reapply adhesive if necessary.
3.2. Using Sequin Pins
Sequin pins offer a quick and straightforward solution for reattaching a sagging headliner, particularly if a significant portion is detaching.
Materials Needed:
- Sequin pins (or similar)
- Measuring tape (optional, for uniform spacing)
Steps:
- Preparation: Ensure the area is clean and dry.
- Pin Placement: Push the sequin pins through the fabric and into the foam backing board. Start at the highest point of the sag and work your way outwards.
- Arrange Pins: Arrange the pins in a visually appealing pattern. Uniform spacing can be achieved by using a measuring tape.
- Secure the Fabric: Ensure that the fabric is pulled taut and smooth as you insert each pin.
3.3. Using Clear-Headed Twist Pins (Saggy Stoppers)
Clear-headed twist pins, also known as saggy stoppers, are designed specifically for headliner repair. They provide a secure and discreet hold without damaging the fabric.
Materials Needed:
- Clear-headed twist pins
Steps:
- Placement: Identify the areas where the headliner is sagging the most.
- Insertion: Push the twist pins through the fabric and into the headliner board.
- Twist to Secure: Twist the pins to secure them in place. The clear heads make them less noticeable.
- Distribute Evenly: Distribute the pins evenly across the sagging area to provide uniform support.
3.4. Using a Steam Cleaner and Paint Roller
This method can help reactivate the old adhesive and smooth out the fabric.
Materials Needed:
- Steam cleaner
- Paint roller
- Clean cloth
Steps:
- Steam Application: Use the steam cleaner to gently apply steam to the sagging areas. Hold the steam cleaner a few inches away from the fabric to avoid over-saturating it.
- Rolling: Immediately after steaming, use the paint roller to smooth the fabric back onto the headliner board. Apply gentle pressure to ensure the fabric adheres evenly.
- Drying: Allow the area to dry completely. Use a clean cloth to absorb any excess moisture.
- Repeat if Necessary: Repeat the process if the fabric continues to sag.
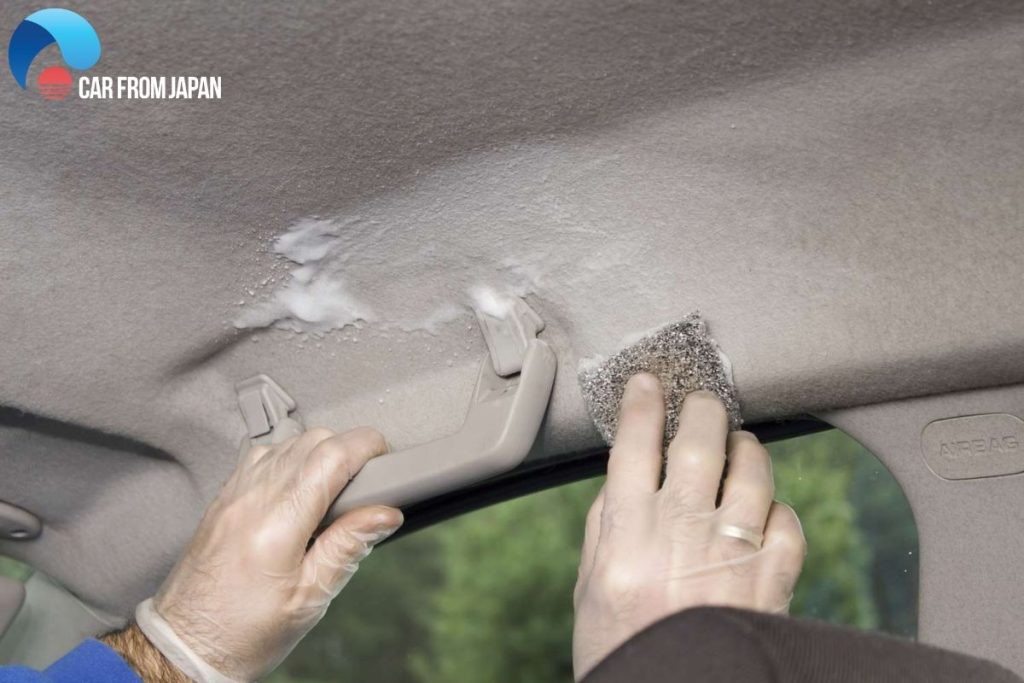 fix sagging headliner
Alt text: A partially removed headliner being repaired with adhesive, showcasing the common method of reattaching the fabric to the backing board.
4. Tips to Prevent Headliner Sagging
Preventing headliner sagging involves proactive care and maintenance. Here are some tips to help extend the life of your car’s headliner:
- Park in the Shade: Whenever possible, park your vehicle in the shade to minimize exposure to direct sunlight and heat.
- Use Window Tint: Applying window tint can reduce the amount of heat entering the car, protecting the headliner from excessive temperatures.
- Regular Cleaning: Clean your headliner regularly using a soft brush or vacuum with an upholstery attachment to remove dust and debris.
- Avoid Harsh Chemicals: When cleaning, avoid using harsh chemicals or abrasive cleaners that can damage the fabric and adhesive.
- Monitor and Address Leaks: Regularly check your car for leaks, especially around the sunroof or windows, and address them promptly to prevent moisture damage.
- Control Interior Climate: Use your car’s air conditioning system to maintain a consistent interior temperature, which can help prevent adhesive breakdown.
- Protect from Physical Damage: Keep children and pets from pulling or scratching the headliner.
By following these tips, you can help prevent sagging and maintain the integrity of your car’s headliner for years to come.
5. Professional Replacement Costs
While DIY methods can be effective, sometimes professional replacement is the best option, especially for extensive damage.
The cost of replacing a car’s headliner can vary significantly based on the vehicle type, the complexity of the design, and whether you choose aftermarket or factory-original parts.
Here’s a cost-summary table based on vehicle type and complexity:
| Vehicle Type | Average Cost | Additional Notes |
|---|---|---|
| Simple Sedan/Hatchback/Coupe (e.g., Accord, Corolla) | $300 – $750 | Designed without ceiling accessories |
| Typical SUV/Crossover (e.g., RAV4, X-Trail) | $500 – $900 | Includes sunroof and moonroof |
| Luxury Vehicle (e.g., BMW) | $1,000 – $6,000 | Features large and high-quality ceiling materials and accessories |
These prices include both parts and labor. Luxury vehicles tend to have higher costs due to more complex designs and premium materials.
6. Why Choose Professional Automotive Repair Tools from CARDIAGTECH.NET?
For auto repair professionals and enthusiasts, having the right tools is crucial for efficient and effective work. At CARDIAGTECH.NET, we offer a wide range of high-quality automotive repair tools designed to meet the demands of any job.
Here are some of the benefits of choosing CARDIAGTECH.NET for your automotive tool needs:
- Extensive Product Range: We offer a comprehensive selection of tools, from diagnostic scanners and headliner adhesives to specialized instruments for interior repairs.
- High-Quality Products: Our tools are sourced from trusted manufacturers, ensuring durability and reliability.
- Expert Support: Our team of experienced professionals can provide expert advice and support, helping you choose the right tools for your specific needs.
- Competitive Prices: We offer competitive pricing on all our products, making professional-grade tools accessible to a wider range of customers.
7. Addressing Customer Challenges with CARDIAGTECH.NET
We understand the challenges faced by auto repair professionals, including the physical demands of the job, constant exposure to chemicals, and the need to stay updated with the latest automotive technologies. That’s why CARDIAGTECH.NET is committed to providing tools and equipment that enhance efficiency, accuracy, and safety.
Customer Challenges:
- Physical Strain: Auto repair work can be physically demanding, requiring strength and endurance.
- Chemical Exposure: Technicians are often exposed to oils, grease, and other hazardous chemicals.
- Keeping Up with Technology: The automotive industry is constantly evolving, requiring technicians to stay updated with new technologies and repair techniques.
- Time Constraints: Auto repair shops often operate under tight deadlines, requiring technicians to work quickly and efficiently.
- Competition: The auto repair industry is highly competitive, requiring shops to provide high-quality service at competitive prices.
How CARDIAGTECH.NET Helps:
- Ergonomic Tools: We offer ergonomic tools designed to reduce strain and fatigue.
- Protective Gear: We provide a range of protective gear, including gloves and safety glasses, to minimize chemical exposure.
- Diagnostic Tools: Our advanced diagnostic tools help technicians quickly and accurately identify problems, reducing repair time.
- Training and Support: We offer training and support resources to help technicians stay updated with the latest technologies.
- Cost-Effective Solutions: Our competitive prices and high-quality products help shops maximize their profitability.
Ready to elevate your auto repair capabilities? Contact CARDIAGTECH.NET today for expert advice and support. Whether you’re looking for headliner repair solutions or advanced diagnostic tools, we have everything you need to succeed.
Contact Information:
- Address: 276 Reock St, City of Orange, NJ 07050, United States
- WhatsApp: +1 (641) 206-8880
- Website: CARDIAGTECH.NET
8. Actionable Steps with CARDIAGTECH.NET
At CARDIAGTECH.NET, we’re dedicated to providing practical solutions and resources that empower our customers. Follow these actionable steps to address your headliner issues and enhance your automotive repair capabilities:
- Assess the Damage: Evaluate the extent of the sagging in your headliner to determine the best course of action. For minor sagging, DIY methods like adhesive spray or twist pins may suffice. For extensive damage, consider professional replacement.
- Gather Your Supplies: Based on your assessment, gather the necessary supplies and tools. CARDIAGTECH.NET offers a wide range of headliner repair kits, adhesives, and tools to suit every need.
- Prepare Your Workspace: Protect your vehicle’s interior by covering seats and surfaces with drop cloths or plastic sheeting. Ensure you have adequate ventilation when using adhesives or cleaners.
- Follow Repair Instructions: Carefully follow the instructions provided with your chosen repair method. Whether you’re applying adhesive, inserting twist pins, or using a steam cleaner, precision and attention to detail are key.
- Inspect and Adjust: After completing the repair, inspect the headliner for any remaining sags or imperfections. Make adjustments as needed to ensure a smooth and even finish.
- Maintain Your Headliner: Take proactive steps to prevent future sagging by parking in the shade, using window tint, and regularly cleaning your headliner.
By following these steps and leveraging the expertise and resources available at CARDIAGTECH.NET, you can effectively address your headliner issues and maintain the overall condition of your vehicle’s interior.
9. Real-World Applications and Testimonials
At CARDIAGTECH.NET, we take pride in empowering our customers with the tools and knowledge they need to succeed. Here are some real-world applications and testimonials from satisfied customers who have used our products to fix sagging headliners:
- Case Study 1: DIY Headliner Repair
- John, a car enthusiast from California, used our headliner adhesive spray and twist pins to repair a sagging headliner in his classic car. He praised the ease of use and effectiveness of our products, noting that they saved him hundreds of dollars compared to professional replacement.
- Case Study 2: Professional Auto Repair Shop
- Sarah, the owner of an auto repair shop in Texas, relies on CARDIAGTECH.NET for all her automotive tool needs. She stated that our high-quality tools and expert support have helped her streamline her operations and provide top-notch service to her customers.
- Testimonial 1: Mary from Florida
- “I was skeptical about repairing my headliner myself, but CARDIAGTECH.NET made it easy. The adhesive spray worked like a charm, and the twist pins provided extra support. My headliner looks as good as new!”
- Testimonial 2: Tom from New York
- “As a professional auto mechanic, I rely on quality tools to get the job done right. CARDIAGTECH.NET never disappoints. Their tools are durable, reliable, and competitively priced.”
These real-world examples highlight the effectiveness and value of CARDIAGTECH.NET’s products and services. Whether you’re a DIY enthusiast or a professional auto mechanic, we’re here to help you achieve your goals.
10. Long-Term Benefits and Maintenance
Investing in the right tools and solutions for your automotive needs offers long-term benefits beyond immediate repairs. By choosing high-quality products from CARDIAGTECH.NET, you’re ensuring the longevity and performance of your vehicle.
Here are some long-term benefits of addressing headliner issues:
- Improved Aesthetics: A well-maintained headliner enhances the overall appearance of your car’s interior, increasing its value and appeal.
- Enhanced Comfort: A properly installed headliner provides insulation and noise reduction, improving the comfort of your driving experience.
- Prevention of Further Damage: Addressing sagging issues early can prevent further damage to the headliner and underlying components, saving you money in the long run.
- Preservation of Vehicle Value: Maintaining your vehicle’s interior, including the headliner, helps preserve its resale value.
To ensure the long-term performance of your headliner repair, follow these maintenance tips:
- Regular Cleaning: Clean your headliner regularly using a soft brush or vacuum with an upholstery attachment to remove dust and debris.
- Avoid Harsh Chemicals: When cleaning, avoid using harsh chemicals or abrasive cleaners that can damage the fabric and adhesive.
- Protect from Sunlight: Park in the shade or use window tint to minimize exposure to direct sunlight, which can cause fading and deterioration.
- Address Leaks Promptly: Check for leaks around the sunroof or windows and address them promptly to prevent moisture damage.
By following these maintenance tips and relying on the high-quality products and expertise available at CARDIAGTECH.NET, you can enjoy the long-term benefits of a well-maintained vehicle interior.
9. Future Trends in Headliner Repair
The automotive industry is constantly evolving, and headliner repair is no exception. Here are some future trends to watch for:
- Sustainable Materials: As environmental awareness grows, expect to see more headliners made from sustainable materials like recycled fabrics and bio-based foams.
- Advanced Adhesives: Innovations in adhesive technology will lead to stronger, more durable adhesives that are easier to apply and less prone to breakdown.
- Smart Headliners: Future headliners may incorporate smart technologies like integrated lighting, climate control, and noise cancellation features.
- DIY Repair Kits: As DIY culture continues to thrive, expect to see more comprehensive and user-friendly headliner repair kits available for consumers.
By staying informed about these trends and partnering with CARDIAGTECH.NET, you can ensure you’re always at the forefront of headliner repair technology and techniques.
10. FAQs About Headliner Repair
Here are some frequently asked questions about headliner repair:
1. How do you know if your ceiling is sagging?
Signs include cracking sounds when the car shakes, drooping plasterboard, visible cracks, and tiny blisters forming as lines produced by nails or screws.
2. Is it OK to fix the headliner sagging myself?
Yes, you can fix minor issues yourself with a repair kit. These kits allow you to use small tools to secure the inner layer of a sinking headliner.
3. Can I paint a headliner?
Painting a headliner is not recommended. It requires significant preparation and the paint is unlikely to withstand temperature-related expansion and contraction within the car.
4. Does car insurance cover the cost of car headliner replacement?
Most car insurance policies do not cover interior upholstery, trim, and headliners.
5. What is the best adhesive for headliner repair?
A high-quality headliner adhesive spray is recommended. Ensure it is specifically designed for automotive headliners to withstand temperature changes.
6. How long does it take to fix a sagging headliner?
DIY repairs can take anywhere from 2-4 hours, depending on the extent of the damage and your experience. Professional replacement can take a full day.
7. Can heat cause a headliner to sag?
Yes, extreme heat can cause the adhesive to break down, leading the fabric to detach from the headliner board.
8. What tools do I need to fix a sagging headliner?
Essential tools include headliner adhesive spray, sequin pins or twist pins, a steam cleaner, a paint roller, a clean cloth, and masking tape.
9. How can I prevent my headliner from sagging?
Park in the shade, use window tint, regularly clean your headliner, avoid harsh chemicals, monitor and address leaks, and control interior climate.
10. Is it worth repairing a sagging headliner?
Yes, repairing a sagging headliner improves the aesthetics, comfort, and value of your vehicle. DIY repairs are cost-effective, while professional replacement ensures a high-quality finish.
By addressing these FAQs and partnering with CARDIAGTECH.NET, you can confidently tackle your headliner repair needs and maintain the overall condition of your vehicle’s interior.