How Much Does it Cost to Fix a Leather Car Seat?
Fixing a leather car seat can range from a simple DIY project costing $20 to professional repairs reaching up to $800, depending on the damage’s extent and repair method. At CARDIAGTECH.NET, we provide the tools and expertise to help you decide on the best course of action, ensuring your car’s interior looks its best while offering services, solutions, and expert advice. Explore options for leather restoration, upholstery repair, and automotive interior care to revitalize your vehicle’s appeal.
1. Understanding the Cost Factors for Leather Car Seat Repair
The cost to fix a leather car seat varies significantly based on several key factors. Understanding these elements is crucial for budgeting and deciding whether to DIY or hire a professional.
-
Extent of the Damage:
- Minor Tears or Scratches: These are the easiest and cheapest to fix.
- Larger Tears or Cracks: Require more extensive repair work, increasing costs.
- Severe Damage (e.g., significant rips, discoloration): May necessitate complete panel replacement or professional reupholstering.
-
Type of Leather:
- Genuine Leather: More costly to repair due to its natural properties and the need for specialized treatments.
- Faux Leather (Vinyl or Pleather): Generally less expensive to repair.
-
Repair Method:
- DIY Repair Kits: Most affordable for minor issues.
- Professional Repair: More expensive but provides a higher quality finish, especially for significant damage.
- Reupholstering: The most costly option, involving complete replacement of the leather on the seat.
-
Labor Costs:
- Professional labor rates vary by location and the technician’s expertise. Complex repairs will naturally incur higher labor charges. According to recent data, labor costs can range from $75 to $150 per hour.
-
Materials Used:
- The cost of leather repair compounds, dyes, and other materials can add up, especially if high-quality products are used to ensure a lasting repair.
1.1. Cost Comparison Table
| Repair Type | Description | Estimated Cost | DIY or Professional |
|---|---|---|---|
| Minor Tear/Scratch Repair | Small imperfections fixed with leather repair kits. | $20 – $50 | DIY |
| Medium Tear Repair | Larger tears requiring patching and color matching. | $100 – $300 | DIY or Professional |
| Professional Patching | Expert repair of significant tears or damage, including color and texture matching. | $200 – $500 | Professional |
| Panel Replacement | Replacing a section of the leather seat due to irreparable damage. | $300 – $600 | Professional |
| Complete Reupholstering | Replacing all the leather on the seat. | $500 – $1200 | Professional |
| Leather Conditioning/Care | Regular maintenance to prevent damage and extend the life of the leather. | $20 – $40 per application | DIY |
1.2. Additional Considerations
- Heated Seats: Repairs on seats with heating elements can be more complex and expensive.
- Custom Stitching or Detailing: Unique seat designs may increase repair costs due to the added complexity of matching patterns and stitching.
Understanding these cost factors enables car owners to make informed decisions about leather car seat repairs, balancing cost with the desired quality and longevity of the repair.
2. DIY Leather Car Seat Repair: A Cost-Effective Approach
For minor damages like small tears, scratches, or scuffs, DIY leather repair can be a cost-effective solution. Here’s a detailed guide to help you through the process.
2.1. Essential Tools and Materials
- Leather Repair Kit: Includes leather filler, colorants, and applicators. Prices range from $20 to $50.
- Leather Cleaner: To prepare the surface.
- Leather Conditioner: To protect and maintain the repaired area.
- Palette Knife or Spreader: For applying filler smoothly.
- Sandpaper (Fine Grit): For smoothing the repaired area.
- Heat Gun or Hair Dryer: To cure the filler.
- Color Matching Kit: To achieve the perfect color match.
- Masking Tape: To protect surrounding areas.
- Soft Cloths: For cleaning and applying conditioner.
2.2. Step-by-Step DIY Repair Guide
- Clean the Area: Use a leather cleaner to remove dirt and grime.
- Prepare the Surface: Lightly sand the damaged area to create a smooth surface.
- Apply Leather Filler: Use a palette knife to apply the filler in thin layers, allowing each layer to dry before applying the next.
- Cure the Filler: Use a heat gun or hair dryer to cure the filler, following the manufacturer’s instructions.
- Sand the Repaired Area: Gently sand the repaired area with fine-grit sandpaper to blend it with the surrounding leather.
- Color Match: Use the color matching kit to mix a color that matches your car seat.
- Apply Colorant: Apply the colorant in thin layers, allowing each layer to dry.
- Apply Leather Conditioner: Once the colorant is dry, apply a leather conditioner to protect and moisturize the repaired area.
Image demonstrating a cracked leather car seat requiring repair.
2.3. Cost Savings of DIY Repair
- DIY Repair: $20 – $50 (cost of the repair kit).
- Professional Repair: $200 – $500 (for similar damage).
Potential Savings: $180 – $450
2.4. Benefits of DIY Leather Repair
- Cost-Effective: Save money on professional labor costs.
- Convenient: Repair at your own pace and schedule.
- Educational: Learn valuable skills in car maintenance.
2.5. Limitations of DIY Repair
- Quality: May not achieve the same level of finish as professional repair.
- Time: Requires time and patience to achieve good results.
- Complexity: Not suitable for extensive damage or complex repairs.
2.6. Tips for Successful DIY Repair
- Follow Instructions: Always follow the instructions provided with the repair kit.
- Practice: Practice on a hidden area first to get a feel for the materials and techniques.
- Thin Layers: Apply filler and colorant in thin layers to avoid a lumpy or uneven finish.
- Patience: Allow each layer to dry completely before proceeding to the next step.
DIY leather car seat repair is a viable option for minor damages, offering significant cost savings and the satisfaction of doing it yourself. However, it’s essential to assess the extent of the damage and your comfort level before deciding to take on the project. For more complex or extensive damage, professional repair is often the better choice. At CARDIAGTECH.NET, we offer expert advice and quality repair kits to help you achieve the best possible results.
3. Professional Leather Car Seat Repair: When to Seek Expert Help
While DIY repairs can address minor issues, certain types of damage require the expertise of a professional. Knowing when to seek professional help ensures high-quality repairs and prevents further damage to your car’s interior.
3.1. Types of Damage Best Addressed by Professionals
- Large Tears and Rips: Extensive damage that requires patching, stitching, or panel replacement.
- Deep Cracks and Creases: Significant structural damage that cannot be adequately addressed with simple fillers.
- Extensive Discoloration or Fading: Requires professional color matching and dyeing techniques.
- Damage to Heated Seats: Repairs involving electrical components or heating elements.
- Complex Stitching or Detailing: Repairs on seats with unique designs or patterns.
Image showcasing the cleaning process of a car seat with a foaming solution.
3.2. Benefits of Professional Leather Repair
- High-Quality Finish: Professionals have the skills and tools to achieve a seamless and durable repair.
- Color Matching Expertise: Accurate color matching ensures the repaired area blends perfectly with the surrounding leather.
- Structural Integrity: Professional repairs address underlying damage to maintain the seat’s structural integrity.
- Warranty: Many professional services offer warranties on their work, providing peace of mind.
- Convenience: Saves time and effort compared to DIY repairs.
3.3. Factors Affecting Professional Repair Costs
- Labor Rates: Professional labor rates vary by location and the technician’s expertise. Expect to pay between $75 and $150 per hour.
- Materials Used: High-quality leather, dyes, and repair compounds can increase costs.
- Complexity of Repair: More complex repairs, such as panel replacement or heated seat repair, will incur higher costs.
- Type of Leather: Genuine leather repairs are generally more expensive than those on faux leather.
- Additional Services: Additional services like cleaning, conditioning, or detailing can add to the overall cost.
3.4. Estimated Costs for Professional Repairs
| Type of Repair | Description | Estimated Cost |
|---|---|---|
| Patching a Large Tear | Repairing a significant tear with a leather patch and color matching. | $200 – $500 |
| Panel Replacement | Replacing a section of the leather seat due to irreparable damage. | $300 – $600 |
| Dyeing and Recoloring | Restoring color to faded or discolored leather. | $150 – $400 |
| Heated Seat Repair | Repairing or replacing heating elements in the seat. | $250 – $700 |
| Complete Reupholstering | Replacing all the leather on the seat. | $500 – $1200 |
3.5. Finding a Reputable Repair Shop
- Check Online Reviews: Look for shops with positive reviews and high ratings.
- Ask for Recommendations: Get referrals from friends, family, or online car communities.
- Verify Credentials: Ensure the shop is licensed and insured.
- Get a Detailed Estimate: Obtain a written estimate that outlines all costs and services.
- Inquire About Warranty: Ask about the shop’s warranty policy.
3.6. Questions to Ask Before Hiring a Professional
- What is your experience with leather car seat repairs?
- Do you offer a warranty on your work?
- Can you provide references from previous customers?
- What type of materials do you use?
- How long will the repair take?
Knowing when to seek professional help for leather car seat repairs is crucial for ensuring quality results and preventing further damage. While DIY repairs can be cost-effective for minor issues, complex or extensive damage requires the expertise of a skilled professional. At CARDIAGTECH.NET, we recommend consulting with a trusted repair shop for accurate assessments and reliable service.
4. Step-by-Step Guide to Leather Car Seat Restoration
Restoring leather car seats involves a detailed process to repair damage, revitalize the material, and protect it for the future. Here’s a comprehensive guide to help you through each step.
4.1. Assessment and Preparation
-
Inspect the Damage:
- Identify all areas of damage, including tears, cracks, stains, and discoloration.
- Assess the severity of each issue to determine the appropriate repair method.
-
Gather Supplies:
- Leather cleaner and conditioner
- Leather repair kit (filler, colorants, applicators)
- Sandpaper (fine grit)
- Palette knife or spreader
- Heat gun or hair dryer
- Color matching kit
- Masking tape
- Soft cloths
-
Clean the Seats:
- Use a leather cleaner to remove dirt, grime, and surface contaminants.
- Follow the manufacturer’s instructions and use a soft cloth to gently scrub the leather.
- Wipe away any excess cleaner with a clean, dry cloth.
Image illustrating the application of patching material using a palette knife.
4.2. Repairing Tears and Cracks
-
Prepare the Area:
- Use masking tape to protect the surrounding areas from accidental damage.
- Lightly sand the damaged area with fine-grit sandpaper to create a smooth surface.
-
Apply Leather Filler:
- Use a palette knife to apply the leather filler in thin layers.
- Allow each layer to dry completely before applying the next.
- For deeper tears, apply multiple layers to gradually fill the void.
-
Cure the Filler:
- Use a heat gun or hair dryer to cure the filler, following the manufacturer’s instructions.
- Apply heat evenly to ensure the filler cures properly.
-
Sand the Repaired Area:
- Gently sand the repaired area with fine-grit sandpaper to blend it with the surrounding leather.
- Be careful not to remove too much filler, as this can weaken the repair.
4.3. Color Matching and Dyeing
-
Color Matching:
- Use a color matching kit to mix a color that matches your car seat.
- Test the color on a hidden area to ensure it is a perfect match.
- Adjust the color as needed until you achieve the desired result.
-
Apply Colorant:
- Apply the colorant in thin layers using a soft cloth or applicator.
- Allow each layer to dry completely before applying the next.
- Apply multiple layers to achieve an even and consistent color.
-
Blend the Color:
- Use a soft cloth to gently blend the edges of the colored area with the surrounding leather.
- This will help to create a seamless transition and prevent the repaired area from standing out.
4.4. Conditioning and Protection
-
Apply Leather Conditioner:
- Apply a leather conditioner to protect and moisturize the repaired area.
- Use a soft cloth to gently massage the conditioner into the leather.
- Allow the conditioner to absorb for the recommended time.
-
Wipe Away Excess Conditioner:
- Use a clean, dry cloth to wipe away any excess conditioner.
- This will prevent the leather from becoming sticky or greasy.
-
Protect the Seats:
- Use a leather protectant spray to provide an additional layer of protection against UV rays, stains, and wear.
- Reapply conditioner and protectant regularly to maintain the leather’s condition.
4.5. Maintenance Tips
- Regular Cleaning: Clean your leather car seats regularly to remove dirt and grime.
- Avoid Harsh Chemicals: Use only leather-specific cleaners and conditioners.
- Protect from Sunlight: Park in shaded areas or use a sunshade to protect the leather from UV damage.
- Condition Regularly: Apply leather conditioner every 3-6 months to keep the leather moisturized and prevent cracking.
By following these steps, you can effectively restore your leather car seats and keep them looking their best for years to come. At CARDIAGTECH.NET, we provide the tools, products, and expertise you need to achieve professional-quality results.
5. Cost of Leather Car Seat Reupholstering: A Comprehensive Overview
Reupholstering leather car seats involves replacing the existing leather with new material. This is a significant investment that can dramatically improve the look and feel of your car’s interior.
5.1. Factors Affecting Reupholstering Costs
-
Type of Leather:
- Genuine Leather: The most expensive option, offering superior quality and durability. Costs range from $50 to $150 per square foot.
- Faux Leather (Vinyl or Pleather): A more affordable alternative, but less durable and luxurious. Costs range from $20 to $50 per square foot.
- Leatherette: A synthetic material that mimics the look and feel of leather, costing between faux and genuine leather.
-
Labor Costs:
- Professional labor rates vary by location and the technician’s expertise. Expect to pay between $75 and $150 per hour.
- Reupholstering a single seat can take 8-16 hours, depending on the complexity.
-
Complexity of the Seat Design:
- Simple seat designs are easier and less expensive to reupholster.
- Complex designs with intricate stitching, patterns, or electronic components (e.g., heated seats) will increase labor costs.
-
Additional Materials:
- Foam padding, batting, and other materials used to provide cushioning and support.
- Thread, adhesives, and other supplies needed for the reupholstering process.
-
Vehicle Type:
- The make and model of your vehicle can affect reupholstering costs.
- Some vehicles have more complex seat designs or require specialized materials.
Image showing the pressing of flexible material onto the surface during a car seat repair.
5.2. Estimated Costs for Reupholstering
| Scope of Work | Description | Estimated Cost |
|---|---|---|
| Single Seat | Reupholstering one car seat with genuine leather. | $500 – $1200 |
| Two Front Seats | Reupholstering both front seats with genuine leather. | $1000 – $2400 |
| Complete Interior | Reupholstering all seats in the vehicle with genuine leather. | $2000 – $5000+ |
| Faux Leather Upgrade | Replacing existing fabric or worn leather with faux leather on all seats. | $800 – $2000 |
| Custom Design | Reupholstering with custom patterns, stitching, or materials, adding significant cost based on complexity. | Varies, $3000+ |
5.3. Cost Breakdown Example (Single Seat)
- Genuine Leather: 20 square feet at $75 per square foot = $1500
- Labor: 12 hours at $100 per hour = $1200
- Additional Materials: Foam, batting, thread, etc. = $100
- Total Cost: $1500 + $1200 + $100 = $2800
5.4. Benefits of Reupholstering
- Improved Aesthetics: Reupholstering can dramatically improve the look and feel of your car’s interior.
- Increased Comfort: New foam padding and leather can provide a more comfortable seating experience.
- Enhanced Vehicle Value: Reupholstering can increase the resale value of your vehicle.
- Customization: Choose from a wide range of leather types, colors, and designs to create a unique look.
- Durability: High-quality leather can last for many years with proper care and maintenance.
5.5. Choosing a Reupholstering Service
- Check Online Reviews: Look for shops with positive reviews and high ratings.
- Ask for Recommendations: Get referrals from friends, family, or online car communities.
- Verify Credentials: Ensure the shop is licensed and insured.
- Get a Detailed Estimate: Obtain a written estimate that outlines all costs and services.
- Inquire About Warranty: Ask about the shop’s warranty policy.
- View Samples: Ask to see samples of the shop’s previous work.
Reupholstering leather car seats is a significant investment that can transform your car’s interior. By understanding the factors that affect costs and choosing a reputable service, you can achieve stunning results that enhance your driving experience and increase your vehicle’s value. At CARDIAGTECH.NET, we recommend consulting with experienced professionals to explore your options and make informed decisions.
6. Maintaining Leather Car Seats: Preventing Costly Repairs
Proper maintenance is crucial for preserving the condition of leather car seats and preventing costly repairs. Regular cleaning, conditioning, and protection can extend the life of your leather and keep it looking its best.
6.1. Regular Cleaning
-
Frequency: Clean your leather car seats every 1-3 months, depending on usage and environmental conditions.
-
Materials:
- Leather cleaner: Use a pH-balanced leather cleaner specifically designed for automotive use.
- Soft cloths: Use microfiber cloths to avoid scratching the leather.
- Vacuum cleaner: Use a vacuum cleaner with a soft brush attachment to remove loose dirt and debris.
-
Procedure:
- Vacuum the seats to remove loose dirt and debris.
- Spray the leather cleaner onto a soft cloth.
- Gently wipe the leather seats in a circular motion.
- Use a clean, damp cloth to wipe away any excess cleaner.
- Dry the seats with a clean, dry cloth.
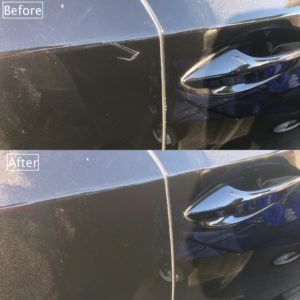
Image showing a seamless bond after a patch has dried on a car seat.
6.2. Conditioning
-
Frequency: Condition your leather car seats every 3-6 months to keep them moisturized and prevent cracking.
-
Materials:
- Leather conditioner: Use a high-quality leather conditioner specifically designed for automotive use.
- Soft cloths: Use microfiber cloths to apply the conditioner evenly.
-
Procedure:
- Ensure the seats are clean and dry.
- Apply a small amount of leather conditioner onto a soft cloth.
- Gently massage the conditioner into the leather in a circular motion.
- Allow the conditioner to absorb for the recommended time.
- Wipe away any excess conditioner with a clean, dry cloth.
6.3. Protection
-
UV Protection:
- Park in shaded areas or use a sunshade to protect the leather from UV damage.
- Apply a leather protectant spray that contains UV inhibitors.
-
Stain Protection:
- Clean spills immediately to prevent staining.
- Use a leather protectant spray to create a barrier against stains.
-
Wear Protection:
- Avoid wearing sharp objects or clothing that could scratch the leather.
- Use seat covers to protect the leather from wear and tear.
6.4. Tips for Maintaining Leather Car Seats
- Avoid Harsh Chemicals: Use only leather-specific cleaners and conditioners.
- Test Products: Always test new products on a hidden area before applying them to the entire seat.
- Clean Spills Immediately: Wipe up spills as soon as they occur to prevent staining.
- Condition Regularly: Keep the leather moisturized to prevent cracking and fading.
- Protect from Sunlight: Minimize exposure to direct sunlight to prevent UV damage.
6.5. Products to Avoid
- Household Cleaners: Avoid using household cleaners, as they can damage the leather.
- Abrasive Cleaners: Do not use abrasive cleaners or scrub brushes, as they can scratch the leather.
- Silicone-Based Products: Avoid silicone-based products, as they can dry out the leather over time.
By following these maintenance tips, you can keep your leather car seats looking their best and prevent costly repairs. At CARDIAGTECH.NET, we offer a wide range of high-quality leather care products to help you maintain your car’s interior.
7. Leather Car Seat Repair vs. Replacement: Making the Right Choice
Deciding between repairing and replacing leather car seats involves weighing the costs, benefits, and long-term value of each option. Understanding the factors that influence this decision can help you make the right choice for your vehicle.
7.1. Factors to Consider
-
Extent of the Damage:
- Minor Damage: Small tears, scratches, or stains can often be repaired at a fraction of the cost of replacement.
- Extensive Damage: Large tears, deep cracks, or significant discoloration may necessitate replacement.
-
Cost:
- Repair: Costs range from $20 to $50 for DIY repairs and $200 to $500 for professional repairs.
- Replacement: Costs range from $500 to $1200+ per seat for reupholstering.
-
Age and Condition of the Seats:
- Old Seats: If the seats are old and worn, replacement may be the better option to improve overall comfort and appearance.
- Newer Seats: If the seats are relatively new and in good condition, repair may be sufficient to address minor damage.
-
Vehicle Value:
- High-Value Vehicle: Replacement may be a worthwhile investment to maintain or increase the vehicle’s value.
- Lower-Value Vehicle: Repair may be a more cost-effective option for addressing damage without over-investing in the vehicle.
-
Personal Preferences:
- Aesthetic Goals: If you want to completely transform the look of your car’s interior, replacement may be the best option.
- Budget: If you have a limited budget, repair may be the more practical choice.
Image demonstrating the use of adhesive in a damaged car seat seam.
7.2. When to Choose Repair
- Minor Tears and Scratches: If the damage is limited to small imperfections, repair is a cost-effective solution.
- Localized Damage: If the damage is confined to a specific area of the seat, repair can address the issue without replacing the entire seat.
- Cost Savings: If you want to save money and extend the life of your seats, repair is a practical choice.
- DIY Feasibility: If you are comfortable with DIY projects, you can save even more money by repairing the seats yourself.
7.3. When to Choose Replacement
- Extensive Damage: If the seats have large tears, deep cracks, or significant discoloration, replacement may be necessary to restore their appearance and functionality.
- Old and Worn Seats: If the seats are old, worn, and uncomfortable, replacement can provide a significant improvement in comfort and aesthetics.
- Vehicle Value Enhancement: If you want to increase the resale value of your vehicle, replacement may be a worthwhile investment.
- Customization: If you want to customize the look of your car’s interior, replacement allows you to choose from a wide range of leather types, colors, and designs.
7.4. Cost Comparison Table
| Factor | Repair | Replacement (Reupholstering) |
|---|---|---|
| Cost | $20 – $500 per seat | $500 – $1200+ per seat |
| Damage Extent | Minor tears, scratches, stains | Large tears, deep cracks, discoloration |
| Time | Few hours to a day | Several days |
| Skill Level | DIY or Professional | Professional |
| Longevity | Extends life of existing seat | New seat with extended lifespan |
| Aesthetic Impact | Improves appearance of damaged area | Dramatically improves overall appearance |
7.5. Making the Decision
- Assess the Damage: Evaluate the extent of the damage to determine the appropriate course of action.
- Get Estimates: Obtain estimates from professional repair shops and reupholstering services.
- Consider Your Budget: Determine how much you are willing to spend on the project.
- Evaluate Your Goals: Consider your aesthetic goals and the long-term value of your vehicle.
- Make an Informed Decision: Weigh the costs, benefits, and long-term value of each option to make the right choice for your needs.
Choosing between repairing and replacing leather car seats requires careful consideration of various factors. By assessing the damage, getting estimates, and evaluating your goals, you can make an informed decision that balances cost, aesthetics, and long-term value. At CARDIAGTECH.NET, we provide the expertise and resources you need to make the right choice for your vehicle.
8. Finding Affordable Leather Car Seat Repair Options
Repairing leather car seats doesn’t have to break the bank. Here are several strategies for finding affordable repair options that fit your budget.
8.1. DIY Repair Kits
- Cost: DIY repair kits are the most affordable option, ranging from $20 to $50.
- Benefits: Save on labor costs and gain valuable skills in car maintenance.
- Limitations: Suitable for minor damage only.
- Where to Find: Auto parts stores, online retailers, and CARDIAGTECH.NET.
8.2. Mobile Repair Services
- Cost: Mobile repair services often have lower overhead costs than traditional repair shops, resulting in lower prices.
- Benefits: Convenient service that comes to you, saving time and effort.
- Limitations: May not be suitable for extensive damage or complex repairs.
- How to Find: Search online for mobile leather repair services in your area.
Image showcasing leather cleaner and vinyl prep products.
8.3. Local Repair Shops
- Cost: Prices vary depending on the shop and the extent of the damage.
- Benefits: Access to skilled technicians and high-quality repairs.
- Limitations: Can be more expensive than DIY or mobile repair services.
- How to Find: Search online for local auto upholstery shops or ask for recommendations from friends and family.
8.4. Comparison Shopping
- Get Multiple Estimates: Obtain estimates from several different repair services to compare prices.
- Negotiate: Don’t be afraid to negotiate prices, especially if you have multiple estimates.
- Ask About Discounts: Inquire about discounts for seniors, military personnel, or AAA members.
8.5. Timing Your Repair
- Off-Season Repairs: Schedule your repair during the off-season (e.g., winter) when demand is lower and prices may be more competitive.
- Promotional Periods: Take advantage of promotional periods or special offers to save money on repairs.
8.6. Focusing on Essential Repairs
- Prioritize Damage: Focus on repairing the most critical damage first, such as tears that affect safety or comfort.
- Delay Non-Essential Repairs: Postpone non-essential repairs, such as minor stains or cosmetic issues, until you have more budget available.
8.7. Utilizing Refurbished Parts
- Cost: Refurbished leather seats can be significantly cheaper than new ones.
- Benefits: Environmentally friendly and cost-effective.
- Limitations: Availability may be limited, and the quality may vary.
- Where to Find: Auto salvage yards, online retailers, and specialty shops.
8.8. Considering Faux Leather Alternatives
- Cost: Faux leather (vinyl or pleather) is a more affordable alternative to genuine leather.
- Benefits: Lower cost, easy maintenance, and a wide range of colors and styles.
- Limitations: Less durable and luxurious than genuine leather.
- When to Consider: If you are on a tight budget and want to update the look of your car’s interior.
8.9. Financing Options
- Payment Plans: Some repair shops offer payment plans that allow you to spread the cost of the repair over time.
- Credit Cards: Use a credit card with a low interest rate or a 0% introductory APR to finance the repair.
By exploring these affordable leather car seat repair options, you can maintain your car’s interior without overspending. At CARDIAGTECH.NET, we offer a range of DIY repair kits and expert advice to help you find the best solution for your needs and budget.
9. Common Mistakes to Avoid During Leather Car Seat Repair
Avoiding common mistakes during leather car seat repair is crucial for achieving high-quality results and preventing further damage. Here are some pitfalls to watch out for.
9.1. Using the Wrong Products
- Problem: Using household cleaners, abrasive cleaners, or silicone-based products can damage the leather.
- Solution: Use only leather-specific cleaners and conditioners designed for automotive use.
9.2. Skipping Surface Preparation
- Problem: Failing to clean and prepare the surface before applying repair compounds can result in poor adhesion and uneven results.
- Solution: Thoroughly clean the leather with a leather cleaner and lightly sand the damaged area with fine-grit sandpaper before proceeding with repairs.
9.3. Applying Too Much Filler at Once
- Problem: Applying too much filler at once can result in a lumpy or uneven finish.
- Solution: Apply filler in thin layers, allowing each layer to dry completely before applying the next.