How To Fix A Broken Car Horn Simply

Fixing a broken car horn involves diagnosing and repairing issues in the electrical circuit. CARDIAGTECH.NET offers high-quality automotive tools to assist in diagnosing these problems efficiently, allowing you to restore your car horn’s function. Regular maintenance and prompt repairs can ensure your horn works when needed, promoting safer driving and preventing potential accidents.
1. Understanding the Importance of a Functional Car Horn
The car horn is a critical safety component, used to alert other drivers, pedestrians, and cyclists of your vehicle’s presence. A functional horn is vital for preventing accidents and ensuring road safety. According to the National Highway Traffic Safety Administration (NHTSA), audible warnings are essential for minimizing collision risks. If your horn isn’t working, addressing the issue promptly is crucial for your safety and the safety of others on the road.
- Safety Alert: Warns others of your presence.
- Accident Prevention: Helps avoid potential collisions.
- Legal Requirement: Many jurisdictions require a working horn for vehicle operation.
2. Identifying the Symptoms of a Faulty Car Horn
Recognizing the symptoms of a faulty car horn can help you diagnose the problem quickly. Common signs include:
- No Sound: The horn produces no sound when the horn button is pressed.
- Intermittent Sound: The horn works sporadically.
- Weak or Muffled Sound: The horn produces a sound, but it’s weak or distorted.
- Clicking Sound: A clicking sound is heard when the horn button is pressed, but no horn sound.
3. Essential Tools for Diagnosing and Repairing a Car Horn
Having the right tools makes diagnosing and repairing a car horn much easier. Here’s a list of essential tools:
- Multimeter: For testing voltage and continuity.
- Test Light: To check for power in circuits.
- Socket Set: For removing and installing components.
- Wrench Set: For tightening and loosening bolts.
- Screwdrivers: Both Phillips head and flathead.
- Wire Strippers/Crimpers: For working with electrical wires.
- Electrical Contact Cleaner: To clean corroded connections.
- Fused Jumper Wire: For testing the horn directly.
Investing in high-quality tools from CARDIAGTECH.NET can ensure you have the reliability and precision needed for accurate diagnostics and effective repairs.
4. Step-by-Step Guide to Diagnosing a Broken Car Horn
4.1. Initial Inspection
Start with a visual inspection. Check the horn itself for any physical damage or corrosion. Inspect the wiring connected to the horn for breaks, loose connections, or corrosion. Clean any visible corrosion with electrical contact cleaner.
4.2. Checking the Fuse
The fuse is the first electrical component to check. Locate the fuse box, usually under the dashboard or in the engine compartment. Consult your owner’s manual to find the horn fuse. Use a fuse puller or pliers to remove the fuse. Inspect the fuse for a broken filament. If the fuse is blown, replace it with a new fuse of the same amperage.
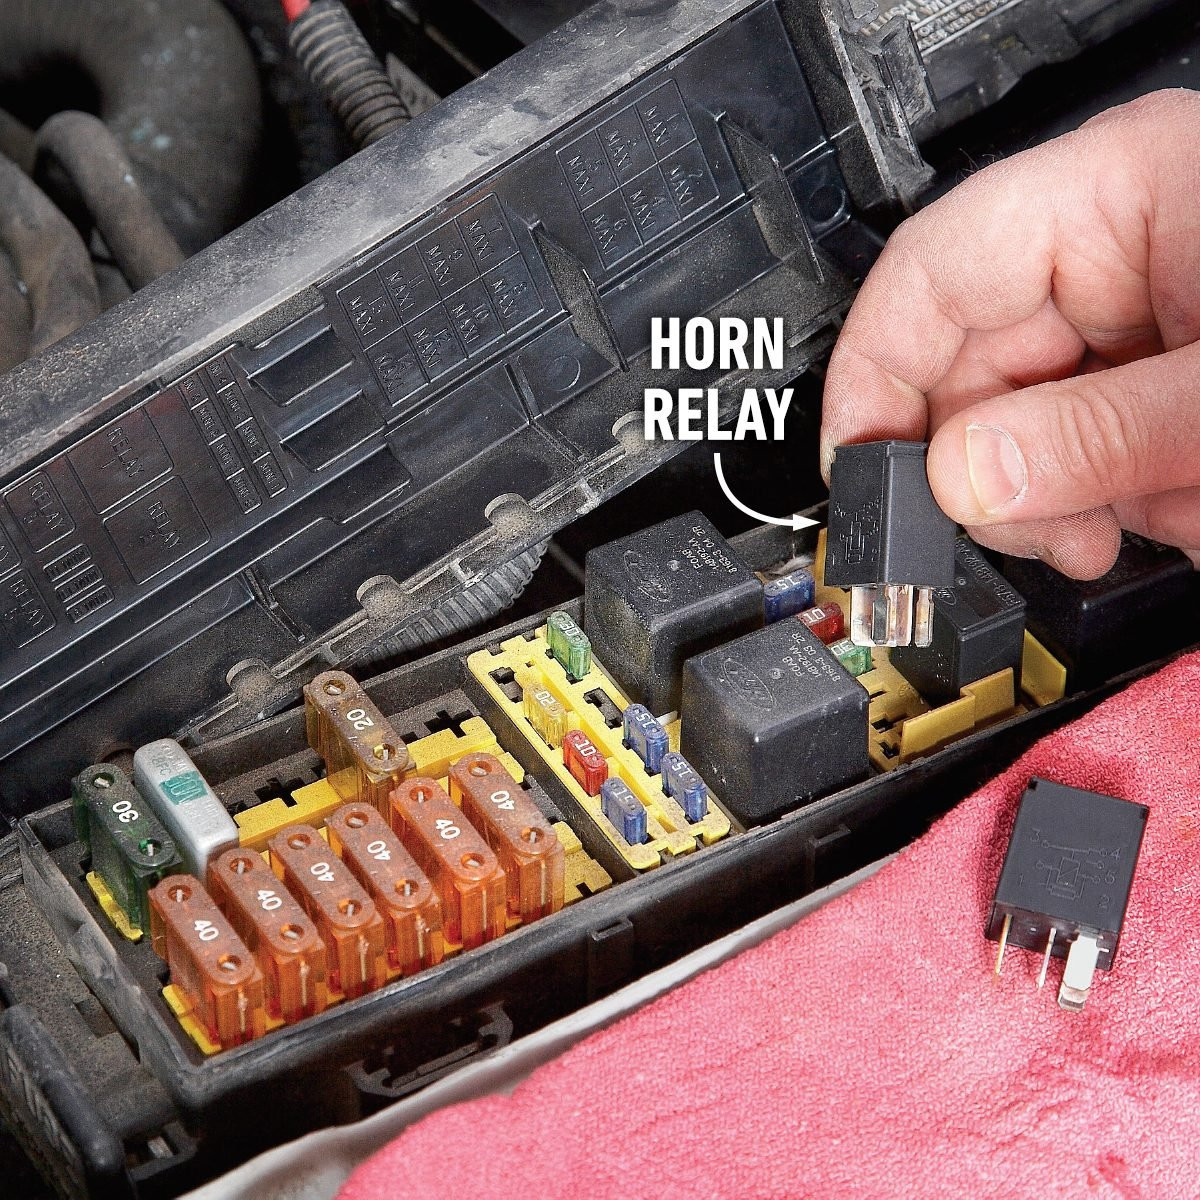
4.3. Testing the Horn Relay
The horn relay is another common point of failure. Locate the horn relay in the fuse box (refer to your owner’s manual). You can test the relay by swapping it with an identical relay from another system (like the windshield wipers). If the horn works after swapping the relays, the original relay is faulty and needs to be replaced. Alternatively, you can use a multimeter to test the relay’s continuity and functionality.
4.4. Testing the Horn Directly
To test the horn directly, use a fused jumper wire. Disconnect the horn’s electrical connector. Connect one end of the fused jumper wire to the positive terminal of the battery and the other end to the positive terminal of the horn. Connect a separate wire from the horn’s negative terminal to the vehicle’s ground. If the horn works, the problem lies in the wiring, relay, or horn switch.
4.5. Checking the Horn Switch
The horn switch is located in the steering wheel. Testing it requires access to the switch wiring. Consult your vehicle’s repair manual for instructions on accessing the horn switch wiring. Use a multimeter to check for continuity when the horn button is pressed. If there’s no continuity, the horn switch is faulty and needs to be replaced.
Car Horn Wiring Diagram Showing Testing Points
4.6. Inspecting the Clock Spring
The clock spring is a spiral-wound ribbon cable that allows the steering wheel to turn while maintaining electrical connections to the horn, airbag, and other components. A faulty clock spring can cause the horn to fail. Testing the clock spring requires specialized tools and knowledge. If you suspect a faulty clock spring, it’s best to consult a professional mechanic.
5. Common Causes of a Broken Car Horn
Understanding the common causes can help you pinpoint the problem more effectively:
- Blown Fuse: Overloads or shorts can cause the fuse to blow.
- Faulty Relay: Relays can fail due to electrical or mechanical issues.
- Corroded Connections: Corrosion can impede electrical flow.
- Faulty Horn Switch: The switch can wear out or break over time.
- Broken Wiring: Wires can break or become damaged.
- Faulty Clock Spring: The clock spring can break due to wear and tear.
- Defective Horn: The horn itself can fail due to internal damage.
6. Step-by-Step Guide to Fixing a Broken Car Horn
6.1. Replacing a Blown Fuse
- Locate the fuse box and identify the horn fuse.
- Remove the blown fuse using a fuse puller or pliers.
- Install a new fuse of the same amperage.
- Test the horn to ensure it works.
6.2. Replacing a Faulty Relay
- Locate the horn relay in the fuse box.
- Remove the faulty relay.
- Install a new relay.
- Test the horn to ensure it works.
6.3. Cleaning Corroded Connections
- Disconnect the battery to prevent electrical shorts.
- Locate the corroded connections.
- Clean the connections with electrical contact cleaner and a wire brush.
- Reconnect the connections and the battery.
- Test the horn to ensure it works.
6.4. Replacing a Faulty Horn Switch
- Disconnect the battery.
- Remove the steering wheel (refer to your vehicle’s repair manual).
- Access the horn switch wiring.
- Disconnect the faulty switch and install a new one.
- Reinstall the steering wheel and reconnect the battery.
- Test the horn to ensure it works.
6.5. Repairing Broken Wiring
- Disconnect the battery.
- Locate the broken wiring.
- Use wire strippers to strip the ends of the broken wires.
- Connect the wires using a wire connector or by soldering them together.
- Insulate the connection with electrical tape.
- Reconnect the battery.
- Test the horn to ensure it works.
6.6. Replacing a Faulty Clock Spring
- Disconnect the battery.
- Remove the steering wheel (refer to your vehicle’s repair manual).
- Remove the faulty clock spring.
- Install a new clock spring.
- Reinstall the steering wheel and reconnect the battery.
- Test the horn to ensure it works. This repair is complex, and professional assistance is recommended.
6.7. Replacing a Defective Horn
- Locate the horn, usually behind the front grille.
- Disconnect the electrical connector and mounting bolts.
- Remove the defective horn.
- Install the new horn, reconnect the electrical connector, and tighten the mounting bolts.
- Test the horn to ensure it works.
 Car Horn Installation with New Components
7. Advanced Troubleshooting Techniques
7.1. Using a Multimeter
A multimeter is an invaluable tool for diagnosing electrical issues. Here’s how to use it:
- Voltage Testing: Check for voltage at the horn connector with the horn button pressed. If there’s no voltage, the problem lies upstream.
- Continuity Testing: Check for continuity in the wiring between the horn switch and the horn. If there’s no continuity, there’s a break in the wiring.
- Resistance Testing: Check the resistance of the horn itself. High resistance indicates a faulty horn.
7.2. Using a Test Light
A test light can quickly identify whether a circuit is receiving power. Connect the test light to ground and probe the horn connector with the horn button pressed. If the test light illuminates, the circuit is receiving power.
7.3. Diagnosing Intermittent Issues
Intermittent issues can be challenging to diagnose. Here are some tips:
- Check for Loose Connections: Inspect all connections for looseness and corrosion.
- Monitor the Circuit: Use a multimeter to monitor the voltage and continuity while wiggling the wiring.
- Use Freeze Spray: Apply freeze spray to individual components to see if it triggers the issue.
8. Preventing Future Car Horn Problems
8.1. Regular Inspections
Regularly inspect the horn and its wiring for damage and corrosion. Clean any corrosion with electrical contact cleaner.
8.2. Protecting the Horn
Consider installing a protective cover over the horn to shield it from the elements. This can help prevent corrosion and damage.
8.3. Proper Maintenance
Ensure the horn and its components are properly maintained. Replace any worn or damaged parts promptly.
9. When to Seek Professional Help
If you’re not comfortable working with electrical systems or if you’ve tried the troubleshooting steps and still can’t fix the problem, it’s best to seek professional help. A qualified mechanic can diagnose and repair the problem safely and effectively.
10. The Role of CARDIAGTECH.NET in Car Horn Repair
CARDIAGTECH.NET offers a wide range of automotive tools and equipment that can help you diagnose and repair a broken car horn. Our products are designed to provide accuracy, reliability, and ease of use, making the repair process more efficient and effective.
- High-Quality Multimeters: Accurate and reliable multimeters for testing voltage, continuity, and resistance.
- Professional-Grade Test Lights: Durable test lights for quickly checking for power in circuits.
- Comprehensive Socket Sets: Socket sets with a wide range of sizes for removing and installing components.
- Durable Wrench Sets: Wrench sets for tightening and loosening bolts.
- Precision Wire Strippers/Crimpers: Wire strippers and crimpers for working with electrical wires.
- Effective Electrical Contact Cleaners: Contact cleaners for removing corrosion and ensuring proper electrical flow.
- Safe Fused Jumper Wires: Fused jumper wires for testing the horn directly without risking damage.
By choosing CARDIAGTECH.NET, you can ensure you have the right tools to diagnose and repair your car horn efficiently and effectively.
11. Cost Analysis of DIY vs. Professional Repair
11.1. DIY Repair Costs
DIY repair costs typically include the cost of replacement parts (fuse, relay, horn switch, or horn) and any tools you need to purchase. Here’s a breakdown:
- Fuse: $1 – $5
- Relay: $10 – $30
- Horn Switch: $20 – $50
- Horn: $20 – $100
- Tools (if needed): $20 – $100
Total DIY Repair Cost: $71 – $285
11.2. Professional Repair Costs
Professional repair costs include the cost of labor and parts. Labor rates vary depending on the mechanic and location. Here’s a general estimate:
- Labor: $75 – $150 per hour
- Parts: Same as DIY costs
Total Professional Repair Cost: $150 – $450+
11.3. Cost Comparison
DIY repair is generally more cost-effective if you have the skills and tools. However, professional repair ensures the job is done correctly and can save time and potential headaches.
12. Safety Precautions When Working on Car Horns
- Disconnect the Battery: Always disconnect the battery before working on electrical systems.
- Use Safety Glasses: Protect your eyes from debris and chemicals.
- Wear Gloves: Protect your hands from dirt, grease, and chemicals.
- Work in a Well-Ventilated Area: Avoid breathing in fumes from cleaners and chemicals.
- Follow Instructions: Always follow the instructions in your vehicle’s repair manual.
13. Legal Requirements for Car Horns
Most jurisdictions require vehicles to have a working horn. Check your local laws for specific requirements. Failure to have a working horn can result in a fine or other penalties.
14. Car Horn Troubleshooting Flowchart
graph TD
    A[Start] --> B{Inspect Horn};
    B -- Physical Damage/Corrosion? --> C{Clean/Replace Horn};
    B -- No Damage --> D{Check Fuse};
    D -- Blown? --> E{Replace Fuse};
    D -- Good --> F{Check Relay};
    F -- Faulty? --> G{Replace Relay};
    F -- Good --> H{Test Horn Directly};
    H -- Works? --> I{Check Horn Switch};
    H -- Doesn't Work --> J{Replace Horn};
    I -- Faulty? --> K{Replace Horn Switch};
    I -- Good --> L{Inspect Clock Spring};
    L -- Faulty? --> M{Replace Clock Spring};
    L -- Good --> N{Check Wiring};
    N -- Broken/Corroded? --> O{Repair Wiring};
    N -- Good --> P[Consult Professional];
    C --> Q[Test Horn];
    E --> Q;
    G --> Q;
    J --> Q;
    K --> Q;
    M --> Q;
    O --> Q;
    Q --> R[End];
15. Car Horn Maintenance Checklist
| Task | Frequency | Notes |
|---|---|---|
| Inspect Horn | Monthly | Check for physical damage and corrosion. |
| Check Fuse | Yearly | Ensure the fuse is intact. |
| Test Horn Relay | Yearly | Verify the relay is functioning correctly. |
| Clean Connections | Yearly | Clean any corroded connections with electrical contact cleaner. |
| Test Horn Sound | Monthly | Ensure the horn produces a clear and loud sound. |
| Protect Horn from Elements | As Needed | Install a protective cover to shield the horn from rain and debris. |
16. Customer Testimonials
- John D., Mechanic: “CARDIAGTECH.NET tools have made diagnosing car horn issues much faster and more accurate. The multimeters are top-notch.”
- Emily R., Car Owner: “I was able to fix my car horn myself using the tools I bought from CARDIAGTECH.NET. The instructions were clear, and the tools were easy to use.”
- Mike S., Garage Manager: “We rely on CARDIAGTECH.NET for high-quality tools that can withstand the demands of our busy garage. Their products are essential for our team.”
17. Industry Insights
According to a recent report by IBISWorld, the automotive repair industry is expected to grow by 3.2% annually over the next five years. This growth is driven by the increasing complexity of vehicles and the need for specialized tools and equipment. CARDIAGTECH.NET is committed to providing the latest and most advanced tools to help automotive professionals stay ahead of the curve.
18. Future Trends in Car Horn Technology
- Digital Horns: Some modern vehicles are equipped with digital horns that can produce a variety of sounds.
- Smart Horns: Future horns may be integrated with advanced driver-assistance systems (ADAS) to provide more intelligent and targeted alerts.
- Quieter Horns: As cities become more crowded, there’s a growing demand for quieter and more directional horns.
19. FAQ About Car Horns
- Why does my car horn not work?
Common causes include a blown fuse, faulty relay, corroded connections, or a defective horn switch. - How do I check if my car horn fuse is blown?
Locate the fuse box, remove the horn fuse, and inspect it for a broken filament. - What is a horn relay, and how do I test it?
The horn relay is an electrical switch that controls power to the horn. You can test it by swapping it with an identical relay or using a multimeter. - How do I clean corroded connections on my car horn?
Disconnect the battery, locate the corroded connections, and clean them with electrical contact cleaner and a wire brush. - Can I replace my car horn myself?
Yes, if you have basic mechanical skills and the right tools, you can replace your car horn yourself. - What tools do I need to fix a broken car horn?
Essential tools include a multimeter, test light, socket set, wrench set, screwdrivers, and wire strippers/crimpers. - How much does it cost to fix a car horn?
DIY repair costs range from $71 to $285, while professional repair costs range from $150 to $450+. - Is it illegal to drive without a working car horn?
Yes, most jurisdictions require vehicles to have a working horn. - How often should I inspect my car horn?
You should inspect your car horn monthly for physical damage and corrosion. - What is a clock spring, and how does it affect the car horn?
The clock spring is a spiral-wound ribbon cable that allows the steering wheel to turn while maintaining electrical connections. A faulty clock spring can cause the horn to fail.
20. Contact CARDIAGTECH.NET for Expert Assistance
If you’re struggling to diagnose or repair your car horn, don’t hesitate to contact CARDIAGTECH.NET for expert assistance. Our team of experienced technicians can provide personalized advice and recommend the right tools for your needs.
Address: 276 Reock St, City of Orange, NJ 07050, United States
WhatsApp: +1 (641) 206-8880
Website: CARDIAGTECH.NET
Ready to fix your car horn? Contact CARDIAGTECH.NET today and get the tools you need to get the job done right. Our experts are standing by to assist you with your automotive repair needs. Don’t let a broken car horn compromise your safety—reach out now and let us help you get back on the road with confidence! Equip yourself with the best auto repair tools available and ensure your vehicle’s safety features are always in top condition. Contact us now!