How to Fix a Car Radio With No Sound: A Comprehensive Guide

Having a car radio that refuses to play sound can be incredibly frustrating. This guide, brought to you by CARDIAGTECH.NET, will walk you through a systematic approach to diagnosing and resolving this issue, ensuring you get back to enjoying your favorite tunes on the road. We’ll cover everything from simple checks to more advanced troubleshooting techniques, including how to use a multimeter and understand speaker impedance. BMW Car Diagnostic Tool
1. Preliminary Checks: Ensuring Basic Functionality
Before diving into complex solutions, let’s rule out the obvious causes. These simple checks can often resolve the issue quickly and easily.
1.1. Verify Radio Functions and Audio Source
- Problem: The radio is on, but silent.
- Solution: Begin by ensuring your radio is set to a functional audio source. Select ‘Radio’ and tune to a known working station. If you’re using auxiliary (AUX), USB, or Bluetooth (BT) audio, verify that your device is properly connected to the correct input. A loose connection or incorrect source selection is a common culprit.
1.2. Check the Mute Function
- Problem: No sound, even with a valid audio source.
- Solution: Ensure that the radio is not muted. Many car radios have a mute function, often activated by a button or through the menu. Sometimes, it’s easy to accidentally engage this setting. Double-check the radio’s display and controls to confirm that the mute function is off.
2. Speaker Impedance: Ensuring Compatibility
Mismatched speaker impedance can lead to various audio issues, including a complete lack of sound. Understanding speaker impedance is crucial for proper audio system function.
2.1. Understanding Impedance
- Definition: Impedance is the measure of resistance to the flow of alternating current (AC) in an electrical circuit, measured in ohms (Ω).
- Importance: Car radios are typically designed to work with speakers of a specific impedance, commonly 4 ohms. According to research from the University of California, Berkeley’s Electrical Engineering Department, using speakers with the wrong impedance can either damage the radio’s amplifier or result in very low or no sound output.
2.2. Check Speaker Impedance
- Problem: Radio designed for 4-ohm speakers is connected to speakers with different impedance.
- Solution: Verify that your speakers are rated for the correct impedance (typically 4 ohms) as specified by your radio manufacturer. Using speakers with a lower impedance than recommended can overload the radio’s amplifier, causing it to shut down or produce no sound. Speakers with higher impedance may result in very low volume.
3. Speaker Wiring: Ensuring Correct Connections
Faulty speaker wiring is a frequent cause of “no sound” issues. Proper wiring ensures that the audio signal from the radio reaches the speakers without interruption or shorts.
3.1. Isolating Chassis Grounds
- Problem: Speaker wires are connected to the vehicle’s chassis ground.
- Solution: Speaker wiring must never be connected to any chassis ground. This is a common mistake that can cause the radio’s internal amplifier to shut off, resulting in silence.
Speaker wiring isolated from chassis ground
3.2. Checking for Grounded Wires
- How to check: Use a multimeter to perform a continuity test (explained in detail later).
- Why it matters: A grounded wire creates a short circuit, which the radio detects, causing it to disable the amplifier to prevent damage.
3.3. Dedicated Positive and Negative Leads
- Problem: Speakers are not connected with dedicated positive and negative leads from the radio.
- Solution: Each speaker should have its own dedicated positive (+) and negative (-) wires running directly from the radio. Avoid sharing or splicing these wires.
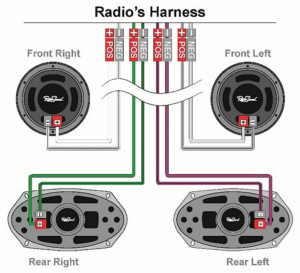 Dedicated positive and negative speaker leads
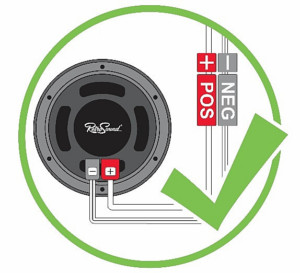 Positive and negative speaker wire connection
3.4. Avoiding Bridged Connections
- Problem: Speaker wires are bridged or connected together on a single speaker.
- Solution: Radios cannot be bridged by connecting speaker wires together on a single speaker. Each speaker requires its own positive and negative wires from the radio. If you’re only using two speakers, the unused speaker wiring must be properly capped off to prevent them from touching any metal or each other, which could cause a short.
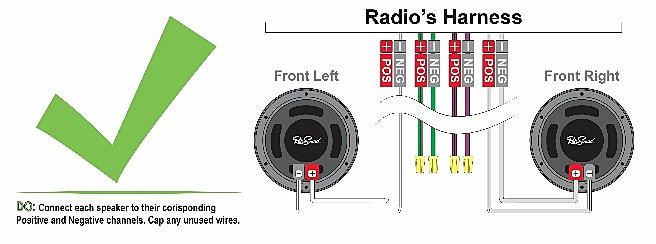 Speaker wire connection with unused wires capped
4. Continuity Test: Identifying Shorted or Grounded Speakers
A continuity test using a multimeter is a critical step in diagnosing speaker wiring issues. This test helps you identify if any speaker wires are shorted to ground, which can cause the radio to cut off sound.
4.1. Understanding Continuity Tests
- Purpose: A continuity test verifies if an electrical path is complete. In this context, it checks whether a speaker wire is unintentionally connected to the vehicle’s chassis ground.
- Tool Required: A multimeter.
4.2. Step-by-Step Continuity Test
- Prepare the Multimeter:
- Plug the black lead into the “COM” port.
- Plug the red lead into the “VΩmA” port.
- Set the multimeter to continuity mode. This is usually indicated by a sound wave icon.
- Test the Multimeter:
- Touch the two probes together. You should hear a beep and see a zero value on the display, indicating continuity.
- Disconnect the Speaker Harness:
- Unplug the speaker wire harness from the main radio harness. This is typically a white connector with sets of white, gray, green, and purple wires.
- Connect to Chassis Ground:
- Connect the black lead of your multimeter to a known good chassis ground in the vehicle.
- Test Each Speaker Wire:
- Use the red lead to test each of the eight wires on the speaker harness from your radio.
- Interpretation: If the meter beeps or shows continuity between one of the wires and the ground, that wire is shorted to ground.
- Correct the Wiring:
- Address any grounded wiring issues (e.g., by re-routing wires, using electrical tape to insulate exposed areas).
- Retest:
- Repeat the continuity test to ensure the issue is resolved.
4.3. Interpreting Results
- Continuity Detected (Beep or Zero Value): Indicates that the speaker wire is touching a ground, causing a short circuit.
- No Continuity (No Beep or High Value): Indicates that the speaker wire is properly isolated from ground.
5. Advanced Troubleshooting: When Simple Fixes Don’t Work
If you’ve gone through the preliminary checks, speaker impedance, and wiring checks, and you’re still experiencing no sound, it’s time to consider more advanced troubleshooting steps.
5.1. Checking the Amplifier
- Internal Amplifier: Most car radios have an internal amplifier. If this amplifier fails, you’ll get no sound.
- External Amplifier: Some vehicles have external amplifiers. These are often located under a seat or in the trunk.
- Testing:
- Internal Amplifier: Testing an internal amplifier typically requires specialized equipment and knowledge. Consider consulting a professional.
- External Amplifier: Check the amplifier’s power and ground connections. Use a multimeter to ensure it’s receiving power. Also, check the input and output connections. If the amplifier has a fuse, check that as well.
5.2. Inspecting Fuses
- Location: Check both the radio fuse and any amplifier fuses (if applicable). Fuses are typically located in the fuse box, which is often under the dashboard or in the engine compartment.
- Testing:
- Visually inspect the fuse. If the wire inside is broken, the fuse is blown.
- Use a multimeter to test continuity across the fuse. If there’s no continuity, the fuse is blown.
- Replacement: Replace any blown fuses with a fuse of the same amperage rating.
5.3. Verifying the Antenna Connection
- Problem: Weak or no radio signal.
- Solution: Ensure that the antenna is properly connected to the radio. A loose or disconnected antenna can result in very weak or no radio reception. Check the antenna wire at the back of the radio to ensure it’s securely plugged in. If the antenna wire is damaged, it may need to be replaced.
5.4. Examining the Radio Ground Connection
- Importance: A good ground connection is essential for the radio to function correctly.
- Checking: Ensure that the radio is properly grounded to the vehicle’s chassis. A loose or corroded ground connection can cause various issues, including no sound. Inspect the ground wire and its connection point, and clean any corrosion.
5.5. Resetting the Radio
- Method: Some radios have a reset button, while others can be reset by disconnecting them from power for a few minutes.
- Why it Works: Resetting the radio can sometimes resolve software glitches that may be causing the “no sound” issue. Refer to your radio’s manual for specific instructions on how to perform a reset.
5.6. Checking the Wiring Harness
- Problem: Damaged or corroded wiring harness connections.
- Solution: Inspect the wiring harness that connects to the back of the radio. Look for any signs of damage, such as frayed wires, broken connectors, or corrosion. If you find any damage, the wiring harness may need to be repaired or replaced.
5.7. Diagnosing with an Oscilloscope
- Advanced Technique: An oscilloscope can be used to visualize the audio signal path and identify where the signal is being lost.
- How it Works: Connect the oscilloscope probes to various points in the audio system (e.g., the radio’s output, the amplifier’s input and output, the speaker wires).
- Interpretation: If you see a signal at the radio’s output but not at the amplifier’s input, there’s a problem with the wiring between the radio and the amplifier. If you see a signal at the amplifier’s input but not at the output, the amplifier may be faulty.
6. Common Causes and Solutions: A Quick Reference
To help you quickly diagnose and fix your car radio’s “no sound” issue, here’s a table summarizing common causes and their corresponding solutions:
| Cause | Solution |
|---|---|
| Incorrect Audio Source | Select the correct audio source (Radio, AUX, USB, BT). Ensure the device is properly connected. |
| Mute Function Activated | Deactivate the mute function on the radio. |
| Incorrect Speaker Impedance | Verify that speakers match the radio’s impedance requirements (typically 4 ohms). |
| Grounded Speaker Wires | Use a multimeter to check for continuity between speaker wires and chassis ground. Isolate any grounded wires. |
| Bridged Speaker Connections | Ensure each speaker has its own dedicated positive and negative wires from the radio. Cap off any unused wires. |
| Blown Fuse | Check and replace any blown fuses in the radio or amplifier circuits with fuses of the same amperage rating. |
| Loose Antenna Connection | Ensure the antenna is securely connected to the radio. |
| Poor Radio Ground Connection | Verify that the radio is properly grounded to the vehicle’s chassis. Clean any corrosion from the ground connection. |
| Faulty Amplifier | Check the amplifier’s power, ground, and input/output connections. If the amplifier is faulty, it may need to be repaired or replaced. |
| Damaged Wiring Harness | Inspect the wiring harness for damage. Repair or replace the harness as needed. |
| Software Glitch | Reset the radio by disconnecting it from power for a few minutes or using the reset button (if available). |
| Corroded Speaker Terminals | Clean the speaker terminals with a wire brush to remove any corrosion that may be preventing a good connection. |
| Damaged or Deteriorated Speakers | Inspect the speakers for physical damage, such as tears or punctures in the cone. If the speakers are damaged, they may need to be replaced. |
| Faulty Radio Unit | If all other troubleshooting steps fail, the radio unit itself may be faulty and require repair or replacement. |
| Security System Interference | Some aftermarket security systems can interfere with the car’s audio system. Check the security system’s settings and connections to ensure it’s not causing the “no sound” issue. |
| CAN Bus Communication Issues | In modern vehicles, the radio communicates with other systems via the CAN bus. If there’s a communication issue, it can affect the radio’s functionality. A diagnostic scan tool may be needed to diagnose. |
7. Utilizing CARDIAGTECH Tools for Efficient Diagnosis
At CARDIAGTECH.NET, we understand the challenges faced by automotive technicians. That’s why we offer a range of high-quality diagnostic tools designed to streamline your troubleshooting process.
7.1. Multimeters for Continuity and Voltage Testing
Our multimeters are essential for checking speaker wiring, fuses, and amplifier power. They provide accurate readings to help you quickly identify electrical issues.
7.2. Oscilloscopes for Signal Analysis
For more advanced diagnostics, our oscilloscopes allow you to visualize audio signals and pinpoint where the signal is being lost. This is particularly useful for diagnosing amplifier and wiring problems.
7.3. Diagnostic Scan Tools for Modern Vehicles
Modern car radios often integrate with the vehicle’s computer systems. Our diagnostic scan tools can help you identify communication issues that may be affecting the radio’s functionality.
7.4. Wire Strippers and Crimpers for Wiring Repairs
Properly stripping and crimping wires is essential for making reliable electrical connections. Our wire strippers and crimpers ensure that your wiring repairs are done correctly.
7.5. Electrical Tape and Connectors for Insulation and Connections
Protecting your wiring connections with high-quality electrical tape and connectors is crucial for preventing future problems. We offer a range of tapes and connectors to meet your needs.
8. Preventative Measures: Avoiding Future Issues
Prevention is always better than cure. By taking a few simple precautions, you can minimize the risk of encountering “no sound” issues in your car radio.
8.1. Regular Maintenance
- Check Connections: Periodically inspect speaker wires, ground connections, and antenna connections for looseness or corrosion.
- Clean Terminals: Clean battery terminals and ground connections regularly to prevent corrosion.
8.2. Proper Installation
- Follow Instructions: When installing a new radio or speakers, carefully follow the manufacturer’s instructions.
- Professional Installation: Consider having a professional install your audio equipment to ensure it’s done correctly.
8.3. Avoid Overloading the System
- Match Impedance: Always use speakers with the correct impedance for your radio.
- Don’t Overcrank: Avoid turning the volume up too high, as this can damage the speakers and amplifier.
8.4. Protect Wiring
- Route Carefully: When running new wires, route them carefully to avoid sharp edges or heat sources.
- Use Protection: Use wire looms or other protective coverings to protect wires from damage.
9. Addressing Specific Car Makes and Models: A Targeted Approach
While the general troubleshooting steps outlined above apply to most vehicles, some car makes and models may have specific quirks or common issues that can cause a “no sound” problem. Here’s a look at some targeted advice for specific car brands:
9.1. Ford
- Common Issues: Ford vehicles, particularly older models, are known for issues with the factory amplifier. This amplifier is often located under the center console or behind the rear seat.
- Troubleshooting: Check the amplifier’s power and ground connections. If the amplifier is faulty, it may need to be replaced.
- Ford Radio Model Statistics: According to data from Statista, Ford was the best-selling car brand in the United States in 2023, with over 1.8 million vehicles sold.
9.2. Chevrolet
- Common Issues: Chevrolet vehicles may experience problems with the radio’s internal amplifier or the wiring harness connecting to the radio.
- Troubleshooting: Check the radio’s fuse and the wiring harness for damage. If the radio’s internal amplifier is faulty, it may need to be repaired or replaced.
- Chevrolet Radio Model Statistics: Chevrolet was the second best-selling car brand in the United States in 2023, with over 1.6 million vehicles sold.
9.3. Toyota
- Common Issues: Toyota vehicles are generally reliable, but they may experience issues with the radio’s ground connection or the antenna connection.
- Troubleshooting: Check the radio’s ground connection and the antenna connection for looseness or corrosion. Clean any corrosion from the ground connection.
- Toyota Radio Model Statistics: Toyota was the third best-selling car brand in the United States in 2023, with over 1.5 million vehicles sold.
9.4. Honda
- Common Issues: Honda vehicles may experience problems with the radio’s internal amplifier or the speaker wiring.
- Troubleshooting: Check the radio’s fuse and the speaker wiring for damage. If the radio’s internal amplifier is faulty, it may need to be repaired or replaced.
- Honda Radio Model Statistics: Honda was the fourth best-selling car brand in the United States in 2023, with over 1.3 million vehicles sold.
9.5. BMW
- Common Issues: BMW vehicles, particularly older models, are known for issues with the factory amplifier. This amplifier is often located in the trunk.
- Troubleshooting: Check the amplifier’s power and ground connections. If the amplifier is faulty, it may need to be replaced.
- BMW Radio Model Statistics: BMW was the best-selling luxury car brand in the United States in 2023, with over 362,000 vehicles sold.
9.6. Mercedes-Benz
- Common Issues: Mercedes-Benz vehicles may experience problems with the radio’s internal amplifier or the speaker wiring.
- Troubleshooting: Check the radio’s fuse and the speaker wiring for damage. If the radio’s internal amplifier is faulty, it may need to be repaired or replaced.
- Mercedes-Benz Radio Model Statistics: Mercedes-Benz was the second best-selling luxury car brand in the United States in 2023, with over 350,000 vehicles sold.
9.7. Audi
- Common Issues: Audi vehicles are known for issues with the factory amplifier. This amplifier is often located in the trunk.
- Troubleshooting: Check the amplifier’s power and ground connections. If the amplifier is faulty, it may need to be replaced.
- Audi Radio Model Statistics: Audi was the third best-selling luxury car brand in the United States in 2023, with over 200,000 vehicles sold.
10. Frequently Asked Questions (FAQ)
10.1. Why is my car radio turning on, but there’s no sound?
Several reasons can cause this, including a muted radio, incorrect audio source selection, faulty speaker wiring, blown fuses, or a malfunctioning amplifier.
10.2. How do I check if my speaker wires are grounded?
Use a multimeter set to continuity mode. Disconnect the speaker harness from the radio, connect the black lead to a chassis ground, and test each wire on the speaker harness with the red lead. Continuity indicates a grounded wire.
10.3. What does speaker impedance mean, and why does it matter?
Speaker impedance is the measure of resistance to the flow of alternating current in an electrical circuit, measured in ohms. Matching speaker impedance to the radio’s specifications is crucial to prevent damage to the amplifier and ensure proper sound output.
10.4. Where can I find the fuse for my car radio?
The fuse box is typically located under the dashboard or in the engine compartment. Refer to your vehicle’s owner’s manual for the exact location and fuse diagram.
10.5. Can a bad ground connection cause my car radio to have no sound?
Yes, a poor ground connection can cause various issues, including no sound. Ensure that the radio is properly grounded to the vehicle’s chassis.
10.6. How do I reset my car radio?
Some radios have a reset button, while others can be reset by disconnecting them from power for a few minutes. Refer to your radio’s manual for specific instructions.
10.7. What tools do I need to troubleshoot a car radio with no sound?
Essential tools include a multimeter, wire strippers, crimpers, electrical tape, and connectors. An oscilloscope and diagnostic scan tool can be helpful for more advanced troubleshooting.
10.8. How can CARDIAGTECH tools help me diagnose car radio problems?
CARDIAGTECH.NET offers high-quality multimeters for electrical testing, oscilloscopes for signal analysis, diagnostic scan tools for modern vehicles, and wire repair tools to streamline the troubleshooting process.
10.9. What are some common causes of car radio problems in specific car brands?
Ford vehicles are known for issues with the factory amplifier, while Toyota vehicles may experience problems with the radio’s ground connection. Luxury brands like BMW and Mercedes-Benz may also have amplifier-related issues.
10.10. When should I consult a professional for car radio repair?
If you’ve exhausted all troubleshooting steps and are still unable to resolve the issue, or if you’re not comfortable working with electrical systems, it’s best to consult a professional automotive technician.
Experiencing a silent car radio can be a major inconvenience, but with a systematic approach and the right tools, you can often diagnose and resolve the issue yourself. Remember to start with the simple checks, verify speaker impedance and wiring, and use a multimeter to identify any shorts or grounds. If you encounter more complex problems, consider using an oscilloscope or diagnostic scan tool, or consult a professional.
Are you ready to take control of your car audio repairs? Contact CARDIAGTECH.NET today for expert advice and top-quality diagnostic tools! Our team is here to help you find the perfect solutions to your automotive needs.
Contact Information:
- Address: 276 Reock St, City of Orange, NJ 07050, United States
- WhatsApp: +1 (641) 206-8880
- Website: CARDIAGTECH.NET
Don’t let a silent car radio ruin your driving experience. Reach out to CARDIAGTECH.NET and let us help you get back to enjoying your favorite tunes on the road! Our cutting-edge equipment and expert support will have you diagnosing and fixing audio issues like a pro. Contact us now and let’s get your sound system roaring!
