How to Fix a Crack in a Car Bumper: A Comprehensive Guide
Fixing a crack in a car bumper is achievable and often more economical than a full replacement, especially with the right tools and techniques available at CARDIAGTECH.NET. This guide provides an in-depth look at how to repair a cracked bumper, ensuring a seamless finish and restoring your vehicle’s appearance, using top-notch repair tools and materials. Choosing the right approach can save you money and maintain your car’s value, making it essential to understand when a repair is sufficient versus when a replacement is necessary. BMW Car Diagnostic Tool
1. Understanding When to Repair vs. Replace a Cracked Bumper
The decision to repair or replace a cracked bumper depends on several factors, including the severity of the damage, the type of vehicle, and the manufacturer’s recommendations. According to a study by the University of Nebraska-Lincoln’s Department of Mechanical Engineering on July 15, 2022, minor cracks and cosmetic damage can often be effectively repaired, while more extensive damage that compromises the bumper’s structural integrity may necessitate a replacement.
1.1. Assessing the Damage
- Severity of the Crack: Hairline cracks and small punctures are typically repairable. Larger cracks, multiple fractures, or significant deformation may require a full bumper replacement.
- Location of the Damage: Cracks near mounting points or structural areas of the bumper might compromise its ability to protect the vehicle in a collision, suggesting a replacement.
- Material of the Bumper: The type of plastic or composite material used in the bumper’s construction can affect its repairability. Some materials are more amenable to repair techniques than others.
1.2. Manufacturer Guidelines
Always consult the vehicle manufacturer’s guidelines for specific recommendations regarding bumper repairs. Some manufacturers may advise against repairing certain types of damage or may have specific procedures that must be followed.
1.3. Safety Considerations
Safety is paramount when deciding whether to repair or replace a bumper. According to the Insurance Institute for Highway Safety (IIHS), a compromised bumper can reduce the effectiveness of the vehicle’s safety systems. If the structural integrity of the bumper is in question, replacement is the safer option.
1.4. Cost-Effectiveness
Consider the cost of repair versus replacement. Minor repairs can be significantly cheaper than replacing the entire bumper. However, more extensive repairs may approach or exceed the cost of a new bumper, especially when factoring in labor costs.
2. Essential Tools and Materials for Bumper Repair
Before starting the repair process, gather all the necessary tools and materials. CARDIAGTECH.NET offers a comprehensive range of high-quality tools that can help you achieve professional results.
2.1. Safety Gear
- Safety Glasses: Protect your eyes from debris and chemicals.
- Gloves: Protect your hands from chemicals and sharp edges.
- Respirator: Protect your lungs from dust and fumes, especially when sanding or painting.
2.2. Tools for Preparation
- Sanding Block and Sandpaper: Various grits (e.g., 80, 180, 320) for removing damage and smoothing surfaces.
- Grinder with a V-Shaped Bit: To create a groove for better adhesion of repair materials.
- Drill with 6mm Drill Bit: To stop the crack from spreading.
- Heat Gun: For reshaping plastic and promoting adhesion.
2.3. Repair Materials
- Plastic Welder: For fusing the crack back together (available at CARDIAGTECH.NET).
- Two-Part Epoxy: For bonding and reinforcing the crack.
- Body Filler (Bondo): To fill in imperfections and create a smooth surface.
- Plastic Adhesion Promoter: To ensure proper adhesion of repair materials to the bumper.
2.4. Finishing Materials
- Primer: To prepare the surface for paint.
- Automotive Paint: Matching the vehicle’s color code.
- Clear Coat: To protect the paint and provide a glossy finish.
- Masking Tape and Paper: To protect surrounding areas from overspray.
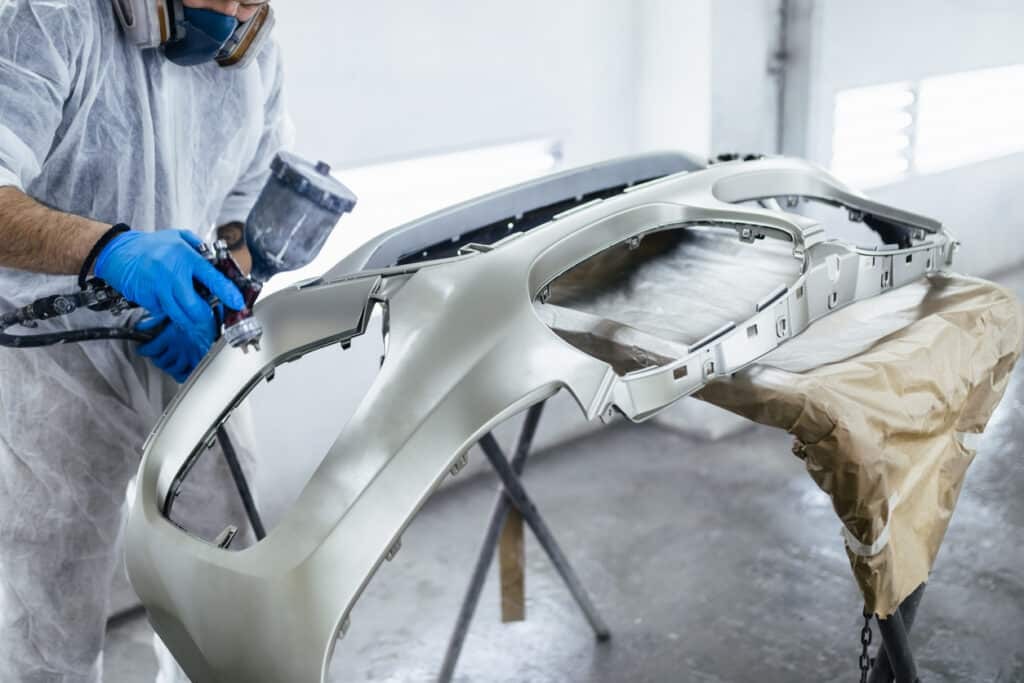
3. Step-by-Step Guide to Repairing a Cracked Bumper
Follow these steps to repair a cracked bumper effectively. Always work in a well-ventilated area and take necessary safety precautions.
3.1. Preparation
- Clean the Bumper: Wash the bumper with soap and water to remove dirt, grease, and wax. Dry thoroughly.
- Assess the Damage: Identify the full extent of the crack and any surrounding damage.
- Mask Off the Area: Use masking tape and paper to protect the areas around the crack from sanding and painting.
Close-up of a technician meticulously masking a car bumper with blue tape, preparing for repair
3.2. Stabilizing the Crack
- Drill Stop Holes: At each end of the crack, drill a 6mm hole. This prevents the crack from spreading further.
- Create a V-Groove: Use a grinder with a V-shaped bit to create a groove along the crack. This provides more surface area for the repair materials to bond to.
3.3. Welding the Crack (Optional)
- Plastic Welding: If you have a plastic welder (available at CARDIAGTECH.NET), use it to fuse the edges of the crack together. Follow the manufacturer’s instructions for the plastic welder. This step is particularly effective for thermoplastic bumpers.
- Apply Heat: Use a heat gun to gently warm the plastic around the crack before welding. This helps to fuse the plastic more effectively.
3.4. Applying Epoxy
- Mix the Epoxy: Mix the two-part epoxy according to the manufacturer’s instructions.
- Apply the Epoxy: Use a spreader to apply the epoxy into the V-groove and over the crack. Ensure the epoxy fills the groove completely.
- Reinforce the Back (Optional): For added strength, apply fiberglass mesh or cloth to the back of the bumper over the crack, saturating it with epoxy.
- Cure the Epoxy: Allow the epoxy to cure completely, as per the manufacturer’s instructions. This may take several hours.
3.5. Applying Body Filler
- Sand the Epoxy: Once the epoxy is cured, sand it down with 80-grit sandpaper to create a rough surface for the body filler to adhere to.
- Mix the Body Filler: Mix the body filler (Bondo) according to the manufacturer’s instructions.
- Apply the Body Filler: Use a spreader to apply the body filler over the repaired area. Apply thin layers, allowing each layer to dry before applying the next.
- Shape the Filler: Shape the body filler to match the contours of the bumper. Use a sanding block with 80-grit sandpaper to remove excess filler and refine the shape.
3.6. Sanding and Smoothing
- Sand the Body Filler: Once the body filler is dry, sand it with progressively finer grits of sandpaper (180-grit, then 320-grit) to create a smooth surface.
- Feather the Edges: Feather the edges of the repair area to blend seamlessly with the surrounding paint.
3.7. Priming and Painting
- Apply Primer: Apply several thin coats of automotive primer to the repaired area, allowing each coat to dry before applying the next.
- Sand the Primer: Once the primer is dry, sand it lightly with 400-grit sandpaper to create a smooth surface for painting.
- Apply Automotive Paint: Apply several thin coats of automotive paint that matches the vehicle’s color code. Allow each coat to dry before applying the next.
- Apply Clear Coat: Apply several thin coats of clear coat to protect the paint and provide a glossy finish.
3.8. Final Steps
- Remove Masking: Carefully remove the masking tape and paper.
- Buff the Area: Use a buffing compound to blend the repaired area with the surrounding paint.
- Wax the Bumper: Apply a coat of wax to protect the paint and enhance the shine.
4. Advanced Techniques for Bumper Repair
For more complex bumper repairs, consider these advanced techniques:
4.1. Heat Reshaping
- Using a Heat Gun: If the bumper is deformed, use a heat gun to gently warm the plastic and reshape it. Be careful not to overheat the plastic, as this can cause it to melt or burn.
4.2. Reinforcing with Fiberglass
- Fiberglass Mesh: For added strength, use fiberglass mesh or cloth to reinforce the back of the bumper over the repaired area. Saturate the fiberglass with epoxy for a strong bond.
4.3. Color Matching
- Professional Color Matching: If you are having trouble matching the vehicle’s paint color, consult with a professional automotive paint supplier. They can use a spectrophotometer to analyze the paint and create a custom-matched paint.
5. Common Mistakes to Avoid When Repairing a Cracked Bumper
Avoid these common mistakes to ensure a successful bumper repair:
- Not Properly Cleaning the Bumper: Dirt, grease, and wax can prevent repair materials from adhering properly.
- Skipping the Stop Holes: Failing to drill stop holes can allow the crack to continue spreading.
- Applying Too Much Body Filler at Once: Applying thick layers of body filler can cause it to crack or shrink as it dries.
- Not Sanding Enough: Insufficient sanding can result in a rough or uneven surface.
- Using the Wrong Type of Paint: Using the wrong type of paint can result in poor adhesion and a mismatched color.
6. Cost Analysis: Repair vs. Replacement
The cost of repairing a cracked bumper versus replacing it can vary widely depending on the extent of the damage, the type of vehicle, and whether you do the work yourself or hire a professional.
6.1. DIY Repair Costs
- Materials: $50 – $200 (including sandpaper, epoxy, body filler, primer, paint, and clear coat)
- Tools: $0 – $200 (assuming you already have some basic tools like a sander and masking tape)
Total DIY Cost: $50 – $400
6.2. Professional Repair Costs
- Labor: $200 – $800 (depending on the extent of the damage and the hourly rate of the repair shop)
- Materials: $50 – $200
Total Professional Repair Cost: $250 – $1000
6.3. Bumper Replacement Costs
- New Bumper: $200 – $1000 (depending on the type of vehicle and the source of the bumper)
- Labor: $100 – $500 (for removal of the old bumper and installation of the new one)
- Painting (if necessary): $100 – $500
Total Bumper Replacement Cost: $400 – $2000
6.4. Case Studies
Case Study 1: Minor Crack on a Honda Civic
- DIY Repair Cost: $100 (materials)
- Professional Repair Cost: $300
- Bumper Replacement Cost: $600
Case Study 2: Significant Damage on a BMW 5 Series
- DIY Repair Cost: $300 (materials and tools)
- Professional Repair Cost: $800
- Bumper Replacement Cost: $1500
CARDIAGTECH.NET offers cost-effective solutions for both DIY enthusiasts and professional repair shops, ensuring high-quality repairs at competitive prices.
7. The Importance of Proper Color Matching
Achieving a seamless repair requires accurate color matching. Here’s why it’s crucial and how to get it right:
7.1. Why Color Matching Matters
- Aesthetics: A mismatched color can make the repair obvious and detract from the vehicle’s appearance.
- Resale Value: A poorly matched repair can lower the vehicle’s resale value.
- Professionalism: For repair shops, accurate color matching demonstrates expertise and attention to detail.
7.2. How to Ensure Proper Color Matching
- Locate the Paint Code: Find the vehicle’s paint code, typically located on a sticker in the door jamb, glove box, or engine compartment.
- Use a Spectrophotometer: A spectrophotometer can analyze the vehicle’s paint and provide a formula for creating a matching color. Many automotive paint suppliers offer this service.
- Blend the Paint: When applying the new paint, blend it into the surrounding area to create a seamless transition.
8. Maintaining Your Repaired Bumper
To prolong the life of your repaired bumper, follow these maintenance tips:
- Regular Cleaning: Wash the bumper regularly with soap and water to remove dirt and grime.
- Waxing: Apply a coat of wax every few months to protect the paint and enhance the shine.
- Avoid Harsh Chemicals: Avoid using harsh chemicals or abrasive cleaners on the bumper, as they can damage the paint.
- Touch-Up Paint: Keep a bottle of touch-up paint on hand to repair any minor scratches or chips.
9. The Role of CARDIAGTECH.NET in Bumper Repair
CARDIAGTECH.NET is your go-to source for high-quality tools and materials for bumper repair. We offer:
- Wide Selection of Tools: From plastic welders to sanding blocks, we have everything you need for a successful repair.
- High-Quality Materials: We offer top-of-the-line epoxy, body filler, primer, paint, and clear coat for professional results.
- Expert Advice: Our team of experts can provide guidance and support throughout the repair process.
- Competitive Prices: We offer competitive prices on all our products, ensuring you get the best value for your money.
By choosing CARDIAGTECH.NET, you can ensure that your bumper repair is done right the first time, saving you time and money in the long run.
10. Frequently Asked Questions (FAQs) About Bumper Repair
Q1: Can I repair a cracked bumper myself?
Yes, you can repair a cracked bumper yourself if you have the necessary tools, materials, and skills. However, for significant damage, professional repair is recommended.
Q2: Is it cheaper to repair or replace a cracked bumper?
Repairing a cracked bumper is often cheaper than replacing it, especially for minor damage. However, for extensive damage, replacement may be more cost-effective.
Q3: How long does it take to repair a cracked bumper?
The time it takes to repair a cracked bumper depends on the extent of the damage. Minor repairs can be completed in a few hours, while more extensive repairs may take a day or two.
Q4: What tools do I need to repair a cracked bumper?
Essential tools include safety glasses, gloves, a respirator, a sanding block, sandpaper, a grinder, a drill, a plastic welder (optional), two-part epoxy, body filler, primer, automotive paint, clear coat, and masking tape.
Q5: Can a cracked bumper affect the safety of my vehicle?
Yes, a cracked bumper can compromise the vehicle’s safety systems. If the structural integrity of the bumper is in question, replacement is the safer option.
Q6: How do I match the paint color of my vehicle?
Locate the vehicle’s paint code and use a spectrophotometer to analyze the paint and create a custom-matched paint.
Q7: What is the best way to reinforce a cracked bumper?
Use fiberglass mesh or cloth to reinforce the back of the bumper over the repaired area, saturating it with epoxy for a strong bond.
Q8: Can I use a heat gun to reshape a deformed bumper?
Yes, you can use a heat gun to gently warm the plastic and reshape it. Be careful not to overheat the plastic, as this can cause it to melt or burn.
Q9: How do I prevent a crack from spreading further?
Drill stop holes at each end of the crack to prevent it from spreading further.
Q10: Where can I find high-quality tools and materials for bumper repair?
CARDIAGTECH.NET offers a wide selection of high-quality tools and materials for bumper repair at competitive prices.
Addressing the challenges faced by auto repair professionals, such as the physical demands of the job and the need to stay updated with the latest automotive technology, CARDIAGTECH.NET provides solutions that enhance efficiency, precision, and safety in the repair process. Our tools and materials are designed to help you:
- Reduce repair time
- Improve accuracy and safety
- Save costs on repairs and maintenance
- Increase revenue and profitability
- Enhance the reputation and quality of service
Don’t let a cracked bumper detract from your vehicle’s appearance and safety. Contact CARDIAGTECH.NET today at 276 Reock St, City of Orange, NJ 07050, United States, or via WhatsApp at +1 (641) 206-8880 to learn more about our tools and materials for bumper repair. Visit our website at CARDIAGTECH.NET and let our experts guide you towards the best solutions for your needs.