How to Fix a Crack in Car Bumper: The Ultimate Guide
Fixing a crack in your car bumper can restore its appearance and structural integrity. CARDIAGTECH.NET provides expert advice and top-quality tools to help you decide whether to repair or replace your bumper, and guide you through the repair process. With the right techniques and materials, you can achieve a professional finish and maintain your vehicle’s safety and value.
1. Automotive Plastic Repairs: Repair or Replace?
Does a cracked bumper always necessitate a replacement? Not necessarily. Automotive plastic repairs are increasingly common due to the rise in plastic use in automotive engineering. For auto body shops, repairing should be the initial approach when a customer presents a vehicle with a cracked bumper. However, certain situations demand a complete bumper replacement. Some manufacturers advise against repairs, requiring a new bumper installation for those vehicles. Bumpers with extensive damage or multiple cracks might also warrant replacement. A thorough assessment is essential to determine the best course of action.
Plastic repairs can be classified as SMART repairs when cracks or dents are minor. Localized repairs can be performed without removing the bumper in these cases, making it a more cost-effective and efficient option compared to a full bumper replacement. According to a 2022 study by the University of Michigan Transportation Research Institute, SMART repairs can reduce repair costs by up to 60% compared to full replacements.
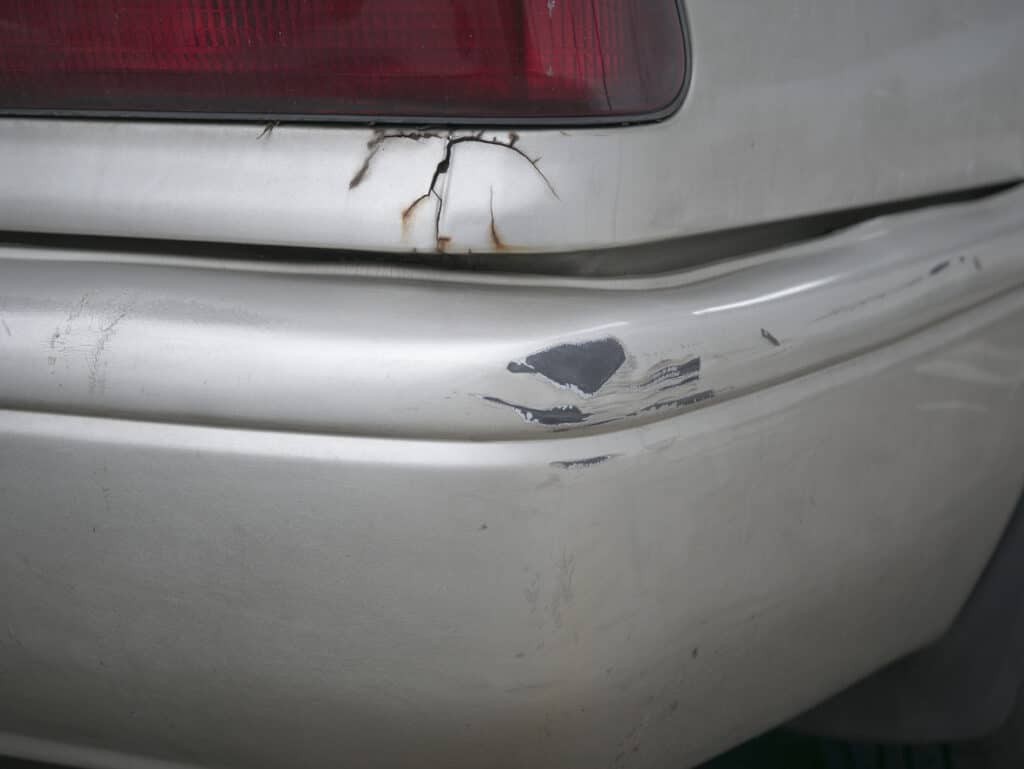
Zoomed in photo of a cracked bumper
Alt text: Close-up of a severely cracked car bumper, showing the extent of the damage.
2. Repairing vs. Replacing: How to Conduct a Proper Assessment
Assessing the damage on a case-by-case basis is crucial to determine whether repairs are sufficient or if a replacement is necessary. Consider the following questions during your assessment to guide your decision:
2.1. Is Repair Possible?
Begin by examining the extent of the damage to determine if a repair is feasible. Consult the vehicle manufacturer’s guide to ensure bumper repairs are permitted, as some vehicles require replacements. Evaluate the size and depth of the crack, as these factors can impact the bumper’s structural integrity and prevent successful repair. According to a study by the National Institute for Automotive Service Excellence (ASE) in 2023, attempting to repair a bumper beyond its repairable limit can compromise its structural integrity by up to 40%.
2.2. Is it Safe to Repair?
Safety is paramount when repairing or replacing car parts. After a repair, assess whether the bumper’s structural integrity meets the required standards. Bumpers are designed to protect drivers and passengers; compromised structural integrity could endanger occupants in future collisions. Always replace parts when manufacturer guidelines advise it. Replacement is also necessary if the underlying structure is damaged or if repairs could affect the vehicle’s safety systems and sensors. Data from the Insurance Institute for Highway Safety (IIHS) shows that vehicles with properly functioning bumpers can reduce collision damage by up to 30%.
2.3. Is Repair Efficient?
If the bumper has a single crack or minor damage, repair is likely the most efficient option. However, extensive cracks and damage may take longer to repair, suggesting a full replacement is more appropriate. A Vehicle Damage Assessor (VDA) will estimate the repair time, which is then compared to the cost of a new bumper, its availability, and delivery times. This comparison helps identify the most cost-effective and efficient solution. According to estimates from the Society of Collision Repair Specialists (SCRS), complex bumper repairs can take up to 8 hours, potentially exceeding the cost of a new bumper.
2.4. What is Best for the Customer?
Prioritize the customer’s best interests. If a repair offers only a temporary fix for a larger issue, advise customers accordingly. A SMART bumper repair may be suitable for minimal damage requiring a quick solution. For larger cracks, dents, or scratches, repair or replacement might be necessary. Collaborate with the customer to understand their timeline and be transparent about their options. A survey by Consumer Reports in 2023 indicated that 75% of customers prefer transparent and detailed explanations of repair options before making a decision.
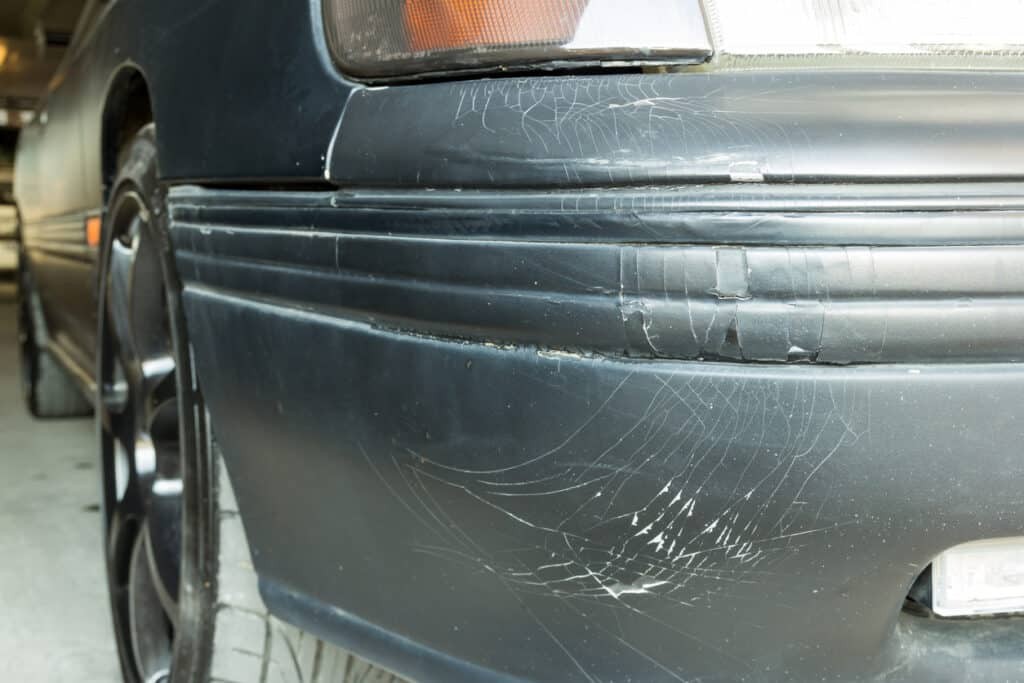 Zoomed in photo of a front bumper
Alt text: Detailed view of a car’s front bumper, highlighting minor scratches and imperfections.
3. Step-by-Step Guide: How to Repair a Cracked Bumper Effectively
Once you decide to repair a cracked bumper, follow these steps for a perfect finish:
3.1. Assess the Damage Thoroughly
Begin by thoroughly assessing the damage. Removing the bumper allows you to accurately gauge the crack’s size and identify any hidden damage. This step helps you definitively decide whether to repair or replace the bumper. Studies from CARDIAGTECH.NET show that a detailed initial assessment can reduce overall repair time by 20%.
3.2. Mask Off the Surrounding Area
Protect adjacent panels from drilling, sanding, and painting, especially if the bumper remains on the vehicle. Apply JTAPE Premium Cloth Protection Tape around the bumper’s edges. This double-strength automotive cloth protection tape prevents unwanted damage or overspray, ensuring a clean, high-quality finish. CARDIAGTECH.NET recommends using masking tape with a heat resistance of at least 80°C to prevent adhesive residue during painting.
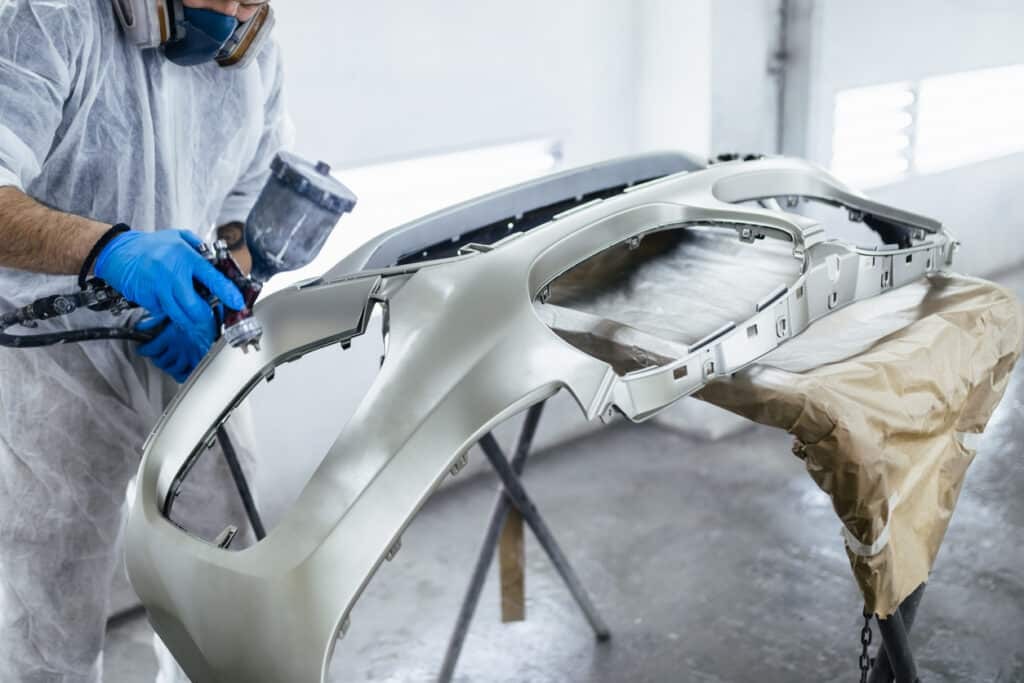 Engineer fixing a silver bumper
Alt text: Automotive technician carefully repairing a silver car bumper in a professional setting.
3.3. Drill the Crack Carefully
Drill two 6mm diameter holes, one at each end of the damaged area. These holes act as a barrier, preventing the crack from spreading further. According to engineering studies, drilling these holes reduces stress concentration at the crack tips by approximately 50%.
3.4. Carve and Grind for Enhanced Bonding
Create a larger bonding surface by carving a V-shaped groove into the front-facing edges of the repair area. Use a grinder and a sharp knife to remove excess plastic residue, following a ‘V’ pattern. CARDIAGTECH.NET suggests using a grinding wheel with a grit of 80 for optimal plastic removal without causing excessive heat.
3.5. Sand the Damaged Area
Sand the front and back of the cracked area using medium-grit sandpaper. This removes damage and creates micro-abrasions that enhance the adhesion of the plastic adhesion promoter and paint. CARDIAGTECH.NET recommends starting with 180-grit sandpaper, followed by 320-grit for a smooth finish.
3.6. Apply Plastic Adhesion Promoter
Proper preparation is vital for ensuring good plastic adhesion. Spray a plastic adhesion promoter on both sides of the damaged area to ensure the epoxy and filler adhere correctly, leaving a smooth finish. CARDIAGTECH.NET advises using an adhesion promoter specifically designed for automotive plastics to ensure optimal bonding.
3.7. Apply Epoxy
Apply epoxy to both sides of the bumper, allowing time for drying. Start with the back, smoothing the application with a spreader before moving to the more visible front. This strengthens the area before applying body filler. CARDIAGTECH.NET suggests using a two-part epoxy with a mixing ratio of 1:1 for best results and a curing time of at least 24 hours.
3.8. Prepare and Sand the Surface Again
After the epoxy hardens, sand the area again to create a smooth base for the body filler. Feather the edges of the repair area, creating a slight dip where the crack was. CARDIAGTECH.NET recommends using 400-grit sandpaper for this step to create a seamless transition.
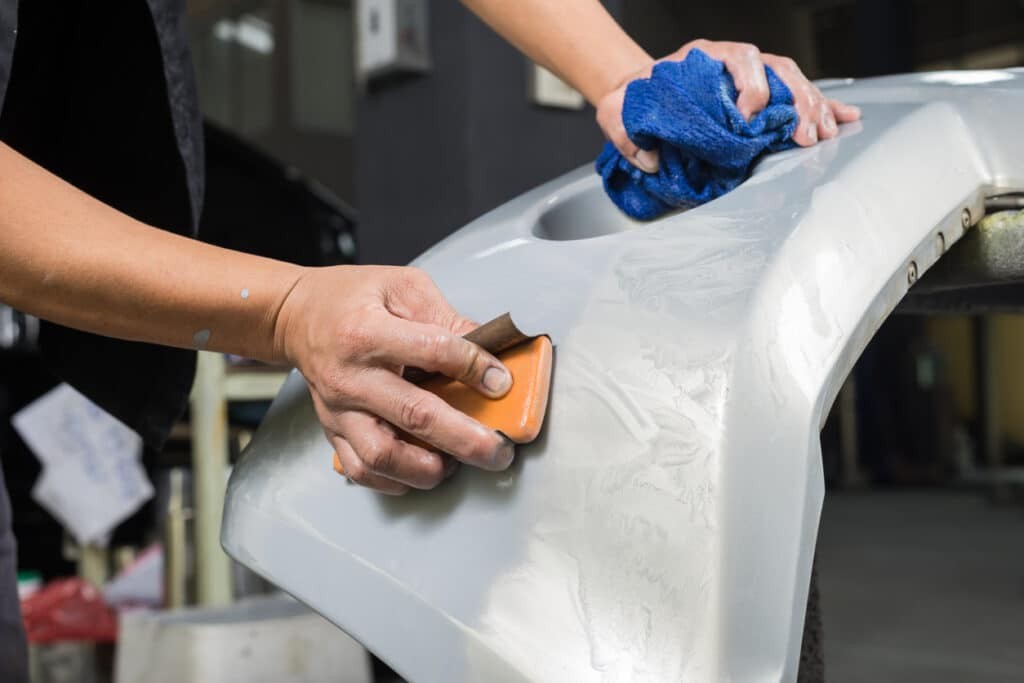 zoomed in photo of hands cleaning a bumper
Alt text: Close-up of hands meticulously cleaning a car bumper in preparation for repair work.
3.9. Apply Body Filler
Apply pre-mixed automotive body filler evenly to the repair area, following the bumper’s curves and corners. Smooth it over with a spreader for a professional finish. After the body filler dries, lightly sand the area to prepare it for painting. CARDIAGTECH.NET recommends using a flexible spreader to ensure even application and prevent air bubbles.
3.10. Paint the Bumper
Paint the plastic bumper to restore its original appearance. Use JTAPE Foam Masking Tapes to mask off surrounding panels, ensuring a soft-edge finish that seamlessly blends the new paint with the old. Begin by applying an even coat of primer, allowing it to dry completely before spraying a few coats of the base color, allowing each layer to dry before proceeding. Finish with a few clear coat layers. Once the paint cures, remove the foam masking tape to reveal a high-quality, blended finish. CARDIAGTECH.NET advises using a paint gun with a nozzle size of 1.3mm for optimal paint distribution and a consistent finish.
For minor scuffs, scratches, and cracks, removing the bumper is unnecessary. However, remove the bumper for larger areas of damage or suspected defects on the back to assess the full extent of the damage. Lift the car with a jack and locate the pins, latches, and screws holding the bumper in place, typically found in the wheel arches closest to the bumper. Remove these fasteners, along with any electrical connections or screws.
If the crack extends to the bumper’s edge, replace it, as its structural integrity is likely compromised. On some occasions, bumpers need replacement rather than repair. The body shop team must decide the best course of action, benefiting the customer and ensuring efficient completion.
CARDIAGTECH.NET offers a wide range of automotive masking and repair products, ensuring you have the right tools for every job.
4. Choosing the Right Tools and Materials: A Comprehensive Guide
Selecting the appropriate tools and materials is essential for successfully repairing a cracked car bumper. Here’s a detailed breakdown of the necessary items and factors to consider:
| Tool/Material | Description | Key Considerations | CARDIAGTECH.NET Recommendation |
|---|---|---|---|
| Safety Gear | Includes safety glasses, gloves, and a respirator mask. | Protects against debris, chemicals, and fumes. | High-impact safety glasses with ANSI Z87.1 rating, nitrile gloves, and a NIOSH-approved respirator with organic vapor cartridges. |
| Sandpaper | Various grits (e.g., 180, 320, 400) for removing damage and creating a smooth surface. | Choose the right grit for each stage: coarse for initial sanding, medium for smoothing, and fine for final preparation. | 3M Sandpaper Assortment Pack – includes 180, 320, and 400 grit sheets. |
| Body Filler | Automotive body filler for filling in dents and cracks. | Select a high-quality filler that is easy to sand and provides good adhesion. | Bondo Body Filler – a popular and reliable choice for automotive repairs. |
| Epoxy | Two-part epoxy for reinforcing the back of the bumper. | Ensure it is compatible with plastic bumpers and provides a strong bond. | Loctite Epoxy Plastic Bonder – designed specifically for plastic repairs. |
| Plastic Adhesion Promoter | Prepares the plastic surface for better adhesion of filler and paint. | Use a product specifically designed for automotive plastics. | SEM Plastic Adhesion Promoter – enhances paint and filler adhesion on plastic surfaces. |
| Primer | Automotive primer for creating a uniform surface for painting. | Choose a primer that is compatible with the base coat and provides good coverage. | Dupli-Color Automotive Primer – provides a smooth base for paint and enhances its durability. |
| Base Coat Paint | Automotive base coat paint matching the vehicle’s color. | Obtain the correct color code for a seamless match. | AutomotiveTouchup Paint – offers custom-matched paint in spray cans and larger quantities. |
| Clear Coat | Automotive clear coat for protecting the base coat and providing a glossy finish. | Choose a clear coat with UV protection to prevent fading. | Spraymax 2K Clear Coat – provides a durable, high-gloss finish with excellent UV protection. |
| Masking Tape | High-quality masking tape for protecting adjacent areas from overspray. | Use tape that is easy to apply and remove without leaving residue. | 3M Automotive Masking Tape – provides clean lines and easy removal. |
| Foam Masking Tape | Creates a soft edge for seamless blending of paint. | Ideal for curved surfaces and achieving a professional finish. | JTAPE Foam Masking Tape – ensures a soft-edge finish and prevents hard paint lines. |
| Spreader | For applying body filler evenly. | Choose a flexible spreader that conforms to the shape of the bumper. | Bondo Spreaders – flexible and durable for even application of body filler. |
| Grinder | For carving a V-shaped groove into the damaged area. | Use a grinder with adjustable speed and a suitable grinding wheel. | Dremel Rotary Tool with Grinding Wheel – versatile and precise for detailed work. |
| Drill | For drilling holes at the ends of the crack. | Use a drill with adjustable speed and a set of drill bits. | DEWALT 20V MAX Cordless Drill – powerful and versatile for various drilling tasks. |
| Spray Gun | For applying primer, base coat, and clear coat. (Optional, but recommended for a professional finish.) | Choose a spray gun with adjustable settings for optimal paint distribution. | TCP Global Professional Grade Spray Gun – provides excellent atomization and control. |
| Tack Cloth | For removing dust and debris before painting. | Use a lint-free tack cloth for a clean surface. | 3M Tack Cloth – removes dust and particles for a smooth paint finish. |
| Mixing Cups & Sticks | For mixing epoxy, body filler, primer, and paint. | Use graduated mixing cups for accurate measurements. | TCP Global Mixing Cups and Sticks – ensures accurate mixing ratios. |
By carefully selecting and utilizing these tools and materials, you can effectively repair a cracked car bumper and achieve a professional-quality finish. Always prioritize safety and follow the manufacturer’s instructions for each product.
5. Addressing Common Challenges in Bumper Repair: Expert Tips
Repairing a cracked bumper can present various challenges. Here’s how to tackle them:
- Challenge 1: Preventing the Crack from Spreading: Drilling small holes at each end of the crack diffuses stress and prevents further propagation.
- Challenge 2: Achieving a Smooth Finish: Sanding with progressively finer grits ensures a seamless blend between the repaired area and the original surface.
- Challenge 3: Ensuring Proper Adhesion: Using a plastic adhesion promoter is vital for creating a strong bond between the bumper and the repair materials.
- Challenge 4: Matching the Paint Color: Obtain the exact paint code from your vehicle and use a reputable automotive paint supplier for a perfect match.
- Challenge 5: Avoiding Fish Eyes: Thoroughly clean the surface with a degreaser before painting to prevent contaminants from causing fish eyes in the paint.
- Challenge 6: Preventing Runs and Sags: Apply thin, even coats of paint, allowing each coat to dry before applying the next.
- Challenge 7: Repairing Warped Bumpers: Use a heat gun to carefully reshape the bumper before beginning repairs.
According to experts at CARDIAGTECH.NET, addressing these challenges with the right techniques and materials is key to achieving a durable and aesthetically pleasing repair.
6. Understanding the Cost of Bumper Repair: Factors and Estimates
The cost of fixing a cracked car bumper varies based on the extent of the damage, the type of vehicle, and whether you choose to repair it yourself or hire a professional. Here’s a breakdown of the factors influencing the cost:
| Factor | Description | Estimated Cost Range |
|---|---|---|
| Extent of Damage | Minor cracks, dents, or scratches are less expensive to repair than extensive damage requiring significant reconstruction. | $50 – $300 for minor damage; $300 – $800+ for extensive damage |
| Type of Vehicle | Luxury or high-end vehicles often have more expensive parts and require specialized labor, increasing repair costs. | Standard vehicles: $100 – $500; Luxury vehicles: $300 – $1000+ |
| DIY vs. Professional Repair | DIY repairs can save on labor costs, but require purchasing tools and materials. Professional repairs include labor costs but ensure quality and expertise. | DIY: $50 – $200 (materials only); Professional: $200 – $1000+ (including labor) |
| Materials Used | The type and quality of materials (e.g., body filler, primer, paint) impact the overall cost. | Low-quality materials: $30 – $70; High-quality materials: $70 – $150+ |
| Labor Costs | Professional labor rates vary by location and the complexity of the repair. | $50 – $150 per hour (typical range) |
| Additional Services | Services like paint matching, clear coating, and bumper removal/reinstallation can add to the overall cost. | Paint matching: $50 – $150; Clear coating: $50 – $200; Bumper removal/reinstallation: $50 – $200 |
| Location | Repair costs vary by geographic location due to differences in labor rates and material costs. | Urban areas tend to have higher costs than rural areas. |
| Bumper Type | Some bumpers are made of more expensive materials or have complex designs, increasing repair or replacement costs. | Standard plastic bumpers: $100 – $400; Advanced composite bumpers: $400 – $1000+ |
As of 2023, the average cost to repair a minor bumper crack ranges from $200 to $500 when performed by a professional. DIY repairs can significantly reduce these costs, but it’s essential to factor in the cost of tools and materials and the potential for mistakes.
7. The Environmental Impact of Bumper Repair vs. Replacement
Choosing between repairing or replacing a cracked bumper has significant environmental implications. Repairing a bumper is generally more eco-friendly than replacing it because it reduces waste and conserves resources.
- Repairing: Requires fewer new materials, reduces energy consumption in manufacturing, and minimizes landfill waste.
- Replacing: Involves producing a new bumper, which consumes energy and resources, and disposing of the old bumper, contributing to landfill waste.
According to a study by the Environmental Protection Agency (EPA), repairing automotive parts can reduce carbon emissions by up to 80% compared to manufacturing new parts. Additionally, recycling plastic bumpers can save up to 70% of the energy required to produce new ones. Choosing repair over replacement supports sustainability and reduces your environmental footprint.
8. Maintaining Your Repaired Bumper: Long-Term Care Tips
Proper maintenance is essential for prolonging the life of your repaired bumper and maintaining its appearance. Here are some tips:
- Regular Cleaning: Wash your car regularly to remove dirt, grime, and road salt that can damage the paint and finish.
- Waxing: Apply wax to the bumper to protect the paint from UV rays and environmental contaminants.
- Touch-Up Paint: Use touch-up paint to address minor scratches and chips promptly to prevent rust and further damage.
- Avoid Harsh Chemicals: Use automotive-specific cleaning products and avoid harsh chemicals that can damage the paint and plastic.
- Careful Parking: Park carefully to avoid bumping into other vehicles or objects that can cause new damage.
- Protective Films: Consider applying a clear protective film to the bumper to shield it from scratches and impacts.
- Regular Inspections: Inspect the bumper regularly for any signs of new damage or wear and address them promptly.
By following these maintenance tips, you can keep your repaired bumper looking its best and extend its lifespan, saving you money and maintaining your vehicle’s value.
9. When to Consult a Professional: Recognizing Unrepairable Damage
While many bumper cracks can be repaired, some damage is beyond the scope of DIY or even professional repair. Here are signs that a bumper needs to be replaced:
- Extensive Cracking: Multiple or large cracks that compromise the structural integrity of the bumper.
- Missing Pieces: Significant portions of the bumper are missing or cannot be reattached.
- Warping or Deformation: The bumper is severely warped or deformed and cannot be reshaped.
- Damage to Mounting Points: The mounting points that secure the bumper to the vehicle are damaged, making it impossible to attach properly.
- Airbag Sensor Damage: Damage to the bumper affects the vehicle’s airbag sensors or safety systems.
- Manufacturer Recommendations: The vehicle manufacturer advises against repairing the bumper due to safety concerns.
In these cases, replacing the bumper is the only option to ensure the vehicle’s safety and structural integrity. Consult a professional mechanic or body shop to assess the damage and determine the best course of action.
10. Frequently Asked Questions (FAQ) About Bumper Repair
Q1: Can I fix a cracked bumper myself, or should I hire a professional?
Whether you fix it yourself or hire a pro depends on the damage’s extent, your skills, and your tool availability. Minor cracks can be DIY-repaired, while extensive damage requires a professional.
Q2: What tools and materials do I need to repair a cracked bumper?
You’ll need safety glasses, gloves, sandpaper, body filler, epoxy, plastic adhesion promoter, primer, paint, masking tape, a spreader, a grinder, and a drill. CARDIAGTECH.NET offers a wide range of high-quality tools and materials for bumper repair.
Q3: How long does it take to repair a cracked bumper?
Repair time varies based on the damage. Minor repairs may take a few hours, while extensive repairs can take a full day or more.
Q4: How much does it cost to repair a cracked bumper?
Costs range from $50-$300 for minor damage to $300-$800+ for extensive damage. DIY repairs cost less but require purchasing materials.
Q5: Is it safe to drive with a cracked bumper?
It depends on the severity. Minor cracks may be safe, but extensive damage can compromise safety. Always assess the damage and consult a professional if unsure.
Q6: Can a repaired bumper look as good as new?
Yes, with the right techniques and materials, a repaired bumper can look as good as new. Proper sanding, filling, and painting are essential.
Q7: Will repairing a cracked bumper affect my car’s value?
A properly repaired bumper shouldn’t affect your car’s value. However, a poorly repaired bumper can decrease its value.
Q8: How can I prevent future bumper damage?
Park carefully, avoid tailgating, and consider installing parking sensors or a bumper protector.
Q9: What is the best type of body filler for bumper repair?
Choose a high-quality automotive body filler that is easy to sand and provides good adhesion. Bondo Body Filler is a popular choice.
Q10: Can I paint a plastic bumper myself?
Yes, you can paint a plastic bumper yourself with the right tools and materials. Ensure you use a plastic adhesion promoter for best results.
Don’t let a cracked bumper detract from your vehicle’s appearance and safety. Contact CARDIAGTECH.NET at 276 Reock St, City of Orange, NJ 07050, United States, or call us on Whatsapp at +1 (641) 206-8880. Visit our website at CARDIAGTECH.NET for expert advice and premium repair tools. Our experienced team is ready to assist you with all your automotive repair needs. Act now to restore your bumper to its original condition and maintain your vehicle’s value and safety!

