**How To Fix a Dent on a Car Bumper: A Comprehensive Guide**
Fixing a dent on your car bumper can seem daunting, but with the right techniques and tools, it’s often manageable at home. CARDIAGTECH.NET offers the equipment you need to tackle these repairs efficiently, saving you time and money. Read on to discover expert methods for dent removal, explore essential tools for the job, and learn how to keep your car looking its best with our detailed guide and explore the range of automotive repair tools.
1. Understanding Car Bumper Dents
What exactly is a car bumper dent, and why does it happen?
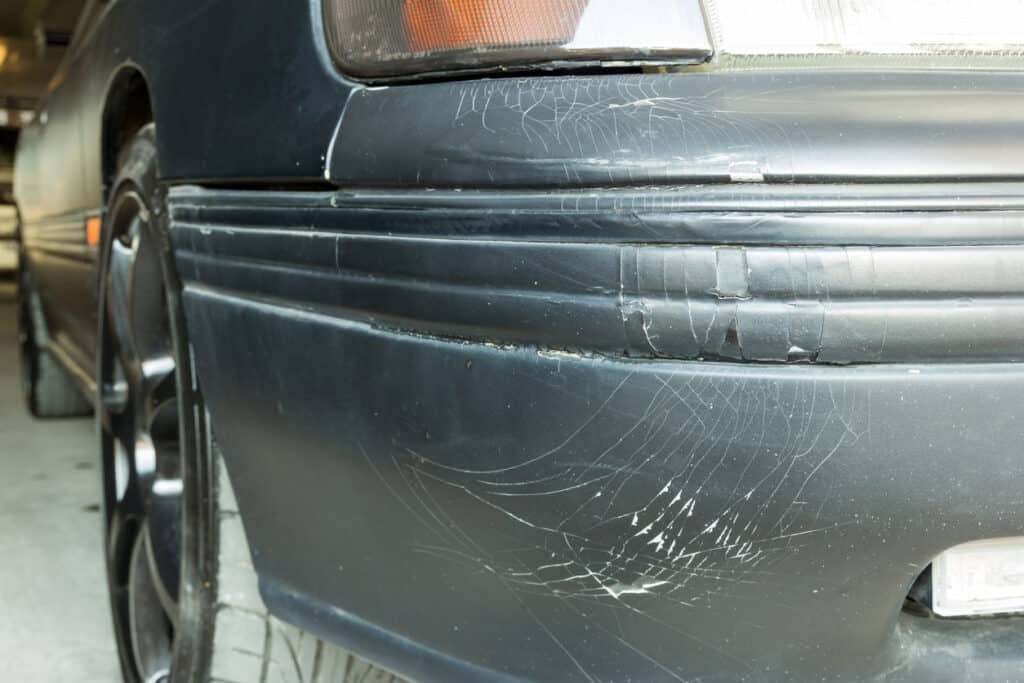
A car bumper dent is a deformation in the bumper material, typically caused by impact. These dents can range from minor cosmetic issues to more significant structural damage. According to a study by the Highway Loss Data Institute (HLDI), bumper damage accounts for a significant percentage of vehicle repair costs each year. Minor impacts, such as parking mishaps or collisions with objects, are common causes. Understanding the type and severity of the dent is crucial for determining the appropriate repair method.
- Minor Dents: These are usually shallow and don’t involve paint damage. They’re often the easiest to fix.
- Creased Dents: These dents have sharp creases and may require more advanced techniques.
- Dents with Paint Damage: These require not only dent removal but also paint repair to prevent rust and maintain the car’s appearance.
- Large or Deep Dents: These may compromise the structural integrity of the bumper and might be best left to professionals.
Choosing the right approach depends on the dent’s characteristics.
2. Assessing the Damage: Is It Worth Fixing Yourself?
Before you start popping that dent, it’s critical to honestly assess the damage. Is it a DIY job, or should you call in the pros?
First, consider the size and depth of the dent. Smaller, shallower dents are usually safe for DIY repair. However, larger, deeper dents, especially those with creases or paint damage, might require professional attention. A survey by the American Automobile Association (AAA) found that even minor bumper repairs can cost several hundred dollars at a body shop, so DIY can save money, but not if you botch the job.
Next, evaluate your skill level. Are you comfortable using tools and following detailed instructions? If you’re a novice, start with easier methods. If you’re unsure, it’s better to consult a professional to avoid further damage.
Finally, think about the materials involved. Plastic bumpers are more forgiving and easier to manipulate, while metal bumpers may require specialized tools and techniques.
If you decide to proceed with DIY repair, CARDIAGTECH.NET offers a range of tools and equipment to help you get the job done right.
3. Essential Tools and Equipment
What tools do you really need to fix that bumper dent?
Having the right tools can make all the difference. Here’s a list of essential tools and equipment you’ll need:
| Tool | Description | CARDIAGTECH.NET Recommendation |
|---|---|---|
| Plunger | A standard household plunger can be effective for popping out small, shallow dents. | Any standard plunger will work. |
| Heat Gun/Hair Dryer | Used to heat the plastic bumper, making it more pliable and easier to manipulate. | A heat gun with adjustable temperature settings for precision. |
| Dent Puller Kit | Includes various tools like suction cups, glue tabs, and a slide hammer to pull out dents without damaging the paint. | A comprehensive kit with multiple suction cup sizes and durable materials. |
| Rubber Mallet | Used to gently tap the bumper back into shape without causing further damage. | A mallet with a soft rubber head to prevent scratches. |
| Padded Pry Bar Set | Useful for reaching behind the bumper to push out dents from the inside. | A set with various sizes and angles for different access points. |
| Gloves | Protect your hands from heat, chemicals, and sharp edges. | Heat-resistant and chemical-resistant gloves. |
| Safety Glasses | Protect your eyes from debris and splashes. | Impact-resistant safety glasses. |
| Boiling Water | Can be used to soften plastic bumpers before attempting to push out dents. | A kettle or pot for heating water. |
| Dry Ice | When used with a hair dryer, can help metal dents pop back into place due to rapid temperature changes. | Available at most grocery stores; handle with extreme caution. |
| Tinfoil | Used to protect the paint when applying dry ice. | Standard kitchen tinfoil. |
| Car Detailing Supplies | Includes items like soap, water, microfiber cloths, and polish to clean and finish the repaired area. | High-quality car wash soap, microfiber cloths, and a good car polish. |
| Suction Cup Tool | Handheld suction cups that can adhere to the dented area, allowing you to gently pull the dent out. Ideal for shallow to medium-sized dents. | Suction cups with strong grip and easy-release mechanisms. Look for sets that offer different sizes. |
| Bondo Body Filler | A putty-like substance used to fill in imperfections after the dent is pulled out. Requires sanding and painting after application. Best for dents with minor surface irregularities. | Automotive-grade body filler that is easy to sand and paint. |
| Sandpaper Set | For smoothing out body filler and preparing the surface for painting. Different grits are needed for various stages of the sanding process. | A set with a range of grits from coarse to fine for optimal results. |
| Automotive Paint | To match the original color of your car. Requires proper application techniques, including priming, painting, and clear coating. | High-quality automotive paint that matches your car’s color code. |
| Primer | Enhances paint adhesion and provides a uniform surface for the paint to bond to. Essential for achieving a professional-looking finish. | Automotive-grade primer that is compatible with the paint you’re using. |
| Clear Coat | Protects the paint from UV damage and adds a glossy finish. Applied after the paint has dried. | High-quality clear coat for a durable and glossy finish. |
| Masking Tape | To protect surrounding areas from paint overspray. Ensures clean lines and prevents unwanted paint on unaffected surfaces. | Automotive-grade masking tape that is easy to apply and remove. |
| Respirator | To protect against harmful fumes when sanding and painting. Essential for safety when working with chemicals. | A respirator with filters suitable for automotive paints and chemicals. |
| Work Light | A portable light source to help you see the dent and surrounding area clearly. Essential for detailed work. | A bright LED work light with adjustable angles and a stable base. |
| Trim Removal Tools | Used to safely remove trim pieces around the bumper without causing damage. Essential for accessing the back of the bumper. | A set with various sizes and shapes to fit different trim pieces. |
Investing in quality tools from CARDIAGTECH.NET will not only make the repair process easier but also ensure better results.
4. DIY Methods for Fixing a Car Bumper Dent
Alright, let’s get down to business. What are the most effective DIY methods for fixing a car bumper dent?
Here are several proven techniques, along with step-by-step instructions:
4.1 The Plunger Method
This method works best for small, shallow dents.
- Prepare the Area: Clean the dented area and the plunger with soap and water.
- Wet the Surfaces: Wet both the plunger and the dent with water to create a good seal.
- Apply the Plunger: Place the plunger directly over the dent, ensuring it’s centered.
- Plunge: Push and pull the plunger repeatedly, maintaining a firm seal.
- Repeat: Continue until the dent pops out. This may take several attempts.
4.2 The Boiling Water Method
This is ideal for plastic bumpers that are pliable when heated.
- Boil Water: Heat a pot of water to boiling.
- Pour Water: Slowly pour the boiling water over the dented area.
- Reach Behind: Reach behind the bumper (if possible) and gently push the dent out. Wear gloves to protect your hands from the heat.
- Cool Down: Pour cold water over the area to cool and set the plastic.
4.3 The Hair Dryer Method
Another great option for plastic bumpers.
- Clean the Area: Ensure the dented area is clean and dry.
- Heat the Dent: Use a hair dryer to heat the dented area for several minutes, using sweeping motions. Keep the hair dryer about 6 inches away to avoid blistering the paint.
- Push Out the Dent: While the plastic is still warm, reach behind the bumper and gently push the dent out. Wear gloves to protect your hands.
4.4 The Hair Dryer and Dry Ice Method
This method is suitable for metal surfaces.
- Prepare the Area: Clean the dented area and cover it with tinfoil.
- Heat the Dent: Use a hair dryer to heat the dented area for about three minutes.
- Apply Dry Ice: Wearing gloves, apply a handful of dry ice to the tinfoil-covered area.
- Wait: After a few minutes, the dent should pop out.
- Repeat: Repeat the process if necessary.
4.5 The Suction Method
This method is effective if you have access to a vacuum cleaner and a bucket or pot.
- Prepare the Bucket: Cut a hole in the bottom of the bucket or pot.
- Attach to Dent: Use tape to attach the bucket or pot to the dented area, ensuring a good seal.
- Apply Vacuum: Position the vacuum cleaner over the hole. The suction should pull the dent out.
4.6 The Dent Puller Kit Method
Using a dent puller kit can provide more precise results.
- Clean the Area: Clean the dented area thoroughly.
- Apply Glue Tabs: Attach glue tabs to the dent using a glue gun.
- Attach Slide Hammer: Attach the slide hammer to the glue tab.
- Pull the Dent: Gently pull the dent out using the slide hammer.
- Remove Glue: Remove the glue residue with a plastic scraper and adhesive remover.
4.7 Using Bondo Body Filler
This method is useful for filling in minor imperfections after the dent is pulled out.
- Prepare the Area: Clean the area and sand it down to create a rough surface for the filler to adhere to.
- Mix the Filler: Mix the Bondo body filler according to the manufacturer’s instructions.
- Apply the Filler: Apply the filler to the dent, making sure to fill it completely.
- Let it Dry: Let the filler dry completely.
- Sand it Down: Sand the filler down to match the surrounding surface.
- Paint the Area: Paint the area to match the original color of your car.
Each method has its advantages, so choose the one that best suits the type and severity of your dent. And remember, CARDIAGTECH.NET is your go-to source for the tools and equipment you need to succeed.
5. Step-by-Step Guide: Fixing a Dent with a Heat Gun and Suction Cup
Let’s walk through a detailed example using a heat gun and suction cup, a popular and effective method.
- Gather Your Supplies: You’ll need a heat gun, suction cup tool, gloves, and a microfiber cloth.
- Clean the Area: Thoroughly clean the dented area with soap and water, then dry it with a microfiber cloth.
- Heat the Area: Put on your gloves and use the heat gun to heat the dented area. Move the heat gun in sweeping motions, keeping it about 6 inches away from the surface. Heat for 2-3 minutes to make the plastic more pliable.
- Attach the Suction Cup: Position the suction cup directly over the center of the dent. Ensure it has a firm grip.
- Pull the Dent: Gently pull the suction cup outward, applying steady pressure. You should feel the dent starting to pop out.
- Repeat if Necessary: If the dent doesn’t fully pop out, reheat the area and repeat the process.
- Cool Down: Once the dent is removed, cool the area with cold water to set the plastic.
- Inspect and Finish: Inspect the area for any remaining imperfections. Polish the surface with a car polish to restore shine.
This method is particularly effective for plastic bumpers, and with the right tools from CARDIAGTECH.NET, you can achieve professional-quality results.
6. The Science Behind Dent Removal
Why do these methods actually work? Let’s dive into the science.
- Heat Expansion: Applying heat, whether from boiling water or a heat gun, causes the plastic to expand and become more pliable. This makes it easier to manipulate and push the dent out.
- Thermal Contraction: Using dry ice or cold water after heating causes rapid contraction, which can help the material snap back into its original shape.
- Suction and Pressure: Plungers and suction cups create a vacuum that pulls the dent outward. Consistent pressure helps to reshape the material.
- Material Memory: Many plastics have a “memory” that allows them to return to their original shape when heated and manipulated.
Understanding the science behind these methods can help you choose the most effective technique and avoid causing further damage.
7. Choosing the Right Products at CARDIAGTECH.NET
With so many options available, how do you choose the right dent repair tools at CARDIAGTECH.NET?
Consider these factors:
- Type of Dent: Different tools are better suited for different types of dents. Small, shallow dents may only require a plunger or suction cup, while larger dents may need a dent puller kit.
- Bumper Material: Plastic bumpers are more forgiving and can be repaired with heat and pressure. Metal bumpers may require more specialized tools and techniques.
- Skill Level: If you’re a beginner, start with simpler tools and methods. If you’re more experienced, you can tackle more complex repairs with advanced kits.
- Budget: CARDIAGTECH.NET offers tools at various price points. Set a budget and choose the best tools within your range.
Here are some top recommendations from CARDIAGTECH.NET:
- For Small Dents: Suction Cup Dent Puller Kit
- For Plastic Bumpers: Heat Gun with Adjustable Settings
- For Metal Bumpers: Dent Puller Kit with Slide Hammer
- For Finishing: Car Detailing Supplies
8. Safety First: Protecting Yourself and Your Vehicle
Safety is paramount when performing any DIY car repair. Here are some essential safety tips:
- Wear Safety Gear: Always wear gloves and safety glasses to protect your hands and eyes.
- Work in a Well-Ventilated Area: If you’re using chemicals or paints, work in a well-ventilated area to avoid inhaling harmful fumes.
- Use Heat with Caution: Be careful when using heat guns or boiling water. Avoid overheating the plastic or blistering the paint.
- Handle Dry Ice Safely: Dry ice can cause severe burns. Always wear gloves and handle it with care.
- Disconnect the Battery: Before working on any electrical components, disconnect the car battery to prevent electrical shock.
- Use Proper Lifting Techniques: If you need to lift the car, use a jack and jack stands to support the vehicle safely.
- Keep a Fire Extinguisher Nearby: When working with flammable materials, keep a fire extinguisher nearby.
9. When to Call a Professional
Sometimes, DIY isn’t the answer. Know when to call a professional.
- Large or Deep Dents: If the dent is large, deep, or has creases, it’s best to consult a professional.
- Paint Damage: Dents with paint damage require specialized paint repair techniques to prevent rust and maintain the car’s appearance.
- Structural Damage: If the dent has compromised the structural integrity of the bumper, it’s crucial to seek professional repair.
- Lack of Experience: If you’re not comfortable with DIY repair, it’s better to avoid causing further damage and let a professional handle it.
According to a report by Consumer Reports, professional auto body shops have the expertise and equipment to restore your car to its pre-accident condition.
10. Maintaining Your Car Bumper to Prevent Future Dents
Prevention is better than cure. Here are some tips for maintaining your car bumper and preventing future dents:
- Park Carefully: Avoid parking too close to other cars or objects. Use parking sensors and cameras to help you navigate tight spaces.
- Install Bumper Guards: Bumper guards can provide an extra layer of protection against minor impacts.
- Be Mindful of Surroundings: Pay attention to your surroundings when driving and parking. Watch out for shopping carts, bicycles, and other potential hazards.
- Regular Inspections: Regularly inspect your bumper for any signs of damage. Address minor issues promptly to prevent them from becoming larger problems.
- Use a Car Cover: When parking outdoors, use a car cover to protect your bumper from the elements and minor impacts.
11. Real-World Examples: Dent Repair Success Stories
Let’s look at a couple of real-world examples of successful dent repairs:
- Case Study 1: John’s Plastic Bumper
John had a small dent on his plastic bumper from a minor parking incident. He used the boiling water method and a rubber mallet to gently push the dent out. The repair was quick, easy, and saved him hundreds of dollars. - Case Study 2: Maria’s Metal Bumper
Maria had a shallow dent on her metal bumper from a runaway shopping cart. She used a dent puller kit from CARDIAGTECH.NET to carefully pull the dent out. She then used Bondo body filler to smooth out the surface and painted the area to match the original color. The result was a professional-quality repair.
These stories illustrate that with the right tools and techniques, DIY dent repair can be both effective and rewarding.
12. Cost Analysis: DIY vs. Professional Repair
Let’s break down the costs of DIY vs. professional dent repair.
| Cost Item | DIY Repair | Professional Repair |
|---|---|---|
| Tools and Equipment | $50 – $200 | N/A |
| Materials | $20 – $50 | Included in Labor Costs |
| Labor | Your Time | $200 – $1000+ |
| Total Estimated Cost | $70 – $250 | $200 – $1000+ |
As you can see, DIY repair can save you a significant amount of money, especially for minor dents. However, professional repair may be necessary for larger or more complex damage.
13. Expert Tips and Tricks for Perfect Results
Want to achieve professional-quality results with your DIY dent repair? Here are some expert tips and tricks:
- Take Your Time: Don’t rush the repair process. Take your time and work carefully to avoid causing further damage.
- Use Proper Lighting: Ensure you have adequate lighting to see the dent and surrounding area clearly.
- Follow Instructions Carefully: Read and follow the instructions for each tool and product you use.
- Practice on a Test Area: If you’re using a new tool or technique, practice on a test area first to get a feel for it.
- Sand Smoothly: When sanding body filler, use progressively finer grits of sandpaper to achieve a smooth, seamless finish.
- Apply Paint Evenly: When painting, apply thin, even coats of paint to avoid runs and drips.
- Use a Clear Coat: Apply a clear coat to protect the paint and add a glossy finish.
14. The Future of Car Dent Repair Technology
What does the future hold for car dent repair technology?
- Advanced Materials: New bumper materials are being developed that are more resistant to dents and damage.
- Self-Healing Coatings: Self-healing coatings can automatically repair minor scratches and dents.
- Robotic Repair Systems: Robotic repair systems can perform precise and efficient dent repairs.
- AI-Powered Diagnostics: AI-powered diagnostics can assess the extent of the damage and recommend the best repair methods.
As technology advances, car dent repair will become even easier and more accessible.
15. Resources and Further Reading
Want to learn more about car dent repair? Here are some helpful resources:
- CARDIAGTECH.NET Blog: Our blog features articles, tutorials, and tips on car repair and maintenance.
- Automotive Repair Manuals: Repair manuals provide detailed instructions and diagrams for various car repair tasks.
- Online Forums: Online forums are a great place to ask questions, share tips, and connect with other car enthusiasts.
- YouTube Tutorials: YouTube is a treasure trove of car repair tutorials. Search for videos on dent repair to see the techniques in action.
- Local Community Colleges: Many community colleges offer automotive repair courses that can provide hands-on training.
16. Bumper Repair FAQs
Let’s tackle some frequently asked questions about car bumper repair:
16.1. How much does it cost to fix a bumper dent?
The cost to fix a bumper dent varies widely depending on the severity of the damage and whether you choose to do it yourself or hire a professional. DIY repairs can range from $50 to $250 for tools and materials. Professional repairs can cost between $200 and $1000 or more.
16.2. Can I fix a cracked bumper myself?
Fixing a cracked bumper is more complex than fixing a simple dent. While minor cracks can be repaired with body filler and paint, larger cracks may require professional attention. If the crack compromises the structural integrity of the bumper, it’s best to have it repaired by a professional.
16.3. What tools do I need to fix a car bumper dent?
Essential tools include a heat gun or hair dryer, a plunger or suction cup, a rubber mallet, a dent puller kit, Bondo body filler, sandpaper, automotive paint, and safety gear like gloves and safety glasses. CARDIAGTECH.NET offers a wide range of tools and equipment for car dent repair.
16.4. How long does it take to fix a bumper dent?
The time it takes to fix a bumper dent depends on the severity of the damage and your skill level. Minor dents can be repaired in a few hours, while larger dents may take a day or more. Professional repairs typically take one to three days.
16.5. Can heat really remove dents from a car bumper?
Yes, heat can be effective for removing dents from plastic bumpers. Applying heat makes the plastic more pliable, allowing you to manipulate it back into its original shape. However, it’s important to use heat with caution to avoid overheating the plastic or blistering the paint.
16.6. Is it worth fixing a bumper dent?
Whether it’s worth fixing a bumper dent depends on several factors, including the severity of the damage, the cost of repair, and your personal preferences. Minor dents may be worth fixing to maintain your car’s appearance and prevent further damage. Larger dents may require professional repair, which can be more expensive.
16.7. What is the best way to remove a dent from a plastic bumper?
The best way to remove a dent from a plastic bumper is to use heat to make the plastic more pliable, then gently push the dent out from behind. You can use a heat gun, hair dryer, or boiling water to heat the plastic.
16.8. Can a plunger really remove a dent from a car?
Yes, a plunger can be effective for removing small, shallow dents from a car. The plunger creates a vacuum that pulls the dent outward. However, this method is not suitable for larger or deeper dents.
16.9. How do professionals fix bumper dents?
Professionals use a variety of tools and techniques to fix bumper dents, including heat guns, dent puller kits, slide hammers, body filler, and paint. They also have the expertise to repair more complex damage, such as cracks and structural issues.
16.10. Where can I buy dent repair tools?
You can buy dent repair tools at CARDIAGTECH.NET. We offer a wide range of high-quality tools and equipment for car dent repair, from basic plungers and suction cups to advanced dent puller kits and body filler.
17. Call to Action: Get Your Dent Repair Tools Today!
Ready to tackle that bumper dent? Head over to CARDIAGTECH.NET to find the tools and equipment you need to get the job done right.
- Browse our selection of dent puller kits, heat guns, and car detailing supplies.
- Read our expert guides and tutorials for step-by-step instructions.
- Contact our customer support team for personalized recommendations.
Don’t let a dent ruin your car’s appearance. With the right tools from CARDIAGTECH.NET, you can restore your bumper to its original condition and save money in the process.
Address: 276 Reock St, City of Orange, NJ 07050, United States
WhatsApp: +1 (641) 206-8880
Website: CARDIAGTECH.NET
For personalized advice on the best dent repair tools for your specific needs, reach out to our friendly experts at CARDIAGTECH.NET via WhatsApp at +1 (641) 206-8880. We’re here to help you choose the perfect equipment to efficiently and effectively restore your car’s bumper, ensuring you achieve professional-quality results every time. Contact us today and let us guide you towards the best solution for your car repair needs!