How To Fix A Falling Car Headliner: Your Expert Guide

A falling car headliner is not only unsightly but also a sign of potential issues. At CARDIAGTECH.NET, we understand the importance of a well-maintained vehicle. Discover effective methods on How To Fix A Falling Car Headliner, restoring your car’s interior without costly replacements. Explore our selection of auto repair tools and equipment at CARDIAGTECH.NET, including headliner adhesives, upholstery tools, and more, to help you tackle this project.
1. Understanding Car Headliners
1.1. What Exactly is a Car Headliner?
A car headliner, often referred to as headlining, is the fabric meticulously secured to the interior roof of your vehicle. Its primary function extends beyond aesthetics, providing a smooth texture, noise absorption, and insulation against external temperatures. Headliners typically consist of multiple layers, including foam (often polyurethane) attached to a backing board. This construction not only softens the interior but also contributes to thermal and acoustic comfort. Without this crucial layer, a car parked under the sun can experience significantly higher interior temperatures, while wind noise becomes more pronounced, particularly at higher speeds. Furthermore, the headliner enhances the performance of customized audio systems tailored to specific vehicle interiors.
Car headliner secured to the roof framing
1.2. Common Reasons for Headliner Sagging
Over time, car headliners can start to sag, detracting from the vehicle’s interior appeal. This is often due to the adhesive failing, causing the fabric to detach from its backing board. Several factors can contribute to this issue, including:
- Heat and Sunlight: Exposure to extreme heat can melt the adhesive, causing the fabric to loosen and sag.
- Moisture: Humidity and leaks can infiltrate the headliner, leading to the foam backing absorbing moisture and losing its structural integrity. This results in warping and sagging.
- Poor Installation: Inadequate initial installation, characterized by insufficient glue or improper techniques, can lead to premature sagging.
- Physical Stress: Actions like playing, scratching, or pulling on the headliner, especially common with children or pets, can hasten the sagging process.
Addressing these issues promptly can prevent further damage and maintain your car’s value.
2. Step-by-Step Guide: How to Fix a Falling Car Headliner Without Removing It
Replacing a car headliner can be an expensive endeavor, especially for older vehicles. Luckily, there are methods to fix a falling car headliner without the need for full removal. These solutions offer a cost-effective way to restore your car’s interior. Here’s how:
2.1. Old-Fashioned Gluing Method
This method is best suited for minor sagging, particularly around the edges or corners of the headliner. You’ll need a specialized headlining adhesive, which is more effective than ordinary glue. Spray-can adhesives are recommended for even application and distribution.
Step-by-Step Guide
- Preparation: Clean the sagging area with a soft brush to remove any loose debris.
- Apply Adhesive: Spray the adhesive evenly onto both the sagging fabric and the exposed backing board.
- Reattach Fabric: Gently press the fabric back into place, ensuring a smooth, wrinkle-free surface.
- Secure: Use clamps or tape to hold the fabric in place while the adhesive dries. Allow ample drying time as instructed on the adhesive.
2.2. Pinning Method
This is a quick and inexpensive fix, especially effective for headliners that are partially detached. You’ll need sequin pins or similar pins.
Step-by-Step Guide
- Position Fabric: Gently push the sagging fabric back into its original position against the backing board.
- Secure with Pins: Insert the pins through the fabric and into the foam backing board, arranging them in a visually pleasing pattern.
- Even Distribution: Space the pins evenly to ensure the fabric remains in place.
2.3. Clear-Headed Twist Pins (Saggy Stoppers)
These pins, also known as saggy stoppers, offer a no-fuss solution to secure a sagging headliner, even when large sections are affected. They prevent damage to the headlining board, making them a safer option compared to glue or tacks.
Step-by-Step Guide
- Placement: Position the sagging headliner fabric against the backing board.
- Insert Pins: Twist the clear-headed pins through the fabric and into the backing board.
- Secure: Ensure the pins are firmly in place, holding the fabric securely against the board.
2.4. Steam Cleaner and Paint Roller Combo
This method utilizes steam to reactivate the adhesive and a paint roller to smooth out the fabric. It works best for sagging around the edges.
Step-by-Step Guide
- Steam Application: Use a car steam cleaner to gently apply steam to the sagging fabric.
- Reattach Fabric: As the adhesive softens, use a paint roller to smooth the fabric back into place, eliminating creases and wrinkles.
- Final Touches: Ensure the fabric is evenly attached without any air pockets or wrinkles.
These methods offer practical solutions for How To Fix A Falling Car Headliner, extending the life of your car’s interior without significant costs.
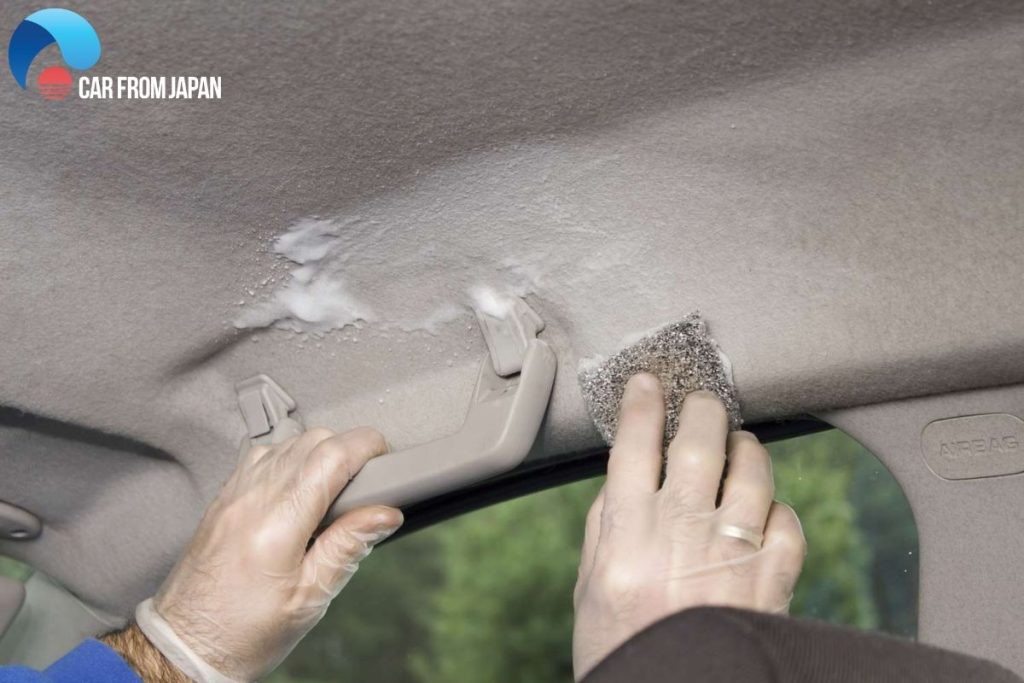 Fixing a sagging headliner
3. Essential Tools and Materials for Headliner Repair
Having the right tools and materials is critical for successful headliner repair. CARDIAGTECH.NET offers a wide range of auto repair tools to meet your needs. Here’s what you’ll typically need:
| Tool/Material | Description | Benefits |
|---|---|---|
| Headliner Adhesive | Special adhesive designed for headliner fabric | Strong bond, heat resistance, prevents future sagging |
| Sequin Pins | Small, decorative pins for securing fabric | Quick fix, easy to use, minimal damage to headliner |
| Clear-Headed Twist Pins | Pins designed to hold sagging fabric in place | Prevents damage, easy to install, ideal for larger areas of sagging |
| Car Steam Cleaner | Steamer for softening adhesive | Loosens old adhesive, helps reattach fabric smoothly |
| Paint Roller | Tool for smoothing fabric after steaming | Ensures even application, eliminates creases and wrinkles |
| Soft Brush | For cleaning the headliner surface | Removes debris, prepares surface for adhesive application |
| Clamps or Tape | For holding fabric in place while adhesive dries | Keeps fabric secure, ensures proper adhesion |
| Upholstery Tool Kit | A set of tools specifically designed for automotive upholstery repairs | Includes various tools for removing trim, clips, and fasteners without causing damage |
| Safety Glasses | To protect your eyes from debris and adhesive | Ensures eye safety during the repair process |
| Gloves | To protect your hands from adhesive and cleaning solutions | Protects skin from irritation and chemicals |
| Mask or Respirator | To avoid inhaling adhesive fumes | Ensures respiratory safety when working with adhesives and cleaning agents |
| Measuring Tape | To accurately measure areas for fabric or adhesive application | Provides precise measurements to avoid waste and ensure proper fit |
| Utility Knife or Scissors | For trimming excess fabric or adhesive | Allows for clean and precise cuts to achieve a professional finish |
| Screwdriver Set | Various screwdrivers for removing and reinstalling interior components | Facilitates the removal of panels, lights, and other parts to access the headliner |
| Pliers | For gripping and manipulating small parts and fasteners | Helps in removing and installing clips, fasteners, and other small components during the repair |
Purchasing quality tools from CARDIAGTECH.NET ensures longevity and precision in your repair efforts.
4. Preventing Future Sagging: Proactive Measures
Prevention is always better than cure. Here are some actionable tips to prevent your car headliner from sagging:
- Park in the Shade: Always try to park your car in shaded areas to avoid direct sunlight, which can melt the adhesive.
- Regulate Interior Temperature: Use window shades or covers to minimize heat buildup inside the car.
- Avoid Moisture: Regularly check for and repair any leaks to prevent moisture from damaging the headliner.
- Gentle Handling: Ensure that children and pets do not pull or scratch the headliner.
- Regular Cleaning: Clean your headliner regularly using gentle methods to prevent the buildup of dirt and grime.
- Professional Installation: If replacing the headliner, ensure it is installed by a professional using high-quality adhesives.
By following these tips, you can prolong the life of your car headliner and avoid costly repairs.
5. Understanding the Costs: Sagging Headliner Replacement vs. Repair
The cost of dealing with a sagging headliner can vary significantly depending on whether you choose to repair or replace it. Repairing a sagging headliner yourself using methods like gluing, pinning, or steaming can cost as little as $20 to $100 for materials such as adhesive, pins, and cleaning solutions. This option is highly cost-effective for minor sagging issues and can save you a considerable amount of money if you’re comfortable doing the work yourself.
On the other hand, professional headliner replacement can range from $300 to $1,000 or more, depending on the vehicle’s make and model, the complexity of the headliner design (e.g., наличия sunroof, dome lights), and labor costs in your area. Luxury vehicles or those with intricate headliner designs may incur even higher costs due to the increased complexity of the replacement process.
Here is a detailed cost breakdown for headliner replacement:
| Vehicle Type | Average Cost | Additional Factors |
|---|---|---|
| Simple Sedan/Hatchback/Coupe (e.g., Accord/Corolla) | $300 – $750 | Basic design, fewer accessories |
| Typical SUV/Crossover (e.g., RAV4/X-Trail) | $500 – $900 | Presence of sunroof or moonroof adds to complexity |
| Luxury Vehicle (e.g., BMW) | $1,000 – $6,000 | High-quality materials, complex design, specialized labor |
Choosing the right approach depends on the extent of the damage, your budget, and your comfort level with DIY repairs.
6. When to Seek Professional Help: Recognizing the Limits of DIY
While DIY repairs can be cost-effective, there are situations where professional help is necessary. Attempting complex repairs without the right knowledge and tools can lead to further damage and higher costs in the long run. Here are signs that it’s time to consult a professional:
- Extensive Sagging: If the headliner is sagging significantly across a large area, DIY methods may not provide a long-term solution.
- Damaged Backing Board: If the backing board is damaged or crumbling, it may need to be replaced, requiring professional expertise.
- Complex Design: Vehicles with intricate headliner designs or integrated features like sunroofs or lighting systems may require specialized knowledge to repair.
- Lack of Experience: If you’re uncomfortable with DIY repairs or lack the necessary tools and skills, it’s best to seek professional assistance.
Professional auto repair shops have the expertise and equipment to handle complex headliner repairs, ensuring a high-quality and lasting result.
7. Enhancing Car Interior: Beyond Headliner Repair
Maintaining your car’s interior goes beyond just fixing a sagging headliner. Consider these additional steps to enhance your car’s overall interior appeal:
- Upholstery Cleaning: Regularly clean your car seats and upholstery to remove stains and dirt.
- Carpet Cleaning: Use a vacuum and carpet cleaner to keep your car carpets fresh and clean.
- Dashboard and Trim Care: Use a protectant to keep your dashboard and trim looking new and prevent cracking.
- Air Fresheners: Use air fresheners or odor eliminators to keep your car smelling fresh.
- Detailing Services: Consider professional detailing services for a thorough cleaning and restoration of your car’s interior.
By investing in your car’s interior, you can enhance its comfort, appearance, and overall value.
8. Customer Success Stories: Real-Life Headliner Repair Experiences
Hearing from others who have successfully tackled headliner repairs can provide inspiration and confidence. Here are a few customer success stories:
- John from California: “My headliner was sagging badly, and I was quoted $800 for a replacement. I decided to try the pinning method, and it worked like a charm. Saved me a ton of money!”
- Sarah from Texas: “The steam cleaner and paint roller combo was a lifesaver. My headliner looks as good as new, and it only cost me a few dollars.”
- Mike from Florida: “I bought a headliner adhesive from CARDIAGTECH.NET, and it worked perfectly. My headliner is now firmly in place, and I couldn’t be happier.”
These stories highlight the effectiveness of DIY methods and the importance of using quality products from trusted suppliers like CARDIAGTECH.NET.
9. CARDIAGTECH.NET: Your Partner in Auto Repair Solutions
At CARDIAGTECH.NET, we are committed to providing high-quality auto repair tools and equipment to help you maintain your vehicle. Our selection includes everything you need for headliner repair, from adhesives and pins to steam cleaners and upholstery tools.
9.1. Why Choose CARDIAGTECH.NET?
- Wide Selection: We offer a comprehensive range of auto repair tools to meet your needs.
- Quality Products: Our products are sourced from trusted manufacturers, ensuring durability and performance.
- Expert Support: Our team of experts is available to provide guidance and support for your repair projects.
- Competitive Pricing: We offer competitive prices to help you save money on your auto repair needs.
- Customer Satisfaction: We are committed to providing excellent customer service and ensuring your satisfaction.
9.2. Featured Products for Headliner Repair
- Headliner Adhesive: High-strength adhesive for securing headliner fabric.
- Clear-Headed Twist Pins: Easy-to-use pins for holding sagging fabric in place.
- Car Steam Cleaner: Powerful steamer for softening adhesive and cleaning fabric.
- Upholstery Tool Kit: Comprehensive kit for removing and installing interior components.
Visit CARDIAGTECH.NET today to explore our full range of auto repair tools and equipment.
10. Legal and Safety Considerations for DIY Auto Repairs
When performing DIY auto repairs, it’s essential to prioritize safety and be aware of legal considerations. Here are some key points to keep in mind:
Safety Precautions:
- Wear Safety Gear: Always wear safety glasses, gloves, and a mask or respirator when working with adhesives, cleaning solutions, and power tools.
- Work in a Well-Ventilated Area: Ensure adequate ventilation to avoid inhaling harmful fumes.
- Follow Manufacturer Instructions: Carefully follow the instructions provided by the manufacturers of adhesives, cleaning solutions, and tools.
- Disconnect the Battery: Disconnect the car battery before working on electrical components to prevent accidental shocks.
- Use Proper Lifting Techniques: Use jacks and jack stands to safely lift and support the vehicle when necessary.
Legal Considerations:
- Local Regulations: Be aware of local regulations regarding auto repairs, including restrictions on working on vehicles in certain areas or disposing of waste materials.
- Warranty Implications: DIY repairs may void certain warranties, so check the terms of your vehicle’s warranty before proceeding.
- Insurance Coverage: Understand how DIY repairs may affect your insurance coverage. Some insurance policies may not cover damage caused by improper repairs.
By following these safety precautions and being aware of legal considerations, you can ensure a safe and compliant DIY auto repair experience.
11. Understanding Car Insurance Coverage for Headliner Damage
Most standard car insurance policies typically do not cover damage to the headliner unless it is the direct result of a covered event, such as a collision, fire, or vandalism. General wear and tear, aging, or sagging due to heat and humidity are usually excluded from coverage.
Comprehensive coverage, which protects against events like theft, vandalism, and natural disasters, might cover headliner damage if it is caused by one of these covered perils. However, even with comprehensive coverage, the damage must be directly linked to the covered event. For example, if a tree falls on your car and damages the headliner, comprehensive coverage would likely apply.
Extended warranties or specific interior protection plans may offer coverage for headliner damage, but these are typically separate from standard car insurance policies and come with their own terms and conditions.
It’s always best to review your specific insurance policy and consult with your insurance provider to understand the extent of your coverage for headliner damage.
12. Addressing Common Misconceptions About Headliner Repair
There are several common misconceptions about headliner repair that can lead to confusion or improper repair techniques. Let’s address some of these misconceptions:
Misconception 1: Any Glue Will Work for Headliner Repair
Reality: Using the wrong type of adhesive can lead to failure and further damage. Headliner adhesive is specifically designed to withstand high temperatures and provide a strong, lasting bond.
Misconception 2: Sagging Headliners Can Be Fixed with Hairspray or Fabric Softener
Reality: These household products are not designed for headliner repair and can cause staining or further deterioration of the fabric and adhesive.
Misconception 3: Once a Headliner Starts Sagging, It’s Beyond Repair
Reality: With the right tools and techniques, many sagging headliners can be successfully repaired without the need for replacement.
Misconception 4: Replacing a Headliner Is Always the Best Option
Reality: While replacement may be necessary in some cases, repair is often a more cost-effective and environmentally friendly option for minor to moderate sagging issues.
Misconception 5: All Headliners Are the Same and Can Be Repaired Using the Same Methods
Reality: Headliners vary in material, construction, and attachment methods. It’s essential to identify the type of headliner in your vehicle and use appropriate repair techniques.
By understanding these common misconceptions, you can make informed decisions about headliner repair and choose the most effective methods for your specific situation.
13. Headliner Repair vs. Replacement: A Detailed Comparison Table
Choosing between repairing and replacing a sagging headliner depends on several factors, including the extent of the damage, your budget, and your DIY skills. Here’s a detailed comparison table to help you make the right decision:
| Feature | Headliner Repair | Headliner Replacement |
|---|---|---|
| Cost | $20 – $100 (DIY) | $300 – $1,000+ (Professional) |
| Complexity | Low to Medium | Medium to High |
| Time Required | 1-3 hours | 4-8 hours |
| Skill Level | Beginner to Intermediate | Intermediate to Advanced |
| Tools/Materials | Adhesive, pins, steam cleaner, basic tools | New headliner, adhesive, specialized tools |
| Best For | Minor to moderate sagging, detached edges, small areas of damage | Extensive sagging, damaged backing board, complex designs |
| Longevity | Can last several years with proper care | Can last the life of the vehicle |
| Environmental Impact | Lower (avoids disposal of old headliner) | Higher (requires disposal of old headliner) |
| Customization Options | Limited to existing fabric | Allows for custom fabric and design choices |
| Vehicle Value Impact | Preserves vehicle value with cost-effective solution | Can increase vehicle value with a professional-grade replacement |
| DIY Feasibility | Highly feasible for most car owners | Requires specialized knowledge and tools |
| Potential Risks | Improper adhesive application, fabric damage | Damage to interior components during removal/installation |
By carefully considering these factors, you can determine whether headliner repair or replacement is the best option for your vehicle.
14. DIY vs. Professional Headliner Repair: Weighing the Options
Deciding whether to tackle a headliner repair yourself or hire a professional can be a tough decision. Here’s a breakdown of the pros and cons of each approach:
DIY Headliner Repair
Pros:
- Cost Savings: DIY repairs can save you hundreds of dollars compared to professional services.
- Convenience: You can perform the repair at your own pace and on your own schedule.
- Learning Experience: DIY repairs can be a rewarding learning experience, allowing you to gain new skills and knowledge.
- Personal Satisfaction: Successfully completing a DIY repair can provide a sense of accomplishment and pride.
Cons:
- Time Commitment: DIY repairs can take several hours, depending on the complexity of the project.
- Potential for Mistakes: Without proper knowledge and experience, you may make mistakes that could damage the headliner or other interior components.
- Tool and Material Costs: You may need to purchase specialized tools and materials, which can add to the overall cost of the project.
- Warranty Implications: DIY repairs may void certain warranties, so check the terms of your vehicle’s warranty before proceeding.
Professional Headliner Repair
Pros:
- Expertise and Experience: Professional technicians have the knowledge, skills, and experience to perform high-quality headliner repairs.
- Quality Materials: Professionals use high-quality materials and adhesives to ensure a long-lasting repair.
- Warranty Protection: Professional repairs often come with a warranty, providing peace of mind.
- Convenience: You can drop off your vehicle and have the repair done while you focus on other tasks.
Cons:
- Higher Cost: Professional headliner repairs can be significantly more expensive than DIY repairs.
- Scheduling Challenges: You may need to schedule an appointment and wait for the repair to be completed.
- Potential for Inconvenience: Dropping off and picking up your vehicle can be inconvenient.
- Loss of Control: You may not have as much control over the repair process as you would with a DIY project.
Ultimately, the best approach depends on your individual skills, budget, and preferences. If you’re comfortable with DIY repairs and have the time and resources to invest in the project, DIY headliner repair can be a rewarding and cost-effective option. However, if you lack the necessary skills or prefer to have the repair done by a professional, hiring a qualified technician may be the best choice.
15. Advanced Techniques: Headliner Replacement for Seasoned DIYers
For experienced DIY enthusiasts, tackling a full headliner replacement can be a rewarding challenge. Here are some advanced techniques to ensure a successful headliner replacement:
1. Careful Removal of Interior Components:
- Document the Process: Take photos or videos of each step to help you remember how to reassemble the interior.
- Use Specialized Tools: Invest in trim removal tools to avoid damaging plastic components.
- Label and Organize Parts: Label each part and store them in separate bags or containers to prevent confusion during reassembly.
2. Preparing the Headliner Board:
- Remove Old Fabric and Adhesive: Use a scraper or wire brush to remove all traces of the old fabric and adhesive from the headliner board.
- Repair Damaged Areas: Fill any cracks or holes in the headliner board with body filler or epoxy.
- Sand the Surface: Sand the surface of the headliner board smooth to ensure proper adhesion of the new fabric.
3. Applying the New Headliner Fabric:
- Measure and Cut the Fabric: Measure the headliner board and cut the new fabric slightly larger to allow for trimming.
- Apply Adhesive Evenly: Use a high-quality headliner adhesive and apply it evenly to both the headliner board and the fabric.
- Smooth the Fabric: Use a roller or brush to smooth the fabric onto the headliner board, working from the center outwards to avoid wrinkles and bubbles.
4. Trimming and Finishing:
- Trim Excess Fabric: Use a sharp utility knife or scissors to trim the excess fabric around the edges of the headliner board.
- Reinstall Interior Components: Carefully reinstall all of the interior components, following your documentation to ensure proper placement.
- Inspect and Adjust: Inspect the finished headliner for any imperfections and make any necessary adjustments.
5. Additional Tips for Success:
- Work in a Clean and Well-Lit Area: A clean and well-lit workspace will help you avoid mistakes and ensure a professional-looking result.
- Take Your Time: Don’t rush the process. Take your time and pay attention to detail to ensure a high-quality headliner replacement.
- Consult Online Resources: There are many online resources, including videos and forums, that can provide guidance and support for your headliner replacement project.
By following these advanced techniques, you can successfully replace your headliner and restore the interior of your vehicle to its former glory.
16. Eco-Friendly Options: Sustainable Headliner Repair Solutions
In today’s world, sustainability is increasingly important. Here are some eco-friendly options for headliner repair:
1. Use Recycled or Upcycled Materials:
- Recycled Fabric: Choose headliner fabric made from recycled materials, such as plastic bottles or textile scraps.
- Upcycled Fabric: Repurpose old fabric from clothing, blankets, or other items to create a unique and sustainable headliner.
2. Choose Eco-Friendly Adhesives:
- Water-Based Adhesives: Opt for water-based adhesives that are low in VOCs (volatile organic compounds) and safer for the environment.
- Natural Adhesives: Consider using natural adhesives made from plant-based materials, such as rubber or starch.
3. Practice Responsible Disposal:
- Recycle Old Fabric: Recycle your old headliner fabric whenever possible.
- Dispose of Waste Properly: Dispose of any waste materials, such as adhesive containers and cleaning supplies, according to local regulations.
4. Consider Repairing Instead of Replacing:
- Repair Minor Damage: Repairing minor damage to your headliner, rather than replacing it entirely, can save resources and reduce waste.
- Extend the Life of Your Headliner: Proper maintenance and care can extend the life of your headliner, reducing the need for frequent replacements.
5. Support Sustainable Businesses:
- Choose Eco-Conscious Suppliers: Purchase your headliner repair supplies from businesses that are committed to sustainability and environmental responsibility.
- Hire Green Mechanics: If you choose to hire a professional for your headliner repair, consider supporting mechanics who use eco-friendly practices.
By incorporating these eco-friendly options into your headliner repair project, you can reduce your environmental impact and contribute to a more sustainable future.
17. Frequently Asked Questions (FAQs) About Headliner Repair
17.1. How do I know if my headliner is sagging?
Common signs include visible drooping of the fabric, especially in warmer weather, and a noticeable gap between the fabric and the roof of the car.
17.2. Can I fix a sagging headliner myself?
Yes, you can fix a sagging headliner yourself using methods like gluing, pinning, or steaming, depending on the extent of the damage and your DIY skills.
17.3. What materials do I need to fix a sagging headliner?
Essential materials include headliner adhesive, pins (sequin or twist pins), a car steam cleaner, a paint roller, and basic tools like a soft brush, clamps, or tape.
17.4. How much does it cost to replace a car headliner?
Professional headliner replacement can range from $300 to $1,000 or more, depending on the vehicle’s make and model, the complexity of the design, and labor costs in your area.
17.5. Is it better to repair or replace a sagging headliner?
The decision depends on the extent of the damage, your budget, and your DIY skills. Repair is suitable for minor to moderate sagging, while replacement is necessary for extensive damage or a damaged backing board.
17.6. How can I prevent my headliner from sagging in the future?
Preventive measures include parking in the shade, regulating interior temperature, avoiding moisture, gentle handling, and regular cleaning.
17.7. What type of adhesive is best for headliner repair?
A specialized headliner adhesive designed to withstand high temperatures and provide a strong, lasting bond is recommended.
17.8. Can I paint my car headliner?
Painting the headliner is not recommended as it can cause stiffness and may not adhere well due to temperature changes inside the car.
17.9. Does car insurance cover headliner replacement?
Most standard car insurance policies do not cover headliner damage unless it is the direct result of a covered event, such as a collision, fire, or vandalism.
17.10. Where can I buy headliner repair materials?
You can purchase headliner repair materials from auto parts stores, online retailers like CARDIAGTECH.NET, and upholstery supply shops.
Conclusion
Knowing how to fix a falling car headliner not only saves you money but also enhances your vehicle’s aesthetic appeal. With the right tools and techniques, you can restore your car’s interior with ease. CARDIAGTECH.NET is your reliable partner for all auto repair needs, offering a wide range of high-quality tools and expert advice. Don’t let a sagging headliner detract from your driving experience. Visit CARDIAGTECH.NET today and take the first step towards restoring your car’s interior to its former glory.
Ready to tackle your sagging headliner? Contact us at +1 (641) 206-8880 or visit our website CARDIAGTECH.NET for expert advice and the best tools on the market. Our address is 276 Reock St, City of Orange, NJ 07050, United States. Let CARDIAGTECH.NET help you restore your car to its best condition.