How to Fix a Horn on Car: A Comprehensive Guide

Is your car horn not working? This comprehensive guide from CARDIAGTECH.NET provides step-by-step instructions on how to diagnose and fix a car horn, covering everything from checking for corrosion to replacing the horn itself. Learn how to troubleshoot a faulty car horn and get back on the road safely. These troubleshooting and repair tips can help you restore your horn and ensure vehicle safety with our expert advice and LSI keywords: car horn repair, automotive horn troubleshooting, and vehicle horn maintenance.
1. Identifying the Culprit: Common Car Horn Problems
What are the most frequent reasons a car horn malfunctions? The most common reasons a car horn stops working include corrosion, a blown fuse, a faulty relay, a broken switch, or wiring issues. Let’s delve into each of these potential causes to equip you with the knowledge to diagnose and tackle the problem effectively. According to a 2022 study by the National Institute for Automotive Service Excellence (ASE), electrical issues account for approximately 40% of car horn failures.
- Corrosion: Because horns are often located behind the front grille, they’re constantly exposed to the elements. Rain, dirt, road salt, and debris can corrode the horn’s internal components, leading to shorts and malfunctions.
- Blown Fuse: The electrical circuit that powers the horn includes a fuse designed to protect the system from overloads. If the fuse blows, the horn will stop working.
- Faulty Relay: A relay is an electrically operated switch that controls the flow of power to the horn. A failing relay may not properly send power to the horn, resulting in silence.
- Broken Switch: The horn switch, typically located in the steering wheel, can wear out or break over time. If the switch fails, it won’t activate the horn.
- Wiring Issues: Damaged, loose, or shorted wires can interrupt the electrical signal to the horn, preventing it from working. According to a report by J.D. Power in 2023, wiring problems are responsible for about 25% of car horn failures.
2. Initial Inspection: Checking for Corrosion
Where should I start when troubleshooting a non-working car horn? Begin your troubleshooting by visually inspecting the horn for corrosion, as this is a common cause of horn failure. This initial step can often save you time and effort by identifying a simple fix right away.
- Locate the Horn: Car horns are typically located behind the front grille, near the radiator. Refer to your vehicle’s service manual for the precise location if needed.
- Visual Inspection: Carefully examine the horn, looking for signs of corrosion on the terminals, wiring, and the horn itself. Corrosion often appears as a white or greenish buildup.
- Check Wire Connections: Ensure that the wire connections to the horn are secure and free from corrosion. Gently tug on the wires to check for looseness.
- Clean Connections: If you find corrosion, disconnect the wires from the horn. Use a wire brush or sandpaper to clean the terminals and connectors thoroughly. Apply a small amount of dielectric grease to prevent future corrosion.
- Reconnect and Test: Reconnect the wires to the horn and try honking the horn. If it works, you’ve solved the problem. If not, proceed to the next step.
Checking wire connections on a car horn
3. Fuse Examination: A Quick and Easy Check
How do I check if a blown fuse is the reason my car horn stopped working? Check the fuse box for any blown fuses related to the horn, as this is a simple and common cause of horn failure. Replacing a blown fuse is a quick and inexpensive fix.
- Locate the Fuse Box: The fuse box is usually located under the dashboard, in the engine compartment, or sometimes in the trunk. Refer to your vehicle’s owner’s manual for the exact location.
- Identify the Horn Fuse: Consult the fuse box diagram in your owner’s manual to identify the fuse that corresponds to the horn.
- Visual Inspection: Carefully inspect the fuse. If the wire inside the fuse is broken or the fuse appears burnt, it’s blown and needs to be replaced.
- Fuse Tester: Use a fuse tester to confirm whether the fuse is blown. A fuse tester will light up if the fuse is good and won’t light up if the fuse is blown.
- Replacement: Replace the blown fuse with a new fuse of the same amperage. The amperage rating is printed on the fuse itself.
- Test the Horn: After replacing the fuse, test the horn to see if it’s working. If the horn still doesn’t work, there may be a larger problem.
Fuse Types and Common Amperages
| Fuse Type | Common Amperages (Amps) | Description |
|---|---|---|
| Blade Fuse (ATO/ATC) | 5, 7.5, 10, 15, 20, 25, 30 | Most common type in modern vehicles; color-coded for easy identification. |
| Mini Blade Fuse | 5, 7.5, 10, 15, 20, 25, 30 | Smaller version of the blade fuse, used in tighter spaces. |
| Glass Tube Fuse | 1, 3, 5, 10, 15, 20, 30 | Older style, less common in modern vehicles; visible element inside glass tube. |
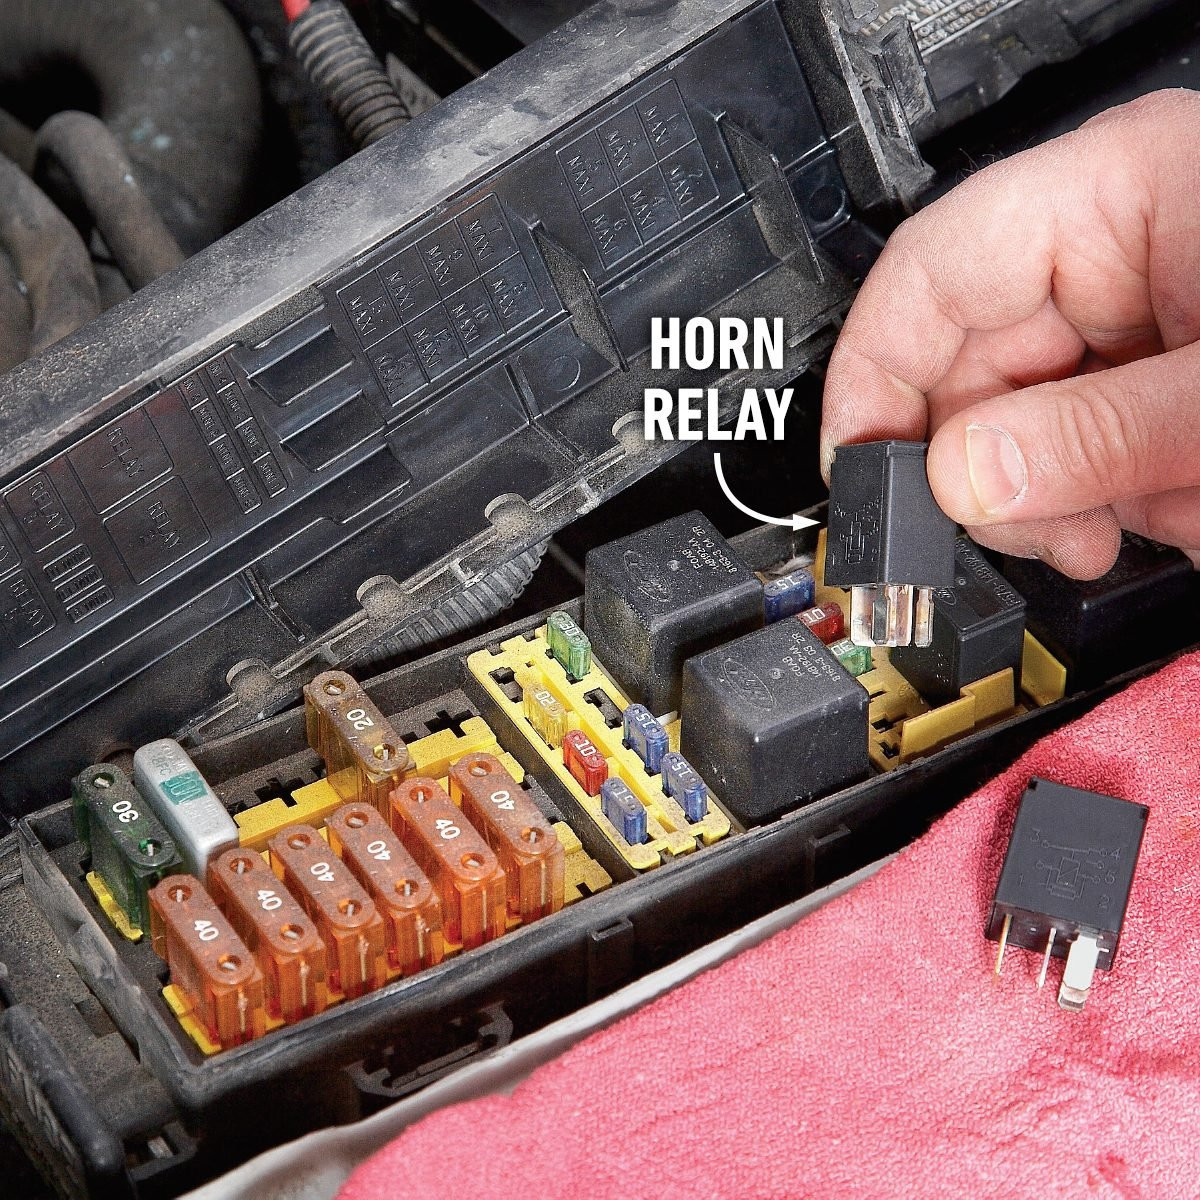
4. Relay Assessment: Swapping for Success
What should I do if the fuse is good, but the horn still doesn’t work? Try swapping the horn relay with a similar relay in the fuse box to see if that resolves the issue. A faulty relay can prevent power from reaching the horn.
- Locate the Relay Box: The relay box is usually located in the engine compartment or under the dashboard. Refer to your vehicle’s owner’s manual for the exact location.
- Identify the Horn Relay: Consult the relay box diagram in your owner’s manual to identify the relay that corresponds to the horn.
- Find a Compatible Relay: Locate another relay in the relay box that is identical to the horn relay. This could be a relay for the headlights, fog lights, or another non-essential system.
- Swap Relays: Carefully remove both relays and swap their positions.
- Test the Horn: Test the horn to see if it’s working. If the horn now works, the original relay is faulty and needs to be replaced.
- Replace the Relay: Purchase a new relay that matches the specifications of the original horn relay and install it in the correct location.
5. Direct Power Test: Isolating the Horn
How can I test the horn directly to see if the horn itself is the problem? Jump power directly to the horn using a fused jumper wire to bypass the vehicle’s wiring and determine if the horn is functional. This test isolates the horn and helps identify whether the issue lies within the horn itself or in the upstream wiring.
- Prepare a Fused Jumper Wire: Create a fused jumper wire by attaching battery clips to each end of a length of wire with an in-line fuse holder in the middle. Use a low-amperage fuse (e.g., 5 amps) to protect the circuit.
- Locate the Horn: Find the horn, typically located behind the front grille.
- Disconnect the Horn Connector: Disconnect the electrical connector from the horn.
- Connect the Jumper Wire: Attach one clip of the fused jumper wire to the positive (+) terminal of the car battery.
- Connect to the Horn: Carefully touch the other clip of the fused jumper wire to the positive (+) terminal on the horn.
- Observe the Horn: If the horn is working, it will sound. If the horn does not sound, it indicates that the horn itself is faulty and needs to be replaced.
- Disconnect the Jumper Wire: Once you’ve completed the test, disconnect the jumper wire from the horn and the car battery.
 Testing a car horn with a fused jumper wire
6. Ground Connection Check: Ensuring a Solid Path
Why is a good ground connection so important for the car horn to work? Ensure the horn has a good ground connection by cleaning the ground cables and connections thoroughly. A poor ground connection can prevent the horn from working correctly, even if all other components are functioning properly.
- Locate the Ground Connection: The horn typically has a ground wire attached to the vehicle’s chassis or frame.
- Inspect the Ground Connection: Examine the ground connection for signs of corrosion, rust, or looseness.
- Clean the Connection: Disconnect the ground wire from the chassis. Use a wire brush or sandpaper to clean the terminal and the contact point on the chassis.
- Reattach the Ground Wire: Reattach the ground wire securely to the chassis.
- Test the Horn: Try honking the horn to see if it works.
7. Steering Wheel Switch Examination: Accessing the Horn Switch
How do I access and test the horn switch in the steering wheel? To check the horn switch, you’ll need to access the switch located in the steering wheel and test it for continuity. This requires removing the airbag and steering wheel, so proceed with caution and disconnect the battery first.
- Disconnect the Battery: Disconnect the negative terminal of the car battery to prevent accidental airbag deployment.
- Remove the Airbag: Carefully remove the airbag from the steering wheel. This usually involves removing screws or clips located on the back of the steering wheel. Refer to your vehicle’s service manual for specific instructions.
- Disconnect the Horn Switch: Locate the horn switch, which is typically located behind the airbag. Disconnect the electrical connector from the switch.
- Test for Continuity: Use a multimeter to test the switch for continuity. When the switch is pressed, it should show continuity. If it doesn’t, the switch is faulty and needs to be replaced.
- Reassemble: Reconnect the horn switch, reinstall the airbag, and reconnect the battery.
8. Clock Spring Inspection: Maintaining Electrical Connection
What is the clock spring, and why is it important for the horn to function? Check the clock spring for damage or breakage, as it maintains the electrical connection to the horn and other components in the steering wheel. A faulty clock spring can cause the horn to fail, along with other issues like airbag malfunction.
- Locate the Clock Spring: The clock spring is located behind the steering wheel, between the steering column and the steering wheel itself.
- Remove the Steering Wheel: You’ll need to remove the steering wheel to access the clock spring. Refer to your vehicle’s service manual for specific instructions.
- Inspect for Damage: Carefully inspect the clock spring for any signs of damage, such as broken wires or a cracked housing.
- Test for Continuity: Use a multimeter to test the clock spring for continuity. Check the continuity between the input and output terminals for the horn circuit. If there is no continuity, the clock spring is faulty and needs to be replaced.
- Replace the Clock Spring: If the clock spring is damaged or faulty, replace it with a new one.
- Reassemble: Reinstall the steering wheel and reconnect the battery.
9. Wiring Harness Examination: Tracing the Electrical Path
How do I inspect the wiring harness for issues that could be causing the horn to fail? Inspect the wiring harness for any breaks, shorts, or damage that could be preventing the horn from working. Damaged wiring can interrupt the electrical signal to the horn.
- Locate the Wiring Harness: Trace the wiring harness from the horn back to the fuse box and relay box.
- Visual Inspection: Carefully inspect the wiring harness for any signs of damage, such as cuts, abrasions, or melted insulation.
- Check for Shorts: Use a multimeter to check for shorts in the wiring. Disconnect the battery and test for continuity between the horn wire and ground. If there is continuity, there is a short in the wiring.
- Repair or Replace: Repair any damaged wiring or replace the entire wiring harness if necessary.
- Test the Horn: After repairing or replacing the wiring, test the horn to see if it works.
10. Professional Assistance: When to Seek Expert Help
When should I consider taking my car to a professional mechanic to fix the horn? If you’ve exhausted all the troubleshooting steps and the horn still isn’t working, it may be time to seek professional assistance. Complex electrical issues or internal component failures may require specialized tools and expertise.
- Complex Electrical Issues: If you suspect a complex electrical problem, such as a short circuit or a faulty control module, a professional mechanic with advanced diagnostic tools can help.
- Airbag System Concerns: If you’re not comfortable working around the airbag system, it’s best to leave the repair to a professional to avoid accidental deployment and potential injury.
- Persistent Problems: If you’ve tried all the DIY solutions and the horn still doesn’t work, a professional mechanic can accurately diagnose and repair the problem.
According to RepairPal, the average cost to repair a car horn ranges from $88 to $166. This includes the cost of parts and labor. For more complex issues, the cost may be higher.
11. Utilizing CARDIAGTECH.NET for Your Automotive Needs
Where can I find high-quality tools and equipment for automotive repairs? CARDIAGTECH.NET offers a wide range of high-quality automotive tools and equipment to help you with your car horn repair and other automotive needs. From multimeters to wiring tools, CARDIAGTECH.NET has everything you need to get the job done right.
Here’s why CARDIAGTECH.NET stands out:
- Comprehensive Selection: A wide array of tools and equipment tailored for diagnosing and fixing car horn issues, from multimeters to wiring tools.
- High-Quality Products: Ensuring reliability and accuracy in your repairs with tools built to last.
- Expert Support: Access to professional advice and guidance to help you choose the right tools for your specific needs.
Essential Tools Available at CARDIAGTECH.NET
| Tool | Description | Use Case |
|---|---|---|
| Multimeters | Measures voltage, current, and resistance to diagnose electrical issues. | Testing fuses, relays, and wiring continuity. |
| Wiring Tools | Includes wire strippers, crimpers, and testers for repairing and maintaining electrical connections. | Repairing damaged wiring and ensuring secure connections. |
| Fuse Testers | Quickly identifies blown fuses without removing them from the fuse box. | Quickly checking the condition of fuses. |
| Relay Testers | Tests the functionality of relays to ensure they are working correctly. | Determining if a relay is faulty and needs replacement. |
| Diagnostic Scan Tools | Provides detailed information about the vehicle’s electrical system to diagnose complex issues. | Identifying issues with the car’s computer system that may be affecting the horn. |
12. Why Choose CARDIAGTECH.NET for Your Automotive Tools?
Why should I choose CARDIAGTECH.NET for my automotive tool needs? CARDIAGTECH.NET is your trusted partner for high-quality automotive tools, offering expert support and a comprehensive selection to ensure you have the right equipment for any repair job. With CARDIAGTECH.NET, you can confidently tackle your car horn repair and other automotive projects.
Here are key reasons to choose CARDIAGTECH.NET:
- Expertise: CARDIAGTECH.NET offers expert advice and guidance to help you choose the right tools for your specific needs.
- Quality: CARDIAGTECH.NET provides high-quality tools and equipment that are built to last, ensuring reliability and accuracy in your repairs.
- Selection: CARDIAGTECH.NET offers a comprehensive selection of automotive tools, so you can find everything you need in one place.
13. Step-by-Step Car Horn Replacement Guide
How do I replace a faulty car horn? If your car horn is faulty and needs replacement, follow these steps for a successful installation. Replacing a car horn is a straightforward process that can restore your vehicle’s safety and functionality.
- Gather Tools and Parts:
- New car horn
- Wrench or socket set
- Screwdriver
- Wire brush
- Dielectric grease
- Disconnect the Battery: Disconnect the negative terminal of the car battery to prevent electrical accidents.
- Locate the Horn: Find the horn, typically located behind the front grille.
- Remove the Old Horn:
- Disconnect the electrical connector from the horn.
- Remove the bolts or screws holding the horn in place.
- Carefully remove the old horn.
- Prepare the New Horn:
- Clean the mounting surface with a wire brush.
- Apply a small amount of dielectric grease to the electrical terminals.
- Install the New Horn:
- Position the new horn in the mounting location.
- Secure the horn with the bolts or screws.
- Connect the electrical connector to the horn.
- Test the Horn:
- Reconnect the battery.
- Test the horn to make sure it’s working.
14. Advanced Diagnostics: Using Scan Tools
Can diagnostic scan tools help with car horn problems? Yes, diagnostic scan tools can help identify underlying issues by reading error codes related to the horn circuit or other electrical systems. Advanced diagnostic scan tools can provide valuable insights into complex problems affecting the car horn.
- Connect the Scan Tool: Plug the scan tool into the OBD-II port, usually located under the dashboard.
- Read Error Codes: Turn on the ignition and follow the scan tool’s instructions to read any stored error codes.
- Interpret Codes: Consult the vehicle’s service manual or a reliable online resource to interpret the error codes.
- Troubleshoot: Use the error codes to guide your troubleshooting efforts. For example, a code related to the horn relay circuit could indicate a problem with the relay or wiring.
- Clear Codes: After repairing the issue, clear the error codes using the scan tool.
- Test the Horn: Test the horn to ensure it’s working correctly.
15. Safety Precautions: Working with Automotive Electrical Systems
What safety precautions should I take when working with automotive electrical systems? Always disconnect the battery before working on any electrical components, and be cautious when dealing with the airbag system. Automotive electrical systems can be dangerous if not handled properly.
- Disconnect the Battery: Disconnect the negative terminal of the car battery to prevent electrical shock and accidental airbag deployment.
- Airbag System: Be extremely cautious when working around the airbag system. Refer to the vehicle’s service manual for specific instructions, and avoid any actions that could trigger airbag deployment.
- Electrical Shorts: Avoid creating electrical shorts by being careful not to touch bare wires to the vehicle’s chassis or other metal surfaces.
- Protective Gear: Wear safety glasses and gloves to protect yourself from electrical shock and injury.
- Proper Tools: Use the right tools for the job, and make sure they are in good condition.
16. Regular Maintenance: Preventing Future Horn Problems
How can I prevent future car horn problems with regular maintenance? Regularly inspect and clean the horn and its connections to prevent corrosion and ensure proper functionality. Simple maintenance can extend the life of your car horn and prevent future problems.
- Visual Inspection: Inspect the horn and its connections regularly for signs of corrosion, damage, or looseness.
- Clean Connections: Clean the electrical connections with a wire brush and apply dielectric grease to prevent corrosion.
- Test the Horn: Test the horn periodically to ensure it’s working correctly.
- Address Issues Promptly: Address any issues promptly to prevent them from escalating into more significant problems.
17. Cost-Effective Solutions: DIY vs. Professional Repair
What are the pros and cons of DIY car horn repair versus professional repair in terms of cost? DIY car horn repair can save you money on labor costs, but professional repair ensures the job is done correctly and may be necessary for complex issues. Consider your skills and the complexity of the repair when deciding whether to DIY or seek professional help.
DIY Car Horn Repair:
- Pros:
- Lower cost (parts only)
- Convenience
- Opportunity to learn
- Cons:
- Time-consuming
- Requires tools and knowledge
- Potential for mistakes
Professional Car Horn Repair:
- Pros:
- Expert diagnosis and repair
- Guaranteed workmanship
- Convenience
- Cons:
- Higher cost (parts and labor)
- Requires scheduling and transportation
18. Understanding Car Horn Types: Choosing the Right Replacement
What are the different types of car horns available, and how do I choose the right one for my vehicle? Different types of car horns, such as electric, air, and novelty horns, offer varying sound levels and tones. Choosing the right replacement horn depends on your personal preferences and vehicle requirements.
Types of Car Horns:
- Electric Horns: The most common type, using an electromagnet to vibrate a diaphragm and create sound.
- Air Horns: Louder than electric horns, using compressed air to produce a powerful sound.
- Novelty Horns: Play a variety of sounds, such as musical tunes or animal noises.
Factors to Consider When Choosing a Replacement Horn:
- Sound Level: Electric horns typically produce 100-110 decibels, while air horns can reach 120 decibels or more.
- Tone: Car horns can have a high or low tone, or a combination of both.
- Compatibility: Make sure the replacement horn is compatible with your vehicle’s electrical system.
- Installation: Consider the ease of installation when choosing a replacement horn.
19. Troubleshooting Guide: Car Horn Still Not Working
What should I do if I’ve tried everything, and my car horn still isn’t working? If you’ve tried all the troubleshooting steps and the horn still doesn’t work, revisit each step to ensure nothing was missed. It may be time to consult a professional mechanic for further diagnosis and repair.
- Revisit Each Step:
- Double-check the fuse and relay.
- Verify the ground connection.
- Test the horn directly with a fused jumper wire.
- Inspect the wiring harness for damage.
- Test the horn switch and clock spring.
- Consult a Professional Mechanic: If you’ve exhausted all the DIY solutions, a professional mechanic can accurately diagnose and repair the problem.
20. Call to Action: Get Your Automotive Tools Today
Are you ready to tackle your car horn repair? Contact CARDIAGTECH.NET today for expert advice and high-quality tools to get the job done right. Don’t let a faulty car horn compromise your safety – equip yourself with the best tools and knowledge from CARDIAGTECH.NET.
- Address: 276 Reock St, City of Orange, NJ 07050, United States
- WhatsApp: +1 (641) 206-8880
- Website: CARDIAGTECH.NET
Our team at CARDIAGTECH.NET is dedicated to helping you maintain your vehicle’s safety and reliability. Contact us today to learn more about our products and services.
FAQ: Addressing Your Car Horn Questions
1. Why is my car horn not working?
Your car horn may not be working due to several reasons, including corrosion, a blown fuse, a faulty relay, a broken switch, or wiring issues. Checking each of these components can help diagnose the problem.
2. How do I check the fuse for the car horn?
Locate the fuse box (usually under the dashboard or in the engine compartment), identify the horn fuse using your owner’s manual, and inspect it for any signs of breakage or burning. Replace the fuse if it’s blown.
3. What is a car horn relay, and how do I test it?
A car horn relay is an electrical switch that controls the power to the horn. You can test it by swapping it with a similar relay in the fuse box to see if the horn starts working.
4. How can I test the car horn directly?
You can test the car horn directly by using a fused jumper wire to connect the horn terminals to the car battery. If the horn sounds, the horn itself is working.
5. What is a clock spring, and how does it affect the car horn?
The clock spring is a coiled wire assembly that maintains the electrical connection to the horn and other components in the steering wheel. A faulty clock spring can cause the horn to fail.
6. Can corrosion affect the car horn?
Yes, corrosion is a common cause of car horn failure. It can affect the horn terminals, wiring, and internal components, leading to shorts and malfunctions.
7. What tools do I need to fix a car horn?
Common tools needed to fix a car horn include a multimeter, wire stripper, crimper, fuse tester, socket set, and screwdriver. CARDIAGTECH.NET offers a wide range of high-quality automotive tools to help you with your repair.
8. How much does it cost to repair a car horn?
The cost to repair a car horn can range from $88 to $166, including parts and labor. However, the cost may be higher for more complex issues.
9. When should I seek professional help for a car horn problem?
If you’ve tried all the DIY solutions and the horn still doesn’t work, it’s best to seek professional help. Complex electrical issues or airbag system concerns may require specialized tools and expertise.
10. Where can I buy high-quality automotive tools for car horn repair?
You can buy high-quality automotive tools for car horn repair at CARDIAGTECH.NET. We offer a comprehensive selection of tools and equipment to help you with your automotive needs.