How To Fix A Metal Dent In Your Car Like A Pro
Fixing a metal dent in your car can bring back its pristine look and maintain its value. CARDIAGTECH.NET offers top-quality tools and expert advice to help you tackle this task efficiently. Restore your vehicle’s appearance with the right dent removal techniques and professional-grade equipment.
1. Understanding Metal Dents In Cars
1.1. Common Causes Of Metal Dents
Metal dents in cars are an unfortunate reality for many drivers. These unsightly blemishes can arise from a variety of everyday situations. Understanding these causes can help you take preventative measures and address the damage promptly. Here are some common culprits:
- Hailstorms: Hail can leave numerous small dents across your car’s surface, especially on the hood, roof, and trunk.
- Parking Lot Mishaps: Shopping carts, other car doors, and careless pedestrians can cause dents while your car is parked.
- Road Debris: Flying rocks, stones, and other debris kicked up by vehicles can impact your car’s body.
- Minor Collisions: Even a low-speed fender-bender can result in noticeable dents and damage.
- Vandalism: Sadly, intentional acts of vandalism can also lead to dents and scratches on your vehicle.
1.2. Types Of Metal Dents
Understanding the different types of metal dents that can occur on your car is essential for choosing the right repair method. Each type of dent requires a specific approach to ensure the best possible outcome. Here’s a breakdown of common metal dent types:
- Ding: A small, shallow dent, often caused by minor impacts like a pebble or door ding.
- Round Dent: A circular indentation typically caused by a blunt object, such as a ball or a fist.
- Sharp Dent: A small, deep dent with a defined edge, usually caused by a pointed object.
- Crease Dent: A long, linear dent that often involves paint damage, typically caused by a glancing blow from another vehicle or object.
- Complex Dent: A large dent with multiple bends and creases, often resulting from more significant impacts or collisions.
1.3. Why Timely Repair Is Important
Addressing metal dents promptly is crucial for several reasons. Delaying repairs can lead to more significant issues and higher costs in the long run. Here’s why timely dent repair is important:
- Preventing Rust: Dents that damage the paint can expose the bare metal to moisture, leading to rust formation.
- Maintaining Vehicle Value: Dents detract from your car’s appearance and reduce its resale value.
- Avoiding Further Damage: Small dents can worsen over time due to stress and environmental factors.
- Ensuring Safety: In some cases, dents can compromise the structural integrity of your vehicle.
- Aesthetic Appeal: Repairing dents promptly keeps your car looking its best, reflecting pride in ownership.
2. Essential Tools For DIY Metal Dent Repair From CARDIAGTECH.NET
2.1. Dent Puller Kits
Dent puller kits are indispensable for DIY metal dent repair, and CARDIAGTECH.NET offers a variety of high-quality options to suit different types of dents and skill levels. These kits typically include a range of tools designed to gently pull the dented metal back to its original shape without damaging the surrounding paint.
Types of Dent Puller Kits Available at CARDIAGTECH.NET:
| Kit Type | Description | Best For | Price Range |
|---|---|---|---|
| Suction Cup Pullers | Uses suction to adhere to the dented area and pull it out. | Small, shallow dents on relatively flat surfaces. | $20-$50 |
| Glue Puller Kits | Involves gluing tabs to the dented area and using a puller to extract the dent. | Medium to large dents, and areas where suction cups may not adhere well. | $40-$100 |
| Slide Hammer Pullers | Employs a slide hammer mechanism to apply force and pull out the dent. | Deep, stubborn dents that require more aggressive pulling force. | $60-$150 |
| Bridge Pullers | Features a bridge-like structure that distributes force evenly across the dented area. | Versatile for various dent sizes and shapes, providing controlled pulling. | $50-$120 |
Key Features to Look for in a Dent Puller Kit from CARDIAGTECH.NET:
- Durable Construction: Tools made from high-quality materials that can withstand repeated use.
- Variety of Attachments: A range of suction cups, glue tabs, and pulling heads to accommodate different dent sizes and shapes.
- Adjustable Pulling Force: Control over the amount of force applied to prevent over-pulling and further damage.
- User-Friendly Design: Ergonomic handles and easy-to-use mechanisms for comfortable and efficient operation.
2.2. Slide Hammers
Slide hammers are powerful tools designed for removing stubborn metal dents that require significant pulling force. CARDIAGTECH.NET offers a range of slide hammers known for their durability and effectiveness in tackling challenging dent repairs.
How Slide Hammers Work:
A slide hammer consists of a weighted hammer attached to a shaft with a handle. The shaft is connected to a pulling attachment that is secured to the dented area. By sliding the hammer along the shaft and forcefully striking the end, a strong pulling force is generated to extract the dent.
Types of Slide Hammers Available at CARDIAGTECH.NET:
| Slide Hammer Type | Description | Best For | Price Range |
|---|---|---|---|
| Standard Slide Hammer | A basic slide hammer with a single pulling attachment. | General dent pulling tasks on relatively accessible areas. | $30-$80 |
| Multi-Hook Slide Hammer | Features multiple hooks or attachments for pulling dents from various angles. | Dents in tight spaces or areas with complex shapes. | $50-$120 |
| Reverse Puller Slide Hammer | Designed for pulling dents from the inside of panels, often used in collision repair. | Accessing dents from the back side of the panel. | $70-$150 |
| Mini Slide Hammer | A smaller, more compact slide hammer for delicate dent pulling. | Small, precise dent repairs on sensitive areas. | $40-$100 |
Key Considerations When Choosing a Slide Hammer from CARDIAGTECH.NET:
- Weight and Size: Select a slide hammer with a weight and size that you can comfortably handle and maneuver.
- Attachment Options: Ensure the slide hammer comes with a variety of pulling attachments to suit different dent shapes and sizes.
- Durability: Look for a slide hammer made from high-quality steel or other durable materials to withstand heavy use.
- Ergonomic Design: Choose a slide hammer with a comfortable handle and smooth sliding action to reduce fatigue.
2.3. Heat Guns
Heat guns are valuable tools for DIY metal dent repair, especially when dealing with plastic bumpers or metal panels that require gentle heating to improve flexibility. CARDIAGTECH.NET offers a selection of heat guns designed for automotive applications, providing precise temperature control and reliable performance.
How Heat Guns Aid in Dent Repair:
- Plastic Bumper Repair: Heat guns soften the plastic, making it easier to push or pull dents back into shape.
- Metal Panel Flexibility: Gentle heating can help relieve stress in metal panels, allowing them to be more easily manipulated during dent repair.
- Adhesive Removal: Heat guns can soften adhesives used in dent pulling kits, making it easier to remove glue tabs and other attachments.
Features of Heat Guns Available at CARDIAGTECH.NET:
| Feature | Description | Benefit |
|---|---|---|
| Variable Temperature Settings | Allows you to adjust the heat output to suit different materials and applications. | Prevents overheating and damage to delicate surfaces. |
| Multiple Nozzle Attachments | Comes with various nozzle shapes and sizes for directing heat precisely. | Enables you to focus heat on specific areas for targeted repair. |
| Overload Protection | Automatically shuts off the heat gun if it overheats, preventing damage and ensuring safety. | Protects the tool and prevents potential hazards. |
| Ergonomic Design | Comfortable handle and balanced weight for easy handling and reduced fatigue. | Allows you to work comfortably for extended periods. |
Tips for Using Heat Guns Safely and Effectively:
- Wear Protective Gear: Always wear heat-resistant gloves and eye protection when using a heat gun.
- Maintain Distance: Keep the heat gun nozzle several inches away from the surface to prevent scorching or melting.
- Use in a Well-Ventilated Area: Avoid inhaling fumes by working in a well-ventilated space.
- Start with Low Heat: Begin with a low heat setting and gradually increase it as needed.
- Move the Heat Gun: Keep the heat gun moving to avoid concentrating heat on one spot.
2.4. Body Fillers And Putties
Body fillers and putties are essential for achieving a smooth, seamless finish when repairing metal dents, especially when the damage is extensive or involves imperfections. CARDIAGTECH.NET offers a range of high-quality body fillers and putties designed for automotive applications, providing excellent adhesion, workability, and durability.
How Body Fillers and Putties Work:
Body fillers and putties are paste-like substances that are applied to the dented area to fill in imperfections and create a smooth, even surface. Once hardened, they can be sanded and painted to match the surrounding area.
Types of Body Fillers and Putties Available at CARDIAGTECH.NET:
| Type | Description | Best For |
|---|---|---|
| Traditional Body Filler | A general-purpose filler for filling dents, scratches, and other imperfections. | Filling medium to large dents and creating a smooth base for painting. |
| Lightweight Body Filler | A lighter version of traditional body filler, easier to sand and ideal for larger areas. | Filling large areas and creating a smooth, lightweight finish. |
| Fiberglass Body Filler | Reinforced with fiberglass strands for added strength and durability, suitable for repairing damaged panels. | Repairing damaged panels and creating a strong, durable repair. |
| Glazing Putty | A fine-grained putty for filling small imperfections and pinholes, creating a flawless surface. | Filling small imperfections and creating a smooth, flawless surface before painting. |
| Self-Leveling Body Filler | A filler that spreads and levels itself, reducing the need for extensive sanding. | Filling large, uneven areas and creating a smooth, level surface with minimal effort. |
Tips for Using Body Fillers and Putties Effectively:
- Prepare the Surface: Clean and sand the dented area thoroughly to ensure proper adhesion.
- Mix Properly: Follow the manufacturer’s instructions for mixing the filler with the hardener.
- Apply in Thin Layers: Apply the filler in thin layers to prevent air bubbles and ensure even curing.
- Sand Smoothly: Sand the filler smooth using progressively finer grits of sandpaper.
- Prime Before Painting: Apply a primer to the filled area before painting to ensure proper adhesion and color match.
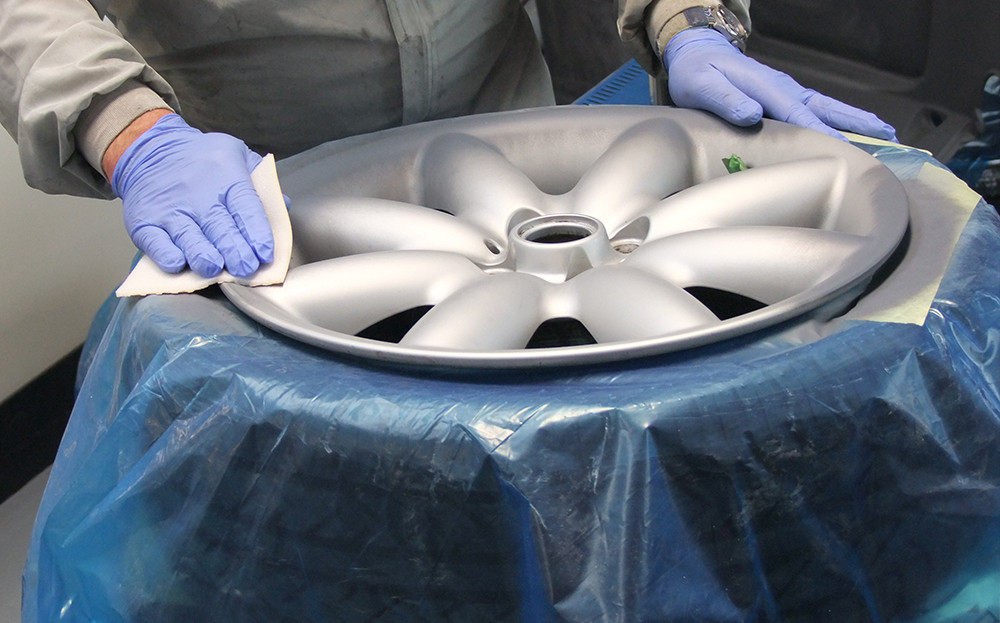
2.5. Sandpaper And Sanding Blocks
Sandpaper and sanding blocks are indispensable tools for achieving a smooth, flawless finish when repairing metal dents. CARDIAGTECH.NET offers a wide selection of high-quality sandpaper and sanding blocks designed for automotive applications, providing excellent cutting power, durability, and ease of use.
How Sandpaper and Sanding Blocks Are Used in Dent Repair:
- Surface Preparation: Sandpaper is used to remove rust, paint, and other contaminants from the dented area before applying body filler.
- Shaping Body Filler: Sandpaper is used to shape and smooth body filler after it has hardened, creating a seamless transition between the repaired area and the surrounding panel.
- Feathering Edges: Sandpaper is used to feather the edges of the repaired area, blending it seamlessly with the surrounding paint.
- Final Smoothing: Fine-grit sandpaper is used to smooth the primed surface before painting, ensuring a flawless finish.
Types of Sandpaper Available at CARDIAGTECH.NET:
| Sandpaper Type | Grit Range | Common Uses |
|---|---|---|
| Coarse Grit | 40-80 | Removing rust, paint, and heavy imperfections. |
| Medium Grit | 100-180 | Shaping body filler and removing scratches. |
| Fine Grit | 220-320 | Smoothing body filler and feathering edges. |
| Very Fine Grit | 400-600 | Final smoothing before priming. |
| Ultra Fine Grit | 800-1200 | Smoothing primer and preparing for paint. |
Tips for Sanding Effectively:
- Use the Right Grit: Start with a coarse grit to remove imperfections and gradually move to finer grits for smoothing.
- Use a Sanding Block: Wrap the sandpaper around a sanding block to distribute pressure evenly and prevent gouging.
- Sand in a Circular Motion: Sand in a circular motion to avoid creating lines or scratches.
- Keep the Sandpaper Clean: Clean the sandpaper frequently to prevent clogging and ensure efficient cutting.
- Wear a Dust Mask: Protect yourself from dust and debris by wearing a dust mask.
3. Step-By-Step Guide: Fixing A Metal Dent
3.1. Preparation And Safety Measures
Before embarking on the process of fixing a metal dent in your car, meticulous preparation and adherence to safety measures are paramount. This ensures not only the quality of the repair but also your personal well-being.
- Gather Your Tools and Materials: Assemble all the necessary tools and materials, including a dent puller kit, slide hammer, heat gun, body filler, sandpaper, sanding blocks, cleaning supplies, and safety gear.
- Clean the Dented Area: Thoroughly clean the dented area with soap and water to remove dirt, grease, and other contaminants. Dry the area completely with a clean microfiber cloth.
- Inspect the Dent: Carefully inspect the dent to assess its size, shape, and depth. Identify any sharp edges or creases that may require special attention.
- Protect Surrounding Areas: Use painter’s tape and masking paper to protect the surrounding paint and trim from damage during the repair process.
- Wear Safety Gear: Always wear safety glasses, gloves, and a dust mask to protect yourself from flying debris, chemicals, and dust.
- Work in a Well-Ventilated Area: Ensure adequate ventilation to avoid inhaling fumes from body filler, paint, and other chemicals.
3.2. Step 1: Accessing The Dent
The initial step in fixing a metal dent involves gaining access to the damaged area. This might seem straightforward, but it requires careful consideration to avoid causing further harm.
- Evaluate Accessibility: Assess whether the dent is easily accessible from the exterior or if it requires accessing the panel from the inside.
- Remove Obstructions: Remove any trim, moldings, or interior panels that may obstruct access to the dent. Use appropriate tools to avoid damaging these components.
- Consider Internal Access: If the dent is located in a closed panel, explore options for accessing it from the inside. This may involve removing interior trim or drilling a small access hole.
- Use Specialized Tools: If necessary, use specialized tools such as long reach dent repair tools or inspection cameras to reach труднодоступных areas.
- Take Precautions: Exercise caution when accessing dents in areas with electrical wiring or airbags. Disconnect the battery and take appropriate safety measures to avoid injury.
3.3. Step 2: Applying Heat (If Applicable)
In certain situations, applying heat can be a beneficial step in the process of fixing a metal dent. Heat can help to soften the metal, making it more pliable and easier to manipulate. However, it is essential to use heat with caution and avoid overheating the panel, which can damage the paint or weaken the metal.
- Determine if Heat is Necessary: Assess whether the dent is located in an area where heat may be helpful. This is often the case with plastic bumpers or metal panels that have a lot of tension or stress.
- Use a Heat Gun: Use a heat gun to apply gentle heat to the dented area. Keep the heat gun moving and avoid concentrating heat on one spot for too long.
- Maintain Distance: Hold the heat gun several inches away from the panel to prevent overheating.
- Check Temperature: Periodically check the temperature of the panel with your hand to ensure it does not get too hot.
- Work in Stages: Apply heat in stages, allowing the panel to cool slightly between applications.
- Use Protective Gear: Wear heat-resistant gloves to protect your hands from burns.
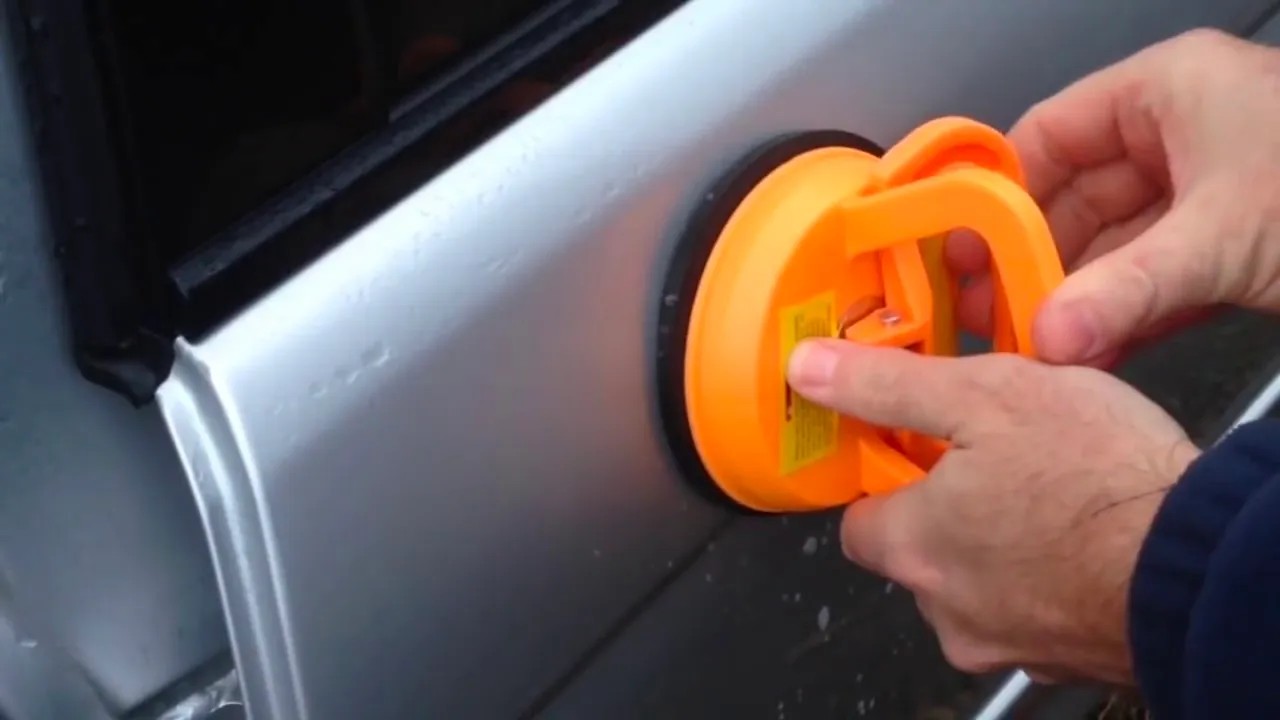
3.4. Step 3: Pulling The Dent
The core of the dent repair process involves carefully pulling the dent back to its original shape. There are several methods for pulling dents, each with its own advantages and disadvantages.
- Suction Cup Puller: For small, shallow dents on relatively flat surfaces, a suction cup puller may be sufficient. Attach the suction cup to the dented area and gently pull the dent outward.
- Glue Puller Kit: For medium to large dents, or areas where suction cups may not adhere well, a glue puller kit is a good option. Glue tabs to the dented area and use a puller to extract the dent.
- Slide Hammer: For deep, stubborn dents that require more aggressive pulling force, a slide hammer may be necessary. Attach a pulling attachment to the dented area and use the slide hammer to generate a strong pulling force.
- Bridge Puller: A bridge puller is versatile for various dent sizes and shapes, providing controlled pulling. It features a bridge-like structure that distributes force evenly across the dented area.
- Work Slowly and Carefully: Regardless of the method used, work slowly and carefully to avoid over-pulling the dent or damaging the surrounding paint.
3.5. Step 4: Applying Body Filler (If Necessary)
In cases where the dent is too deep or complex to be completely removed by pulling, body filler may be necessary to restore the panel to its original shape. Body filler is a paste-like substance that is applied to the dented area to fill in imperfections and create a smooth, even surface.
- Clean and Prepare the Surface: Clean the dented area with soap and water to remove dirt, grease, and other contaminants. Sand the area with coarse-grit sandpaper to create a rough surface for the body filler to adhere to.
- Mix the Body Filler: Follow the manufacturer’s instructions for mixing the body filler with the hardener. Mix only the amount of body filler that you can use in a short period of time, as it will harden quickly.
- Apply the Body Filler: Use a plastic spreader to apply the body filler to the dented area. Apply the filler in thin layers, allowing each layer to dry before applying the next.
- Overfill Slightly: Overfill the dent slightly to allow for sanding.
- Allow to Dry: Allow the body filler to dry completely according to the manufacturer’s instructions.
3.6. Step 5: Sanding And Smoothing
Once the body filler has dried completely, the next step is to sand and smooth the area to create a seamless transition between the repaired area and the surrounding panel. This requires patience and attention to detail to achieve a professional-looking finish.
- Start with Coarse-Grit Sandpaper: Begin by sanding the body filler with coarse-grit sandpaper (e.g., 80-grit) to remove excess material and shape the area.
- Use a Sanding Block: Use a sanding block to distribute pressure evenly and prevent gouging.
- Sand in a Circular Motion: Sand in a circular motion to avoid creating lines or scratches.
- Gradually Move to Finer Grits: Gradually move to finer grits of sandpaper (e.g., 180-grit, 320-grit) to smooth the surface and feather the edges.
- Check for Imperfections: Periodically check the surface for imperfections by running your hand over it.
- Prime the Area: Once you are satisfied with the smoothness of the surface, prime the area with automotive primer.
3.7. Step 6: Painting And Finishing
The final step in the dent repair process is to paint and finish the repaired area to match the surrounding paint. This requires careful preparation and attention to detail to achieve a seamless and professional-looking result.
- Prepare the Surface: Lightly sand the primed surface with fine-grit sandpaper (e.g., 400-grit) to create a smooth surface for the paint to adhere to.
- Clean the Area: Clean the area with a tack cloth to remove any dust or debris.
- Mask Surrounding Areas: Mask off the surrounding areas with painter’s tape and masking paper to protect them from overspray.
- Apply Base Coat: Apply several thin coats of automotive base coat to the repaired area, allowing each coat to dry before applying the next.
- Apply Clear Coat: Apply several thin coats of automotive clear coat to the repaired area, allowing each coat to dry before applying the next.
- Wet Sand (Optional): If desired, wet sand the clear coat with ultra-fine-grit sandpaper (e.g., 2000-grit) to remove any imperfections.
- Buff and Polish: Buff and polish the painted area to restore its shine and luster.
4. Professional Metal Dent Repair Vs. DIY
4.1. Factors To Consider
Deciding between professional metal dent repair and DIY methods involves evaluating several key factors to determine the best course of action for your specific situation.
- Dent Size and Complexity: Small, shallow dents are often suitable for DIY repair, while larger, more complex dents may require professional expertise.
- Paint Damage: If the dent has caused significant paint damage, professional repair may be necessary to ensure a seamless color match and finish.
- Tool Availability: Do you have the necessary tools and equipment for DIY dent repair, or will you need to purchase them?
- Skill Level: Are you comfortable working on your car and have experience with dent repair techniques?
- Time Commitment: DIY dent repair can be time-consuming, especially if you are not experienced.
- Cost: Compare the cost of DIY repair (including tools and materials) with the cost of professional repair.
- Desired Outcome: Are you aiming for a perfect, factory-quality repair, or are you willing to accept a less-than-perfect result?
4.2. When To Choose Professional Repair
In many instances, opting for professional metal dent repair is the most prudent choice. While DIY methods can be tempting, certain situations warrant the expertise and precision that only a professional can provide.
- Extensive Damage: When your vehicle has suffered significant damage, such as large dents, creases, or multiple impact points, professional repair becomes essential.
- Paint Damage: If the dent is accompanied by scratches, chips, or other paint damage, professional repair is crucial to ensure a seamless color match and finish.
- Structural Damage: If you suspect that the dent has compromised the structural integrity of your vehicle, it’s imperative to seek professional assessment and repair.
- Lack of Experience: If you lack experience in dent repair techniques or are uncomfortable working on your car, entrusting the job to a professional is a wise decision.
- Specialized Tools Required: Certain dent repairs require specialized tools and equipment that are not readily available to the average DIY enthusiast.
- Desired Perfection: If you’re aiming for a flawless, factory-quality repair, a professional is best equipped to deliver the desired outcome.
4.3. Benefits Of Professional Dent Repair
Opting for professional metal dent repair offers a multitude of benefits that often outweigh the allure of DIY methods. These advantages extend beyond mere aesthetics, encompassing factors such as quality, expertise, and long-term value.
- Expertise and Experience: Professional dent repair technicians possess the knowledge, skills, and experience to handle a wide range of dent types and complexities.
- Specialized Tools and Equipment: Professionals have access to specialized tools and equipment that are designed to achieve optimal results without damaging the vehicle.
- Precise Color Matching: Professional auto body shops have the capability to precisely match the color of your vehicle’s paint, ensuring a seamless and undetectable repair.
- Quality Materials: Professionals use high-quality body fillers, paints, and other materials that are designed to withstand the elements and maintain their appearance over time.
- Warranty Protection: Many professional dent repair services offer warranty protection on their work, providing peace of mind and assurance of quality.
- Preservation of Vehicle Value: Professional dent repair helps to preserve the value of your vehicle by restoring its appearance and preventing further damage.
5. Cost Of Metal Dent Repair
5.1. DIY Repair Costs
Embarking on a DIY metal dent repair project can seem like a cost-effective alternative to professional services, but it’s essential to factor in all potential expenses to accurately assess the true cost.
- Dent Puller Kit: $20-$100
- Slide Hammer: $30-$150
- Heat Gun: $20-$100
- Body Filler and Putty: $10-$50
- Sandpaper and Sanding Blocks: $10-$30
- Primer and Paint: $20-$50
- Masking Tape and Paper: $10-$20
- Cleaning Supplies: $5-$10
- Safety Gear: $10-$30
- Miscellaneous Supplies: $10-$20
Total Estimated Cost: $145-$560
5.2. Professional Repair Costs
The cost of professional metal dent repair can vary significantly depending on several factors, including the size and complexity of the dent, the location of the damage, and the type of repair method used.
- Paintless Dent Repair (PDR): PDR is a cost-effective method for repairing small to medium-sized dents without damaging the paint. The cost of PDR typically ranges from $50 to $500, depending on the size and location of the dent.
- Traditional Dent Repair: Traditional dent repair involves using body filler to fill in the dented area and then sanding and painting the surface. The cost of traditional dent repair can range from $200 to $2,000 or more, depending on the size and complexity of the dent.
- Panel Replacement: In some cases, it may be more cost-effective to replace the entire body panel rather than attempting to repair the dent. The cost of panel replacement can range from $500 to $3,000 or more, depending on the type of vehicle and the cost of the replacement panel.
5.3. Factors Affecting Repair Costs
Several factors can influence the cost of metal dent repair, whether you opt for DIY methods or professional services. Understanding these variables can help you make informed decisions and budget accordingly.
- Dent Size and Depth: Larger and deeper dents typically require more time, materials, and expertise to repair, resulting in higher costs.
- Location of the Dent: Dents in труднодоступных areas, such as edges, corners, or complex body panels, can be more challenging to repair and may incur higher labor costs.
- Paint Damage: If the dent has caused significant paint damage, additional costs will be incurred for paint matching, blending, and refinishing.
- Repair Method: The chosen repair method, whether it’s paintless dent repair (PDR), traditional dent repair, or panel replacement, will significantly impact the overall cost.
- Labor Rates: Labor rates vary depending on the location, experience, and reputation of the repair shop.
- Parts Costs: If replacement parts are needed, such as body panels or trim pieces, these costs will be added to the total repair bill.
6. Tips For Maintaining Your Car’s Body
6.1. Protective Measures
Taking proactive measures to protect your car’s body is essential for minimizing the risk of dents, scratches, and other forms of damage.
- Park Strategically: Choose parking spots that are away from other vehicles, shopping carts, and potential hazards.
- Use a Car Cover: When parking outdoors, use a car cover to protect your vehicle from hail, tree sap, and other environmental elements.
- Install Door Edge Guards: Door edge guards can prevent dings and scratches when opening your car doors in tight spaces.
- Apply Paint Protection Film: Consider applying paint protection film to vulnerable areas of your car, such as the hood, fenders, and bumpers.
- Wash Your Car Regularly: Regular washing removes dirt, grime, and other contaminants that can damage your car’s paint.
6.2. Regular Inspections
Conducting regular inspections of your car’s body is crucial for identifying and addressing minor issues before they escalate into more significant problems.
- Walk Around Your Car Regularly: Take a few minutes each week to walk around your car and visually inspect the body for dents, scratches, and other damage.
- Pay Attention to Details: Pay attention to details such as door edges, bumpers, and wheel wells, as these areas are particularly prone to damage.
- Check for Rust: Inspect your car for signs of rust, especially in areas where the paint has been chipped or scratched.
- Address Issues Promptly: Address any issues you find promptly to prevent them from worsening over time.
6.3. Safe Driving Habits
Practicing safe driving habits is paramount for minimizing the risk of accidents and collisions that can result in costly body damage.
- Maintain a Safe Following Distance: Maintain a safe following distance to allow yourself ample time to react to unexpected events.
- Drive Defensively: Drive defensively and be aware of your surroundings at all times.
- Avoid Distractions: Avoid distractions such as cell phones, eating, and adjusting the radio while driving.
- Obey Traffic Laws: Obey all traffic laws and speed limits.
- Drive According to Conditions: Adjust your driving to suit the weather and road conditions.
7. Frequently Asked Questions (FAQ)
7.1. Can I really fix a metal dent myself?
Yes, you can often fix a metal dent yourself, especially if it’s small and shallow. DIY dent repair kits and techniques are available, but the success depends on your skill, the dent’s complexity, and whether the paint is damaged. For larger or more complex dents, professional repair is recommended.
7.2. What tools do I need to fix a metal dent?
Essential tools for DIY metal dent repair include a dent puller kit (suction cup or glue-based), a heat gun (for plastic bumpers or to make metal more pliable), body filler (if needed to fill imperfections), sandpaper, sanding blocks, and safety gear like gloves and eye protection.
7.3. How much does it cost to fix a metal dent professionally?
Professional metal dent repair costs vary. Paintless dent repair (PDR) for small dents ranges from $50 to $500. Traditional dent repair with body filler and painting can cost $200 to $2,000 or more, depending on the dent’s size, location, and paint damage.
7.4. Is paintless dent repair (PDR) a good option?
Yes, paintless dent repair (PDR) is an excellent option for small to medium-sized dents where the paint hasn’t been damaged. PDR is cost-effective, preserves the original paint, and is often faster than traditional repair methods.
7.5. How long does it take to fix a metal dent?
The time to fix a metal dent varies. DIY repairs can take a few hours to a full day, depending on your skill and the dent’s complexity. Professional PDR might take an hour or two, while traditional dent repair could take several days due to body work and painting.
7.6. Will a dent affect my car’s value?
Yes, a dent can negatively affect your car’s value, especially if it’s large, visible, or accompanied by paint damage. Repairing dents promptly helps maintain your car’s appearance and resale value.
7.7. Can I use a plunger to remove a car dent?
While a plunger might work on certain shallow dents, it’s generally not the most effective or reliable method for car dent repair. Specialized dent puller kits are more likely to provide successful results without causing further damage.
7.8. What is body filler, and when should I use it?
Body filler is a paste-like substance used to fill in dents, scratches, and imperfections in a car’s body. It’s typically used when the dent is too deep or complex to be completely removed by pulling or hammering alone.
7.9. How can I prevent future dents in my car?
To prevent future dents, park strategically away from other cars and shopping carts, use a car cover when parking outdoors, install door edge guards, apply paint protection film, and practice safe driving habits.
7.10. Should I file an insurance claim for a dent repair?
Filing an insurance claim for a dent repair depends on your deductible and the cost of the repair. If the repair cost is close to or below your deductible, it might not be worth filing a claim, as it could potentially increase your insurance premiums.
Are you ready to take on that metal dent and restore your car’s sleek appearance? At CARDIAGTECH.NET, we understand the challenges you face – the physical demands, the constant need to update your skills, and the pressure to deliver efficient, high-quality repairs. That’s why we offer a curated selection of top-notch dent repair tools designed to make your job easier, faster, and more profitable.
Don’t let dents diminish your car’s value and your reputation. Contact CARDIAGTECH.NET today at +1 (641) 206-8880 or visit our website at CARDIAGTECH.NET, located at 276 Reock St, City of Orange, NJ 07050, United States, and let our experts guide you to the perfect tools for your needs. Invest in quality, invest in efficiency, and watch your business thrive.