**How to Fix a Minor Scratch on Car: Your Ultimate Guide**
Fixing a minor scratch on your car doesn’t have to be a daunting task. This comprehensive guide from CARDIAGTECH.NET will walk you through the process, providing expert tips and advice on how to restore your car’s paint job to its original shine. We’ll cover everything from identifying the type of scratch to the best products and techniques for a flawless finish. Discover how to tackle light scratches, swirl marks, and other paint imperfections, ensuring your vehicle looks its best with scratch removal, paint correction, and car detailing techniques.
1. Understanding the Types of Car Scratches
Before you grab any product, it’s essential to identify what kind of scratch you’re dealing with. Different types of scratches require different approaches. This understanding will help you choose the right methods and products for effective scratch repair.
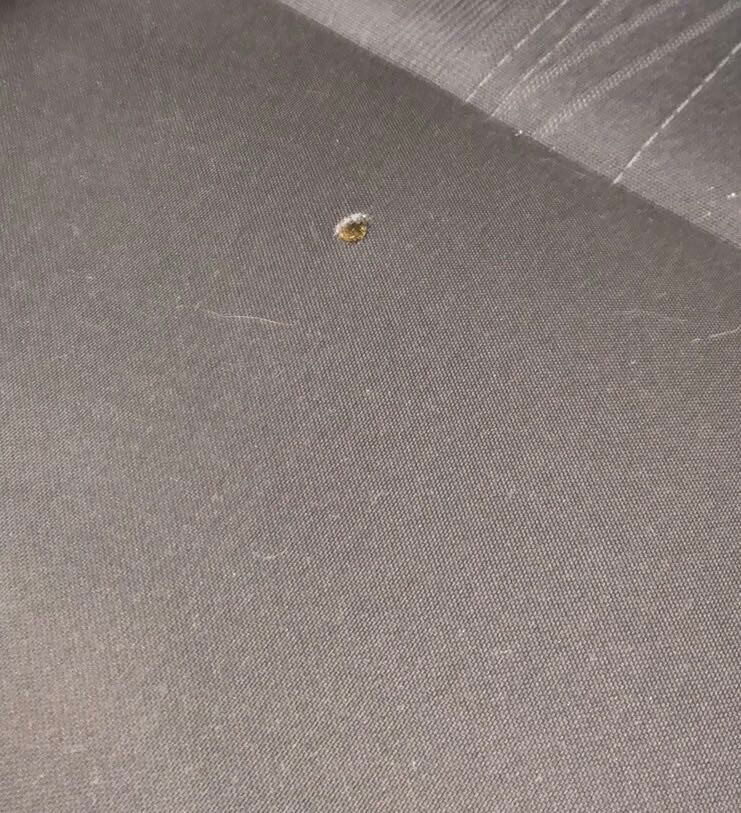
1.1. Clear Coat Scratches
These are the most superficial types of scratches, only affecting the clear coat layer of your car’s paint. They often appear as light swirl marks or minor imperfections on the surface.
- How to Identify: Clear coat scratches are typically only visible at certain angles and don’t penetrate the color coat.
- How to Fix: These can usually be fixed with polishing compounds and a microfiber cloth.
1.2. Paint Scratches
These scratches penetrate through the clear coat and into the color coat of paint. They are more noticeable and require a slightly more aggressive approach.
- How to Identify: Paint scratches are deeper and more visible than clear coat scratches, often showing the color of the underlying primer or metal.
- How to Fix: Paint scratches may require the use of a scratch repair kit, touch-up paint, or wet sanding.
1.3. Primer Scratches
When a scratch goes through the clear coat and paint layers, reaching the primer, it’s considered a more severe issue. Primer scratches need careful attention to prevent rust and further damage.
- How to Identify: Primer scratches are quite deep, exposing the grey or white primer layer beneath the paint.
- How to Fix: Repairing primer scratches often involves filling the scratch with touch-up paint, followed by sanding and polishing.
1.4. Deep Scratches (Metal Exposure)
The most severe type of scratch goes all the way through the clear coat, paint, and primer, exposing the bare metal of the car. These scratches are a serious concern because they can lead to rust and corrosion.
- How to Identify: Deep scratches are easily visible and expose the shiny metal underneath the paint layers.
- How to Fix: Deep scratches require immediate attention. The area needs to be treated to prevent rust, filled with primer, painted with touch-up paint, and then sealed with a clear coat.
2. Assessing the Severity of the Scratch
Before attempting any repairs, it’s crucial to accurately assess how deep the scratch is. This will determine the best course of action and prevent you from causing further damage.
2.1. The Water Test
A simple water test can help you determine the depth of the scratch.
- Clean the Area: Thoroughly clean the scratched area with soap and water and dry it with a clean microfiber cloth.
- Apply Water: Pour a small amount of water over the scratch.
- Observe: If the scratch disappears when wet but reappears when dry, it’s likely a clear coat scratch. If it remains visible when wet, it has penetrated deeper into the paint layers.
2.2. The Fingernail Test
Another quick way to gauge the scratch’s depth is by gently running your fingernail across it.
- Clean the Area: Clean the scratched area thoroughly.
- Run Fingernail: Lightly run your fingernail perpendicular to the scratch.
- Assess: If your nail catches on the scratch, it’s likely a deeper scratch that has penetrated the clear coat and possibly the paint layer.
2.3. Visual Inspection
Carefully examine the scratch under good lighting. Use a magnifying glass if necessary.
- Clear Coat Scratches: These appear as fine lines or swirl marks on the surface.
- Paint Scratches: These are more defined and show a difference in color compared to the surrounding paint.
- Primer Scratches: These expose a grey or white layer beneath the paint.
- Deep Scratches: These reveal the bare metal of the car and may have rough edges.
3. Essential Tools and Materials for Scratch Repair
Having the right tools and materials on hand is crucial for effectively fixing minor scratches on your car. Here’s a comprehensive list to get you started, available at CARDIAGTECH.NET:
3.1. Cleaning Supplies
- Car Wash Soap: To thoroughly clean the area before and after repairs.
- Microfiber Towels: Soft and non-abrasive, perfect for cleaning and drying.
- Detailing Clay: To remove contaminants from the paint surface.
- Isopropyl Alcohol: To clean the surface before applying touch-up paint or clear coat.
3.2. Sanding Materials
- Wet/Dry Sandpaper: Various grits (2000, 2500, 3000) for leveling the scratch.
- Sanding Block: To ensure even pressure and a flat sanding surface.
- Spray Bottle: To keep the sandpaper and surface wet during sanding.
3.3. Polishing and Buffing
- Polishing Compound: To remove fine scratches and swirl marks.
- Buffing Compound: For restoring shine and gloss to the paint.
- Polishing Pads: Foam pads for applying polishing and buffing compounds.
- Buffing Machine (Optional): For faster and more effective polishing.
3.4. Paint and Sealant
- Touch-Up Paint: Matching your car’s paint code for filling deeper scratches.
- Clear Coat: To protect the repaired area and blend it with the surrounding paint.
- Primer: For treating bare metal and providing a base for touch-up paint.
- Wax or Sealant: To protect the paint and enhance its shine after repairs.
3.5. Applicators and Tools
- Detail Brushes: For cleaning tight areas and applying touch-up paint.
- Masking Tape: To protect surrounding areas from sanding and polishing.
- Latex Gloves: To protect your hands from chemicals and paint.
- Mixing Sticks: For stirring touch-up paint and clear coat.
3.6. Safety Gear
- Safety Glasses: To protect your eyes from debris and chemicals.
- Respirator Mask: To avoid inhaling harmful fumes during sanding and painting.
Having these tools and materials ready will streamline the scratch repair process and ensure a professional-looking finish. Visit CARDIAGTECH.NET for high-quality tools and supplies.
4. Step-by-Step Guide to Fixing Minor Clear Coat Scratches
Clear coat scratches are the easiest to fix and often require minimal effort and materials. Here’s a detailed step-by-step guide:
4.1. Cleaning the Area
- Wash the Car: Start by washing the area around the scratch with car wash soap and water to remove any dirt and debris.
- Dry Thoroughly: Use a clean microfiber towel to dry the area completely.
- Decontaminate (Optional): If necessary, use detailing clay to remove any embedded contaminants from the paint surface.
4.2. Applying Polishing Compound
- Apply Compound: Apply a small amount of polishing compound to a clean polishing pad.
- Work the Compound: Gently rub the compound onto the scratched area using circular motions.
- Use a Machine (Optional): If using a buffing machine, set it to a low speed and work the compound over the scratch.
4.3. Buffing the Area
- Switch Pads: Switch to a clean buffing pad.
- Buff the Surface: Buff the area to remove any remaining compound and restore the shine to the clear coat.
- Check Results: Inspect the area under good lighting to ensure the scratch is gone or significantly reduced.
4.4. Applying Wax or Sealant
- Apply Wax: Apply a thin layer of car wax or sealant to the repaired area.
- Allow to Cure: Let the wax or sealant cure according to the manufacturer’s instructions.
- Buff Again: Buff the area with a clean microfiber towel to reveal a glossy finish.
This method is effective for removing light swirl marks and minor imperfections in the clear coat.
5. Repairing Paint Scratches: A Detailed Guide
When scratches penetrate the clear coat and reach the paint layer, a more involved repair process is necessary. Here’s how to do it:
5.1. Cleaning and Preparation
- Wash the Area: Clean the scratched area thoroughly with car wash soap and water.
- Dry Completely: Dry the area with a clean microfiber towel.
- Inspect the Scratch: Examine the scratch to determine its depth and ensure all dirt and debris are removed.
5.2. Wet Sanding (If Necessary)
- Prepare Sandpaper: Soak a piece of 2500-grit wet/dry sandpaper in water for several minutes.
- Sand Lightly: Gently sand the scratched area using light, even pressure. Keep the surface wet by spraying it with water.
- Check Progress: Periodically check your progress by drying the area and inspecting the scratch. The goal is to level the scratch with the surrounding paint.
5.3. Applying Touch-Up Paint
- Shake Well: Shake the touch-up paint thoroughly to ensure it’s properly mixed.
- Apply Thin Coats: Use a fine-tipped brush or applicator to apply thin, even coats of touch-up paint to the scratch. Allow each coat to dry completely before applying the next.
- Build Up Layers: Continue applying thin coats until the paint is level with the surrounding surface.
5.4. Blending the Paint
- Wet Sand (Again): Once the touch-up paint is dry, lightly wet sand the area with 3000-grit sandpaper to blend the new paint with the old.
- Be Gentle: Use light pressure and keep the surface wet to avoid damaging the surrounding paint.
5.5. Polishing and Buffing
- Apply Polishing Compound: Apply a small amount of polishing compound to a polishing pad.
- Work the Compound: Polish the area using circular motions, either by hand or with a buffing machine.
- Buff the Surface: Switch to a clean buffing pad and buff the area to remove any remaining compound and restore the shine.
5.6. Applying Clear Coat
- Clean the Area: Clean the area with isopropyl alcohol to remove any residue.
- Apply Clear Coat: Apply a thin, even layer of clear coat to the repaired area.
- Allow to Dry: Let the clear coat dry completely according to the manufacturer’s instructions.
5.7. Final Buffing and Sealing
- Final Buff: Lightly buff the area to smooth out any imperfections.
- Apply Wax or Sealant: Apply a layer of car wax or sealant to protect the paint and enhance its shine.
This process can effectively repair paint scratches and restore the appearance of your car’s paint job.
6. Addressing Primer Scratches: A Comprehensive Approach
When scratches go deep enough to expose the primer layer, it’s essential to take extra steps to prevent rust and ensure a lasting repair. Here’s a detailed guide:
6.1. Cleaning and Rust Prevention
- Wash the Area: Thoroughly clean the scratched area with car wash soap and water.
- Remove Rust: If there is any rust present, use a rust remover or a wire brush to carefully remove it.
- Clean Again: Clean the area again to remove any residue from the rust removal process.
6.2. Applying Primer
- Mask the Area: Use masking tape to protect the surrounding paint from overspray.
- Apply Primer: Apply a thin, even coat of automotive primer to the exposed primer area.
- Allow to Dry: Let the primer dry completely according to the manufacturer’s instructions. Apply additional coats if necessary.
6.3. Wet Sanding the Primer
- Prepare Sandpaper: Soak a piece of 3000-grit wet/dry sandpaper in water for several minutes.
- Sand Lightly: Gently wet sand the primed area to smooth it out and blend it with the surrounding paint.
- Clean the Area: Clean the area with a tack cloth to remove any sanding residue.
6.4. Applying Touch-Up Paint
- Shake Well: Shake the touch-up paint thoroughly to ensure it’s properly mixed.
- Apply Thin Coats: Use a fine-tipped brush or applicator to apply thin, even coats of touch-up paint to the primed area.
- Allow to Dry: Allow each coat to dry completely before applying the next. Build up layers until the paint is level with the surrounding surface.
6.5. Blending and Polishing
- Wet Sand (Again): Lightly wet sand the area with 3000-grit sandpaper to blend the new paint with the old.
- Apply Polishing Compound: Apply a small amount of polishing compound to a polishing pad.
- Work the Compound: Polish the area using circular motions, either by hand or with a buffing machine.
6.6. Applying Clear Coat
- Clean the Area: Clean the area with isopropyl alcohol to remove any residue.
- Apply Clear Coat: Apply a thin, even layer of clear coat to the repaired area.
- Allow to Dry: Let the clear coat dry completely according to the manufacturer’s instructions.
6.7. Final Touches
- Final Buff: Lightly buff the area to smooth out any imperfections.
- Apply Wax or Sealant: Apply a layer of car wax or sealant to protect the paint and enhance its shine.
By following these steps, you can effectively repair primer scratches, prevent rust, and restore the appearance of your car’s paint job.
7. Repairing Deep Scratches Exposing Metal
Deep scratches that expose the bare metal require immediate attention to prevent rust and corrosion. Here’s a comprehensive guide:
7.1. Initial Cleaning and Rust Treatment
- Thorough Cleaning: Begin by thoroughly cleaning the area around the scratch with car wash soap and water.
- Rust Removal: If rust is present, use a wire brush or a specialized rust remover to eliminate it completely.
- Final Cleaning: After rust removal, clean the area once more to ensure no residue remains.
7.2. Applying Rust Inhibitor
- Apply Rust Inhibitor: Apply a rust inhibitor to the exposed metal to prevent future corrosion.
- Allow to Dry: Let the rust inhibitor dry completely according to the manufacturer’s instructions.
7.3. Priming the Area
- Masking: Use masking tape to carefully protect the surrounding paint from overspray.
- Primer Application: Apply a thin, even coat of automotive primer to the area where the metal is exposed.
- Drying Time: Allow the primer to dry fully, following the manufacturer’s guidelines. Apply additional coats if necessary for adequate coverage.
7.4. Wet Sanding the Primer
- Sandpaper Preparation: Soak a piece of 3000-grit wet/dry sandpaper in water for several minutes.
- Gentle Sanding: Lightly wet sand the primed area to achieve a smooth surface that blends seamlessly with the surrounding paint.
- Residue Removal: Use a tack cloth to carefully remove any sanding residue.
7.5. Applying Touch-Up Paint
- Paint Mixing: Shake the touch-up paint thoroughly to ensure a consistent mixture.
- Thin Coats: Apply thin, even coats of touch-up paint using a fine-tipped brush or applicator.
- Layering: Allow each coat to dry completely before applying the next, gradually building up layers until the paint is level with the surrounding surface.
7.6. Blending and Polishing
- Blending Sanding: Lightly wet sand the area with 3000-grit sandpaper to blend the new paint with the existing paint.
- Polishing Compound: Apply a small amount of polishing compound to a polishing pad.
- Polishing: Polish the area using circular motions, either by hand or with a buffing machine, to smooth out imperfections.
7.7. Clear Coat Application
- Surface Cleaning: Clean the area with isopropyl alcohol to remove any remaining residue.
- Clear Coat Application: Apply a thin, even layer of clear coat to the repaired area for protection and shine.
- Drying Time: Allow the clear coat to dry completely, adhering to the manufacturer’s instructions.
7.8. Final Buffing and Sealing
- Buffing: Lightly buff the area to smooth out any final imperfections and enhance the shine.
- Wax or Sealant: Apply a layer of car wax or sealant to protect the newly painted surface and ensure a lasting finish.
By following these detailed steps, you can effectively repair deep scratches that expose the metal, prevent rust, and restore your car’s appearance.
8. Advanced Techniques for Blending and Finishing
Achieving a seamless finish requires mastering advanced techniques for blending and finishing the repaired area.
8.1. Wet Sanding Techniques
Wet sanding is crucial for blending touch-up paint with the surrounding clear coat.
- Progressive Sanding: Start with a coarser grit sandpaper (2000) and gradually move to finer grits (2500, 3000) to smooth the surface.
- Even Pressure: Apply even pressure and use a sanding block to ensure a flat, uniform surface.
- Lubrication: Keep the sandpaper and surface well-lubricated with water to prevent scratching.
8.2. Polishing Techniques
Polishing removes fine scratches and swirl marks, restoring the shine to the paint.
- Multiple Passes: Make multiple passes with the polishing compound, using light to moderate pressure.
- Clean Pads: Use clean polishing pads to avoid reintroducing contaminants to the surface.
- Machine Polishing: A buffing machine can significantly improve the results, but use caution to avoid burning the paint.
8.3. Clear Coat Blending
Blending clear coat is essential for achieving a seamless finish.
- Feathering: Feather the edges of the clear coat application to blend it with the surrounding clear coat.
- Thin Coats: Apply thin, even coats to avoid runs and drips.
- Wet Sanding: Lightly wet sand the clear coat after it has dried to remove any imperfections.
8.4. Color Matching
Accurate color matching is crucial for a seamless repair.
- Paint Code: Use your car’s paint code to ensure you’re using the correct touch-up paint.
- Test Area: Test the paint in an inconspicuous area to ensure it matches before applying it to the scratch.
- Custom Mixing: If necessary, have the paint custom mixed to match your car’s specific color.
9. Maintaining Your Car’s Paint to Prevent Future Scratches
Prevention is always better than cure. Here are some tips to maintain your car’s paint and prevent future scratches:
9.1. Regular Washing
- Wash Frequently: Wash your car regularly to remove dirt, grime, and contaminants that can scratch the paint.
- Use Proper Soap: Use a pH-balanced car wash soap and avoid household detergents.
- Two-Bucket Method: Use the two-bucket method to prevent reintroducing dirt to the paint surface.
9.2. Waxing and Sealing
- Apply Wax: Apply a coat of car wax or sealant every few months to protect the paint from the elements.
- Choose the Right Product: Choose a wax or sealant that is specifically designed for your car’s paint type.
- Proper Application: Apply the wax or sealant according to the manufacturer’s instructions.
9.3. Protective Measures
- Parking Smart: Park in covered areas or away from other cars to avoid scratches and dings.
- Paint Protection Film (PPF): Consider applying paint protection film to high-impact areas like the hood, fenders, and bumpers.
- Avoid Abrasive Materials: Avoid using abrasive materials like scouring pads or harsh chemicals to clean your car.
9.4. Quick Touch-Ups
- Address Scratches Promptly: Address any minor scratches or imperfections promptly to prevent them from worsening.
- Use a Paint Pen: Keep a paint pen handy for quick touch-ups on small scratches.
- Professional Help: For deeper or more extensive scratches, consider seeking professional help from a body shop.
By following these maintenance tips, you can keep your car’s paint looking its best and prevent future scratches.
10. When to Seek Professional Help
While many minor scratches can be fixed at home, there are situations where it’s best to seek professional help.
10.1. Extensive Damage
If your car has extensive scratches or damage, such as large areas of chipped paint or deep gouges, it’s best to take it to a professional body shop.
10.2. Color Matching Issues
If you’re unable to accurately match the paint color or blend the touch-up paint with the surrounding area, a professional can ensure a seamless repair.
10.3. Lack of Experience
If you’re not comfortable working with power tools or chemicals, or if you’re unsure about any step in the repair process, it’s best to seek professional help to avoid causing further damage.
10.4. Cost Considerations
While DIY repairs can save money, they can also be time-consuming and require purchasing specialized tools and materials. In some cases, the cost of professional repair may be comparable or even more cost-effective.
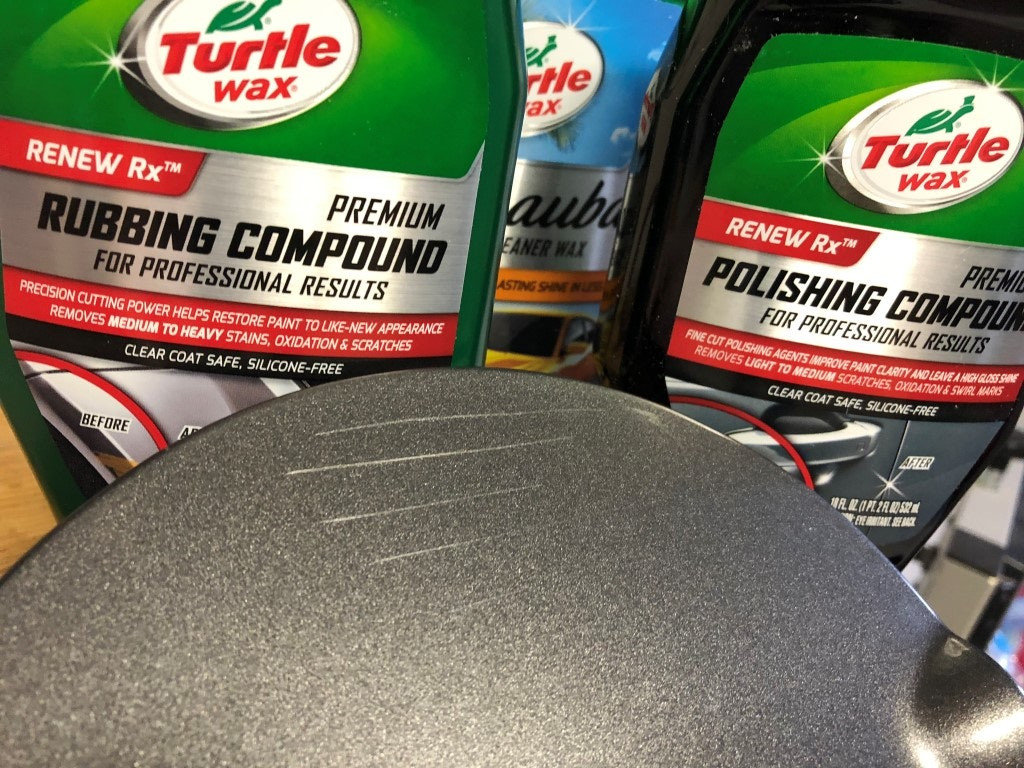
11. Choosing the Right Products: CARDIAGTECH.NET Recommendations
Selecting the right products is critical for effective scratch repair. Here are some top recommendations available at CARDIAGTECH.NET:
11.1. Polishing Compounds
- Meguiar’s Ultimate Compound: Known for its ability to remove light to moderate scratches and swirl marks.
- 3M Rubbing Compound: A more aggressive compound for tackling deeper imperfections.
- Chemical Guys V36 Optical Cut Polishing Compound: A versatile compound for various paint types.
11.2. Touch-Up Paint
- Dupli-Color Touch-Up Paint: Offers a wide range of colors to match most car manufacturers.
- AutomotiveTouchup: Provides custom-matched touch-up paint for specific car models.
- OEM Touch-Up Paint: Genuine touch-up paint from your car’s manufacturer for the best color match.
11.3. Clear Coats
- Spraymax 2K Clear Coat: A high-quality aerosol clear coat that provides excellent durability and shine.
- USC Spray Max 2K Glamour High Gloss Clearcoat Aerosol: Offers a professional-grade finish in an easy-to-use aerosol can.
- Dupli-Color Perfect Match Clear Coat: A convenient clear coat for small touch-up repairs.
11.4. Sandpaper
- 3M Wetordry Sandpaper: High-quality sandpaper for wet sanding applications.
- Norton Abrasives Sandpaper: Durable sandpaper for various sanding needs.
- Mirka Abralon Sanding Discs: Flexible sanding discs for blending and finishing.
11.5. Buffing Machines
- Meguiar’s DA Power System: An affordable and easy-to-use buffing system that attaches to a standard drill.
- Porter-Cable 7424XP: A popular dual-action polisher for enthusiasts and professionals.
- Griot’s Garage 6″ Random Orbital Polisher: A high-quality polisher with variable speed settings.
11.6. Car Waxes and Sealants
- Meguiar’s Ultimate Liquid Wax: Provides long-lasting protection and a deep, glossy shine.
- Chemical Guys Butter Wet Wax: Easy to apply and provides a warm, buttery shine.
- Collinite 845 Insulator Wax: A durable wax that offers excellent protection against the elements.
Visit CARDIAGTECH.NET for these and other top-quality products to keep your car looking its best.
12. Cost-Effective DIY Scratch Repair vs. Professional Services
Deciding whether to tackle a scratch repair yourself or hire a professional often comes down to cost and the extent of the damage. Here’s a comparison:
12.1. DIY Scratch Repair Costs
- Materials: $20 – $100 (depending on the products needed)
- Time: 1-3 hours (depending on the complexity of the repair)
- Pros:
- Cost-effective for minor scratches
- Convenient and can be done at your own pace
- Opportunity to learn new skills
- Cons:
- May not achieve professional-level results
- Potential for mistakes that could worsen the damage
- Requires purchasing tools and materials
12.2. Professional Scratch Repair Costs
- Minor Scratches: $50 – $200
- Moderate Scratches: $200 – $500
- Deep Scratches: $500+
- Time: Few hours to a couple of days
- Pros:
- Professional-level results
- Expert color matching and blending
- Convenient and hassle-free
- Cons:
- More expensive than DIY repairs
- Requires scheduling an appointment and leaving your car at the shop
12.3. Cost-Benefit Analysis
| Factor | DIY Scratch Repair | Professional Scratch Repair |
|---|---|---|
| Cost | Lower initial cost, but potential for additional expenses if mistakes are made. | Higher initial cost, but includes expertise and guaranteed results. |
| Time | Requires time and effort to learn and perform the repair. | Less time required on your part, as the professionals handle everything. |
| Skill Level | Suitable for those with some experience or willingness to learn. | Best for those who lack experience or prefer a guaranteed professional finish. |
| Result Quality | Results may vary depending on skill level and quality of materials used. | Typically achieves a higher quality finish with expert color matching and blending. |
| Complexity of Damage | Best suited for minor scratches and imperfections. | Can handle a wider range of damage, including deep scratches and extensive paint issues. |
By weighing the costs and benefits, you can decide whether a DIY approach or professional service is best for your specific situation.
13. Common Mistakes to Avoid When Fixing Car Scratches
Avoiding common mistakes can save you time, money, and potential damage to your car’s paint. Here are some pitfalls to watch out for:
13.1. Using the Wrong Products
- Harsh Cleaners: Avoid using household cleaners or abrasive chemicals that can damage the paint.
- Incompatible Compounds: Use polishing and buffing compounds that are designed for automotive paint.
- Incorrect Touch-Up Paint: Always use touch-up paint that matches your car’s paint code to ensure a seamless repair.
13.2. Improper Sanding
- Excessive Pressure: Applying too much pressure while sanding can damage the clear coat and paint.
- Dry Sanding: Always wet sand to prevent scratching and ensure a smooth surface.
- Skipping Grits: Skipping sandpaper grits can result in an uneven finish.
13.3. Neglecting Preparation
- Dirty Surface: Failing to clean the area thoroughly before starting the repair can trap dirt and contaminants.
- Ignoring Rust: Neglecting to treat rust can lead to further corrosion and damage.
- Skipping Masking: Not masking the surrounding area can result in overspray and damage to the adjacent paint.
13.4. Rushing the Process
- Insufficient Drying Time: Not allowing touch-up paint or clear coat to dry completely can result in runs, drips, and imperfections.
- Skipping Steps: Skipping steps in the repair process can compromise the quality and durability of the repair.
- Lack of Patience: Rushing the repair can lead to mistakes and a less-than-perfect finish.
13.5. Incorrect Polishing and Buffing
- Using Dirty Pads: Using dirty polishing pads can reintroduce contaminants to the paint surface.
- Overheating the Paint: Applying too much pressure or using a high-speed buffer can overheat the paint and cause damage.
- Neglecting to Seal: Failing to apply wax or sealant after polishing can leave the paint unprotected.
By being aware of these common mistakes and taking steps to avoid them, you can achieve a professional-looking scratch repair and keep your car looking its best.
14. Eco-Friendly Scratch Repair Options
For those looking to minimize their environmental impact, there are several eco-friendly scratch repair options available.
14.1. Biodegradable Cleaning Products
- Eco-Friendly Car Wash Soap: Use biodegradable car wash soaps that are free from harsh chemicals.
- Natural Degreasers: Opt for natural degreasers made from plant-based ingredients.
- Microfiber Towels: Microfiber towels are reusable and reduce the need for paper towels.
14.2. Water-Based Touch-Up Paints
- Low-VOC Paints: Choose water-based touch-up paints with low volatile organic compounds (VOCs) to reduce air pollution.
- Recycled Content: Look for paints made with recycled content or sustainable materials.
14.3. Sustainable Polishing Compounds
- Plant-Based Polishes: Use polishing compounds made from plant-based ingredients.
- Biodegradable Abrasives: Opt for polishes that use biodegradable abrasives.
14.4. Natural Waxes and Sealants
- Carnauba Wax: Carnauba wax is a natural wax derived from palm trees and is a sustainable option.
- Beeswax: Beeswax is another natural wax that can be used to protect and shine your car’s paint.
14.5. Responsible Disposal
- Recycle Used Materials: Recycle used sandpaper, polishing pads, and other materials whenever possible.
- Proper Disposal of Chemicals: Dispose of leftover chemicals and paints according to local regulations.
By choosing eco-friendly scratch repair options, you can minimize your environmental impact and still achieve a professional-looking finish.
15. Frequently Asked Questions (FAQ) About Fixing Car Scratches
Have more questions about fixing car scratches? Here are some frequently asked questions to help you out:
15.1. What is the best way to remove a minor scratch from my car?
The best way to remove a minor scratch depends on its severity. For clear coat scratches, polishing compounds and a microfiber cloth are usually sufficient. Deeper scratches may require touch-up paint, wet sanding, and clear coat application.
15.2. Can I use toothpaste to remove scratches from my car?
While some people claim that toothpaste can remove minor scratches, it’s generally not recommended. Toothpaste is abrasive and can potentially damage the clear coat. It’s best to use products specifically designed for automotive paint repair.
15.3. How do I know if a scratch is too deep to fix myself?
If the scratch exposes the primer or bare metal, it’s likely too deep to fix yourself and requires professional attention. These types of scratches require more specialized tools and techniques to prevent rust and ensure a lasting repair.
15.4. What is wet sanding and why is it necessary?
Wet sanding involves using sandpaper with water to smooth out imperfections in the paint. It’s necessary for blending touch-up paint with the surrounding clear coat and achieving a seamless finish.
15.5. How do I match the touch-up paint to my car’s color?
You can find your car’s paint code on a sticker located on the driver’s side doorjamb, in the glove compartment, or under the hood. Use this code to purchase touch-up paint that matches your car’s color.
15.6. What tools do I need to fix a scratch on my car?
Essential tools include car wash soap, microfiber towels, sandpaper (various grits), polishing compound, buffing compound, touch-up paint, clear coat, masking tape, and applicators. A buffing machine can also be helpful for more extensive repairs.
15.7. How long does it take to fix a scratch on my car?
The time it takes to fix a scratch depends on its severity and the repair method used. Minor clear coat scratches can be fixed in as little as an hour, while deeper scratches may take several hours or even days to repair.
15.8. Can I use a household cleaner to wash my car?
No, you should never use household cleaners to wash your car. These cleaners can be too harsh and can damage the clear coat and paint. Always use a pH-balanced car wash soap specifically designed for automotive paint.
15.9. How often should I wax my car?
You should wax your car every 3-6 months to protect the paint from the elements and maintain its shine.
15.10. Is it worth it to fix a scratch on my car myself, or should I take it to a professional?
Whether it’s worth it to fix a scratch yourself depends on your skill level, the severity of the scratch, and your budget. DIY repairs can be cost-effective for minor scratches, but professional repairs may be necessary for more extensive damage.
Conclusion
Fixing minor scratches on your car is a manageable task with the right tools, materials, and techniques. By understanding the different types of scratches, assessing their severity, and following the step-by-step guides provided, you can restore your car’s paint job to its original shine. Remember to visit CARDIAGTECH.NET for all your automotive repair needs.
Are you ready to restore your car’s flawless finish? Contact CARDIAGTECH.NET today for expert advice and the highest quality automotive repair tools and supplies. Our team is here to help you find the perfect solutions for your needs. Reach out now via:
- Address: 276 Reock St, City of Orange, NJ 07050, United States
- WhatsApp: +1 (641) 206-8880
- Website: CARDIAGTECH.NET
Don’t wait, give your car the care it deserves and achieve professional results with CARDIAGTECH.NET!