How To Fix A Punctured Car Tire The Right Way
Fixing a punctured car tire properly is critical for your safety and the longevity of your tire. At CARDIAGTECH.NET, we provide the tools and knowledge to ensure your tire repair is done right, preventing potential hazards. Discover how proper techniques, paired with high-quality equipment, can keep you safely on the road and explore our range of car diagnostic tools and equipment to guarantee a secure and reliable repair!
1. Understanding Tire Punctures and Their Impact
Tire punctures are an unfortunate but common occurrence for drivers. Whether it’s a nail, screw, or piece of glass, these road hazards can lead to a flat tire, leaving you stranded and potentially in a dangerous situation. Understanding the causes and potential consequences of tire punctures is the first step in ensuring your safety on the road. The impact of a punctured tire extends beyond the immediate inconvenience; it can affect your vehicle’s handling, fuel efficiency, and overall safety.
1.1. Common Causes of Tire Punctures
- Road Debris: Nails, screws, glass, and other sharp objects on the road are frequent culprits. Construction sites and areas with heavy traffic often have a higher concentration of these hazards.
- Underinflation: Tires that are not properly inflated are more susceptible to punctures. Underinflated tires flex more, increasing the risk of sharp objects penetrating the tire.
- Overloading: Exceeding the recommended weight limit for your vehicle can put excessive stress on your tires, making them more vulnerable to punctures and blowouts.
- Tire Age: As tires age, the rubber compound can degrade, becoming more brittle and prone to damage. Regularly inspect your tires for signs of aging, such as cracks and bulges.
1.2. Potential Consequences of Driving with a Punctured Tire
- Loss of Control: A sudden tire blowout can cause you to lose control of your vehicle, especially at high speeds. This can lead to accidents and serious injuries. According to the National Highway Traffic Safety Administration (NHTSA), tire-related crashes result in thousands of injuries and fatalities each year.
- Vehicle Damage: Driving on a flat or damaged tire can cause significant damage to your vehicle’s wheels, suspension, and braking system. The cost of these repairs can be substantial.
- Reduced Fuel Efficiency: Underinflated or damaged tires increase rolling resistance, which reduces your vehicle’s fuel efficiency. This can lead to higher fuel costs over time.
- Uneven Tire Wear: Driving with a punctured tire can cause uneven wear on the remaining tires, shortening their lifespan and requiring premature replacement.
1.3. Statistics on Tire-Related Accidents
According to the NHTSA, tire problems are a contributing factor in approximately 11,000 crashes annually in the United States. These crashes result in over 600 fatalities each year. Maintaining your tires properly can significantly reduce your risk of being involved in a tire-related accident.
| Year | Number of Crashes | Fatalities | Injuries |
|---|---|---|---|
| 2018 | 10,800 | 620 | Data not available |
| 2019 | 11,200 | 640 | Data not available |
| 2020 | 11,500 | 660 | Data not available |
Source: National Highway Traffic Safety Administration (NHTSA)
2. Assessing the Puncture: Can the Tire Be Repaired?
Before attempting to fix a punctured car tire, it’s essential to assess the damage and determine if the tire is repairable. Not all punctures can be safely repaired, and attempting to fix a non-repairable tire can lead to dangerous consequences. Understanding the limitations and guidelines for tire repair is crucial for ensuring your safety and the longevity of your tires.
2.1. Location of the Puncture
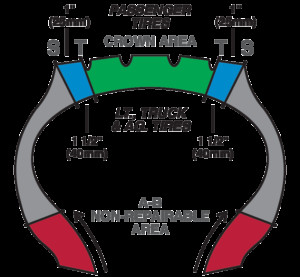
The location of the puncture is a primary factor in determining whether a tire can be repaired. Generally, punctures located in the tread area are repairable, while those in the sidewall or shoulder are not.
- Tread Area: The tread is the portion of the tire that makes contact with the road. Punctures in this area are typically repairable because the tire structure is more robust and designed to withstand wear and tear.
- Sidewall: The sidewall is the flexible part of the tire that connects the tread to the wheel. Punctures in the sidewall are not repairable because this area is subject to significant stress and flexing during driving. A repair in the sidewall would likely fail, leading to a blowout.
- Shoulder: The shoulder is the area between the tread and the sidewall. Punctures in this area are also generally not repairable due to the flexing and stress that occur in this region.
the repairable are of most tires is restricted to the crown
2.2. Size of the Puncture
The size of the puncture is another critical factor. Most tire manufacturers and repair professionals recommend that punctures larger than 1/4 inch (6mm) in diameter should not be repaired. Larger punctures can compromise the structural integrity of the tire, making it unsafe to drive on.
- Small Punctures (up to 1/4 inch): These punctures can typically be repaired using a plug and patch combination. This method involves filling the puncture with a rubber plug and reinforcing the area with a patch on the inside of the tire.
- Large Punctures (over 1/4 inch): These punctures are generally considered non-repairable. Attempting to repair a large puncture can lead to tire failure, especially at high speeds or under heavy loads.
2.3. Tire Condition
The overall condition of the tire also plays a significant role in determining its repairability. Factors such as tire age, wear, and previous repairs can affect the tire’s structural integrity and its ability to be safely repaired.
- Tire Age: Tires older than six years may have degraded rubber, making them more prone to failure. Check the tire’s DOT (Department of Transportation) code to determine its age.
- Tread Depth: If the tire has insufficient tread depth (less than 2/32 inch), it should be replaced rather than repaired. Worn tires have reduced traction and are more susceptible to hydroplaning.
- Previous Repairs: Tires with multiple previous repairs may not be suitable for additional repairs. Each repair weakens the tire’s structure, increasing the risk of failure.
- Visible Damage: Check for signs of damage, such as cuts, bulges, or exposed cords. These conditions can compromise the tire’s integrity and make it unsafe to repair.
2.4. Industry Guidelines
According to the Tire Industry Association (TIA), proper tire repair involves removing the tire from the rim, inspecting it thoroughly, and using a combination of a plug and patch to seal the puncture. The TIA provides detailed guidelines for tire repair to ensure safety and reliability.
2.5. When to Consult a Professional
If you are unsure about the safety or suitability of repairing a punctured tire, it is always best to consult a professional tire technician. They have the expertise and equipment to assess the damage and perform a safe and reliable repair. Contact CARDIAGTECH.NET at +1 (641) 206-8880 for expert advice and assistance.
3. Essential Tools and Equipment for Tire Repair
Having the right tools and equipment is essential for performing a safe and effective tire repair. Whether you’re a professional mechanic or a DIY enthusiast, investing in quality tools can make the job easier and ensure a reliable result. Here’s a comprehensive list of the tools and equipment you’ll need for tire repair.
3.1. Safety Gear
Safety should always be your top priority when working on tires. Protect yourself with the following safety gear:
- Safety Glasses: Protect your eyes from debris and chemicals.
- Gloves: Protect your hands from sharp objects and chemicals.
- Hearing Protection: Use earplugs or earmuffs to protect your hearing, especially when using power tools.
- Work Boots: Wear sturdy work boots to protect your feet.
3.2. Tire Removal Tools
Removing the tire from the wheel is the first step in the repair process. Here are the tools you’ll need:
- Lug Wrench: Loosen and remove the lug nuts that secure the wheel to the vehicle. A six-point lug wrench provides a more secure grip and reduces the risk of rounding off the lug nuts.
- Jack and Jack Stands: Lift the vehicle safely and securely. Use jack stands to support the vehicle once it’s lifted. Never work under a vehicle supported only by a jack.
- Wheel Chocks: Prevent the vehicle from rolling while it’s lifted. Place wheel chocks behind the wheels that are not being removed.
3.3. Tire Repair Tools
These tools are specifically designed for repairing punctured tires:
- Tire Plug Kit: Contains rubber plugs and insertion tools for temporarily sealing punctures. While plugs can provide a quick fix, they are not a permanent solution and should only be used in emergencies.
- Tire Patch Kit: Includes rubber patches, adhesive, and a roller for permanently repairing punctures from the inside of the tire.
- Plug and Patch Combination Units: These units combine a plug and a patch for a more reliable and durable repair. They seal the puncture from both the inside and outside of the tire.
- Carbide Cutter: Drills out the damaged area to remove any damaged cords or belts.
- Buffing Tool: Cleans and roughens the inner liner to prepare it for the patch.
- Vulcanizing Fluid: Acts as an adhesive to bond the patch to the tire.
- Tire Stitcher: Applies pressure to ensure the patch adheres properly to the inner liner.
CARDIAGTECH.NET offers a wide range of tire repair tools to ensure you have everything you need for a professional repair.
3.4. Inflation and Balancing Tools
Once the tire is repaired, you’ll need to inflate and balance it:
- Air Compressor: Provides a source of compressed air for inflating the tire.
- Tire Pressure Gauge: Accurately measures the tire pressure to ensure it’s within the recommended range.
- Tire Balancer: Ensures the wheel and tire assembly is properly balanced to prevent vibrations and uneven wear.
3.5. Diagnostic Tools
Diagnostic tools can help identify any underlying issues that may have contributed to the puncture:
- Tire Pressure Monitoring System (TPMS) Tool: Resets the TPMS after inflating the tire.
- Wheel Alignment Tool: Checks and adjusts the wheel alignment to ensure proper handling and tire wear.
3.6. Recommended Products from CARDIAGTECH.NET
At CARDIAGTECH.NET, we offer a variety of high-quality tools and equipment for tire repair. Contact us at +1 (641) 206-8880 to learn more about our products and how they can help you perform safe and effective tire repairs.
| Tool | Description |
|---|---|
| Tire Plug Kit | Includes plugs and insertion tools for temporary repairs. |
| Tire Patch Kit | Includes patches, adhesive, and a roller for permanent repairs. |
| Plug and Patch Combination Units | Combines a plug and a patch for a more reliable repair. |
| Carbide Cutter | Drills out damaged cords or belts. |
| Buffing Tool | Cleans and roughens the inner liner for patch adhesion. |
| Vulcanizing Fluid | Bonds the patch to the tire. |
| Tire Stitcher | Applies pressure to adhere the patch to the inner liner. |
| TPMS Tool | Resets the Tire Pressure Monitoring System. |
| Wheel Alignment Tool | Checks and adjusts wheel alignment. |
4. Step-by-Step Guide to Fixing a Punctured Tire
Fixing a punctured tire requires a systematic approach to ensure safety and effectiveness. Follow these step-by-step instructions to repair your tire properly. Keep in mind that this guide assumes the puncture is within the repairable area and is not too large. If you’re unsure, consult a professional.
4.1. Safety Precautions
Before you begin, make sure you have the necessary safety gear and take the following precautions:
- Park the vehicle on a level surface away from traffic.
- Engage the parking brake.
- Turn on the hazard lights.
- Place wheel chocks behind the wheels that are not being removed.
4.2. Removing the Wheel
- Loosen the Lug Nuts: Use a lug wrench to loosen the lug nuts on the punctured tire. Turn the wrench counterclockwise. Don’t remove the lug nuts completely at this stage.
- Position the Jack: Consult your vehicle’s owner’s manual for the correct jacking points. Place the jack under the designated jacking point.
- Lift the Vehicle: Raise the vehicle until the punctured tire is off the ground. Make sure the vehicle is stable before proceeding.
- Place Jack Stands: Position jack stands under the vehicle’s frame near the jacking point. Lower the vehicle onto the jack stands.
- Remove the Lug Nuts: Now, completely remove the lug nuts and set them aside in a safe place.
- Remove the Wheel: Carefully remove the wheel and tire assembly from the vehicle.
4.3. Inspecting the Tire
- Locate the Puncture: Examine the tire to locate the puncture. Remove any object that may be embedded in the tire.
- Assess the Damage: Check the size and location of the puncture. If the puncture is in the sidewall or shoulder, or if it’s larger than 1/4 inch, the tire cannot be repaired and must be replaced.
4.4. Preparing the Tire for Repair
- Deflate the Tire: Release any remaining air from the tire using a valve core removal tool.
- Clean the Area: Use a tire cleaner or soapy water to clean the area around the puncture.
- Mark the Puncture: Use a crayon or marker to mark the location of the puncture on the inside of the tire.
4.5. Repairing the Tire with a Plug and Patch Combination Unit
- Buff the Inner Liner: Use a buffing tool to roughen the inner liner around the puncture. This will help the patch adhere properly.
- Apply Vulcanizing Fluid: Apply vulcanizing fluid to the buffed area and the puncture channel. Allow it to dry for 5-10 minutes.
- Insert the Plug: Insert the plug portion of the combination unit through the puncture from the inside of the tire.
- Pull the Plug Through: Use pliers to pull the plug through the puncture until it seats firmly.
- Apply the Patch: Remove the backing from the patch and apply it to the buffed area of the inner liner.
- Stitch the Patch: Use a tire stitcher to firmly press the patch onto the inner liner, working from the center outwards to remove any air bubbles.
- Trim the Excess Plug: Use a sharp knife or scissors to trim the excess plug material on the outside of the tire, leaving about 1/4 inch of the plug protruding.
- Apply Sealant: Apply a thin layer of rubber sealant to the over-buffed area of the inner liner.
4.6. Reinstalling the Wheel
- Mount the Wheel: Carefully mount the wheel and tire assembly back onto the vehicle.
- Install the Lug Nuts: Hand-tighten the lug nuts in a star pattern to ensure even pressure.
- Lower the Vehicle: Raise the vehicle slightly with the jack to remove the jack stands. Then, carefully lower the vehicle to the ground.
- Tighten the Lug Nuts: Use a torque wrench to tighten the lug nuts to the manufacturer’s specified torque. Tighten the lug nuts in a star pattern.
- Inflate the Tire: Inflate the tire to the recommended pressure, as indicated on the tire placard or in your vehicle’s owner’s manual.
- Check for Leaks: Use soapy water to check for leaks around the repair area and the valve stem. If you find any leaks, deflate the tire and repeat the repair process.
- Balance the Wheel: Have the wheel and tire assembly balanced by a professional to ensure smooth and even wear.
4.7. Final Checks
- Inspect the Repair: After driving a short distance, re-inspect the repair area for any signs of leaks or damage.
- Monitor Tire Pressure: Regularly monitor the tire pressure to ensure it remains within the recommended range.
4.8. Step By Step Table Summary
| Step | Action | Description |
|---|---|---|
| 1 | Safety Precautions | Park on a level surface, engage parking brake, turn on hazard lights, and use wheel chocks. |
| 2 | Loosen Lug Nuts | Use a lug wrench to loosen lug nuts. |
| 3 | Position Jack | Place the jack under the designated jacking point. |
| 4 | Lift Vehicle | Raise the vehicle until the tire is off the ground and place jack stands. |
| 5 | Remove Wheel | Remove lug nuts completely and remove the wheel. |
| 6 | Inspect Tire | Locate and assess the puncture. Ensure it is repairable. |
| 7 | Deflate Tire | Release remaining air from the tire. |
| 8 | Clean and Mark | Clean the area and mark the puncture on the inside of the tire. |
| 9 | Buff Inner Liner | Roughen the inner liner around the puncture. |
| 10 | Apply Vulcanizing Fluid | Apply fluid to the buffed area and puncture channel. |
| 11 | Insert Plug | Insert the plug through the puncture from inside. |
| 12 | Apply Patch | Remove backing and apply the patch to the inner liner. |
| 13 | Stitch Patch | Use a tire stitcher to firmly press the patch. |
| 14 | Trim Excess Plug | Trim excess plug material on the outside. |
| 15 | Apply Sealant | Apply a thin layer of rubber sealant to the buffed area. |
| 16 | Mount Wheel | Carefully mount the wheel back onto the vehicle. |
| 17 | Install Lug Nuts | Hand-tighten lug nuts in a star pattern. |
| 18 | Lower Vehicle | Lower the vehicle and remove jack stands. |
| 19 | Tighten Lug Nuts | Use a torque wrench to tighten lug nuts in a star pattern. |
| 20 | Inflate Tire | Inflate the tire to the recommended pressure. |
| 21 | Check for Leaks | Use soapy water to check for leaks. |
| 22 | Balance Wheel | Have the wheel balanced by a professional. |
5. Safe Driving Tips After Tire Repair
After repairing a punctured tire, it’s essential to drive safely to ensure the longevity of the repair and your overall safety. Here are some tips to keep in mind:
5.1. Check Tire Pressure Regularly
Monitor the tire pressure frequently, especially in the days and weeks following the repair. Use a reliable tire pressure gauge to ensure the tire remains properly inflated. According to the NHTSA, proper tire inflation can improve fuel efficiency by up to 3.3%.
5.2. Avoid High Speeds
Refrain from driving at high speeds for the first few days after the repair. High speeds can put additional stress on the repaired area, increasing the risk of failure.
5.3. Monitor for Vibrations
Pay attention to any unusual vibrations or noises while driving. These could be signs of a problem with the repair or the tire itself. If you notice any vibrations, have the tire inspected by a professional.
5.4. Get a Professional Inspection
After a week or two, take your vehicle to a professional tire technician for a thorough inspection of the repair. They can check for any signs of leaks or damage and ensure the repair is holding up properly.
5.5. Consider Replacing the Tire
Keep in mind that a repaired tire may not perform as well as a new tire. If you frequently drive long distances or carry heavy loads, you may want to consider replacing the tire altogether for added safety and peace of mind.
5.6. Safe Driving Tips Table
| Driving Tip | Description |
|---|---|
| Check Tire Pressure Regularly | Monitor frequently to ensure proper inflation. |
| Avoid High Speeds | Reduce stress on the repaired area. |
| Monitor for Vibrations | Watch for signs of a problem with the repair. |
| Get a Professional Inspection | Have a technician inspect the repair after a week or two. |
| Consider Replacing the Tire | For added safety, especially if you drive long distances. |
6. Temporary vs. Permanent Tire Repairs
Understanding the difference between temporary and permanent tire repairs is crucial for ensuring your safety on the road. While temporary repairs can provide a quick fix, they are not intended to be a long-term solution.
6.1. Temporary Tire Repairs
Temporary tire repairs, such as tire plugs, are designed to get you back on the road long enough to reach a service center. These repairs are quick and easy to perform, but they do not provide a complete seal and can allow air and moisture to penetrate the tire, leading to further damage.
- Tire Plugs: These rubber or rope-like plugs are inserted into the puncture to fill the hole. They can be installed from the outside of the tire without removing the wheel.
- Tire Sealants: These liquid sealants are injected into the tire to seal small punctures. They can be effective for minor leaks, but they are not a reliable solution for larger punctures.
6.2. Permanent Tire Repairs
Permanent tire repairs involve removing the tire from the wheel and using a combination of a plug and patch to seal the puncture from the inside. This method provides a more reliable and durable repair that prevents air and moisture from entering the tire.
- Plug and Patch Combination Units: These units combine a plug and a patch for a more secure repair. The plug fills the puncture channel, while the patch reinforces the area from the inside.
- Tire Patches: These rubber patches are applied to the inside of the tire to seal the puncture. They require the use of vulcanizing fluid to bond the patch to the tire.
6.3. When to Use Temporary vs. Permanent Repairs
- Temporary Repairs: Use temporary repairs only in emergency situations to get you to a service center. Do not rely on temporary repairs for long-term use.
- Permanent Repairs: Use permanent repairs for punctures that meet the repair criteria (location, size, and condition). These repairs provide a more reliable and durable solution.
6.4. Temporary vs. Permanent Repairs Table
| Repair Type | Description | When to Use |
|---|---|---|
| Temporary Tire Repairs | Quick fix, not for long-term use. | Emergency situations only. |
| Tire Plugs | Inserted into the puncture to fill the hole. | To reach a service center. |
| Tire Sealants | Liquid sealants to seal small punctures. | For minor leaks. |
| Permanent Tire Repairs | Reliable and durable solution. | Punctures meeting repair criteria. |
| Plug and Patch Combination Units | Secure repair with plug and patch. | For a more secure repair. |
| Tire Patches | Applied to the inside of the tire. | To seal the puncture from the inside. |
7. The Importance of Professional Tire Repair
While it’s possible to repair a punctured tire yourself, there are several reasons why you should consider seeking professional assistance. Professional tire technicians have the expertise, equipment, and training to ensure a safe and reliable repair.
7.1. Expertise and Training
Professional tire technicians are trained to assess tire damage and perform repairs according to industry standards. They understand the limitations of tire repair and can determine whether a tire is safe to repair or if it needs to be replaced.
7.2. Specialized Equipment
Professional tire shops have access to specialized equipment, such as tire changers, balancers, and diagnostic tools. This equipment allows them to perform repairs more efficiently and accurately than you could at home.
7.3. Safety
Tire repair can be dangerous if not done properly. Professional technicians follow strict safety protocols to protect themselves and their customers. They use safety gear, such as safety glasses and gloves, and follow established procedures to minimize the risk of injury.
7.4. Warranty
Many professional tire shops offer warranties on their repairs. This provides added peace of mind knowing that if the repair fails, you will be covered.
7.5. Benefits of Professional Tire Repair Table
| Benefit | Description |
|---|---|
| Expertise and Training | Trained technicians to assess and repair tires. |
| Specialized Equipment | Access to equipment for efficient and accurate repairs. |
| Safety | Strict safety protocols to minimize risk of injury. |
| Warranty | Added peace of mind with repair warranties. |
8. Maintaining Your Tires to Prevent Punctures
Preventing tire punctures is always better than having to repair them. Here are some tips for maintaining your tires to reduce the risk of punctures:
8.1. Check Tire Pressure Regularly
Properly inflated tires are less susceptible to punctures. Check your tire pressure at least once a month and before long trips. Use a reliable tire pressure gauge and inflate your tires to the recommended pressure, as indicated on the tire placard or in your vehicle’s owner’s manual.
8.2. Inspect Tires Regularly
Examine your tires regularly for signs of wear, damage, or embedded objects. Look for cuts, bulges, or uneven wear patterns. Remove any stones, nails, or other debris that may be lodged in the tread.
8.3. Rotate Tires
Rotating your tires helps to distribute wear evenly, extending their lifespan and reducing the risk of punctures. Follow the manufacturer’s recommended rotation pattern, or have your tires rotated every 5,000 to 8,000 miles.
8.4. Avoid Road Hazards
Be mindful of road hazards, such as potholes, construction debris, and sharp objects. Avoid driving through these hazards whenever possible.
8.5. Use Quality Tires
Invest in high-quality tires from reputable brands. Quality tires are more durable and resistant to punctures than cheaper alternatives.
8.6. Tire Maintenance Tips Table
| Maintenance Tip | Description |
|---|---|
| Check Tire Pressure Regularly | Properly inflated tires are less susceptible to punctures. |
| Inspect Tires Regularly | Look for signs of wear, damage, or embedded objects. |
| Rotate Tires | Distribute wear evenly to extend tire lifespan. |
| Avoid Road Hazards | Be mindful of potholes and sharp objects. |
| Use Quality Tires | Invest in durable and puncture-resistant tires. |
9. Choosing the Right Tire Repair Service
Selecting the right tire repair service is crucial for ensuring a safe and effective repair. Here are some factors to consider when choosing a tire repair service:
9.1. Reputation
Look for a tire repair service with a good reputation. Check online reviews and ask for recommendations from friends and family.
9.2. Certification
Choose a tire repair service that is certified by a reputable organization, such as the Tire Industry Association (TIA). Certification indicates that the technicians have received proper training and follow industry standards.
9.3. Experience
Consider the experience of the tire repair service. A service with years of experience is more likely to have the knowledge and skills to handle your tire repair needs.
9.4. Equipment
Ensure the tire repair service has the necessary equipment for performing a safe and effective repair. This includes tire changers, balancers, and diagnostic tools.
9.5. Warranty
Choose a tire repair service that offers a warranty on their repairs. This provides added peace of mind knowing that if the repair fails, you will be covered.
9.6. Factors to Consider Table
| Factor | Description |
|---|---|
| Reputation | Check online reviews and ask for recommendations. |
| Certification | Look for certification from reputable organizations. |
| Experience | Consider the years of experience of the service. |
| Equipment | Ensure the service has the necessary equipment. |
| Warranty | Choose a service that offers a warranty on repairs. |
10. Frequently Asked Questions (FAQs) About Tire Repair
10.1. Is it safe to drive with a repaired tire?
Yes, if the tire is repaired properly by a qualified technician and meets all safety guidelines. However, it’s always best to monitor the tire regularly and consider replacing it if you have any concerns.
10.2. How long does a tire repair last?
A properly performed tire repair can last for the life of the tire. However, it’s essential to monitor the repair and the tire’s overall condition regularly.
10.3. Can I repair a tire with a sidewall puncture?
No, punctures in the sidewall are generally not repairable. The sidewall is a critical structural component of the tire and is subject to significant stress and flexing.
10.4. What is the maximum size puncture that can be repaired?
Most tire manufacturers and repair professionals recommend that punctures larger than 1/4 inch (6mm) in diameter should not be repaired.
10.5. Can I use a tire plug as a permanent repair?
No, tire plugs are intended for temporary use only. They do not provide a complete seal and can allow air and moisture to penetrate the tire.
10.6. How often should I check my tire pressure?
You should check your tire pressure at least once a month and before long trips.
10.7. What is the recommended tire pressure for my vehicle?
The recommended tire pressure is usually listed on the tire placard, which is typically located on the driver’s side doorjamb or in your vehicle’s owner’s manual.
10.8. How do I know if my tires need to be rotated?
You should rotate your tires every 5,000 to 8,000 miles, or as recommended by the tire manufacturer.
10.9. What are the signs of a tire blowout?
Signs of a tire blowout include a sudden loss of control, loud noises, and vibrations in the steering wheel.
10.10. Where can I find reliable tire repair services?
You can find reliable tire repair services by checking online reviews, asking for recommendations, and looking for certified technicians. Contact CARDIAGTECH.NET at +1 (641) 206-8880 for expert advice and assistance in finding a trusted tire repair service.
Don’t let a punctured tire slow you down. With the right tools and knowledge, you can safely repair your tire and get back on the road. Remember to prioritize safety and consult a professional if you have any doubts. For all your automotive diagnostic and repair needs, trust CARDIAGTECH.NET. Visit us at 276 Reock St, City of Orange, NJ 07050, United States, or call us at +1 (641) 206-8880. Let us help you keep your vehicle running smoothly! Contact CARDIAGTECH.NET today and elevate your auto repair capabilities with top-tier tools and support.