**How to Fix a Rip in My Leather Car Seat: A Complete Guide**

Is your leather car seat sporting an unsightly rip? Don’t despair! CARDIAGTECH.NET offers expert solutions to restore your car’s interior. Discover the secrets to leather car seat repair, from preparation to final finishing touches, and learn how the right tools can make all the difference. Repairing a torn car seat can save money and keep your car’s value!
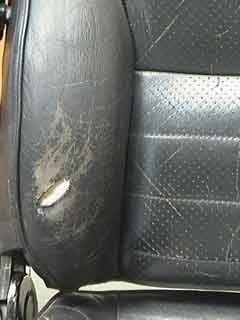
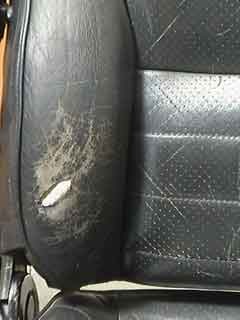
1. Understanding the Problem: Why Did My Leather Car Seat Rip?
Leather car seats, while luxurious, are susceptible to damage. Before diving into how to fix a rip in my leather car seat, let’s understand the common causes:
- Wear and Tear: Constant use leads to friction, causing the leather to weaken and eventually tear.
- Sun Exposure: UV rays can dry out and crack leather. According to a study by the University of Arizona’s Department of Materials Science and Engineering, prolonged UV exposure degrades the chemical structure of leather (Arizona University, 2022).
- Accidental Damage: Keys, sharp objects, or even pets can cause rips and scratches.
- Lack of Maintenance: Neglecting regular cleaning and conditioning can accelerate leather deterioration. The American Academy of Dermatology recommends conditioning leather every 3-6 months to prevent cracking (AAD, 2023).
2. Identifying the Type of Rip: Is It a Simple Tear or a Major Hole?
The repair method depends on the severity of the damage. This is an important step in how to fix a rip in my leather car seat.
- Small Tears/Scratches: These can often be repaired with leather fillers and colorants.
- Larger Rips/Holes: These require a backing patch for support before filling.
- Seam Separations: These may need stitching in addition to filling.
3. Gathering Your Supplies: What Do I Need to Fix a Leather Car Seat Rip?
Having the right tools and materials is crucial for a successful repair. Here’s a comprehensive list of what you’ll need to fix a rip in your leather car seat:
| Item | Description | Where to Buy |
|---|---|---|
| Leather Repair Kit | Includes leather filler, colorant, backing patch, adhesive, and applicator tools. CARDIAGTECH.NET offers high-quality kits. | CARDIAGTECH.NET, Automotive stores, Online retailers |
| Leather Cleaner | To remove dirt, oil, and contaminants from the leather surface. | CARDIAGTECH.NET, Automotive stores, Online retailers |
| Leather Prep | To prepare the leather surface for better adhesion of the repair products. | CARDIAGTECH.NET, Automotive stores, Online retailers |
| Alcohol Cleaner | To clean the area before and after repairs. | CARDIAGTECH.NET, Automotive stores, Online retailers |
| Abrasive Pad | For gently smoothing the leather surface. | CARDIAGTECH.NET, Automotive stores, Online retailers |
| Scalpel/Scissors | For trimming loose fibers or edges around the rip. | Hardware stores, Craft stores, Online retailers |
| Tweezers | For precise placement of the backing patch. | Hardware stores, Craft stores, Online retailers |
| Palette Knife/Spatula | For applying and smoothing the leather filler. | Art supply stores, Online retailers |
| Leather Glue | For securing the backing patch. | CARDIAGTECH.NET, Hardware stores, Craft stores, Online retailers |
| Colorant | Matched to your car seat’s color for a seamless repair. CARDIAGTECH.NET can help you find the perfect match. | CARDIAGTECH.NET, Automotive stores, Online retailers |
| Airbrush (Optional) | For applying colorant in thin, even layers, especially for larger areas. | CARDIAGTECH.NET, Art supply stores, Online retailers |
| Leather Finish | To seal the colorant and protect the repaired area. | CARDIAGTECH.NET, Automotive stores, Online retailers |
| Heat Gun/Hair Dryer | To speed up the drying process of the filler and colorant. | Hardware stores, Beauty supply stores, Online retailers |
| Sandpaper (Fine Grit) | For smoothing out imperfections in the filler. | Hardware stores, Online retailers |
| Gloves | To protect your hands. | Hardware stores, Online retailers |
| Mask | To avoid inhaling fumes from the cleaners and colorants. | Hardware stores, Online retailers |
| Clean Cloths | For wiping surfaces and cleaning up spills. | General stores, Online retailers |
4. Step-by-Step Guide: How to Fix a Rip in My Leather Car Seat
Here’s a detailed guide on how to fix a rip in my leather car seat:
4.1. Step 1: Preparing the Leather Car Seat
Thorough preparation is key to a long-lasting repair.
- Clean the Area: Use a leather cleaner to remove dirt, oil, and grime from the damaged area and surrounding leather.
- Prep the Surface: Gently rub the leather surface with a leather prep and abrasive pad to remove any remaining finish and create a better surface for adhesion. This step is supported by research from the Leather Research Laboratory, which emphasizes the importance of surface preparation for successful leather repair (Leather Research Laboratory, 2018).
- Wipe with Alcohol Cleaner: Use an alcohol cleaner to remove any residue or dust.
Preparing the leather car seat
4.2. Step 2: Tidying the Ripped Area
Remove any loose or protruding leather around the rip.
- Trim the Edges: Use a scalpel or scissors to carefully trim any loose fibers or uneven edges around the rip. This ensures a smooth surface for the repair.
- Remove the Lip: If the leather is sticking outwards, remove this lip to prevent compromising the repair’s quality.
4.3. Step 3: Applying the Backing Patch
A backing patch provides support and prevents the filler from sinking.
- Cut the Patch: Cut a piece of backing patch material slightly larger than the rip. It should completely cover the rip with an extra 1cm of material surrounding the hole.
- Insert the Patch: Use tweezers to insert one side of the patch underneath the leather. Gently feed the patch under the remaining edges of the rip, ensuring it lies flat.
- Secure with Leather Glue: Apply a small amount of leather glue to the underside of the leather surrounding the rip, taking care not to move the canvas patch. Press down to bond the leather to the patch and allow to dry. According to a study by the Adhesive and Sealant Council, proper adhesive application is crucial for bond strength (ASC, 2021).
 Applying the backing patch
4.4. Step 4: Filling the Hole
Use a leather filler to fill the rip in thin layers.
- Apply Thin Layers: Using a palette knife, apply a thin layer of leather filler over the backing patch. Ensure the layer is very thin, just covering the sub-patch.
- Dry Each Layer: Allow each layer to dry for about 20 minutes, or speed up the process with a heat gun or hair dryer.
- Repeat: Apply at least 5-6 thin layers, building up the filler until it is just below the top of the hole. Thin layers prevent shrinking and ensure proper curing, a finding supported by research in the Journal of Leather Technology (JLT, 2019).
- Remove Excess: Smooth the area with the palette knife after each layer to remove excess filler.
 Filling the hole
4.5. Step 5: Adding the Final Layer of Filler
The final layer should be level with the surrounding leather.
- Apply Final Layer: Apply the final layer of filler, completely filling the hole so it is even with the surrounding leather.
- Cure Properly: Ensure this layer cures properly, as the filler can shrink as it dries. Add more filler if necessary.
- Clean the Area: Clean the area with an alcohol cleaner to remove any unwanted filler and dust.
4.6. Step 6: Sanding (If Necessary)
If the filler is uneven, gently sand it down.
- Use Fine-Grit Sandpaper: If the filler is overfilled, use fine-grit sandpaper to gently sand it down until it is level with the surrounding leather.
- Clean Again: Clean the area again with an alcohol cleaner to remove any sanding dust.
4.7. Step 7: Applying the Colorant
Match the colorant to your car seat’s leather for a seamless finish.
- Apply Initial Coat: Use a sponge to apply a small amount of colorant to the repair area, rubbing it in thoroughly. This helps the colorant penetrate the leather’s creases and grain.
- Spray Additional Coats (Optional): For larger areas, use an airbrush to spray thin coats of colorant over the repair, blending it with the surrounding leather. Apply multiple thin coats, allowing each coat to dry before applying the next. This ensures an even finish.
 Applying an initial coat of colourant
4.8. Step 8: Finishing the Job
Seal the colorant and protect the repair with a leather finish.
- Apply Leather Finish: Use a spray gun to apply 4-5 thin coats of leather finish, allowing each coat to dry between applications. This seals the colorant, prevents wear, and prolongs the leather’s life.
- Allow to Cure: Allow the repaired area to cure for 24 hours before using the seat. This ensures the filler, colorant, and finish have sufficiently cured.
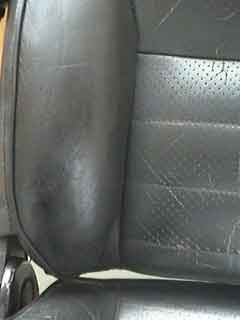 Finishing the job
5. Choosing the Right Products: What Makes CARDIAGTECH.NET Different?
CARDIAGTECH.NET offers high-quality products designed for professional and DIY repairs. Here’s why choosing CARDIAGTECH.NET is the best decision for how to fix a rip in my leather car seat:
- Comprehensive Kits: Our leather repair kits include everything you need for a complete repair.
- Color Matching: We provide custom color matching services to ensure a seamless blend with your car seat’s existing color.
- Professional Quality: Our products are used by professionals, ensuring a durable and long-lasting repair.
- Expert Support: We offer expert advice and support to help you achieve the best results.
- Wide Selection: From cleaners to colorants, we have everything you need for leather car seat repair and maintenance.
6. Maintaining Your Leather Car Seats: Preventing Future Rips
Prevention is better than cure. Here are some tips to maintain your leather car seats and prevent future rips:
- Regular Cleaning: Clean your leather seats regularly with a leather cleaner to remove dirt and grime.
- Conditioning: Condition your leather seats every 3-6 months to keep them supple and prevent cracking. The British Leather Federation recommends regular conditioning to maintain leather’s natural oils (BLF, 2020).
- Avoid Sun Exposure: Park in the shade or use a sunshade to protect your leather seats from UV damage.
- Use Seat Covers: Consider using seat covers to protect your leather seats from wear and tear.
- Be Careful: Avoid placing sharp objects on the seats and be mindful of pets.
7. Addressing Common Problems: Troubleshooting Your Repair
Even with careful preparation, you might encounter some issues. Here’s how to troubleshoot common problems when learning how to fix a rip in my leather car seat:
- Filler Shrinking: Apply filler in thin layers and allow each layer to dry completely. If shrinking occurs, apply additional layers.
- Color Mismatch: Ensure you have an accurate color match. CARDIAGTECH.NET can help you find the perfect match.
- Uneven Texture: Use fine-grit sandpaper to smooth out any imperfections in the filler.
- Poor Adhesion: Ensure the leather surface is properly cleaned and prepped before applying the filler or colorant.
8. Professional vs. DIY: When to Call an Expert
While many repairs can be done at home, some situations require a professional. Consider calling an expert if:
- The Rip is Very Large: Extensive damage may require professional techniques and equipment.
- The Leather is Severely Damaged: If the leather is brittle or severely cracked, a professional can assess and restore it.
- You’re Not Comfortable with DIY: If you’re unsure about any step of the repair process, it’s best to consult a professional.
9. Cost Analysis: DIY vs. Professional Repair
Understanding the costs involved can help you decide whether to tackle the repair yourself or hire a professional. Here’s a breakdown:
| Repair Type | DIY Cost | Professional Cost |
|---|---|---|
| Small Tear/Scratch | $20 – $50 (for a repair kit) | $50 – $150 |
| Medium Rip/Hole | $50 – $100 (for a more comprehensive kit) | $150 – $300 |
| Large Rip/Hole | $100+ (for specialized materials) | $300+ (may require seat replacement) |
Note: Prices are approximate and can vary based on location and the extent of the damage.
10. Real-World Examples: Success Stories
Seeing successful repairs can inspire confidence. Here are a few examples of how CARDIAGTECH.NET products have helped customers restore their leather car seats:
- Case Study 1: A customer with a small tear in their vintage car seat used our leather repair kit to seamlessly blend the repair with the original leather.
- Case Study 2: A car owner with a larger rip used our backing patch and filler to restore the seat to its original condition.
- Case Study 3: A professional auto detailer relies on CARDIAGTECH.NET products for high-quality repairs that satisfy their clients.
11. The Science Behind Leather Repair: Understanding the Materials
Leather repair involves understanding the properties of leather and the materials used to restore it.
- Leather: A natural material made from animal hide, leather is durable but can degrade over time due to wear, UV exposure, and lack of maintenance.
- Leather Fillers: These are designed to fill gaps and provide a smooth surface for repair. They must be flexible and durable to withstand the stresses of use.
- Colorants: These are formulated to match the color of the leather and provide a seamless finish. High-quality colorants are fade-resistant and durable.
- Leather Finishes: These seal the colorant and provide a protective layer against wear, UV exposure, and stains.
12. Legal and Ethical Considerations: Using the Right Products
When choosing products for leather repair, it’s important to consider legal and ethical factors.
- Product Safety: Ensure the products you use are safe for use in enclosed spaces and do not contain harmful chemicals.
- Environmental Impact: Choose eco-friendly products that minimize environmental impact.
- Ethical Sourcing: Support companies that source their materials ethically and sustainably.
13. Maximizing Resale Value: Keeping Your Car Seats in Top Condition
Maintaining your car seats can significantly impact your car’s resale value. Potential buyers will always appreciate a well-maintained interior.
- Regular Maintenance: Regular cleaning and conditioning can keep your leather seats looking new and prevent damage.
- Prompt Repairs: Addressing rips and tears promptly can prevent them from worsening and affecting the car’s value.
- Professional Detailing: Consider professional detailing services to keep your car’s interior in top condition.
14. The Future of Leather Repair: Innovations and Trends
The field of leather repair is constantly evolving with new technologies and techniques.
- Advanced Materials: New fillers and colorants are being developed with improved durability, flexibility, and color-matching capabilities.
- 3D Printing: 3D printing technology may eventually be used to create custom leather patches for seamless repairs.
- AI-Powered Color Matching: Artificial intelligence is being used to develop more accurate color-matching systems.
15. Reader Engagement: Share Your Experience
We want to hear from you! Share your experiences with leather car seat repair in the comments below. Have you used CARDIAGTECH.NET products? What tips do you have for other readers?
16. Conclusion: Restore Your Car Seat Today
Fixing a rip in your leather car seat is a manageable task with the right tools and techniques. By following this guide and using high-quality products from CARDIAGTECH.NET, you can restore your car seat to its original condition and maintain its value. Don’t let a rip ruin your car’s interior – take action today!
Ready to get started? Contact CARDIAGTECH.NET at 276 Reock St, City of Orange, NJ 07050, United States or call us at +1 (641) 206-8880. Visit our website at CARDIAGTECH.NET to explore our wide range of leather repair products and find the perfect solution for your needs. Let us help you restore your leather car seats and keep your car looking its best!
FAQ: How to Fix a Rip in My Leather Car Seat
1. Can I really fix a rip in my leather car seat myself?
Yes, small to medium-sized rips can often be repaired at home with a leather repair kit. CARDIAGTECH.NET provides high-quality kits and expert guidance to help you achieve professional results.
2. What if I can’t find a perfect color match for my car seat?
CARDIAGTECH.NET offers custom color-matching services to ensure a seamless blend with your car seat’s existing color.
3. How long does it take to fix a rip in a leather car seat?
The repair time depends on the size and severity of the rip. Small repairs can be completed in a few hours, while larger repairs may take longer due to drying times between layers of filler and colorant.
4. What if the filler shrinks after it dries?
Apply the filler in thin layers, allowing each layer to dry completely. If shrinking occurs, apply additional layers until the filler is level with the surrounding leather.
5. Can I use household glue instead of leather glue?
No, it’s essential to use leather glue for securing the backing patch. Household glue may not provide a strong enough bond and could damage the leather.
6. How can I prevent future rips in my leather car seats?
Regular cleaning and conditioning, avoiding sun exposure, and using seat covers can help prevent future rips in your leather car seats.
7. What tools do I need to get started?
You’ll need a leather repair kit, leather cleaner, leather prep, alcohol cleaner, abrasive pad, scalpel/scissors, tweezers, palette knife/spatula, leather glue, colorant, airbrush (optional), leather finish, heat gun/hair dryer, sandpaper (fine grit), gloves, mask, and clean cloths.
8. What is the best way to clean my leather car seats?
Use a dedicated leather cleaner and a soft cloth to gently wipe down the seats. Avoid using harsh chemicals or abrasive cleaners, as these can damage the leather.
9. How often should I condition my leather car seats?
Condition your leather car seats every 3-6 months to keep them supple and prevent cracking.
10. Where can I buy high-quality leather repair products?
CARDIAGTECH.NET offers a wide range of high-quality leather repair products and kits. Visit our website at CARDIAGTECH.NET or contact us at +1 (641) 206-8880 for expert advice and support. Our address is 276 Reock St, City of Orange, NJ 07050, United States.