How to Fix a Seal on a Car Door: A Comprehensive Guide
Is your car cabin noisy, drafty, or prone to water leaks? At CARDIAGTECH.NET, we understand how frustrating it can be when your car’s door seals fail. Replacing worn or damaged door seals can dramatically improve your driving experience. This guide will show you how to fix a seal on a car door effectively and efficiently, ensuring a quiet, comfortable, and dry ride. Learn more about door weatherstripping replacement, automotive seal repair, and weather seal maintenance.
1. Understanding the Importance of Car Door Seals
Car door seals, often referred to as weatherstripping, are crucial components that protect your vehicle’s interior from the elements. These seals are typically made of rubber or synthetic materials and are designed to create a barrier between the door and the car’s frame. Let’s explore why these seals are so important:
- Protection from the elements: Door seals prevent rain, snow, wind, and debris from entering the cabin, keeping you and your passengers comfortable.
- Noise reduction: Properly functioning seals minimize road noise, creating a quieter and more enjoyable driving experience.
- Temperature control: Effective seals help maintain a consistent cabin temperature, improving the efficiency of your car’s heating and cooling systems.
- Prevention of rust and corrosion: By keeping moisture out, door seals help prevent rust and corrosion, extending the life of your vehicle.
1.1. Types of Car Door Seals
Different types of door seals are designed for specific areas of the vehicle. Here are some common types:
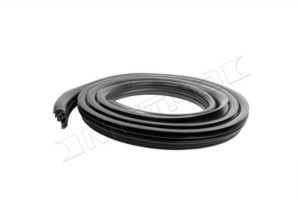
- Tubular rubber seals: Typically used as door seals due to their excellent sealing properties.
- Bulb and V-seals: Often found around permanently fixed glass, providing a tight seal against the elements.
- Sponge and solid seals: Used in areas with infrequent movement, such as the trunk or hood.
- Beltline moldings: Employed to seal movable glass to the door panel, ensuring a weather-tight fit.
1.2. Signs of Failing Car Door Seals
Recognizing the signs of failing door seals is the first step in addressing the problem. Here are some common indicators that your car’s door seals may need replacement:
- Visible damage: Cracks, tears, or breaks in the material are clear signs of wear and tear.
- Loose or detached seals: If the seals are hanging loose or have become detached from the door frame, they are no longer providing an effective barrier.
- Water leaks: Water entering the cabin during rain or car washes is a telltale sign of compromised door seals.
- Increased road noise: If you notice a significant increase in road noise, it could be due to gaps in the door seals.
- Drafts: Feeling drafts inside the car, especially around the doors, indicates that the seals are not properly sealing the cabin.
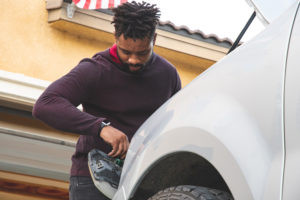
Cracked car door seal indicating wear and need for replacement
Alternative Text: Severely cracked and damaged car door weatherstripping, highlighting the need for weather seal replacement to prevent leaks and noise. Consider professional automotive seal repair for optimal results.
2. Essential Tools and Materials for Door Seal Repair
Before you begin the process of fixing a seal on your car door, it’s essential to gather the necessary tools and materials. Having everything on hand will make the job smoother and more efficient. CARDIAGTECH.NET offers a wide range of high-quality tools and equipment to assist you with your automotive repair needs.
2.1. List of Required Tools and Materials
Here’s a comprehensive list of what you’ll need:
- New weatherstripping: Ensure it is compatible with your vehicle’s make and model.
- Utility knife: For trimming the weatherstripping to the correct length.
- Flathead screwdriver: For prying off the old weatherstripping.
- Cleaning solution: Rubbing alcohol or a mild detergent to clean the door frame.
- Clean rags: For wiping down surfaces and applying cleaning solutions.
- Weatherstripping adhesive: For securing the new weatherstripping in place.
- Trim removal tools: To remove any clips or fasteners without damaging the surrounding areas.
- Lubricant: A silicone-based lubricant to keep the weatherstripping pliable.
- Heat gun or hairdryer: To soften the adhesive of the old weatherstripping for easier removal.
- Measuring tape: For precise measurements when cutting the new weatherstripping.
- Gloves: To protect your hands from chemicals and sharp objects.
- Safety glasses: To protect your eyes from debris and cleaning solutions.
2.2. Choosing the Right Weatherstripping
Selecting the correct weatherstripping is crucial for a successful repair. Consider the following factors when choosing replacement seals:
- Vehicle compatibility: Ensure the weatherstripping is specifically designed for your car’s make, model, and year.
- Material quality: Opt for high-quality rubber or synthetic materials that are durable and resistant to cracking and wear.
- Seal type: Choose the appropriate seal type for the specific area of the door you are repairing (e.g., tubular, bulb, sponge).
- Adhesive backing: Consider weatherstripping with pre-applied adhesive for easier installation.
At CARDIAGTECH.NET, we offer a wide selection of weatherstripping from trusted brands to ensure you get the perfect fit for your vehicle.
2.3. Recommended Brands and Products
Here are some recommended brands and products for door seal repair:
- 3M: Known for their high-quality adhesives and sealants.
- Permatex: Offers a range of weatherstripping adhesives specifically designed for automotive applications.
- Metro Moulded Parts: Specializes in high-quality molded rubber parts, including weatherstripping.
- Fairchild Industries: Provides a wide range of automotive weatherstripping and seals.
 Utility knife for precise cutting of weatherstripping
Alternative Text: A sharp utility knife with a snap blade, essential for cutting weatherstripping to the correct size for a precise car door seal repair. Ensure accuracy in automotive seal repair for optimal fit.
3. Step-by-Step Guide to Removing Old Weatherstripping
Removing the old weatherstripping is a critical step in the repair process. Proper removal ensures that the new seals will adhere correctly and provide a tight, weather-resistant fit.
3.1. Preparing the Vehicle
Before you start, prepare the vehicle by:
- Parking in a well-lit area: This will provide better visibility and make the job easier.
- Opening the door: Ensure the door is fully open to provide easy access to the weatherstripping.
- Protecting the surrounding area: Use masking tape or a drop cloth to protect the paint and trim around the door frame.
3.2. Inspecting the Old Weatherstripping
Carefully inspect the old weatherstripping to identify how it is attached to the door frame. Note any clips, fasteners, or adhesive that may need to be removed.
3.3. Removing Weatherstripping with Adhesive
If the weatherstripping is attached with adhesive, follow these steps:
- Softening the adhesive: Use a heat gun or hairdryer to gently heat the adhesive. This will make it easier to remove the weatherstripping without damaging the paint.
- Prying off the weatherstripping: Insert a flathead screwdriver or trim removal tool under the edge of the weatherstripping. Gently pry it away from the door frame, working your way along the entire length of the seal.
- Removing adhesive residue: Use a solvent or adhesive remover to clean any remaining residue from the door frame.
3.4. Removing Weatherstripping with Clips or Fasteners
If the weatherstripping is attached with clips or fasteners, follow these steps:
- Locating the clips: Identify the location of all clips or fasteners along the weatherstripping.
- Using trim removal tools: Use a trim removal tool to gently pry the clips away from the door frame. Be careful not to break the clips or damage the surrounding area.
- Removing the weatherstripping: Once all the clips are removed, carefully pull the weatherstripping away from the door frame.
3.5. Cleaning the Door Frame
After removing the old weatherstripping, thoroughly clean the door frame to remove any dirt, debris, or adhesive residue. Use a cleaning solution (such as rubbing alcohol or a mild detergent) and a clean rag to wipe down the surface. Ensure the surface is completely dry before proceeding to the next step.
4. Installing New Car Door Weatherstripping
With the old weatherstripping removed and the door frame cleaned, you’re ready to install the new seals. Proper installation is essential to ensure a tight, weather-resistant fit.
4.1. Measuring and Cutting the New Weatherstripping
- Measuring: Use a measuring tape to determine the exact length of weatherstripping needed for each section of the door frame.
- Cutting: Use a utility knife or shears to cut the new weatherstripping to the correct length. Be precise with your cuts to ensure a snug fit.
4.2. Applying Adhesive
If your new weatherstripping does not have pre-applied adhesive, you will need to apply weatherstripping adhesive. Follow these steps:
- Applying adhesive to the door frame: Apply a thin, even layer of weatherstripping adhesive to the door frame where the new seal will be attached.
- Applying adhesive to the weatherstripping: Apply a thin layer of adhesive to the back of the new weatherstripping.
- Allowing adhesive to tack: Allow the adhesive to tack up for a few minutes before attaching the weatherstripping to the door frame. This will ensure a stronger bond.
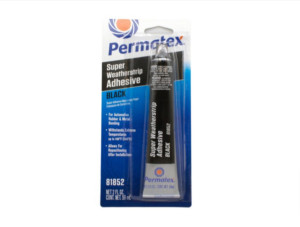 Permatex Weatherstrip Adhesive for secure seal installation
Alternative Text: Permatex black super weatherstrip adhesive, crucial for securely attaching new weatherstripping and ensuring long-lasting automotive seal repair. Essential for effective weather seal maintenance.
4.3. Attaching the Weatherstripping
- Aligning the weatherstripping: Carefully align the new weatherstripping with the door frame, ensuring it is properly positioned.
- Pressing into place: Press the weatherstripping firmly against the door frame, working your way along the entire length of the seal.
- Using clips or fasteners: If your weatherstripping uses clips or fasteners, attach them securely to the door frame.
4.4. Ensuring a Proper Seal
- Closing the door: Close the door and inspect the seal to ensure it is tight and even.
- Making adjustments: If necessary, make any adjustments to the weatherstripping to ensure a proper seal.
- Allowing adhesive to cure: Allow the adhesive to cure for the recommended amount of time before using the door.
4.5. Testing the Seal
- Water test: Use a hose to spray water around the door frame and check for any leaks inside the cabin.
- Noise test: Drive the vehicle and listen for any excessive road noise.
- Adjustments: If you detect any leaks or excessive noise, make further adjustments to the weatherstripping as needed.
5. Importance of Automotive Seal Maintenance
Proper maintenance of your car’s door seals is essential for prolonging their life and ensuring optimal performance. Regular maintenance can prevent premature wear and tear, saving you money on costly repairs in the long run.
5.1. Regular Cleaning
- Washing: Wash your car regularly, paying attention to the door seals. Use a mild detergent and water to remove dirt, debris, and grime.
- Drying: After washing, thoroughly dry the door seals to prevent moisture buildup and mold growth.
5.2. Lubrication
- Silicone lubricant: Apply a silicone-based lubricant to the door seals every few months to keep them pliable and prevent cracking.
- Application: Spray the lubricant onto a clean rag and wipe it onto the door seals, ensuring even coverage.
5.3. Inspection
- Visual inspection: Regularly inspect the door seals for any signs of wear and tear, such as cracks, tears, or loose areas.
- Early detection: Catching minor issues early can prevent them from escalating into major problems.
5.4. Protection
- UV protection: Park your car in a shaded area or use a car cover to protect the door seals from harmful UV rays.
- Extreme temperatures: Avoid exposing your car to extreme temperatures, as this can cause the door seals to dry out and crack.
6. Benefits of Replacing Worn Door Seals
Replacing worn door seals offers numerous benefits that enhance your driving experience and protect your vehicle.
6.1. Enhanced Comfort
- Reduced noise: New door seals significantly reduce road noise, creating a quieter and more comfortable cabin environment.
- Draft prevention: Properly functioning seals eliminate drafts, keeping you and your passengers warm in the winter and cool in the summer.
6.2. Improved Climate Control
- Efficient heating and cooling: New door seals help maintain a consistent cabin temperature, improving the efficiency of your car’s heating and cooling systems.
- Energy savings: By preventing air leaks, new seals can reduce the workload on your car’s HVAC system, saving you money on fuel or electricity.
6.3. Protection from the Elements
- Water leak prevention: New door seals prevent water from entering the cabin during rain or car washes, protecting your car’s interior from damage.
- Rust prevention: By keeping moisture out, new seals help prevent rust and corrosion, extending the life of your vehicle.
6.4. Cost Savings
- Reduced energy costs: Improved climate control efficiency can lead to lower fuel or electricity bills.
- Prevention of costly repairs: By preventing water damage and rust, new door seals can save you money on expensive repairs in the future.
7. Troubleshooting Common Issues
Even with careful installation, you may encounter some common issues when replacing door seals. Here’s how to troubleshoot them:
7.1. Leaks After Installation
- Check alignment: Ensure the weatherstripping is properly aligned with the door frame.
- Apply more adhesive: If necessary, apply additional weatherstripping adhesive to areas where leaks are occurring.
- Adjust the door latch: In some cases, adjusting the door latch can help create a tighter seal.
7.2. Excessive Noise
- Check for gaps: Inspect the weatherstripping for any gaps or loose areas.
- Add sound dampening material: Consider adding sound dampening material to the door panels to further reduce noise.
- Ensure proper fit: Make sure the weatherstripping is the correct size and shape for your vehicle.
7.3. Difficulty Closing the Door
- Check for obstructions: Ensure there are no obstructions preventing the door from closing properly.
- Adjust the weatherstripping: If the weatherstripping is too thick, it may be difficult to close the door. Try adjusting the weatherstripping or using a thinner seal.
- Lubricate the door latch: Lubricating the door latch can help the door close more smoothly.
8. When to Seek Professional Help
While replacing door seals is a DIY-friendly task, there are situations where it’s best to seek professional help.
8.1. Extensive Damage
If the door frame or surrounding areas are extensively damaged, it’s best to consult with a professional body shop.
8.2. Complex Installations
Some vehicles have complex door seal designs that require specialized tools and expertise to install properly.
8.3. Lack of Experience
If you’re not comfortable working on your car or lack the necessary experience, it’s best to leave the job to a professional.
8.4. Ensuring Quality
A professional can ensure that the job is done correctly and that the new door seals provide a tight, weather-resistant fit.
9. Cost Considerations for Door Seal Repair
The cost of door seal repair can vary depending on several factors, including the type of weatherstripping, the complexity of the installation, and whether you choose to do it yourself or hire a professional.
9.1. DIY vs. Professional Repair
- DIY: Doing it yourself can save you money on labor costs, but you’ll need to purchase the necessary tools and materials.
- Professional repair: Hiring a professional will cost more, but you’ll benefit from their expertise and experience.
9.2. Factors Affecting Cost
- Type of weatherstripping: The cost of weatherstripping can vary depending on the material, quality, and brand.
- Complexity of installation: More complex installations may require more time and labor, increasing the overall cost.
- Additional repairs: If there is any damage to the door frame or surrounding areas, additional repairs may be necessary, adding to the cost.
9.3. Estimated Costs
- DIY: The cost of DIY door seal repair typically ranges from $50 to $200, depending on the cost of the weatherstripping and any tools you need to purchase.
- Professional repair: The cost of professional door seal repair can range from $150 to $500, depending on the labor rates in your area and the complexity of the job.
10. Why Choose CARDIAGTECH.NET for Your Automotive Needs?
At CARDIAGTECH.NET, we understand the importance of having the right tools and equipment for your automotive repair needs. We offer a wide selection of high-quality products, expert advice, and exceptional customer service to help you get the job done right.
10.1. Wide Range of Products
We offer a comprehensive selection of automotive tools, equipment, and parts, including weatherstripping, adhesives, trim removal tools, and more.
10.2. High-Quality Products
We only carry products from trusted brands that are known for their quality, durability, and performance.
10.3. Expert Advice
Our team of experienced technicians is available to provide expert advice and guidance on all your automotive repair needs.
10.4. Exceptional Customer Service
We are committed to providing exceptional customer service and ensuring that you are completely satisfied with your purchase.
10.5. Convenient Shopping
Our online store makes it easy to shop for the products you need from the comfort of your own home.
Fixing a seal on your car door is a straightforward process that can significantly improve your driving experience. By following this comprehensive guide and using the right tools and materials, you can effectively repair or replace your car’s door seals and enjoy a quieter, more comfortable, and weather-resistant ride.
Don’t let worn or damaged door seals compromise your comfort and safety. Visit CARDIAGTECH.NET today and discover the tools and equipment you need to keep your car in top condition. Contact us at Whatsapp: +1 (641) 206-8880 or visit our location at 276 Reock St, City of Orange, NJ 07050, United States.
FAQ: Fixing Car Door Seals
1. How do I know if my car door seals need replacing?
Check for visible damage like cracks or tears, water leaks, increased road noise, or drafts.
2. Can I replace car door seals myself?
Yes, it’s a DIY-friendly task with the right tools and a step-by-step guide.
3. What tools do I need to replace car door seals?
You’ll need new weatherstripping, a utility knife, a flathead screwdriver, cleaning solution, clean rags, weatherstripping adhesive, trim removal tools, and a lubricant.
4. How do I remove old weatherstripping?
Soften the adhesive with a heat gun or hairdryer, then gently pry it off with a screwdriver or trim removal tool. Clean any residue.
5. How do I install new weatherstripping?
Measure and cut the new weatherstripping, apply adhesive if needed, align it with the door frame, press it firmly into place, and use clips or fasteners to secure it.
6. What kind of adhesive should I use for weatherstripping?
Use weatherstripping adhesive specifically designed for automotive applications, such as Permatex.
7. How can I maintain my car door seals?
Regularly clean the seals with mild detergent and water, lubricate them with silicone spray, and inspect them for wear and tear.
8. Can new door seals improve fuel efficiency?
New door seals can improve the aerodynamics of your vehicle, which might positively impact fuel efficiency, although it’s unlikely to be a noticeable difference.
9. Is it necessary to replace weatherstripping on all doors?
While you may choose to replace stripping for one door at a time, you might want to replace the weatherstripping on all doors simultaneously for consistency.
10. How often should car weatherstripping be replaced?
Depending on environmental conditions and usage, weatherstripping should last around five to ten years. However, individual strips may wear out more quickly, while others might never need to be replaced.
Still have questions or need assistance with your car door seal repair? Contact CARDIAGTECH.NET today for expert advice and high-quality automotive tools. Reach us at Whatsapp: +1 (641) 206-8880 or visit our location at 276 Reock St, City of Orange, NJ 07050, United States. Our team is ready to help you achieve a perfect seal every time.