How to Fix a Slow Leak in a Car Tire: A Complete Guide
Fixing a slow leak in a car tire is manageable with the right knowledge and tools. CARDIAGTECH.NET offers comprehensive solutions to address tire leaks, ensuring you can maintain optimal tire pressure and vehicle safety. Addressing the problem promptly is crucial for safety and tire longevity; read on to explore our expert advice and product recommendations.
Table of Contents
1. Identifying a Slow Leak in Your Car Tire
- 1.1. Recognizing the Signs
- 1.2. Using a Tire Pressure Monitoring System (TPMS)
- 1.3. Manual Tire Pressure Checks
2. Pinpointing the Source of the Leak - 2.1. The Bubble Test: Soap and Water Method
- 2.2. Using Commercial Leak Detectors
3. Temporary Fixes for Slow Leaks - 3.1. Tire Sealants: Pros and Cons
- 3.2. Using a Tire Repair Kit
- 3.3. Portable Air Compressors
4. Professional Tire Repair Options - 4.1. When to Consult a Tire Technician
- 4.2. Tire Patching vs. Tire Plugging
- 4.3. Valve Stem Replacement
- 4.4. Addressing Leaks from the Tire Bead
5. DIY Tire Repair: Step-by-Step Guide - 5.1. Tools and Materials Needed
- 5.2. Preparing the Tire
- 5.3. Applying a Tire Patch
- 5.4. Re-inflating the Tire
6. Understanding Tire Damage and Repair Limits - 6.1. Puncture Location and Size
- 6.2. Sidewall Damage: When Replacement is Necessary
- 6.3. Identifying Non-Repairable Damage
7. Maintaining Tire Health to Prevent Leaks - 7.1. Regular Tire Pressure Checks
- 7.2. Proper Tire Inflation Techniques
- 7.3. Tire Rotation and Balancing
- 7.4. Avoiding Road Hazards
8. The Role of Wheel Condition in Tire Leaks - 8.1. Inspecting Wheels for Damage
- 8.2. Repairing or Replacing Damaged Wheels
- 8.3. Bead Sealing for Rim Leaks
9. Choosing the Right Tire Repair Products - 9.1. Exploring CARDIAGTECH.NET’s Product Range
- 9.2. Comparing Tire Repair Kits and Sealants
- 9.3. Selecting Durable and Reliable Repair Materials
10. Understanding TPMS and Its Importance - 10.1. How TPMS Works
- 10.2. Maintaining Your TPMS
- 10.3. Troubleshooting TPMS Issues
11. Cost Analysis of Tire Repair vs. Replacement - 11.1. Factors Affecting Repair Costs
- 11.2. Estimating Replacement Costs
- 11.3. Making the Economical Choice
12. Safety Precautions for Tire Repair - 12.1. Essential Safety Gear
- 12.2. Safe Tire Removal and Installation
- 12.3. Handling Repair Materials Safely
13. Environmental Considerations in Tire Maintenance - 13.1. Proper Tire Disposal
- 13.2. Eco-Friendly Tire Maintenance Practices
14. Advanced Techniques for Tire Leak Detection - 14.1. Using Ultrasonic Leak Detectors
- 14.2. Nitrogen Inflation and Leak Detection
15. When to Replace Your Tires - 15.1. Tread Depth Indicators
- 15.2. Tire Age and Condition
- 15.3. Choosing New Tires
16. Case Studies of Common Tire Leaks and Solutions - 16.1. Nail Punctures
- 16.2. Valve Stem Issues
- 16.3. Bead Leaks
17. The Future of Tire Technology - 17.1. Self-Sealing Tires
- 17.2. Run-Flat Tires
- 17.3. Smart Tire Technologies
18. Resources and Further Reading - 18.1. Useful Websites and Forums
- 18.2. Recommended Books and Articles
19. FAQ: Addressing Common Questions About Tire Leaks
20. Conclusion: Maintaining Optimal Tire Health with CARDIAGTECH.NET
1. Identifying a Slow Leak in Your Car Tire
Detecting a slow leak in your car tire early can save you from potential hazards and costly repairs. How can you tell if your tire is losing air slowly? Look for key signs, use your Tire Pressure Monitoring System (TPMS), and conduct regular manual checks.
1.1. Recognizing the Signs
What are the subtle indicators of a slow tire leak? According to the National Highway Traffic Safety Administration (NHTSA), visual cues include a tire that looks deflated compared to others, uneven wear patterns, or a vehicle pulling to one side. Additionally, you might notice a decrease in fuel efficiency or hear a faint hissing sound near the tire.
1.2. Using a Tire Pressure Monitoring System (TPMS)
How does TPMS help identify leaks? TPMS is designed to alert you when your tire pressure drops below a certain level, typically 25% below the recommended pressure, according to a study by the Society of Automotive Engineers (SAE) in 2020. If your TPMS light comes on frequently, even after you’ve inflated your tires, it’s a strong indication of a slow leak.
1.3. Manual Tire Pressure Checks
Why should you manually check your tire pressure? Manual checks using a reliable tire pressure gauge provide an accurate reading, independent of the TPMS, as reported by J.D. Power in their 2022 Vehicle Dependability Study. Check your tire pressure at least once a month and before long trips. The correct pressure, measured in pounds per square inch (PSI), can be found on the sticker inside your driver’s side door or in your vehicle’s owner’s manual.
Key Considerations for Identifying Slow Leaks:
| Sign | Description | Action |
|---|---|---|
| Visual Deflation | One tire appears lower than others. | Inspect the tire closely for punctures or damage. |
| TPMS Light | TPMS light illuminates frequently. | Check tire pressure and look for the source of the leak. |
| Uneven Tire Wear | One tire shows more wear on one side or in the center. | Check tire pressure regularly and consider tire rotation. |
| Vehicle Pulling | Car drifts to one side while driving. | Inspect tires and alignment; address any leaks promptly. |
| Reduced Fuel Efficiency | Noticeable decrease in miles per gallon. | Check tire pressure and overall tire condition. |
2. Pinpointing the Source of the Leak
Once you suspect a slow leak, finding its source is the next crucial step. How can you effectively locate the leak? Two common methods include the bubble test using soap and water and using commercial leak detectors.
2.1. The Bubble Test: Soap and Water Method
How does the soap and water method work? Mix a small amount of dish soap with water in a spray bottle. Inflate the tire to its recommended pressure. Spray the soapy water generously over the entire tire surface, including the valve stem and the area where the tire meets the rim. Watch for bubbles to form, indicating the location of the leak. According to Popular Mechanics, this method is effective for finding most types of leaks.
2.2. Using Commercial Leak Detectors
Are commercial leak detectors more effective? Products like TECH Chek, available at CARDIAGTECH.NET, are specifically designed to detect tire leaks. They often provide more visible and longer-lasting bubbles than homemade solutions. Spray the product around the tire, valve stem, and bead area, and observe for bubbling, which indicates the source of the leak.
Tips for Pinpointing the Leak:
| Method | Procedure | Benefits |
|---|---|---|
| Soap and Water Test | Spray soapy water on the inflated tire and watch for bubbles. | Simple, inexpensive, and effective for locating common leaks. |
| Commercial Leak Detector | Use a product like TECH Chek for more visible and longer-lasting bubbles. | Specifically formulated for tire leak detection, enhancing accuracy. |
| Valve Stem Check | Inspect the valve stem for cracks or damage while applying the test solution. | Critical as valve stem leaks are common and easily overlooked. |
| Bead Area Inspection | Pay close attention to the area where the tire meets the rim. | Bead leaks can occur due to corrosion or damage to the rim. |
3. Temporary Fixes for Slow Leaks
When you find a slow leak, you might need a temporary solution to keep your tire inflated until you can get a professional repair. What are some options for temporary fixes? These include using tire sealants, tire repair kits, and portable air compressors.
3.1. Tire Sealants: Pros and Cons
How effective are tire sealants? Tire sealants are liquid substances injected into the tire to seal small punctures from the inside. They can be a quick fix, but they have limitations. According to Consumer Reports, while sealants can temporarily stop leaks, they may not work on larger punctures or sidewall damage, and they can sometimes interfere with TPMS sensors.
3.2. Using a Tire Repair Kit
What does a tire repair kit include? A tire repair kit typically includes plugs, insertion tools, and a reamer. These kits can be used to fill small punctures in the tread area. According to a study by the Rubber Manufacturers Association, proper use of a tire repair kit can provide a reliable temporary fix, but it’s crucial to follow the instructions carefully. CARDIAGTECH.NET offers Permacure Passenger Kits that ensure your tire remains properly inflated until you can get it serviced.
3.3. Portable Air Compressors
Why is a portable air compressor useful? A portable air compressor allows you to reinflate your tire to the correct pressure after using a sealant or repair kit. It also helps maintain pressure if the leak is very slow. Regular use of an air compressor can extend the time you have before needing a permanent repair.
Temporary Fix Options:
| Fix | Pros | Cons |
|---|---|---|
| Tire Sealant | Quick and easy to apply; seals small punctures temporarily. | May not work on larger punctures; can affect TPMS sensors; temporary solution. |
| Tire Repair Kit | Effective for small tread punctures; provides a more reliable temporary fix. | Requires some skill and effort; only suitable for certain types of punctures; temporary solution. |
| Portable Air Compressor | Allows you to maintain proper tire pressure; useful after sealant or kit use. | Requires a power source (car battery); doesn’t fix the leak itself. |
4. Professional Tire Repair Options
While temporary fixes can help, a professional tire repair is often necessary for a safe and lasting solution. When should you consult a tire technician, and what repair options are available?
4.1. When to Consult a Tire Technician
When is professional help needed? If you’re not comfortable performing a tire repair yourself, or if the leak is large or located on the sidewall, it’s best to consult a professional. Additionally, if you’ve used a tire sealant, a technician can inspect the tire to ensure it’s safe to repair. As AAA advises, a professional evaluation ensures the tire is properly and safely repaired.
4.2. Tire Patching vs. Tire Plugging
What is the difference between patching and plugging? Tire patching involves applying a patch to the inside of the tire after removing it from the rim. Plugging involves inserting a plug into the puncture from the outside. Patching is generally considered the more reliable and long-lasting repair method because it seals the tire from the inside. The U.S. Tire Manufacturers Association (USTMA) recommends patching as the preferred method for tire repair.
4.3. Valve Stem Replacement
Can a damaged valve stem cause leaks? Yes, valve stems can become damaged or corroded over time, leading to slow leaks. A trained tire technician can replace the valve stem at a minimal cost. It’s a simple repair that can often resolve persistent slow leaks.
4.4. Addressing Leaks from the Tire Bead
What causes bead leaks? The tire bead is the edge of the tire that seals against the rim. Leaks can occur here due to corrosion, damage to the rim, or improper seating. A tire technician may be able to reseat and seal the tire using a bead sealer. However, if the damage to the wheel is significant, wheel replacement may be necessary.
Professional Repair Options:
| Repair Type | Description | Benefits |
|---|---|---|
| Tire Patching | Applying a patch to the inside of the tire after removing it from the rim. | More reliable and long-lasting; seals the tire from the inside. |
| Tire Plugging | Inserting a plug into the puncture from the outside. | Quick and easy, but not as reliable as patching; best for temporary repairs. |
| Valve Stem Replacement | Replacing a damaged or corroded valve stem. | Resolves leaks caused by valve stem issues; inexpensive repair. |
| Bead Sealing | Reseating and sealing the tire to the rim. | Addresses leaks caused by corrosion or improper seating; can extend the life of the tire and wheel. |
5. DIY Tire Repair: Step-by-Step Guide
If you’re comfortable with basic car maintenance, you can perform a tire repair yourself. What steps should you follow for a successful DIY tire repair? Here’s a step-by-step guide.
5.1. Tools and Materials Needed
What tools and materials do you need?
- Tire repair kit (with plugs, insertion tool, and reamer)
- Needle-nose pliers
- Lubricant (supplied in the kit or soapy water)
- Portable air compressor
- Tire pressure gauge
- Gloves and safety glasses
5.2. Preparing the Tire
How do you prepare the tire for repair? First, locate the puncture using the soap and water method. Use needle-nose pliers to remove the object causing the puncture. Then, use the reamer tool from the tire repair kit to clean and enlarge the hole, making it ready for the plug.
5.3. Applying a Tire Patch
How do you insert the tire plug? Insert the plug into the insertion tool, following the kit instructions. Apply lubricant to the plug and the insertion tool. Push the tool into the hole until about half an inch of the plug remains outside the tire. Remove the tool carefully, leaving the plug in place. Trim any excess plug material with a sharp knife or scissors.
5.4. Re-inflating the Tire
What is the final step? Use the portable air compressor to re-inflate the tire to the recommended pressure. Check the tire pressure with a gauge. Inspect the repair area for any leaks by applying soapy water. If no bubbles appear, the repair is successful.
DIY Tire Repair Steps:
| Step | Description | Tips |
|---|---|---|
| Gather Tools & Materials | Assemble the necessary tools and materials. | Ensure you have a reliable tire repair kit, portable air compressor, and tire pressure gauge. |
| Locate and Prepare Puncture | Find the puncture and remove the object causing it; clean and enlarge the hole. | Use the soap and water method to locate the puncture; the reamer tool ensures proper plug insertion. |
| Insert Tire Plug | Insert the plug into the insertion tool and apply lubricant. | Follow the kit instructions carefully; lubricant helps the plug slide in smoothly. |
| Re-inflate and Check | Re-inflate the tire to the recommended pressure and check for leaks. | Use a tire pressure gauge to ensure accurate inflation; apply soapy water to check for leaks. |
6. Understanding Tire Damage and Repair Limits
Not all tire damage can be safely repaired. What are the limitations on tire repairs, and when is replacement necessary?
6.1. Puncture Location and Size
Where can a tire be safely repaired? According to tire industry standards, punctures in the tread area can typically be repaired if they are less than ¼ inch in diameter. Repairs should be made in the central tread area and not on the tire’s shoulder or sidewall. The Rubber Manufacturers Association provides detailed guidelines on acceptable repair zones.
6.2. Sidewall Damage: When Replacement is Necessary
Why can’t sidewall damage be repaired? Sidewall damage is generally considered non-repairable due to the flexing and stress the sidewall endures during normal driving. Attempting to repair a sidewall can lead to tire failure, posing a significant safety risk.
6.3. Identifying Non-Repairable Damage
What other types of damage cannot be repaired? Other non-repairable damage includes:
- Punctures larger than ¼ inch
- Sidewall punctures or cuts
- Exposed cords
- Separation of plies
- Damage from running a tire underinflated
Tire Repair Limits:
| Type of Damage | Repairable? | Notes |
|---|---|---|
| Tread Puncture (≤ ¼ inch) | Yes, if located in the central tread area. | Follow industry guidelines for proper patching or plugging. |
| Sidewall Damage | No | Sidewall repairs are unsafe due to flexing and stress. |
| Large Punctures | No | Punctures larger than ¼ inch compromise the tire’s structural integrity. |
| Exposed Cords | No | Indicates severe damage; tire must be replaced. |
| Ply Separation | No | The tire’s layers are separating, making it unsafe to use. |
7. Maintaining Tire Health to Prevent Leaks
Preventing leaks is better than fixing them. What steps can you take to maintain your tires and minimize the risk of slow leaks?
7.1. Regular Tire Pressure Checks
How often should you check your tire pressure? Check your tire pressure at least once a month and before long trips. Proper inflation helps maintain tire integrity and prevents premature wear. As the NHTSA recommends, keeping tires properly inflated improves safety and fuel efficiency.
7.2. Proper Tire Inflation Techniques
What is the correct way to inflate tires? Use a reliable tire pressure gauge to measure the pressure. Inflate the tires to the pressure recommended in your vehicle’s owner’s manual or on the sticker inside the driver’s side door. Avoid over- or under-inflating, as both can lead to tire problems.
7.3. Tire Rotation and Balancing
Why are tire rotation and balancing important? Tire rotation ensures even wear by changing the position of the tires on the vehicle. Balancing corrects weight imbalances that can cause vibration and uneven wear. These practices extend tire life and prevent premature wear that can lead to leaks.
7.4. Avoiding Road Hazards
How can you protect your tires from hazards? Be mindful of road hazards like potholes, sharp objects, and debris. Avoid driving over these hazards whenever possible. Regular inspections can also help identify and address potential issues before they cause leaks.
Tire Maintenance Tips:
| Practice | Benefits | Frequency |
|---|---|---|
| Regular Pressure Checks | Maintains tire integrity; prevents premature wear; improves fuel efficiency. | At least once a month and before long trips. |
| Proper Inflation | Ensures optimal performance and safety; avoids over- or under-inflation. | Inflate to the pressure recommended in your vehicle’s owner’s manual. |
| Tire Rotation and Balancing | Promotes even wear; extends tire life; prevents vibrations. | Every 5,000 to 8,000 miles or as recommended by your vehicle manufacturer. |
| Avoid Road Hazards | Minimizes the risk of punctures and damage. | Be mindful of potholes, sharp objects, and debris on the road. |
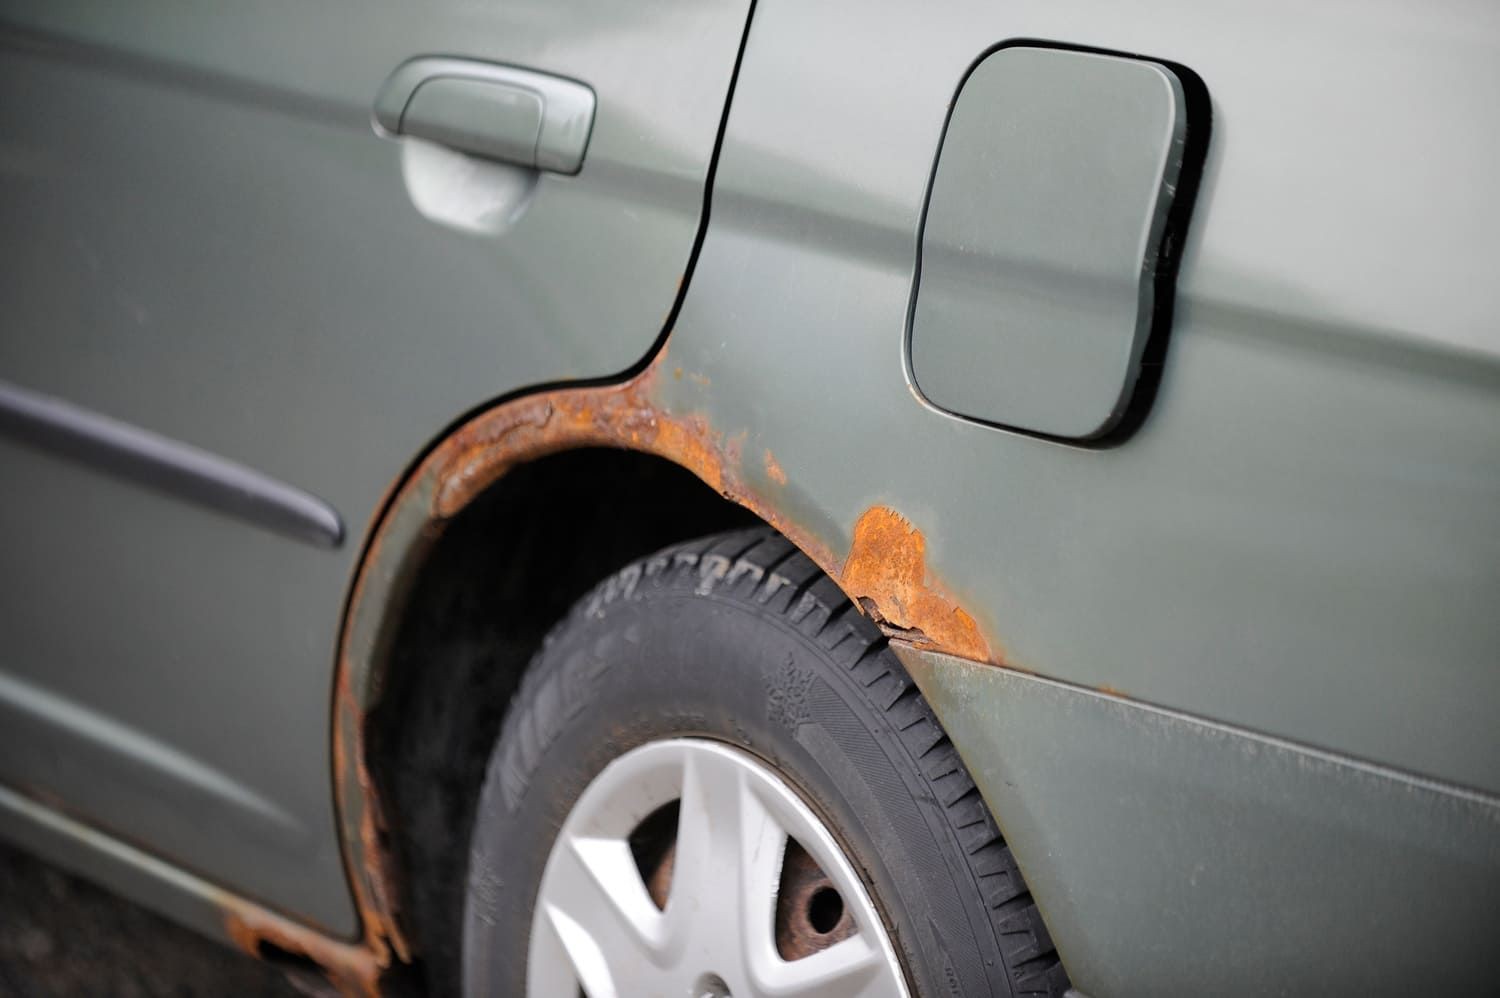
8. The Role of Wheel Condition in Tire Leaks
The condition of your wheels can significantly impact tire health and the likelihood of leaks. How do damaged wheels contribute to tire leaks, and what can you do about it?
8.1. Inspecting Wheels for Damage
What types of wheel damage should you look for? Regularly inspect your wheels for signs of damage, such as:
- Bends or dents
- Cracks
- Corrosion
- Damage to the bead seat area
8.2. Repairing or Replacing Damaged Wheels
Can damaged wheels be repaired? Minor wheel damage, such as small bends or dents, can sometimes be repaired by a professional wheel repair service. However, more severe damage, like cracks or significant bends, often requires wheel replacement. It’s crucial to address wheel damage promptly to ensure proper tire seating and prevent leaks.
8.3. Bead Sealing for Rim Leaks
How does bead sealing work? If the leak is due to corrosion or minor damage to the bead seat area, a tire technician can apply a bead sealer. This creates an airtight seal between the tire and the rim, preventing air from escaping. However, bead sealing is a temporary solution, and addressing the underlying wheel damage is essential for a long-term fix.
Wheel Maintenance and Leaks:
| Issue | Cause | Solution |
|---|---|---|
| Bends and Dents | Impact from potholes or road hazards. | Professional wheel repair or replacement. |
| Cracks | Stress and fatigue; often non-repairable. | Wheel replacement is necessary. |
| Corrosion | Exposure to moisture and road salts. | Cleaning and applying a protective coating; bead sealing may help temporarily. |
| Bead Seat Damage | Corrosion, improper tire mounting, or wear. | Bead sealing; wheel repair or replacement if damage is severe. |
9. Choosing the Right Tire Repair Products
Selecting high-quality tire repair products is crucial for effective and reliable repairs. What should you consider when choosing tire repair products, and what does CARDIAGTECH.NET offer?
9.1. Exploring CARDIAGTECH.NET’s Product Range
What tire repair products does CARDIAGTECH.NET offer? CARDIAGTECH.NET provides a range of tire repair solutions, including:
- TECH Chek leak detector
- Permacure Passenger Kits
- One-piece stem repairs
- Valve stems
- Bead sealers
9.2. Comparing Tire Repair Kits and Sealants
Which is better: a tire repair kit or a sealant? Tire repair kits are generally more reliable for punctures in the tread area, providing a physical plug that seals the hole. Sealants are quicker to apply but may not work on larger punctures or sidewall damage. Consider the type of damage and your comfort level with DIY repairs when choosing between the two.
9.3. Selecting Durable and Reliable Repair Materials
What should you look for in repair materials? Opt for high-quality materials that are designed for durability and reliability. Look for products from reputable brands that meet industry standards. For example, cured rubber stem and repair units are known for their strength and longevity.
Choosing Tire Repair Products:
| Product Type | CARDIAGTECH.NET Offering | Benefits |
|---|---|---|
| Leak Detector | TECH Chek | Quickly and accurately identifies the source of leaks; provides visible and long-lasting bubbles. |
| Tire Repair Kit | Permacure Passenger Kits | Includes plugs, insertion tools, and reamer; ensures a reliable temporary fix for tread punctures. |
| Stem Repairs | One-piece stem repairs | Provides a permanent and durable repair for punctures; made from high-quality cured rubber. |
| Valve Stems | High-quality valve stems | Replace damaged or corroded valve stems; ensures proper tire inflation and prevents leaks. |
| Bead Sealers | Bead sealers | Creates an airtight seal between the tire and the rim; addresses leaks caused by corrosion or minor damage. |
10. Understanding TPMS and Its Importance
A Tire Pressure Monitoring System (TPMS) is an essential safety feature in modern vehicles. How does TPMS work, and why is it important for maintaining tire health?
10.1. How TPMS Works
What are the components of a TPMS? TPMS uses sensors inside the tires to monitor air pressure. These sensors transmit data to the vehicle’s computer, which displays a warning light on the dashboard if the pressure drops below a certain threshold. There are two main types of TPMS: direct and indirect. Direct TPMS uses sensors inside the tire, while indirect TPMS uses the vehicle’s anti-lock braking system to estimate tire pressure.
10.2. Maintaining Your TPMS
How do you maintain your TPMS? Regularly check the TPMS sensors to ensure they are functioning correctly. When replacing tires, have the sensors inspected and, if necessary, replaced or recalibrated. Batteries in the sensors typically last for 5-10 years, so periodic replacement is necessary.
10.3. Troubleshooting TPMS Issues
What should you do if the TPMS light comes on? First, check the tire pressure in all tires and inflate them to the recommended pressure. If the light remains on, there may be a problem with one of the sensors. Consult a tire technician to diagnose and repair the issue.
TPMS Overview:
| Aspect | Description | Importance |
|---|---|---|
| Function | Monitors tire pressure and alerts the driver to low pressure conditions. | Enhances safety by ensuring proper tire inflation; improves fuel efficiency and tire life. |
| Types | Direct (sensors inside tires) and indirect (uses ABS). | Direct TPMS provides more accurate readings; indirect TPMS is less precise but requires no special sensors. |
| Maintenance | Periodic sensor inspection and replacement. | Ensures accurate and reliable performance of the TPMS. |
| Troubleshooting | Check tire pressure first; consult a technician if the light persists. | Identifies and resolves sensor or system issues. |
11. Cost Analysis of Tire Repair vs. Replacement
Deciding whether to repair or replace a tire involves considering the costs. What factors affect the cost of repair, and when is replacement the more economical option?
11.1. Factors Affecting Repair Costs
What influences tire repair costs? The cost of tire repair depends on the type and location of the damage, the repair method used, and the labor rates of the repair shop. Simple repairs, like patching a small puncture, are typically less expensive than more complex repairs or valve stem replacements.
11.2. Estimating Replacement Costs
How much does it cost to replace a tire? Tire replacement costs vary based on the tire brand, size, type, and the retailer. Premium tires and larger sizes generally cost more. Consider the cost of mounting, balancing, and disposal fees when estimating the total replacement cost. According to a 2023 survey by Modern Tire Dealer, the average cost of a new tire ranges from $100 to $300 per tire.
11.3. Making the Economical Choice
When should you repair vs. replace? Repairing a tire is usually more economical if the damage is minor and located in the repairable tread area. However, if the damage is extensive, or if the tire is already worn, replacement is the better option. Consider the long-term costs, safety implications, and remaining tread life when making your decision.
Cost Comparison:
| Option | Cost Factors | When to Choose |
|---|---|---|
| Tire Repair | Type of damage, repair method, labor rates. | Minor tread punctures; cost-effective for small repairs; extends tire life. |
| Tire Replacement | Tire brand, size, type, mounting, balancing, disposal fees. | Extensive damage; sidewall punctures; worn tread; ensures safety and optimal performance. |
12. Safety Precautions for Tire Repair
Safety should always be a top priority when performing tire repairs. What safety precautions should you take to protect yourself?
12.1. Essential Safety Gear
What safety gear should you wear? Always wear safety glasses and gloves when working on tires. Safety glasses protect your eyes from debris, and gloves protect your hands from chemicals and sharp objects.
12.2. Safe Tire Removal and Installation
How do you safely remove and install a tire? Use a jack and lug wrench to remove the tire from the vehicle. Ensure the vehicle is parked on a level surface and the parking brake is engaged. When installing the tire, tighten the lug nuts in a star pattern to ensure even pressure. Use a torque wrench to tighten the lug nuts to the manufacturer’s specifications.
12.3. Handling Repair Materials Safely
How do you handle repair materials safely? Follow the manufacturer’s instructions when using tire repair kits and sealants. Avoid contact with skin and eyes. Work in a well-ventilated area to avoid inhaling fumes.
Safety Guidelines:
| Precaution | Details | Why It’s Important |
|---|---|---|
| Safety Gear | Wear safety glasses and gloves. | Protects eyes from debris and hands from chemicals and sharp objects. |
| Safe Tire Removal/Install | Park on a level surface, engage parking brake, use jack and lug wrench. | Prevents vehicle movement and ensures proper tire mounting and torque. |
| Material Handling | Follow manufacturer’s instructions, avoid skin/eye contact, work in ventilation. | Minimizes exposure to harmful chemicals and ensures proper use of repair materials. |
13. Environmental Considerations in Tire Maintenance
Proper tire maintenance includes environmentally responsible practices. How can you minimize the environmental impact of tire maintenance?
13.1. Proper Tire Disposal
How should you dispose of old tires? Never dispose of tires in landfills or by burning them. Instead, recycle them at a tire recycling center. Recycled tires can be used to make new products, such as playground surfaces, road materials, and fuel.
13.2. Eco-Friendly Tire Maintenance Practices
What eco-friendly practices can you adopt? Use eco-friendly tire cleaning products and avoid harsh chemicals that can harm the environment. Maintain proper tire inflation to improve fuel efficiency and reduce emissions.
Environmental Practices:
| Practice | Details | Benefits |
|---|---|---|
| Proper Tire Disposal | Recycle tires at a tire recycling center. | Prevents landfill waste and repurposes materials for new products. |
| Eco-Friendly Maintenance | Use eco-friendly cleaning products and maintain proper tire inflation. | Reduces harmful chemical runoff and improves fuel efficiency. |
14. Advanced Techniques for Tire Leak Detection
Beyond the basic methods, advanced techniques can help pinpoint elusive tire leaks. What are some advanced methods for detecting tire leaks?
14.1. Using Ultrasonic Leak Detectors
How do ultrasonic leak detectors work? Ultrasonic leak detectors use sound waves to identify leaks that are too small to be detected by other methods. These devices can detect the high-frequency sound produced by air escaping from a leak.
14.2. Nitrogen Inflation and Leak Detection
Why use nitrogen instead of air? Nitrogen molecules are larger than air molecules, so they escape more slowly, making it easier to detect small leaks. Additionally, nitrogen is less susceptible to changes in pressure due to temperature fluctuations, providing more stable tire pressure.
Advanced Leak Detection:
| Technique | Details | Benefits |
|---|---|---|
| Ultrasonic Leak Detectors | Use sound waves to detect small leaks. | Identifies leaks that are difficult to find using other methods. |
| Nitrogen Inflation | Inflate tires with nitrogen instead of air. | Slower leak rate and more stable pressure; easier to detect small leaks and maintains consistent pressure. |
15. When to Replace Your Tires
Knowing when to replace your tires is crucial for safety and performance. What are the key indicators that it’s time for new tires?
15.1. Tread Depth Indicators
How do tread depth indicators work? Tires have tread depth indicators, also known as wear bars, built into the tread grooves. When the tread wears down to the level of these bars, it’s time to replace the tires. A simple test is the penny test: insert a penny upside down into the tread groove. If you can see the top of Lincoln’s head, your tires are worn and need to be replaced.
15.2. Tire Age and Condition
How does tire age affect performance? Even if your tires have sufficient tread depth, they should be replaced after six years, regardless of their condition. Over time, the rubber compounds in tires degrade, leading to reduced grip and increased risk of failure. Check the DOT code on the sidewall to determine the tire’s manufacturing date.
15.3. Choosing New Tires
What should you consider when buying new tires? Consider your vehicle type, driving conditions, and budget. Look for tires with good ratings for tread life, handling, and wet traction. Consult with a tire professional to find the best tires for your needs.
Tire Replacement Indicators:
| Indicator | Details | Action |
|---|---|---|
| Tread Depth Indicators | Wear bars appear when tread is worn down to 2/32 inch. | Replace tires immediately. |
| Tire Age | Replace tires after six years, regardless of condition. | Check DOT code for manufacturing date; degraded rubber can lead to tire failure. |
| Tire Condition | Look for cracks, bulges, or uneven wear. | Replace tires if any of these conditions are present; indicates structural damage. |
16. Case Studies of Common Tire Leaks and Solutions
Understanding common types of tire leaks and their solutions can help you address issues effectively. What are some typical scenarios and how can they be resolved?
16.1. Nail Punctures
How do you fix a nail puncture? Nail punctures are one of the most common causes of tire leaks. If the puncture is in the repairable tread area and less than ¼ inch in diameter, it can be repaired with a tire patch or plug. Remove the nail, prepare the hole, and insert the patch or plug following the instructions in your tire repair kit.
16.2. Valve Stem Issues
What causes valve stem leaks? Valve stems can become damaged or corroded over time, leading to slow leaks. Inspect the valve stem for cracks or damage and replace it if necessary. This is a simple and inexpensive repair that can