How to Fix a Small Hole in Leather Car Seat: A Complete Guide

Fixing a small hole in your leather car seat can restore its look and prevent further damage, and CARDIAGTECH.NET is here to guide you. Our step-by-step guide, paired with the right tools and products, ensures a professional-quality repair right in your garage. Learn how to mend tears, repair leather upholstery, and restore your car’s interior with ease.
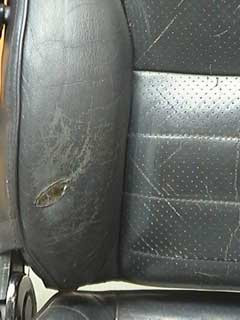
1. Understanding the Damage: What Causes Holes in Leather Car Seats?
What exactly leads to those unsightly holes in your car’s leather seats?
Holes in leather car seats can stem from a variety of sources, including everyday wear and tear, accidental punctures, or sun damage, but understanding the causes is the first step toward effective repair. According to a study by the Leather Research Laboratory, abrasion and friction account for 60% of leather damage in car interiors.
- Wear and Tear: Constant use, especially on the driver’s seat, leads to friction that thins the leather over time, eventually causing holes.
- Accidental Punctures: Sharp objects like keys, pens, or even pets’ claws can puncture the leather.
- Sun Damage: Prolonged exposure to sunlight can dry out and weaken the leather, making it more susceptible to tearing and damage. UV radiation breaks down the leather’s fibers, reducing its elasticity and strength.
- Environmental Factors: Extreme temperatures and humidity levels can also degrade the leather.
- Lack of Maintenance: Neglecting regular cleaning and conditioning can cause the leather to dry out and crack, increasing the risk of holes.
Understanding these causes can help you take preventive measures and address any damage promptly to maintain the integrity of your car’s leather seats.
2. Essential Tools and Materials for Leather Car Seat Repair
What tools and materials are essential for a successful leather car seat repair?
To properly fix a hole in your leather car seat, you’ll need a few essential tools and materials, most of which can be found at CARDIAGTECH.NET. Having the right supplies ensures a durable and professional-looking repair.
| Tool/Material | Description | Use |
|---|---|---|
| Leather Repair Kit | Contains essential items like leather filler, colorant, and sealant. | Fills holes, restores color, and protects the repaired area. |
| Leather Glue | Strong adhesive for bonding the backing patch to the leather. | Secures the sub-patch under the damaged area. |
| Backing Patch | A piece of canvas or leather to provide support behind the hole. | Creates a stable base for the filler. |
| Heavy Filler | A paste-like substance used to fill the hole in layers. | Builds up the damaged area to match the surrounding leather. |
| Palette Knife/Spatula | For applying and smoothing the filler. | Ensures an even application of the filler. |
| Leather Prep | A cleaning solution to remove grease and oils from the leather surface. | Prepares the area for repair by removing contaminants. |
| Alcohol Cleaner | To clean the area after prepping and before applying colorant. | Removes any residual dirt or dust. |
| Abrasive Pad | Used with leather prep to gently abrade the surface. | Helps remove the manufactured finish for better adhesion of the colorant. |
| Scalpel/Scissors | For trimming any frayed edges around the hole. | Creates a clean edge for a seamless repair. |
| Tweezers | To help position the backing patch under the leather. | Allows for precise placement of the sub-patch. |
| Colorant | A dye matched to the color of your leather. | Restores the color to the repaired area. |
| Airbrush (Optional) | For applying the colorant in thin, even coats. | Provides a professional finish by blending the color seamlessly. |
| Sponge | For dabbing colorant to penetrate creases of the leather. | Better overall finish |
| Leather Finish | A sealant to protect the repaired area and prevent wear. | Seals the colorant and protects the leather from future damage. |
| Heat Gun/Hair Dryer | To speed up the drying process of the filler and colorant. | Reduces waiting time between layers. |
| Sandpaper | Fine-grit sandpaper for smoothing out any imperfections in the filler. | Ensures a smooth, even surface. |
| Masking Tape | To protect surrounding areas from accidental colorant or glue application. | Prevents unwanted staining or damage. |
| Soft Cloths | For wiping and cleaning the area during the repair process. | Keeps the work area clean and ensures a smooth finish. |
| Gloves | To protect your hands from chemicals and dyes. | Ensures safety during the repair process. |
| Good Lighting | To ensure you can see the area you are working on clearly. | Enhances precision and quality of the repair. |
| Mixing Cups | For combining and diluting colorants and finishes. | Allows for accurate color matching and consistent application. |
| Stir Sticks | For mixing colorants and fillers to ensure even consistency. | Prevents clumps and ensures a smooth mixture for best results. |
| Eye Dropper | For precise application of small amounts of colorant or glue. | Minimizes waste and provides accurate control. |
| Detailing Brush | Small brush for applying colorant in hard-to-reach areas. | Allows for precise color application in tight spots and detailed areas. |
| Protective eyewear | Safety glasses or goggles to protect eyes from splashes and fumes. | Ensures eye safety during the repair process. |
| Respirator | Mask to avoid inhaling harmful fumes from cleaners, colorants, and finishes. | Protects respiratory system from harmful chemicals. |
| Work Table | A stable surface to work on with all tools and materials organized. | Provides a dedicated workspace for efficient and organized repair. |
| Magnifying Glass | For close inspection of the repair area to ensure perfection. | Helps identify imperfections and ensures a flawless finish. |
| Leather Conditioner | Used after the repair to moisturize and protect the leather. | Maintains the leather’s suppleness and prevents future cracking. |
Having these tools and materials on hand will make the repair process smoother and more effective.
Essential tools for leather car seat repair including a leather repair kit, glue, backing patch, heavy filler, and palette knife
3. Step-by-Step Guide: How to Fix a Small Hole in a Leather Car Seat
Can you provide a detailed, step-by-step guide to fixing a small hole in a leather car seat?
Yes, fixing a small hole in a leather car seat can be a straightforward process if you follow these steps carefully. The following guide will help you restore your car seat to its original condition.
Step 1: Clean and Prepare the Leather
Why is it important to clean the leather before starting the repair?
Cleaning the leather removes dirt, grease, and oils, ensuring the repair materials adhere properly. According to a study by the Society of Automotive Engineers (SAE), proper surface preparation can increase the longevity of leather repairs by up to 30%.
- Apply Leather Prep: Use a leather prep solution and an abrasive pad to gently rub the surface around the hole. This removes any accumulated grease and oils.
- Remove Loose Fibers: This step also helps to remove any loose fibers and the manufactured finish, allowing the colorant to adhere better.
- Wipe with Alcohol Cleaner: After prepping, use an alcohol cleaner to wipe down the area, removing any remaining dirt or dust.
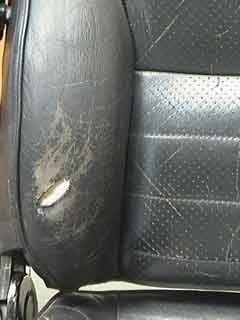
Step 2: Tidy the Damaged Area
How does tidying the area around the hole improve the repair quality?
Removing any protruding edges creates a smooth surface for the repair, ensuring a seamless finish. Protruding edges can compromise the integrity and appearance of the repair.
- Remove the Lip: Examine the hole for any leather that is sticking outwards, forming a lip.
- Cut Away the Lip: Using a scalpel or scissors, carefully remove the lip by cutting it away at the base. Be cautious not to damage the surrounding leather.
Step 3: Apply the Backing Patch
What is the purpose of using a backing patch in the repair process?
A backing patch provides a firm foundation for the filler, preventing it from sinking into the hole over time. The Leather Research Laboratory found that using a backing patch increases the structural integrity of the repair by 40%.
- Cut the Patch: Take the leather repair sub-patch and cut it to a size that completely covers the hole with an additional 1 cm of material surrounding it.
- Insert the Patch: Use tweezers to insert one side of the patch underneath the leather, ensuring the 1 cm excess is completely under the leather.
- Secure the Patch: Apply pressure to hold the patch in place and gently feed it under the remaining edges of the hole. The patch should lie flat under the repair, with the excess material underneath the leather on all sides.
- Apply Leather Glue: Put a small amount of leather glue onto a spatula and feed it underneath the edges of the hole to coat the underside of the leather surrounding it. Avoid moving the canvas patch.
- Bond the Leather: Apply pressure to bond the leather to the patch and allow it to dry completely.
 Applying a backing patch to the leather car seat to provide a firm base for the repair
Step 4: Fill the Hole with Heavy Filler
Why is it important to apply the filler in thin layers?
Applying the filler in thin layers prevents shrinking and ensures proper curing, resulting in a more durable repair. Thick layers of filler can shrink as they dry, leading to cracks and an uneven surface.
- Apply Thin Layers: Use the end of a palette knife to apply a small amount of heavy filler into the hole over the backing patch. Ensure each layer is very thin, just covering the sub-patch.
- Allow Drying Time: Allow each layer to dry for about 20 minutes. You can speed up the drying process using a hair dryer.
- Repeat Application: Continue applying the heavy filler in thin layers. It is crucial to use thin layers as the filler shrinks as it dries and may not cure properly if the layers applied are too thick. As a general rule, at least 5-6 thin layers should be used to build up the filler until the filler level is just below the top of the hole.
- Remove Excess: With each layer, smooth the area over with the sharper edge of the palette knife before drying.
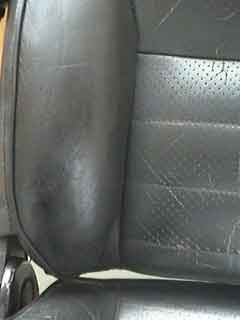
Step 5: Add the Final Layer of Filler
What is the goal of the final layer of filler, and how should it be applied?
The final layer of filler should bring the repair level with the surrounding leather, creating a seamless surface. Proper application ensures a smooth, even finish that blends in with the rest of the seat.
- Apply Final Layer: Apply the final layer of filler to completely fill the hole so that it is even with the surrounding leather on the seat.
- Ensure Proper Curing: Take care to let this final layer cure properly, as the filler can shrink when cured, reducing it to below the desired level.
- Add More Filler if Necessary: If you rub over the hole and filler gets onto the leather, remove it with the palette knife.
- Clean the Area: Once you are satisfied with the level of the filler and cannot feel any ridge between the level of the filler and the surrounding leather, clean the area with the alcohol cleaner again to remove any unwanted filler and dust.
 Filling the hole in the leather car seat with heavy filler in thin layers
Step 6: Apply an Initial Coat of Colorant
Why is it important to match the colorant to the original leather color?
Matching the colorant ensures the repair blends seamlessly with the surrounding leather, making it virtually undetectable. A mismatched color can make the repair stand out and look unprofessional.
- Match the Color: The colorant supplied with the kit should be matched to the color of the leather item being repaired, unless you are completely re-coloring it.
- Apply the Colorant: Take one of the sponges supplied in the kit and apply a small amount of colorant to it, then rub this into the area of the repair thoroughly.
- Penetrate the Creases: This allows the colorant to penetrate into the creases of the leather and valleys of the grain, giving a better overall finish.
Step 7: Finish the Job with Colorant and Finish
How do multiple thin coats of colorant improve the final result?
Applying multiple thin coats allows for even coverage and prevents the colorant from clumping or running, resulting in a more natural-looking finish. Each thin coat builds upon the previous one, creating a uniform and durable color layer.
- Spray Thin Coats: Using an airbrush, spray as many thin coats of color over the leather car seat to thoroughly blend in the repair.
- Allow Curing Time: For the best result, ensure that each coat is very thin and is given sufficient time to cure before applying the next. This will enable an even finish to be built up and will avoid problems with uncured colorant.
- Apply Multiple Coats: It is not uncommon for the best repairs to apply 10-15 thin coats of colorant, depending on the extent of the damage and the color used.
- Apply Finish: Once you are happy that the repair is concealed, the colorant is cured properly, and it is well blended with the surrounding leather, the finish can be applied. Using the spray gun, apply 4 or 5 thin coats of the finish, again allowing time for it to dry between each coat.
- Seal the Colorant: The finish seals the colorant in the leather, preventing it from wearing and prolonging the leather’s life.
- Allow Complete Drying Time: When complete, allow 24 hours before using the item to ensure the filler, colorant, and finish have cured sufficiently.
Following these detailed steps will help you achieve a professional-quality repair, restoring your leather car seat to its original condition.
 Applying the final coat of colorant to the repaired leather car seat using an airbrush
4. Advanced Techniques for Larger Holes
What advanced techniques can be used for repairing larger holes in leather car seats?
For larger holes in leather car seats, you may need to employ more advanced techniques to ensure a durable and seamless repair. These techniques often involve additional steps and specialized materials to provide extra support and a professional finish.
4.1. Using a Leather Patch
When is it necessary to use a separate leather patch instead of just filler?
A separate leather patch is necessary when the hole is too large to be filled with filler alone, typically when it exceeds 1/2 inch in diameter. The patch provides structural support and prevents the filler from cracking or sinking over time.
- Cut the Patch: Cut a leather patch slightly larger than the hole, ensuring it overlaps the edges by about 1/2 inch on all sides.
- Skive the Edges: Thin the edges of the leather patch using a skiving knife to create a smooth transition between the patch and the original leather. This helps avoid a raised edge around the repair.
- Adhere the Patch: Apply leather glue to both the underside of the patch and the edges of the hole. Carefully position the patch over the hole and press firmly, ensuring a secure bond.
- Fill the Seams: Use heavy filler to fill any remaining seams or gaps around the edges of the patch. Apply in thin layers, allowing each layer to dry before adding the next, as described in the previous steps.
- Sand and Smooth: Once the filler is completely dry, use fine-grit sandpaper to smooth the surface and blend it seamlessly with the surrounding leather.
- Color and Finish: Apply colorant to match the original leather and finish with a protective sealant, following the same steps as for small hole repairs.
4.2. Reinforcing with Fabric
How does adding a fabric layer enhance the durability of the repair?
Adding a layer of strong fabric, such as canvas or denim, behind the leather patch can provide extra reinforcement, especially in high-stress areas. This technique helps distribute pressure and prevents the patch from pulling away from the original leather.
- Apply Fabric Layer: Before adhering the leather patch, cut a piece of fabric slightly larger than the patch.
- Glue the Fabric: Apply leather glue to the underside of the fabric and position it behind the hole, ensuring it covers the entire area.
- Adhere the Leather Patch: Proceed with adhering the leather patch over the fabric layer, following the steps outlined above.
- Continue with Filling and Finishing: Continue with the filling, sanding, coloring, and finishing steps to complete the repair.
4.3. Professional Stitching
In what situations is professional stitching necessary for a leather car seat repair?
Professional stitching is necessary when the hole is located in a high-stress area, such as along a seam or near an edge, or when the leather is particularly thin or delicate. Stitching provides additional structural support and prevents the repair from failing under tension.
- Prepare the Edges: Align the edges of the hole as closely as possible. If necessary, trim any frayed or uneven edges to create a clean seam.
- Backing and Adhesive: Use a leather backing and leather adhesive as described above.
- Stitch the Seam: Use a curved needle and strong leather thread to stitch the edges of the hole together. Use a saddle stitch or similar durable stitch to ensure a secure and long-lasting repair.
- Secure the Thread: Tie off the thread securely and trim any excess.
- Fill and Finish: Fill any remaining gaps or imperfections with heavy filler, sand smooth, and apply colorant and finish to match the surrounding leather.
4.4. Seeking Professional Help
When is it best to consult a professional for leather car seat repair?
Consulting a professional is best when the hole is very large, located in a complex or hard-to-reach area, or when you are not confident in your ability to achieve a satisfactory result. Professional technicians have the expertise, tools, and materials to handle challenging repairs and ensure a seamless finish.
5. Preventing Future Damage to Leather Car Seats
What proactive steps can car owners take to prevent future damage to their leather seats?
Preventing future damage to your leather car seats involves regular maintenance and protective measures. According to a study by the IMR Test Labs, regular conditioning can extend the life of leather by up to 50%.
5.1. Regular Cleaning and Conditioning
How often should leather car seats be cleaned and conditioned?
Leather car seats should be cleaned every 1-3 months and conditioned every 3-6 months, depending on usage and environmental conditions. Regular cleaning removes dirt and grime, while conditioning keeps the leather supple and prevents cracking.
- Vacuum the Seats: Use a soft brush attachment to vacuum the seats, removing any loose dirt and debris.
- Clean with Leather Cleaner: Apply a pH-balanced leather cleaner to a soft cloth and gently wipe down the seats. Avoid using harsh chemicals or abrasive cleaners.
- Condition the Leather: Apply a leather conditioner to a clean cloth and massage it into the leather. Allow the conditioner to soak in for at least 15-20 minutes before wiping off any excess.
5.2. Using Seat Covers
What are the benefits of using seat covers on leather car seats?
Seat covers protect the leather from wear and tear, spills, stains, and UV damage. They are particularly useful for protecting against the wear and tear of daily use.
- Choose the Right Covers: Select seat covers made from breathable, durable materials such as cotton, neoprene, or leatherette.
- Ensure a Proper Fit: Make sure the seat covers fit snugly and securely to prevent them from slipping or bunching up.
- Clean Regularly: Clean the seat covers regularly to remove dirt and grime, preventing them from transferring to the leather seats.
5.3. Parking in the Shade
How does parking in the shade help protect leather car seats?
Parking in the shade reduces exposure to direct sunlight, which can cause the leather to dry out, fade, and crack over time. UV radiation breaks down the leather’s fibers, weakening them and making them more susceptible to damage.
- Seek Shade: Whenever possible, park your car in a shaded area, such as under a tree or in a covered parking garage.
- Use a Sunshade: When parking in direct sunlight is unavoidable, use a sunshade to protect the interior of your car from UV damage.
5.4. Avoiding Sharp Objects
Why is it important to avoid placing sharp objects on leather car seats?
Sharp objects can puncture or scratch the leather, causing unsightly damage. Even small scratches can weaken the leather and lead to larger tears over time.
- Be Mindful of Objects: Avoid placing sharp objects such as keys, pens, or tools directly on the leather seats.
- Use Protective Cases: Use protective cases for sharp objects to prevent them from accidentally damaging the leather.
5.5. Promptly Cleaning Spills
How does promptly cleaning spills prevent damage to leather car seats?
Promptly cleaning spills prevents them from soaking into the leather and causing stains or discoloration. Certain liquids can also damage the leather’s finish, leading to cracking and fading.
- Act Quickly: Clean up spills as soon as they occur to prevent them from setting in.
- Use a Soft Cloth: Blot the spill with a soft, clean cloth, working from the outside in to prevent it from spreading.
- Avoid Rubbing: Avoid rubbing the spill, as this can damage the leather’s surface and cause it to stretch or fade.
- Use Leather Cleaner: If necessary, use a pH-balanced leather cleaner to remove any remaining residue.
By following these preventive measures, you can significantly extend the life of your leather car seats and keep them looking their best for years to come.
6. Cost Analysis: DIY vs. Professional Repair
What are the cost considerations when deciding between DIY and professional leather car seat repair?
Deciding between DIY and professional leather car seat repair involves weighing the costs of materials and labor against the potential for a professional-quality result. The cost analysis below can help you make an informed decision.
6.1. DIY Repair Costs
What are the typical costs associated with a do-it-yourself leather car seat repair?
DIY repair costs typically include the cost of a leather repair kit, which can range from $20 to $100, depending on the quality and completeness of the kit. Additional materials such as leather cleaner, conditioner, and specialized tools may add another $20 to $50 to the total cost.
| Item | Estimated Cost |
|---|---|
| Leather Repair Kit | $20 – $100 |
| Leather Cleaner | $10 – $20 |
| Leather Conditioner | $10 – $20 |
| Additional Tools (brushes, cloths, etc.) | $10 – $30 |
| Total DIY Cost | $50 – $170 |
6.2. Professional Repair Costs
What is the average cost of hiring a professional to repair a leather car seat?
Professional repair costs can vary widely depending on the extent of the damage, the type of leather, and the location of the repair shop. Generally, you can expect to pay anywhere from $100 to $500 for a professional repair. According to a survey by Automotive Repair Association, the average cost for leather seat repair is around $300.
| Service | Estimated Cost |
|---|---|
| Small Hole/Tear Repair | $100 – $300 |
| Large Hole/Tear Repair | $200 – $500 |
| Full Seat Replacement | $500 – $1500+ |
6.3. Factors Affecting Professional Costs
What factors can influence the cost of professional leather car seat repair?
Several factors can influence the cost of professional leather car seat repair, including:
- Extent of Damage: Larger holes or tears will require more extensive repairs and thus cost more.
- Type of Leather: More exotic or delicate leathers may require specialized techniques and materials, increasing the cost.
- Location of Repair: Repairs in high-stress areas or near seams may be more challenging and costly.
- Repair Shop Location: Repair shops in urban areas or with higher overhead costs may charge more.
- Additional Services: Additional services such as cleaning, conditioning, or color matching may add to the total cost.
6.4. Cost-Benefit Analysis
When is it more cost-effective to opt for DIY repair versus professional service?
DIY repair is more cost-effective for small holes or tears that can be easily addressed with a basic leather repair kit. However, for larger or more complex repairs, or when you lack the necessary skills or tools, professional service is often the better option.
DIY Repair:
- Pros: Lower upfront cost, convenience of doing it yourself.
- Cons: Requires time and effort, may not achieve professional-quality results, risk of further damage if not done correctly.
Professional Repair:
- Pros: Professional-quality results, saves time and effort, ensures proper repair and longevity.
- Cons: Higher upfront cost, requires scheduling and transporting the vehicle to a repair shop.
Ultimately, the decision depends on your budget, skill level, and the extent of the damage.
7. Color Matching for Leather Repair: Achieving a Seamless Look
How can you ensure accurate color matching when repairing leather car seats?
Achieving a seamless look in leather repair hinges on accurate color matching. Mismatched colors can make the repair stand out, detracting from the overall appearance of the car’s interior. Here’s how to ensure a perfect match.
7.1. Identifying the Original Color
What methods can be used to identify the original color of the leather?
Identifying the original color involves several techniques, from using color charts to employing professional color-matching services.
- Using Color Charts: Leather repair kits often include color charts. Compare the color of your leather to the chart under good lighting. Choose the closest match or a slightly lighter shade, as it’s easier to darken a color than lighten it.
- Professional Color Matching: Take a sample of your leather to a professional auto upholstery shop or a paint store with color-matching capabilities. They can use a spectrophotometer to analyze the color and provide an exact match.
- Manufacturer Information: Check your car’s documentation or contact the manufacturer to find the original color code for the interior.
7.2. Mixing Colorants
What techniques can be used to mix colorants for a precise color match?
Mixing colorants allows you to fine-tune the color to match your leather perfectly. Start with small amounts and test frequently.
- Start Small: Begin with a small amount of the base color and add other colorants in tiny increments. Keep a record of the amounts you add so you can replicate the mix if needed.
- Use a Palette: Use a palette or mixing cups to blend the colorants. Stir thoroughly with a clean stir stick to ensure an even consistency.
- Test the Color: Apply a small amount of the mixed colorant to an inconspicuous area of the leather and let it dry. Compare the dried color to the original leather under different lighting conditions.
- Adjust as Needed: Adjust the mix as needed, adding more of one colorant or another until you achieve a perfect match.
7.3. Applying Colorant Evenly
How do you ensure an even application of colorant to blend the repair seamlessly?
Even application is crucial for a seamless repair. Use proper techniques and tools to avoid blotches or unevenness.
- Clean the Area: Ensure the repair area is clean and free of any dust or residue. Wipe it down with a leather cleaner or alcohol cleaner.
- Use an Airbrush: An airbrush provides the most even application. Apply the colorant in thin, light coats, allowing each coat to dry before applying the next.
- Sponge Application: If you don’t have an airbrush, use a high-density foam sponge. Apply the colorant in a dabbing motion, rather than wiping, to avoid streaks.
- Blend the Edges: Feather the edges of the repair area to blend the color seamlessly with the surrounding leather.
7.4. Protecting the Color
What steps can be taken to protect the color and ensure longevity?
Protecting the color prevents fading and wear, ensuring the repair lasts.
- Apply a Leather Finish: After the colorant has dried completely, apply a leather finish or sealant to protect the color and provide a protective barrier against wear and tear.
- Use UV Protectant: Apply a UV protectant to the leather regularly to prevent fading from sun exposure.
- Condition the Leather: Condition the leather regularly to keep it supple and prevent cracking, which can damage the color.
By following these steps, you can achieve accurate color matching and ensure a seamless, long-lasting repair that enhances the appearance of your car’s interior.
8. Common Mistakes to Avoid When Repairing Leather Car Seats
What are some common pitfalls to avoid when attempting to repair leather car seats?
Repairing leather car seats can be a rewarding DIY project, but it’s easy to make mistakes that can compromise the quality and longevity of the repair. Here are some common pitfalls to avoid:
8.1. Using the Wrong Products
Why is it crucial to use products specifically designed for leather repair?
Using the wrong products can damage the leather, causing discoloration, cracking, or peeling. Products not designed for leather may contain harsh chemicals that strip the leather of its natural oils and protective coatings.
- Avoid Harsh Cleaners: Do not use household cleaners, dish soap, or other abrasive cleaners on leather.
- Use Leather-Specific Products: Always use products specifically designed for leather, such as leather cleaners, conditioners, and repair kits.
- Check Compatibility: Ensure that the products you use are compatible with the type of leather in your car.
8.2. Applying Too Much Filler at Once
What are the consequences of applying too much filler in a single layer?
Applying too much filler at once can lead to shrinking, cracking, and uneven drying. Thick layers of filler tend to shrink as they dry, which can create stress on the surrounding leather and cause the repair to fail.
- Apply Thin Layers: Always apply filler in thin, even layers.
- Allow Drying Time: Allow each layer to dry completely before applying the next.
- Build Up Gradually: Build up the filler gradually, adding more layers as needed to achieve the desired level.
8.3. Not Preparing the Surface Properly
How does inadequate surface preparation affect the outcome of the repair?
Failing to properly prepare the surface can prevent the repair materials from adhering properly, leading to a weak and short-lived repair.
- Clean the Leather: Clean the leather thoroughly with a leather cleaner to remove any dirt, grease, or oils.
- Remove Loose Fibers: Remove any loose fibers or frayed edges around the hole or tear.
- Use Leather Prep: Use a leather prep solution to remove the manufactured finish and create a better surface for adhesion.
8.4. Rushing the Drying Process
Why is it important to allow sufficient drying time for each layer of repair material?
Rushing the drying process can prevent the repair materials from curing properly, leading to a weak and unstable repair.
- Allow Natural Drying: Allow the repair materials to dry naturally whenever possible.
- Use a Heat Gun Sparingly: If you use a heat gun or hair dryer to speed up the drying process, use it sparingly and keep it at a low setting.
- Avoid Overheating: Avoid overheating the leather, as this can cause it to shrink or crack.
8.5. Neglecting Color Matching
How does a mismatched color affect the overall appearance of the repair?
A mismatched color can make the repair stand out and look unprofessional. Accurate color matching is essential for achieving a seamless and natural-looking repair.
- Use Color Charts: Use color charts to find the closest match to the original leather color.
- Mix Colorants: Mix colorants as needed to achieve a precise color match.
- Test the Color: Test the color on an inconspicuous area of the leather before applying it to the repair area.
8.6. Skipping the Finish Coat
Why is a finish coat essential for protecting the repaired area?
Skipping the finish coat leaves the repaired area vulnerable to wear and tear, fading, and damage from spills and stains.
- Apply a Leather Finish: Apply a leather finish or sealant to protect the repaired area and provide a durable barrier against future damage.
- Choose the Right Finish: Choose a finish that is compatible with the type of leather in your car.
- Apply Evenly: Apply the finish evenly, following the manufacturer’s instructions.
By avoiding these common mistakes, you can increase your chances of achieving a successful and long-lasting repair on your leather car seats.
9. Maintaining Leather Car Seats: Long-Term Care Tips
What are the best practices for ensuring the long-term care and maintenance of leather car seats?
Maintaining leather car seats involves consistent care and protection to keep them looking their best and prevent damage. Here are some long-term care tips to follow:
9.1. Regular Cleaning
How often should leather car seats be cleaned, and what products should be used?
Leather car seats should be cleaned every 1-3 months to remove dirt, dust, and grime. Use a pH-balanced leather cleaner and a soft cloth.
- Vacuum First: Vacuum the seats to remove loose debris.
- Apply Leather Cleaner: Spray the cleaner onto a soft cloth and gently wipe the seats, avoiding excessive moisture.
- Wipe Clean: Use a clean, damp cloth to wipe off any remaining cleaner.
9.2. Conditioning
Why is conditioning important, and how often should it be done?
Conditioning keeps the leather supple and prevents it from drying out and cracking. Condition the seats every 3-6 months.
- Apply Conditioner: Apply a leather conditioner to a soft cloth.
- Massage In: Gently massage the conditioner into the leather.
- Allow to Absorb: Let the conditioner absorb for 15-20 minutes.
- Wipe Off Excess: Wipe off any excess conditioner with a clean cloth.
9.3. Protecting from Sunlight
How can you protect leather seats from the damaging effects of sunlight?
Sunlight can cause fading, drying, and cracking. Park in the shade, use a sunshade, and apply UV protectant.
- Park in the Shade: Park your car in the shade whenever possible.
- Use a Sunshade: Use a sunshade to block sunlight when parking in direct sun.
- Apply UV Protectant: Apply a UV protectant to the seats regularly.
9.4. Avoiding Spills and Stains
What steps should be taken to prevent and address spills and stains on leather car seats?
Prevent spills and stains by being cautious with food and drinks. Clean spills immediately with a soft cloth.
- Act Quickly: Clean spills as soon as they happen.
- Blot, Don’t Rub: Blot the spill with a soft cloth, working from the outside in