How To Fix Air In Car: A Comprehensive Guide
Is your car’s AC blowing warm air instead of the refreshing coolness you crave? Don’t sweat it! This guide from CARDIAGTECH.NET will walk you through diagnosing and fixing common AC problems, ensuring you stay comfortable on the road. We’ll cover everything from simple DIY checks to knowing when it’s time to call in the professionals. With our expert tips and advice, you’ll learn how to restore your car’s AC to its peak performance. Get ready to troubleshoot, maintain, and repair your air conditioning system, ensuring a cool and comfortable driving experience. Let’s dive into auto climate control, car AC repair, and automotive maintenance to keep you cool and collected.
1. Understanding Your Car’s AC System
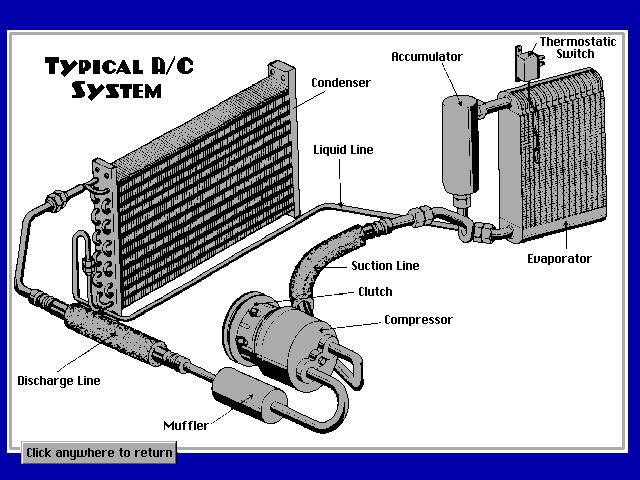
To effectively troubleshoot AC issues, it’s crucial to understand how your car’s air conditioning system operates. The AC system works by circulating refrigerant, a special chemical that absorbs and releases heat. This process cools the air before it’s blown into your car’s cabin. The system consists of several key components, including the compressor, condenser, expansion valve, and evaporator. When these components malfunction, they can cause your AC to blow warm air.
1.1. Key Components of the AC System
- Compressor: The heart of the AC system, the compressor pressurizes the refrigerant, converting it into a high-pressure, high-temperature gas.
- Condenser: Located in front of the radiator, the condenser cools the high-pressure refrigerant, turning it into a liquid.
- Expansion Valve: This valve controls the flow of refrigerant into the evaporator, reducing its pressure and temperature.
- Evaporator: Situated inside the dashboard, the evaporator absorbs heat from the cabin air, cooling it down before it’s blown into the car.
1.2. The Refrigeration Cycle
- Compression: The compressor increases the pressure and temperature of the refrigerant.
- Condensation: The condenser cools the high-pressure refrigerant, turning it into a liquid.
- Expansion: The expansion valve reduces the pressure of the liquid refrigerant, allowing it to expand and cool.
- Evaporation: The evaporator absorbs heat from the cabin air, cooling the air and turning the refrigerant into a gas.
- Repeat: The refrigerant returns to the compressor, and the cycle begins again.
Understanding this cycle helps pinpoint potential issues. For instance, if the compressor isn’t working correctly, the refrigerant won’t be pressurized, and the system won’t cool. Similarly, a clogged expansion valve can restrict the flow of refrigerant, reducing the system’s cooling capacity. Knowing the function of each component is essential for effective troubleshooting and repair.
Car AC System Diagram
Alt: Car AC system diagram showing compressor, condenser, expansion valve, and evaporator.
2. Identifying Common Causes of Warm Air
Several factors can cause your car’s AC to blow warm air. Identifying the root cause is the first step in fixing the problem. Here are some of the most common culprits:
2.1. Low Refrigerant Levels
A common reason for warm air is low refrigerant. Refrigerant leaks can occur over time, reducing the system’s cooling capacity. Low refrigerant can also be caused by a leak in the system.
2.2. Faulty Compressor
The compressor is the heart of the AC system. If it’s not working correctly, it can’t pressurize the refrigerant, resulting in warm air. Compressor failure can be due to age, lack of lubrication, or internal damage.
2.3. Clogged Condenser
The condenser cools the refrigerant. If it’s clogged with debris, it can’t dissipate heat effectively, leading to warm air. Road debris, leaves, and bugs can block the condenser.
2.4. Blocked Expansion Valve
The expansion valve controls the flow of refrigerant. If it’s blocked, it can restrict the flow, reducing the system’s cooling capacity. Debris and contaminants can clog the expansion valve.
2.5. Electrical Issues
Electrical problems, such as blown fuses, faulty relays, or wiring issues, can prevent the AC system from functioning correctly. These issues can disrupt the power supply to various components of the AC system.
2.6. Blower Motor Problems
The blower motor circulates air through the vents. If it’s not working, you won’t get any air, cool or warm. A faulty blower motor or resistor can cause this issue.
2.7. Cabin Air Filter Issues
A clogged cabin air filter restricts airflow, reducing the AC’s efficiency. A dirty filter can also cause the system to work harder, potentially leading to other problems.
Understanding these common causes can help you narrow down the problem and take appropriate action. Addressing these issues promptly can prevent further damage and ensure your AC system operates efficiently.
3. DIY Diagnostic Checks
Before calling a professional, there are several DIY checks you can perform to diagnose the AC problem. These checks can help you identify simple issues and potentially save money on repair costs.
3.1. Visual Inspection
Start with a visual inspection of the AC components. Look for any signs of damage, such as leaks, cracks, or corrosion. Check the condenser for debris and clean it if necessary.
3.2. Checking the Cabin Air Filter
Locate the cabin air filter and inspect its condition. A dirty or clogged filter can restrict airflow and reduce the AC’s effectiveness. Replace the filter if it’s dirty.
Alt: A dirty cabin air filter restricting airflow in a car.
3.3. Testing the Blower Motor
Turn on the AC and check if the blower motor is working. If it’s not blowing air, the blower motor or resistor may be faulty. Listen for any unusual noises from the blower motor.
3.4. Checking Fuses and Relays
Inspect the fuses and relays related to the AC system. A blown fuse or faulty relay can prevent the AC from working. Use a multimeter to test the fuses and relays.
3.5. Assessing the Compressor Clutch
With the engine running and the AC turned on, check if the compressor clutch is engaging. The clutch is a component that engages the compressor when the AC is turned on. If the clutch is not engaging, the compressor will not operate.
3.6. Using a Manifold Gauge Set
A manifold gauge set can help you measure the pressure in the AC system. This tool can provide valuable information about the refrigerant level and the overall health of the system. According to EPA Section 609, only certified technicians are allowed to purchase this product. Technicians must have successfully passed the EPA Section 609 exam and possess documentation to prove their certification.
3.7. Checking For Leaks
Inspect the refrigerant lines and connections for any signs of leaks. You can use a refrigerant leak detector or a soap-and-water solution to identify leaks. If you find a leak, it will need to be repaired by a professional.
These DIY checks can help you identify simple issues and potentially save money on repair costs. However, if you’re not comfortable performing these checks or if you suspect a more complex problem, it’s best to consult a professional.
4. Step-by-Step Guide to Fixing Common AC Problems
Once you’ve identified the problem, you can take steps to fix it. Here’s a step-by-step guide to addressing common AC issues:
4.1. Replacing the Cabin Air Filter
- Locate the Cabin Air Filter: Consult your car’s owner’s manual to find the location of the cabin air filter.
- Remove the Old Filter: Open the filter housing and remove the old filter.
- Install the New Filter: Insert the new filter, ensuring it’s properly aligned.
- Close the Filter Housing: Close the filter housing and secure it.
4.2. Recharging the Refrigerant
- Purchase a Refrigerant Recharge Kit: Buy a refrigerant recharge kit that is compatible with your car’s AC system. EPA Section 609 requires technicians to be certified to recover and recharge the system. Only licensed technicians are allowed to purchase these products. Technicians must have successfully passed the EPA Section 609 exam and possess documentation to prove their certification.
- Connect the Recharge Kit: Connect the recharge kit to the low-pressure port of the AC system.
- Add Refrigerant: Follow the instructions on the recharge kit to add refrigerant to the system.
- Monitor the Pressure: Use the gauge on the recharge kit to monitor the pressure as you add refrigerant.
4.3. Cleaning the Condenser
- Locate the Condenser: Find the condenser in front of the radiator.
- Remove Debris: Use a soft brush or compressed air to remove any debris from the condenser.
- Wash the Condenser: Gently wash the condenser with a hose to remove any remaining dirt.
4.4. Replacing a Blown Fuse
- Locate the Fuse Box: Find the fuse box, usually located under the dashboard or in the engine compartment.
- Identify the Blown Fuse: Consult the fuse box diagram to identify the fuse for the AC system.
- Remove the Blown Fuse: Use a fuse puller to remove the blown fuse.
- Install a New Fuse: Insert a new fuse with the same amperage rating.
4.5. Addressing Electrical Issues
- Inspect Wiring: Check the wiring connections for the AC system.
- Repair or Replace Wiring: Repair or replace any damaged or corroded wiring.
- Test Connections: Use a multimeter to test the electrical connections.
4.6. Checking and Replacing Relays
- Locate the Relay: Locate the relay that controls the AC compressor clutch.
- Test the Relay: Use a multimeter to test the relay for continuity.
- Replace the Relay: If the relay is faulty, replace it with a new one.
Following these step-by-step instructions can help you fix common AC problems and restore your car’s cooling system. Remember to always follow safety precautions and consult a professional if you’re not comfortable performing these tasks.
5. Tools and Equipment for AC Repair
Having the right tools and equipment is essential for effective AC repair. Here’s a list of tools you may need:
5.1. Basic Hand Tools
- Screwdrivers: Various sizes and types for removing screws and fasteners.
- Wrenches: A set of open-end, box-end, and socket wrenches for tightening and loosening nuts and bolts.
- Pliers: Needle-nose pliers, slip-joint pliers, and locking pliers for gripping and manipulating parts.
- Multimeter: For testing electrical circuits and components.
- Fuse Puller: For safely removing fuses from the fuse box.
5.2. Specialized AC Tools
- Refrigerant Recharge Kit: For adding refrigerant to the AC system.
- Manifold Gauge Set: For measuring the pressure in the AC system.
- Vacuum Pump: For evacuating the AC system before recharging.
- Refrigerant Leak Detector: For identifying leaks in the AC system.
- AC Compressor Clutch Tool: For removing and installing the compressor clutch.
5.3. Safety Equipment
- Safety Glasses: To protect your eyes from debris and chemicals.
- Gloves: To protect your hands from chemicals and sharp objects.
- Respirator: To avoid inhaling refrigerant and other harmful substances.
Investing in quality tools and equipment can make AC repair easier and more efficient. Ensure you have the necessary safety equipment to protect yourself from potential hazards. CARDIAGTECH.NET offers a wide range of tools and equipment for automotive repair. Contact us at +1 (641) 206-8880 or visit our website to find the right tools for your needs.
6. Routine Maintenance for Optimal AC Performance
Routine maintenance is crucial for ensuring your car’s AC system operates efficiently and reliably. Regular maintenance can prevent costly repairs and extend the life of your AC system.
6.1. Regular Inspections
Perform regular inspections of the AC system to identify potential issues early. Check for leaks, damage, and corrosion. Inspect the condenser for debris and clean it if necessary.
6.2. Cabin Air Filter Replacement
Replace the cabin air filter regularly, typically every 12,000 to 15,000 miles, or as recommended by your car’s manufacturer. A clean filter ensures proper airflow and prevents the system from working harder.
6.3. Refrigerant Recharge
Recharge the refrigerant as needed to maintain optimal cooling performance. Over time, refrigerant can leak out, reducing the system’s efficiency. Follow the EPA regulations for refrigerant recharge to protect the environment.
6.4. Cleaning the Condenser and Evaporator
Clean the condenser and evaporator regularly to remove debris and prevent clogs. Use a soft brush or compressed air to remove dirt and leaves from the condenser. A professional can clean the evaporator to ensure it operates efficiently.
6.5. Lubricating the Compressor
Lubricate the compressor to prevent wear and ensure smooth operation. Consult your car’s owner’s manual for the recommended lubricant and maintenance schedule.
6.6. Running the AC Regularly
Run the AC regularly, even during cooler months, to keep the seals lubricated and prevent them from drying out. This can help prevent refrigerant leaks and maintain the system’s efficiency.
6.7. Professional AC Service
Schedule a professional AC service at least once a year to have the system inspected, cleaned, and recharged. A professional can identify and address any potential issues before they lead to costly repairs.
Adhering to a routine maintenance schedule can ensure your car’s AC system operates efficiently and reliably for years to come. Regular maintenance can prevent costly repairs and extend the life of your AC system.
7. When to Seek Professional Help: Identifying Complex Issues
While some AC problems can be fixed with DIY solutions, others require professional expertise. Knowing when to seek professional help can save you time, money, and potential damage to your car.
7.1. Complex Refrigerant Leaks
If you suspect a refrigerant leak and cannot locate it using DIY methods, it’s best to consult a professional. Complex leaks may require specialized equipment and expertise to locate and repair.
7.2. Compressor Problems
Compressor repairs or replacements are complex and require specialized tools and knowledge. If you suspect a compressor problem, it’s best to consult a professional. Common symptoms of a failing compressor include unusual noises, lack of cooling, and clutch issues.
7.3. Expansion Valve Issues
Replacing the expansion valve requires specialized tools and knowledge. If you suspect an expansion valve problem, it’s best to consult a professional. Symptoms of a faulty expansion valve include reduced cooling performance and fluctuating vent temperatures.
7.4. Electrical System Diagnostics
Diagnosing electrical problems in the AC system can be challenging. If you’re not comfortable working with electrical systems, it’s best to consult a professional. Electrical issues can range from blown fuses to faulty wiring and relays.
7.5. System Evacuation and Recharge
Evacuating and recharging the AC system requires specialized equipment and knowledge. If you need to evacuate and recharge the system, it’s best to consult a professional. Improper evacuation and recharge can damage the system and release harmful refrigerants into the atmosphere.
7.6. Unfamiliar Noises
Strange noises coming from your AC system, such as rattling, hissing, or grinding, could indicate a serious problem. It’s best to have a professional diagnose the noise and perform any necessary repairs.
7.7. Lack of Cooling Despite Recharge
If you’ve recharged the AC system and it’s still not cooling properly, there may be an underlying issue that requires professional attention. This could indicate a problem with the compressor, expansion valve, or other components.
Knowing when to seek professional help can save you time, money, and potential damage to your car. If you’re unsure about any aspect of AC repair, it’s always best to consult a qualified technician.
8. The Environmental Impact of Refrigerant Leaks
Refrigerant leaks not only affect your car’s AC performance but also have a significant environmental impact. Understanding the environmental consequences of refrigerant leaks can help you make informed decisions about AC repair and maintenance.
8.1. Ozone Depletion
Older refrigerants, such as R-12, contain chlorofluorocarbons (CFCs) that deplete the ozone layer. Although R-12 has been phased out, leaks from older systems can still contribute to ozone depletion.
8.2. Global Warming
Modern refrigerants, such as R-134a, are hydrofluorocarbons (HFCs) that have a high global warming potential (GWP). Even small refrigerant leaks can contribute to global warming. According to the EPA, HFCs can have a GWP hundreds to thousands of times higher than carbon dioxide.
8.3. Regulatory Compliance
The EPA regulates the handling and disposal of refrigerants to minimize their environmental impact. It’s illegal to intentionally release refrigerants into the atmosphere. Certified technicians must recover and recycle refrigerants during AC service and repair.
8.4. Responsible AC Maintenance
Practicing responsible AC maintenance can help reduce the environmental impact of refrigerant leaks. Regular inspections, leak detection, and proper refrigerant handling can minimize the release of harmful substances into the atmosphere.
8.5. Using Environmentally Friendly Refrigerants
Consider using environmentally friendly refrigerants, such as HFO-1234yf, which have a lower GWP than traditional HFCs. HFO-1234yf is becoming increasingly common in newer vehicles.
8.6. Reporting Leaks
Report any significant refrigerant leaks to a qualified technician for prompt repair. Addressing leaks quickly can prevent further environmental damage.
Understanding the environmental impact of refrigerant leaks can help you make informed decisions about AC repair and maintenance. By practicing responsible AC maintenance and using environmentally friendly refrigerants, you can help protect the environment and ensure a sustainable future.
9. Cost-Effective AC Repair Tips
AC repair can be costly, but there are several ways to save money without sacrificing quality. Here are some cost-effective AC repair tips:
9.1. DIY Diagnostics
Perform DIY diagnostics to identify simple issues before seeking professional help. This can save you diagnostic fees and potentially allow you to fix the problem yourself.
9.2. Compare Quotes
Get quotes from multiple repair shops before authorizing any work. Comparing quotes can help you find the best price for the services you need.
9.3. Use Aftermarket Parts
Consider using aftermarket parts instead of OEM parts. Aftermarket parts are often less expensive and can provide the same level of performance.
9.4. Perform Routine Maintenance
Perform routine maintenance to prevent costly repairs. Regular inspections, filter replacements, and refrigerant recharges can extend the life of your AC system and prevent major problems.
9.5. Shop Around for Parts
Shop around for parts online or at local auto parts stores to find the best prices. Compare prices and read reviews before making a purchase.
9.6. Consider Used Parts
Consider using used parts for non-critical components. Used parts can be a cost-effective option for repairs, but ensure they are in good condition and come with a warranty.
9.7. Ask About Discounts
Ask repair shops about discounts or special offers. Many shops offer discounts for seniors, students, or military personnel.
By following these cost-effective AC repair tips, you can save money without sacrificing the quality of your car’s AC system. Remember to prioritize safety and consult a professional if you’re unsure about any aspect of AC repair.
10. Understanding R-134a Refrigerant
R-134a is a hydrofluorocarbon (HFC) refrigerant commonly used in automotive air conditioning systems. Understanding its properties, handling, and regulations is essential for proper AC maintenance and repair.
10.1. Properties of R-134a
- Chemical Formula: CH2FCF3
- Boiling Point: -15.1°F (-26.2°C)
- Global Warming Potential (GWP): 1,430
- Ozone Depletion Potential (ODP): 0
R-134a is a non-flammable, colorless gas with a slight ethereal odor. It’s an effective refrigerant but has a high GWP, contributing to global warming.
10.2. Handling R-134a
- Safety Precautions: Wear safety glasses, gloves, and a respirator when handling R-134a.
- Proper Equipment: Use proper equipment for refrigerant recovery, recycling, and recharging.
- Leak Detection: Use a refrigerant leak detector to identify leaks in the AC system.
- Ventilation: Work in a well-ventilated area to avoid inhaling refrigerant vapors.
10.3. Regulations
- EPA Section 609: Requires technicians to be certified to handle R-134a and other refrigerants.
- Refrigerant Recovery: Prohibits the intentional release of refrigerants into the atmosphere.
- Record Keeping: Requires technicians to keep records of refrigerant purchases, sales, and disposal.
- Leak Repair: Requires technicians to repair refrigerant leaks promptly.
10.4. Alternatives to R-134a
- HFO-1234yf: A hydrofluoroolefin (HFO) refrigerant with a low GWP.
- CO2 (R-744): A natural refrigerant with a very low GWP.
HFO-1234yf is becoming increasingly common in newer vehicles as a more environmentally friendly alternative to R-134a.
10.5. Retrofitting
- Compatibility: R-134a is not compatible with older AC systems designed for R-12 refrigerant.
- Retrofitting: Retrofitting an older AC system to use R-134a requires modifications to the system and may not be cost-effective.
- Professional Assistance: Consult a professional before attempting to retrofit an AC system.
Understanding R-134a refrigerant and its regulations is essential for proper AC maintenance and repair. Always follow safety precautions and consult a professional if you’re unsure about any aspect of refrigerant handling.
11. Advanced AC System Diagnostics
For complex AC problems, advanced diagnostic techniques may be necessary. These techniques require specialized equipment and expertise.
11.1. Pressure Testing
- Purpose: To identify leaks and blockages in the AC system.
- Equipment: Manifold gauge set, nitrogen gas.
- Procedure: Pressurize the AC system with nitrogen gas and monitor the pressure for leaks.
11.2. Vacuum Testing
- Purpose: To check for leaks and remove moisture from the AC system.
- Equipment: Vacuum pump, manifold gauge set.
- Procedure: Evacuate the AC system with a vacuum pump and monitor the vacuum for leaks.
11.3. Dye Injection
- Purpose: To locate refrigerant leaks.
- Equipment: UV dye, UV lamp.
- Procedure: Inject UV dye into the AC system and use a UV lamp to identify leaks.
11.4. Electronic Leak Detection
- Purpose: To locate refrigerant leaks.
- Equipment: Electronic leak detector.
- Procedure: Use an electronic leak detector to sniff for refrigerant leaks.
11.5. Scan Tool Diagnostics
- Purpose: To diagnose electrical and electronic problems in the AC system.
- Equipment: Scan tool.
- Procedure: Use a scan tool to read diagnostic trouble codes (DTCs) and monitor AC system parameters.
11.6. Component Testing
- Purpose: To test individual components of the AC system, such as the compressor, expansion valve, and sensors.
- Equipment: Multimeter, specialized test equipment.
- Procedure: Use a multimeter or specialized test equipment to test the components according to the manufacturer’s specifications.
Advanced AC system diagnostics require specialized equipment and expertise. If you’re not comfortable performing these techniques, it’s best to consult a professional.
12. Preventative Measures for a Cool Ride
Taking preventative measures is crucial for ensuring your car’s AC system operates efficiently and reliably. Regular maintenance and proactive care can prevent costly repairs and extend the life of your AC system.
12.1. Regular AC Usage
Run the AC regularly, even during cooler months, to keep the seals lubricated and prevent them from drying out. This can help prevent refrigerant leaks and maintain the system’s efficiency.
12.2. Scheduled Maintenance
Follow the manufacturer’s recommended maintenance schedule for the AC system. This typically includes inspecting, cleaning, and recharging the system at regular intervals.
12.3. Cabin Air Filter Replacement
Replace the cabin air filter regularly, typically every 12,000 to 15,000 miles, or as recommended by your car’s manufacturer. A clean filter ensures proper airflow and prevents the system from working harder.
12.4. Condenser Cleaning
Clean the condenser regularly to remove debris and prevent clogs. Use a soft brush or compressed air to remove dirt and leaves from the condenser.
12.5. Leak Detection
Check for refrigerant leaks regularly. If you suspect a leak, have it repaired promptly to prevent further damage and environmental harm.
12.6. System Inspection
Have the AC system inspected by a professional at least once a year. A professional can identify and address any potential issues before they lead to costly repairs.
12.7. Avoid Overloading the System
Avoid overloading the AC system by parking in the shade, using window shades, and avoiding prolonged idling in hot weather.
12.8. Proper Refrigerant Handling
Ensure that refrigerant is handled properly during AC service and repair. Use certified technicians and proper equipment to prevent leaks and environmental harm.
By taking these preventative measures, you can ensure your car’s AC system operates efficiently and reliably for years to come. Regular maintenance and proactive care can prevent costly repairs and extend the life of your AC system.
Is your car AC failing to deliver the cool air you need? Don’t wait until the summer heat becomes unbearable! Contact CARDIAGTECH.NET today at +1 (641) 206-8880 or visit our website to explore our wide range of high-quality auto repair tools and equipment. Our expert team can help you diagnose and fix any AC issue, ensuring you stay comfortable on the road. Plus, we offer personalized advice and support to help you choose the perfect tools for your specific needs. Trust CARDIAGTECH.NET to keep your car’s AC running smoothly and efficiently.
FAQ: Troubleshooting Your Car’s AC
1. Why is my car AC blowing hot air?
Several factors can cause this, including low refrigerant levels, a faulty compressor, a clogged condenser, or electrical issues.
2. How can I tell if my car AC needs refrigerant?
Common signs include weak airflow, warm air blowing from the vents, and the compressor not engaging.
3. Can I recharge my car AC myself?
Yes, you can recharge your car AC yourself with a refrigerant recharge kit. However, EPA regulations require technicians to be certified to handle and purchase these items. Ensure you follow all instructions and safety precautions.
4. How often should I replace my cabin air filter?
It’s recommended to replace your cabin air filter every 12,000 to 15,000 miles, or as recommended by your car’s manufacturer.
5. What are the symptoms of a failing AC compressor?
Symptoms include unusual noises (such as rattling or grinding), lack of cooling, and the compressor clutch not engaging.
6. Is it normal for my car AC to leak water?
Yes, it’s normal for your car AC to leak water. This is condensation that forms on the evaporator and drips out of the drain tube.
7. How much does it cost to fix a car AC?
The cost to fix a car AC can vary widely depending on the problem. Simple repairs, such as a refrigerant recharge, may cost $100-$200, while more complex repairs, such as a compressor replacement, can cost $500-$1500 or more.
8. Can I use a universal refrigerant in my car AC?
No, it’s not recommended to use a universal refrigerant in your car AC. Always use the refrigerant specified by your car’s manufacturer.
9. What is the difference between R-134a and HFO-1234yf refrigerant?
R-134a is a hydrofluorocarbon (HFC) refrigerant with a high global warming potential (GWP), while HFO-1234yf is a hydrofluoroolefin (HFO) refrigerant with a low GWP. HFO-1234yf is more environmentally friendly.
10. When should I seek professional help for my car AC?
You should seek professional help for your car AC if you suspect a complex refrigerant leak, have compressor problems, suspect an expansion valve issue, or are not comfortable performing DIY repairs.